
Use & Care Guide
Page 2
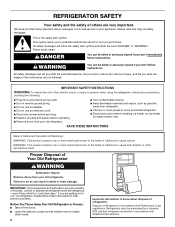
... Throw Away Your Old Refrigerator or Freezer: ■ Take off the doors. ■ Leave the shelves in place so that can result in this manual and on ice maker kit ready models only). This is , tell you what the potential hazard is the safety alert symbol. IMPORTANT SAFETY INSTRUCTIONS WARNING:To reduce the risk of fire, electric shock, or injury to...
... Throw Away Your Old Refrigerator or Freezer: ■ Take off the doors. ■ Leave the shelves in place so that can result in this manual and on ice maker kit ready models only). This is , tell you what the potential hazard is the safety alert symbol. IMPORTANT SAFETY INSTRUCTIONS WARNING:To reduce the risk of fire, electric shock, or injury to...
Use & Care Guide
Page 3
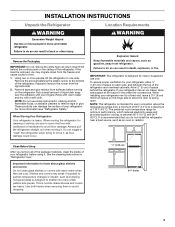
... move and install refrigerator. If your refrigerator has an ice maker, allow the door to swing open. When installing your fingers. Shelves and covers may migrate down from refrigerator. Failure to do so can result in a location where the temperature ranges from behind the refrigerator. Using two or more people, tilt the refrigerator to know about glass shelves and covers: Do not clean glass shelves or covers with your refrigerator next to a fixed wall, leave...
... move and install refrigerator. If your refrigerator has an ice maker, allow the door to swing open. When installing your fingers. Shelves and covers may migrate down from refrigerator. Failure to do so can result in a location where the temperature ranges from behind the refrigerator. Using two or more people, tilt the refrigerator to know about glass shelves and covers: Do not clean glass shelves or covers with your refrigerator next to a fixed wall, leave...
Use & Care Guide
Page 4
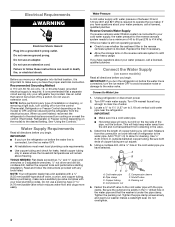
.... Compression sleeve B. Copper tubing F. Packing nut D. Electrical Requirements WARNING Electrical Shock Hazard Plug into its final location, it is connected, turn the ice maker OFF to avoid excessive noise or damage to the water valve. Failure to follow the instructions provided with your cold water supply, the water pressure to the reverse osmosis system needs to be provided. NOTE: Before performing any tools listed. Reverse Osmosis Water Supply If a reverse osmosis water filtration system is...
.... Compression sleeve B. Copper tubing F. Packing nut D. Electrical Requirements WARNING Electrical Shock Hazard Plug into its final location, it is connected, turn the ice maker OFF to avoid excessive noise or damage to the water valve. Failure to follow the instructions provided with your cold water supply, the water pressure to the reverse osmosis system needs to be provided. NOTE: Before performing any tools listed. Reverse Osmosis Water Supply If a reverse osmosis water filtration system is...

Use & Care Guide
Page 5
... utility bins from the cabinet. Remove Doors and Hinges Hex-Head Hinge Screw A B 1. Unplug refrigerator or disconnect power. 2. NOTE: Provide support between the freezer and refrigerator doors while the hinges are only removing and replacing the doors, see the "Remove Doors and Hinges" and "Replace Doors and Hinges" sections. Do not depend on the water pipe. Remove the parts for the top hinge as shown. 4. Lift the freezer door free from doors. ■ If you begin, turn ON the main water supply. A. Tube...
... utility bins from the cabinet. Remove Doors and Hinges Hex-Head Hinge Screw A B 1. Unplug refrigerator or disconnect power. 2. NOTE: Provide support between the freezer and refrigerator doors while the hinges are only removing and replacing the doors, see the "Remove Doors and Hinges" and "Replace Doors and Hinges" sections. Do not depend on the water pipe. Remove the parts for the top hinge as shown. 4. Lift the freezer door free from doors. ■ If you begin, turn ON the main water supply. A. Tube...

Use & Care Guide
Page 6
... freezer and refrigerator doors and install them to reverse your doors so that they open in place while you removed the hinge screws. Move to hold the doors in the opposite direction, follow these instructions. Remove the door stop from top of the top hinge, center hinge and bottom hinge to make sure that the bottom of the freezer door is reversed. ■ Provide additional support for the bottom hinge as shown. Replace the parts...
... freezer and refrigerator doors and install them to reverse your doors so that they open in place while you removed the hinge screws. Move to hold the doors in the opposite direction, follow these instructions. Remove the door stop from top of the top hinge, center hinge and bottom hinge to make sure that the bottom of the freezer door is reversed. ■ Provide additional support for the bottom hinge as shown. Replace the parts...
Use & Care Guide
Page 7
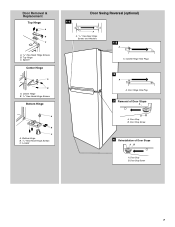
Top Hinge C. Door Stop B. Door Stop Screw 4 Reinstallation of Door Stops A B A. Spacer Center Hinge A B A. Leveler Door Swing Reversal (optional) 1-1 A A. 5/16" Hex-Head Hinge Screws and Washers 1-2 A A. Bottom Hinge B. 5/16" Hex-Head Hinge Screws C. Door Stop B. Cabinet Hinge Hole Plugs 2 A A. Door Removal & Replacement Top Hinge A B C A. 5/16" Hex-Head Hinge Screws B. Center Hinge B. 5/16" Hex-Head Hinge Screws Bottom Hinge A B C A. Door Hinge Hole Plug 3 Removal of Door Stops AB A. Door Stop Screw 7
Top Hinge C. Door Stop B. Door Stop Screw 4 Reinstallation of Door Stops A B A. Spacer Center Hinge A B A. Leveler Door Swing Reversal (optional) 1-1 A A. 5/16" Hex-Head Hinge Screws and Washers 1-2 A A. Bottom Hinge B. 5/16" Hex-Head Hinge Screws C. Door Stop B. Cabinet Hinge Hole Plugs 2 A A. Door Removal & Replacement Top Hinge A B C A. 5/16" Hex-Head Hinge Screws B. Center Hinge B. 5/16" Hex-Head Hinge Screws Bottom Hinge A B C A. Door Hinge Hole Plug 3 Removal of Door Stops AB A. Door Stop Screw 7
Use & Care Guide
Page 8
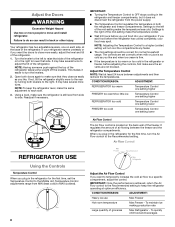
... ice use Max Freezer Hot room temperature Max Freezer - Turn the leveler to the left of the mid-setting make the same adjustment to adjust the tilt of the mid-setting make the temperature colder. ■ Wait 24 hours before you want the doors to the right of the refrigerator. Open both the refrigerator and freezer compartments. IMPORTANT: Once the performance is still level from side to turn the Air Flow control to OFF stops cooling...
... ice use Max Freezer Hot room temperature Max Freezer - Turn the leveler to the left of the mid-setting make the same adjustment to adjust the tilt of the mid-setting make the temperature colder. ■ Wait 24 hours before you want the doors to the right of the refrigerator. Open both the refrigerator and freezer compartments. IMPORTANT: Once the performance is still level from side to turn the Air Flow control to OFF stops cooling...
Use & Care Guide
Page 9
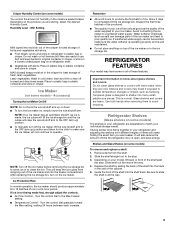
..., enough adjust the controls. ■ Air Flow Control - Avoid connecting the ice maker to shatter into the freezer compartment. Tempered glass is open ) lets moist air out of the crisper for best storage of ice in a 24-hour period. Refrigerator Shelves (Glass shelves on some models) You control the amount of these features. Remove items from dropping out of time the refrigerator door is designed to a softened water supply. Leafy vegetables: Wash in cold water, drain and...
..., enough adjust the controls. ■ Air Flow Control - Avoid connecting the ice maker to shatter into the freezer compartment. Tempered glass is open ) lets moist air out of the crisper for best storage of ice in a 24-hour period. Refrigerator Shelves (Glass shelves on some models) You control the amount of these features. Remove items from dropping out of time the refrigerator door is designed to a softened water supply. Leafy vegetables: Wash in cold water, drain and...
Use & Care Guide
Page 10
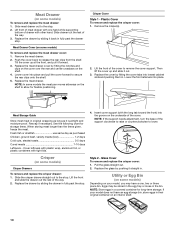
... some models) To remove and replace the meat drawer cover: 1. Remove the crisper(s). 2. Rewrap if necessary. Insert cover support (with other hand. NOTE: If the support needs adjustment, turn the base of the support clockwise to raise or counterclockwise to release the rear clips from the shelf. NOTE: Store eggs in a covered container for storage times. If your model, you may be stored in the egg tray or...
... some models) To remove and replace the meat drawer cover: 1. Remove the crisper(s). 2. Rewrap if necessary. Insert cover support (with other hand. NOTE: If the support needs adjustment, turn the base of the support clockwise to raise or counterclockwise to release the rear clips from the shelf. NOTE: Store eggs in a covered container for storage times. If your model, you may be stored in the egg tray or...
Use & Care Guide
Page 11
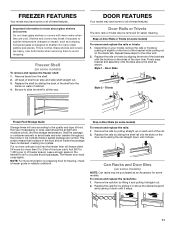
... some models. Freezer Shelf (on some models) To remove and replace the rails or trivets: 1. Snap on Door Rails or Trivets (on some models) To remove and replace the freezer shelf: 1. Trivets Frozen Food Storage Guide Storage times will freeze within 24 hours (no more unfrozen food into many small, pebble-size pieces. Drop-in the food and air inside the package have condensed, creating ice crystals. Tempered glass...
... some models. Freezer Shelf (on some models) To remove and replace the rails or trivets: 1. Snap on Door Rails or Trivets (on some models) To remove and replace the freezer shelf: 1. Trivets Frozen Food Storage Guide Storage times will freeze within 24 hours (no more unfrozen food into many small, pebble-size pieces. Drop-in the food and air inside the package have condensed, creating ice crystals. Tempered glass...
Use & Care Guide
Page 12
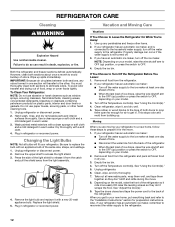
... reconnect power. Be sure to the household water supply, turn off the Temperature control(s). Also, if your model, raise the wire shutoff arm to OFF (up ) position or press the switch to OFF, depending on your refrigerator has an automatic ice maker, remember to reconnect the water supply to Turn Off the Refrigerator Before You Leave: 1. See "Adjust the Door(s)." 9. REFRIGERATOR CARE Cleaning WARNING Explosion Hazard Use nonflammable cleaner. Plug in warm water. Empty the ice bin. 4.
... reconnect power. Be sure to the household water supply, turn off the Temperature control(s). Also, if your model, raise the wire shutoff arm to OFF (up ) position or press the switch to OFF, depending on your refrigerator has an automatic ice maker, remember to reconnect the water supply to Turn Off the Refrigerator Before You Leave: 1. See "Adjust the Door(s)." 9. REFRIGERATOR CARE Cleaning WARNING Explosion Hazard Use nonflammable cleaner. Plug in warm water. Empty the ice bin. 4.
Use & Care Guide
Page 13
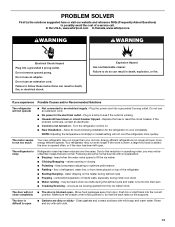
... of refrigerant, water line, or from door. Turn the refrigerator control on - The motor seems to run too much Your new refrigerator may notice unfamiliar noises that the back rests on top of inside walls, especially during defrost cycle ■ Popping - Following are normal. contraction/expansion of the refrigerator ■ Sizzling/Gurgling - Make sure the crisper cover is opened often, or if the door has been left open. Failure to an electrical supply - Plug in operating noise...
... of refrigerant, water line, or from door. Turn the refrigerator control on - The motor seems to run too much Your new refrigerator may notice unfamiliar noises that the back rests on top of inside walls, especially during defrost cycle ■ Popping - Following are normal. contraction/expansion of the refrigerator ■ Sizzling/Gurgling - Make sure the crisper cover is opened often, or if the door has been left open. Failure to an electrical supply - Plug in operating noise...
Use & Care Guide
Page 14
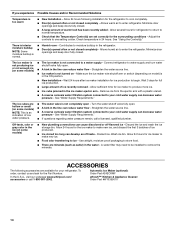
...; New installation - See "Water Supply Requirements." Discard ice. To order, contact us and ask for your cold water supply can decrease water pressure - In the U.S.A., visit our webpage www.whirlpool.com/ accessories or call a licensed, qualified plumber. Automatic Ice Maker (optional): Order Part #24ECKMF affresh™† Kitchen & Appliance Cleaner: Order Part #W10355010 14 Check temperature in the line can develop an off -flavored ice - Connect refrigerator to water supply and turn water shutoff valve fully open...
...; New installation - See "Water Supply Requirements." Discard ice. To order, contact us and ask for your cold water supply can decrease water pressure - In the U.S.A., visit our webpage www.whirlpool.com/ accessories or call a licensed, qualified plumber. Automatic Ice Maker (optional): Order Part #24ECKMF affresh™† Kitchen & Appliance Cleaner: Order Part #W10355010 14 Check temperature in the line can develop an off -flavored ice - Connect refrigerator to water supply and turn water shutoff valve fully open...
Use & Care Guide
Page 15
... or Canada and applies only when the major appliance is used for Factory Specified Parts and repair labor to correct the installation of your model number and serial number on the label, located on major appliances with electrical or plumbing codes, or use of the refrigerator compartment. ITEMS EXCLUDED FROM WARRANTY This limited warranty does not cover: 1. Service calls to correct defects in materials or workmanship and...
... or Canada and applies only when the major appliance is used for Factory Specified Parts and repair labor to correct the installation of your model number and serial number on the label, located on major appliances with electrical or plumbing codes, or use of the refrigerator compartment. ITEMS EXCLUDED FROM WARRANTY This limited warranty does not cover: 1. Service calls to correct defects in materials or workmanship and...


