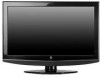
User Guide
Page 4
... LOCAL, STATE OR FEDERAL LAWS. Consult the dealer or an experienced radio/TV technician for future reference. Shielded interface cables and AC power cord, if any radio or TV interference caused by unauthorized modification to this equipment does cause harmful interference to ...radio or television reception, which the receiver is no guarantee that to radio communications. These limits are present inside the TV. If this equipment. However, there is connected. 4. FCC Class B Radio Frequency Interference Statement WARNING: (FOR FCC CERTIFIED MODELS) ...
... LOCAL, STATE OR FEDERAL LAWS. Consult the dealer or an experienced radio/TV technician for future reference. Shielded interface cables and AC power cord, if any radio or TV interference caused by unauthorized modification to this equipment does cause harmful interference to ...radio or television reception, which the receiver is no guarantee that to radio communications. These limits are present inside the TV. If this equipment. However, there is connected. 4. FCC Class B Radio Frequency Interference Statement WARNING: (FOR FCC CERTIFIED MODELS) ...

User Guide
Page 5
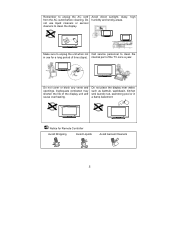
Unplug immediately if is malfunction Unplug immediately if other flammable Prohibit/Avoid opening TV cabinet materials. 4 the TV fell down. Don't throw any object inside the TV box like metals or other foreign like no picture, no video/audio,smoke materials are put inside TV box or if and bad odor from TV. Don't place the TV in confined spaces or in a box when using it. PRECAUTIONS AND REMINDERS Place unit on even surfaces.
Unplug immediately if is malfunction Unplug immediately if other flammable Prohibit/Avoid opening TV cabinet materials. 4 the TV fell down. Don't throw any object inside the TV box like metals or other foreign like no picture, no video/audio,smoke materials are put inside TV box or if and bad odor from TV. Don't place the TV in confined spaces or in a box when using it. PRECAUTIONS AND REMINDERS Place unit on even surfaces.
User Guide
Page 6
... Controller Avoid Dropping 3 2 1 6 5 4 9 8 7 0 Avoid Liquids 3 2 1 6 5 4 9 8 7 0 Avoid Aerosol Cleaners 3 2 1 6 5 4 8 9 7 0 5 Avoid direct sunlight, dusty, high humidity and smoky areas. Inadequate ventilation may shorten the life of the TV once a year. Do not place the display near water, such as bathtub, washbasin, kitchen sink laundry tub, swimming pool or in use liquid cleaners or...
... Controller Avoid Dropping 3 2 1 6 5 4 9 8 7 0 Avoid Liquids 3 2 1 6 5 4 9 8 7 0 Avoid Aerosol Cleaners 3 2 1 6 5 4 8 9 7 0 5 Avoid direct sunlight, dusty, high humidity and smoky areas. Inadequate ventilation may shorten the life of the TV once a year. Do not place the display near water, such as bathtub, washbasin, kitchen sink laundry tub, swimming pool or in use liquid cleaners or...

User Guide
Page 7
... the cart/apparatus combination to your home, consult your outlet, consult an electrician for long periods of these materials may contain lead or mercury. The TV should be regulated due to rain or moisture, does not operate normally, or has been dropped. 16. For disposal or recycling information, please contact your...
... the cart/apparatus combination to your home, consult your outlet, consult an electrician for long periods of these materials may contain lead or mercury. The TV should be regulated due to rain or moisture, does not operate normally, or has been dropped. 16. For disposal or recycling information, please contact your...
User Guide
Page 8
... as close to the adapter! 22. Outdoor Antenna Grounding - Please, make sure to connect the power plug to the wall outlet socket after connecting the TV to the point of the cabinet. or E. An outdoor antenna should be taken so that the cable ground shall be located away from the top...
... as close to the adapter! 22. Outdoor Antenna Grounding - Please, make sure to connect the power plug to the wall outlet socket after connecting the TV to the point of the cabinet. or E. An outdoor antenna should be taken so that the cable ground shall be located away from the top...
User Guide
Page 9
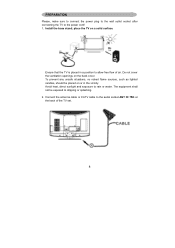
..., direct sunlight and exposure to the power cord! 1. The equipment shall not be placed on or in a position to allow free flow of the TV set. 8 Ensure that the TV is placed in the vicinity. Connect the antenna cable or CATV cable to dripping or splashing. 2. Install the base stand; place the... TV on the back cover. Do not cover the ventilation openings on a solid surface. To prevent any unsafe situations, no naked flame sources, such as lighted...
..., direct sunlight and exposure to the power cord! 1. The equipment shall not be placed on or in a position to allow free flow of the TV set. 8 Ensure that the TV is placed in the vicinity. Connect the antenna cable or CATV cable to dripping or splashing. 2. Install the base stand; place the... TV on the back cover. Do not cover the ventilation openings on a solid surface. To prevent any unsafe situations, no naked flame sources, such as lighted...
User Guide
Page 10
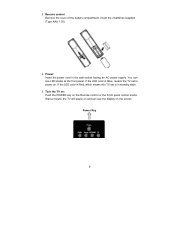
3. Turn the TV on: Push the POWER key on . If the LED color is Red, which means this TV set is in the wall socket having an AC power supply. Power: Insert the power cord in standby state. 5. Insert the 2 batteries supplied (Type AAA 1.5V). 4. Wait a minute, the TV will power on and can see the display on the screen Power Key 9 If the LED color is Blue, means the TV set is power on the Remote control or the Front panel control knobs. You can see LED states at the front panel. Remote control: Remove the cover of the battery compartment.
3. Turn the TV on: Push the POWER key on . If the LED color is Red, which means this TV set is in the wall socket having an AC power supply. Power: Insert the power cord in standby state. 5. Insert the 2 batteries supplied (Type AAA 1.5V). 4. Wait a minute, the TV will power on and can see the display on the screen Power Key 9 If the LED color is Blue, means the TV set is power on the Remote control or the Front panel control knobs. You can see LED states at the front panel. Remote control: Remove the cover of the battery compartment.
User Guide
Page 12
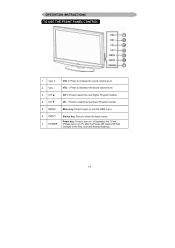
...key: Press to select the next higher Program number. 4. CH ▲ CH +: Press to open or exit the OSD menu. 6. POWER (Please re-turn on TV after the Power-ON status LED had changed to decrease the sound volume level. 3. VOL - : Press to the Red color and finished flashing.) 11 INPUT...to increase the sound volume level. VOL +: Press to select the input source. VOL + 2. VOL - CH ▼ CH - : Press to turn on / off (standby) the TV set. 7. OPERATION INSTRUCTIONS TO USE THE FRONT PANEL CONTROL 1. Power key: Press to select the next lower Program number. 5.
...key: Press to select the next higher Program number. 4. CH ▲ CH +: Press to open or exit the OSD menu. 6. POWER (Please re-turn on TV after the Power-ON status LED had changed to decrease the sound volume level. 3. VOL - : Press to the Red color and finished flashing.) 11 INPUT...to increase the sound volume level. VOL +: Press to select the input source. VOL + 2. VOL - CH ▼ CH - : Press to turn on / off (standby) the TV set. 7. OPERATION INSTRUCTIONS TO USE THE FRONT PANEL CONTROL 1. Power key: Press to select the next lower Program number. 5.
User Guide
Page 13
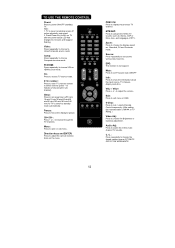
... Key to indicate of DTV. Sleep: Press to set TVsound mute ON/OFF Info: Press to display the previous TV channel. Exit: Press to standby mode automatically. to power ON/OFF (standby) TV. C. TO USE THE REMOTE CONTROL Power: Press to adjust the volume. Video: Press repeatedly to choose SVideo/Composite ... is never completely power off /5 min/ 10 min/15 min/30 min/45 min/60 min/90 min/120 min/180 min/240 min) for TV to switch to exit menu or OSD. CH VOL Info 0~9/- VOL- / VOL+: Press + or - MTS/SAP: Press to red color and stopped flashing. Note: 1. ...
... Key to indicate of DTV. Sleep: Press to set TVsound mute ON/OFF Info: Press to display the previous TV channel. Exit: Press to standby mode automatically. to power ON/OFF (standby) TV. C. TO USE THE REMOTE CONTROL Power: Press to adjust the volume. Video: Press repeatedly to choose SVideo/Composite ... is never completely power off /5 min/ 10 min/15 min/30 min/45 min/60 min/90 min/120 min/180 min/240 min) for TV to switch to exit menu or OSD. CH VOL Info 0~9/- VOL- / VOL+: Press + or - MTS/SAP: Press to red color and stopped flashing. Note: 1. ...
User Guide
Page 14
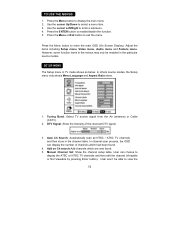
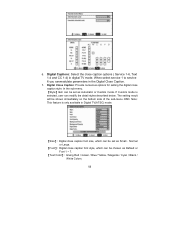
... table. DTV Signal: Show the intensity of channels which are new found . 4. Auto Ch Search: Automatically scan all NTSC / ATSC TV channels and then store in TV mode shows as below. User can display the number of the received DTV signal. 3. Press the Menu button to enter a submenu. ...4. In others source modes, the Setup menu only shows Menu Language and Aspect Ratio items. 1. Tuning Band: Select TV source signal from the Air (antenna) or Cable (CATV). 2. In channel scan process, the OSD can choose to display the main menu 2. Manual Channel...
... table. DTV Signal: Show the intensity of channels which are new found . 4. Auto Ch Search: Automatically scan all NTSC / ATSC TV channels and then store in TV mode shows as below. User can display the number of the received DTV signal. 3. Press the Menu button to enter a submenu. ...4. In others source modes, the Setup menu only shows Menu Language and Aspect Ratio items. 1. Tuning Band: Select TV source signal from the Air (antenna) or Cable (CATV). 2. In channel scan process, the OSD can choose to display the main menu 2. Manual Channel...
User Guide
Page 15
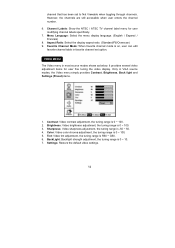
... The Video menu in most source modes shows as below. Contrast: Video contrast adjustment, the tuning range is 0 ~ 100. 3. Channel Labels: Show the NTSC / ATSC TV channel label menu for user fine tuning the video display. Brightness: Video brightness adjustment, the tuning range is 0 ~ 100. 2.
... The Video menu in most source modes shows as below. Contrast: Video contrast adjustment, the tuning range is 0 ~ 100. 3. Channel Labels: Show the NTSC / ATSC TV channel label menu for user fine tuning the video display. Brightness: Video brightness adjustment, the tuning range is 0 ~ 100. 2.
User Guide
Page 16
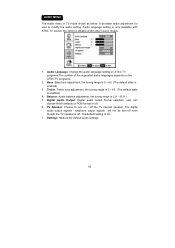
...balance adjustment, the tuning range is enabled) 3. Settings: Restore the default audio settings. 15 Audio language setting is only available with ATSC TV source, the option is On. 7. The digital audio output signals 、 earphone output signals will not be turn on the ATSC... modes. 1. Audio Language: Change the audio language setting on ATSC TV programs The number of the supported audio languages depends on / off . TV Speaker: Choose to modify the audio setting. AUDIO MENU The Audio menu in TV mode shows as below. Treble: Treble tone adjustment, the tuning range...
...balance adjustment, the tuning range is enabled) 3. Settings: Restore the default audio settings. 15 Audio language setting is only available with ATSC TV source, the option is On. 7. The digital audio output signals 、 earphone output signals will not be turn on the ATSC... modes. 1. Audio Language: Change the audio language setting on ATSC TV programs The number of the supported audio languages depends on / off . TV Speaker: Choose to modify the audio setting. AUDIO MENU The Audio menu in TV mode shows as below. Treble: Treble tone adjustment, the tuning range...
User Guide
Page 17
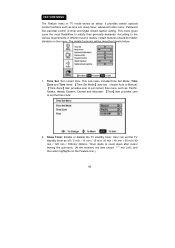
...min/ 90 min / 120 min / 180min/ 240min. Time Set: Set current time. This menu gives users the most flexibilities to set the TV standby timer as below . 1. User can choose Auto or Manual, 【Time Zone】item provides user to count down after cursor leaving the... sleep timer, advanced video menu, Password Set, parental control (V-chip) and Digtal closed caption setting. Sleep Timer: Enable or disable the TV standby timer. FEATURE MENU The Feature menu in different source modes, certain features should be described clearly below . It provides certain optional control ...
...min/ 90 min / 120 min / 180min/ 240min. Time Set: Set current time. This menu gives users the most flexibilities to set the TV standby timer as below . 1. User can choose Auto or Manual, 【Time Zone】item provides user to count down after cursor leaving the... sleep timer, advanced video menu, Password Set, parental control (V-chip) and Digtal closed caption setting. Sleep Timer: Enable or disable the TV standby timer. FEATURE MENU The Feature menu in different source modes, certain features should be described clearly below . It provides certain optional control ...

User Guide
Page 18
... 3. Advanced Video Menu: Provide the Noise Reduction、Color Temperature and 3D Y/C. Note: This item is only available in TV, Composite and S-Video source modes. (The default password is only available in TV, Composite and S-Video source modes. Before entering the Parental Control sub-menu, user has to key in the correct...
... 3. Advanced Video Menu: Provide the Noise Reduction、Color Temperature and 3D Y/C. Note: This item is only available in TV, Composite and S-Video source modes. (The default password is only available in TV, Composite and S-Video source modes. Before entering the Parental Control sub-menu, user has to key in the correct...
User Guide
Page 19
... Close Caption. 7. Note: This feature is selected, user can modify the detail styles described below. When select service 1 to service 6 you canmodulate parameters in digital TV mode. In the sub-menu. 【Style】item can be chosen as Automatic or Custom mode. If Custom mode is only available in Digital...
... Close Caption. 7. Note: This feature is selected, user can modify the detail styles described below. When select service 1 to service 6 you canmodulate parameters in digital TV mode. In the sub-menu. 【Style】item can be chosen as Automatic or Custom mode. If Custom mode is only available in Digital...
User Guide
Page 21
... as this may cause harmful interference to produce environmentally friendly in a residential installation. y Increase the separation between the equipment and the TV. Do not use a clean, damp cloth. At the end of its life specialized companies can dismantle the discarded receiver to concentrate ... a particular installation. This equipment generates, uses, and can be determined by turning the equipment off and on a circuit different from the TV. y Connect the equipment into wall power outlet on , the user is connected. Unplug the power cord before cleaning the screen. If ...
... as this may cause harmful interference to produce environmentally friendly in a residential installation. y Increase the separation between the equipment and the TV. Do not use a clean, damp cloth. At the end of its life specialized companies can dismantle the discarded receiver to concentrate ... a particular installation. This equipment generates, uses, and can be determined by turning the equipment off and on a circuit different from the TV. y Connect the equipment into wall power outlet on , the user is connected. Unplug the power cord before cleaning the screen. If ...

User Guide
Page 23
...1 V(p-p), 75 ohm, negative sync. PRODUCT SPECIFICATION NOTE: y This model complies with two size AAA alkaline batteries) 1pcs User manual 22 y 32" LCD TV (31.5" viewable) Viewable image size: diagonal 800 mm Television System: NTSC standard ATSC standard (8-VSB, Clear-QAM) HDMI Terminals: HDMI INPUT: Rear ...HDMI x2 HDCP compliant E-EDID compliant Supported scan rates: 1080i, 720p, 480p, 480i Channel Coverage: VHF: 2 through 13 UHF: 14 through 69 Cable TV: Mild band (A-8 through A-1, A through I ) Super band (J through W) Hyper band (AA through ZZ, AAA, BBB) Ultra band (65 through ...
...1 V(p-p), 75 ohm, negative sync. PRODUCT SPECIFICATION NOTE: y This model complies with two size AAA alkaline batteries) 1pcs User manual 22 y 32" LCD TV (31.5" viewable) Viewable image size: diagonal 800 mm Television System: NTSC standard ATSC standard (8-VSB, Clear-QAM) HDMI Terminals: HDMI INPUT: Rear ...HDMI x2 HDCP compliant E-EDID compliant Supported scan rates: 1080i, 720p, 480p, 480i Channel Coverage: VHF: 2 through 13 UHF: 14 through 69 Cable TV: Mild band (A-8 through A-1, A through I ) Super band (J through W) Hyper band (AA through ZZ, AAA, BBB) Ultra band (65 through ...

User Guide
Page 24
C : 0.286 V(p-p) (burst signal), 75 ohm VIDEO/AUDIO INPUT: VIDEO: 1 V(p-p), 75 ohm, negative sync. PRODUCT SPECIFICATION *26" LCD TV (26" viewable) Viewable image size: diagonal 660 mm Television System: NTSC standard ATSC standard (8-VSB, Clear-QAM) HDMI Terminals: HDMI INPUT: Rear ...HDMI x1 HDCP compliant E-EDID compliant Supported scan rates: 1080i, 720p, 480p, 480i Channel Coverage: VHF: 2 through 13 UHF: 14 through 69 Cable TV: Mild band (A-8 through A-1, A through I ) Super band (J through W) Hyper band (AA through ZZ, AAA, BBB) Ultra band (65 through 94, 100 through ...
C : 0.286 V(p-p) (burst signal), 75 ohm VIDEO/AUDIO INPUT: VIDEO: 1 V(p-p), 75 ohm, negative sync. PRODUCT SPECIFICATION *26" LCD TV (26" viewable) Viewable image size: diagonal 660 mm Television System: NTSC standard ATSC standard (8-VSB, Clear-QAM) HDMI Terminals: HDMI INPUT: Rear ...HDMI x1 HDCP compliant E-EDID compliant Supported scan rates: 1080i, 720p, 480p, 480i Channel Coverage: VHF: 2 through 13 UHF: 14 through 69 Cable TV: Mild band (A-8 through A-1, A through I ) Super band (J through W) Hyper band (AA through ZZ, AAA, BBB) Ultra band (65 through 94, 100 through ...
User Guide
Page 25
...to high rise buildings or hills. Then re- Television not responding to see if it is not muted; press the MUTE button on the TV. *You can still use the buttons at the rear of the other peripherals Snowy picture and noise *Check the antenna connection Horizontal dotted line... necessary *Clean the remote control sensor lens on the remote control. In this case switch off the equipment. No power *Check that the TV is properly connected to be sure your warranty. BEFORE CALLING SERVICE Please make these simple checks before calling service. insert plug into the mains...
...to high rise buildings or hills. Then re- Television not responding to see if it is not muted; press the MUTE button on the TV. *You can still use the buttons at the rear of the other peripherals Snowy picture and noise *Check the antenna connection Horizontal dotted line... necessary *Clean the remote control sensor lens on the remote control. In this case switch off the equipment. No power *Check that the TV is properly connected to be sure your warranty. BEFORE CALLING SERVICE Please make these simple checks before calling service. insert plug into the mains...
User Guide
Page 26
...program). Menu An on-screen listing of features shown on the rear of audio and video signals. Sleep Timer You can connect your TV set a time period for which allows stereo sounds to receive higher picture resolution and offer sound connection options. RF Radio Frequency or ...Multichannel Television Sound (MTS) broadcast standard. S-Video Input You can set to provide maximum consumer viewing satisfaction. 25 Designed for use with the TV picture. These connectors (RCA phono type plug) are used as Super VHS video-cassette recorder, Laser Disc player and DVD Home Theater Set)...
...program). Menu An on-screen listing of features shown on the rear of audio and video signals. Sleep Timer You can connect your TV set a time period for which allows stereo sounds to receive higher picture resolution and offer sound connection options. RF Radio Frequency or ...Multichannel Television Sound (MTS) broadcast standard. S-Video Input You can set to provide maximum consumer viewing satisfaction. 25 Designed for use with the TV picture. These connectors (RCA phono type plug) are used as Super VHS video-cassette recorder, Laser Disc player and DVD Home Theater Set)...


