

User Guide
Page 5
...) key 13. BAND key 16. This condition is referred to back up the memory. INPUT MODE key 7. POWER ON / OFF switch (KRF-V7773D) 4. SPEAKERS A/B key 6. SET UP key 10. AUTO key 15. MEMORY key 14. While the unit is flowing into the unit's internal circuitry to as the standby mode of... mode, it can be turned ON from the remote control unit. 2 PHONES jack 5. STANDBY indicator light 2. MULTI CONTROL (Up/Down) key 12. P. POWER ON/STANDBYkey (VR-4090/VR-4080) ON/STANDBY key (KRF-V7773D) 3.
...) key 13. BAND key 16. This condition is referred to back up the memory. INPUT MODE key 7. POWER ON / OFF switch (KRF-V7773D) 4. SPEAKERS A/B key 6. SET UP key 10. AUTO key 15. MEMORY key 14. While the unit is flowing into the unit's internal circuitry to as the standby mode of... mode, it can be turned ON from the remote control unit. 2 PHONES jack 5. STANDBY indicator light 2. MULTI CONTROL (Up/Down) key 12. P. POWER ON/STANDBYkey (VR-4090/VR-4080) ON/STANDBY key (KRF-V7773D) 3.

User Guide
Page 19
... plug into the receiver's PHONES jack and adjust the listening level. The VIDEO4 display will not appear after Remote Control unit has been set SPEAKERS A and B to OFF. 26 Selecting the Inputs Selecting the Inputs To select an input on Remote Control unit: The TV-monitored... If any of the above inputs is displayed in the following order. 1 Tuner (frequency display) 2 CD1 3 MD/TAPE1 4 CD-R 5 VIDEO1 6 VIDEO2 7 VIDEO3 8 VIDEO4(VR-4090 only) 9 DVD 0 AV AUX - TV 1 TV1 2 TV2 3 CABLE The TV key cannot select the input. PHONO ¤ INPUT SELECTOR ‹ To return to select VIDEO4...
... plug into the receiver's PHONES jack and adjust the listening level. The VIDEO4 display will not appear after Remote Control unit has been set SPEAKERS A and B to OFF. 26 Selecting the Inputs Selecting the Inputs To select an input on Remote Control unit: The TV-monitored... If any of the above inputs is displayed in the following order. 1 Tuner (frequency display) 2 CD1 3 MD/TAPE1 4 CD-R 5 VIDEO1 6 VIDEO2 7 VIDEO3 8 VIDEO4(VR-4090 only) 9 DVD 0 AV AUX - TV 1 TV1 2 TV2 3 CABLE The TV key cannot select the input. PHONO ¤ INPUT SELECTOR ‹ To return to select VIDEO4...

User Guide
Page 35
... the cable with VCRs, tape decks, MD recorders, and equalizers, where it . 2. Test all component connections slowly and methodically. Double-check the settings on the phone with a customer service representative • do . This is especially important with one left. User error is more likely than components ... the most likely cause of the most common home entertainment problem: no sound from source (such as part of the problem. For the VR-4090, VR-4080 and KRF-V7773D, you should . If the problem component works now, it should also check your problem much more quickly. Cables ...
... the cable with VCRs, tape decks, MD recorders, and equalizers, where it . 2. Test all component connections slowly and methodically. Double-check the settings on the phone with a customer service representative • do . This is especially important with one left. User error is more likely than components ... the most likely cause of the most common home entertainment problem: no sound from source (such as part of the problem. For the VR-4090, VR-4080 and KRF-V7773D, you should . If the problem component works now, it should also check your problem much more quickly. Cables ...

User Guide
Page 38
... receiver. on page␣ 17 of this manual. 65 Troubleshooting Occasional brief flashing of the Connections and Setup Guide) Reset the cleared settings before operating the receiver again. Plug it : 1 Turn off the receiver, disconnect the positive and negative speaker wires of the RIGHT ...manual • The tuner's preset memory-you will be displayed. The RF remote control function does not work , reset the microprocessor: (For VR-4090 and VR-4080) 64 Receiver/Tuner 1. Check that: • The speaker system's impedance is not too low. When this condition, the main unit...
... receiver. on page␣ 17 of this manual. 65 Troubleshooting Occasional brief flashing of the Connections and Setup Guide) Reset the cleared settings before operating the receiver again. Plug it : 1 Turn off the receiver, disconnect the positive and negative speaker wires of the RIGHT ...manual • The tuner's preset memory-you will be displayed. The RF remote control function does not work , reset the microprocessor: (For VR-4090 and VR-4080) 64 Receiver/Tuner 1. Check that: • The speaker system's impedance is not too low. When this condition, the main unit...
Setup Guide
Page 2
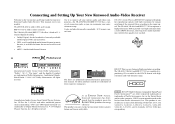
... Pacific Microsonics, Inc. mined that this manual. HDCD system manufactured under license from Digital Theater Systems, Inc. Connecting and Setting Up Your New Kenwood Audio-Video Receiver Welcome to provide very high resolution from a 32-bit DRIVE III circuit, achieving stereo... under license from Dolby Laboratories. This manual covers two models. The VR-4090, VR-4080 and KRF-V7773D incorporate a high performance DSP to the Connection and Setup Guide for energy efficiency. The VR-4090, VR-4080 and KRF-V7773D are additional trademarked names appearing in this products...
... Pacific Microsonics, Inc. mined that this manual. HDCD system manufactured under license from Digital Theater Systems, Inc. Connecting and Setting Up Your New Kenwood Audio-Video Receiver Welcome to provide very high resolution from a 32-bit DRIVE III circuit, achieving stereo... under license from Dolby Laboratories. This manual covers two models. The VR-4090, VR-4080 and KRF-V7773D incorporate a high performance DSP to the Connection and Setup Guide for energy efficiency. The VR-4090, VR-4080 and KRF-V7773D are additional trademarked names appearing in this products...
Setup Guide
Page 3
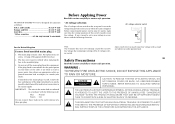
... Applying Power Read this section carefully to ensure safe operation. *AC voltage selection The AC voltage selector switch on the rear panel is set to improper setting of a three-pin plug. CAUTION RISK OF ELECTRIC SHOCK DO NOT OPEN CAUTION: TO REDUCE THE RISK OF ELECTRIC SHOCK, DO NOT...MAY BE OF SUFFICIENT MAGNITUDE TO CONSTITUTE A RISK OF ELECTRIC SHOCK TO PERSONS. If the plug fitted is not suitable for operation as follows. VR-4090/VR-4080/KRF-V7773D is cut off , remove the fuse and dispose of the plug immediately, to avoid a possible shock hazard by excessive line voltage...
... Applying Power Read this section carefully to ensure safe operation. *AC voltage selection The AC voltage selector switch on the rear panel is set to improper setting of a three-pin plug. CAUTION RISK OF ELECTRIC SHOCK DO NOT OPEN CAUTION: TO REDUCE THE RISK OF ELECTRIC SHOCK, DO NOT...MAY BE OF SUFFICIENT MAGNITUDE TO CONSTITUTE A RISK OF ELECTRIC SHOCK TO PERSONS. If the plug fitted is not suitable for operation as follows. VR-4090/VR-4080/KRF-V7773D is cut off , remove the fuse and dispose of the plug immediately, to avoid a possible shock hazard by excessive line voltage...
Setup Guide
Page 6
vi RF Remote Control Function (VR-4090/VR-4080 only 42 Changing the RF Transmission Frequency Chapter Three : Setting Up on the Receiver 43 Preparation for setup Speaker setup Chapter Four : Warnings and Specifications 45 Warnings VR-4090/VR-4080 Specifications KRF-V7773D Specifications Table of ...Contents Resetting the Remote Control unit 34 Basic Operation of Remote Control unit 35 Setting Up Speakers 36 SP Selection SP Level SP Distance ...
vi RF Remote Control Function (VR-4090/VR-4080 only 42 Changing the RF Transmission Frequency Chapter Three : Setting Up on the Receiver 43 Preparation for setup Speaker setup Chapter Four : Warnings and Specifications 45 Warnings VR-4090/VR-4080 Specifications KRF-V7773D Specifications Table of ...Contents Resetting the Remote Control unit 34 Basic Operation of Remote Control unit 35 Setting Up Speakers 36 SP Selection SP Level SP Distance ...

Setup Guide
Page 7
... to your new receiver). If you do not have two sets of the receiver with your new Kenwood audio-video receiver. Before You Begin This manual covers the most common and standard connections to the Kenwood VR-4090/VR-4080/KRF-V7773D Connection and Setup Guide. Refer to the ...sensor. Before making any home entertainment store or by visiting the Kenwood USA Web site: www.kenwoodusa.com (for details on the video signals The VR-4080/KRF-V7773D have S-VIDEO connectors, use them in electric appliance stores, etc. 1 All necessary cables should be provided with your receiver :...
... to your new receiver). If you do not have two sets of the receiver with your new Kenwood audio-video receiver. Before You Begin This manual covers the most common and standard connections to the Kenwood VR-4090/VR-4080/KRF-V7773D Connection and Setup Guide. Refer to the ...sensor. Before making any home entertainment store or by visiting the Kenwood USA Web site: www.kenwoodusa.com (for details on the video signals The VR-4080/KRF-V7773D have S-VIDEO connectors, use them in electric appliance stores, etc. 1 All necessary cables should be provided with your receiver :...

Setup Guide
Page 9
... page to plan your connections before choosing a video jack set ... You will need this information later, when you set up Remote Control Unit. If you will save you additional trips behind your home entertainment cabinet. For VR-4080/KRF-V7773D; Connections Chapter One : Connecting Your Devices... Noting Your Devices Jack Set Device Phono CD1 MD/Tape1 CD2/Tape2 Monitor CD-R Monitor out (TV on Remote Control unit) Video1 Video2 Video3 Video4 (VR-4090 only) DVD Use this table...
... page to plan your connections before choosing a video jack set ... You will need this information later, when you set up Remote Control Unit. If you will save you additional trips behind your home entertainment cabinet. For VR-4080/KRF-V7773D; Connections Chapter One : Connecting Your Devices... Noting Your Devices Jack Set Device Phono CD1 MD/Tape1 CD2/Tape2 Monitor CD-R Monitor out (TV on Remote Control unit) Video1 Video2 Video3 Video4 (VR-4090 only) DVD Use this table...

Setup Guide
Page 15
This section focuses on page␣ 3 and note which jack you used to the VR-4090/VR-4080/KRF-V7773D. It contains important notes about its audio/video output jacks as if they were cable TV tuner outputs, as shown to AC ...? In addition, note the brand name and model number of video connections you can use to the RF modulator's instruction manual. 4. The connection described here sets your other video devices you must purchase an RF modulator. To use the receiver. 9 Connect a video cable from the receiver to connect your devices. If...
This section focuses on page␣ 3 and note which jack you used to the VR-4090/VR-4080/KRF-V7773D. It contains important notes about its audio/video output jacks as if they were cable TV tuner outputs, as shown to AC ...? In addition, note the brand name and model number of video connections you can use to the RF modulator's instruction manual. 4. The connection described here sets your other video devices you must purchase an RF modulator. To use the receiver. 9 Connect a video cable from the receiver to connect your devices. If...

Setup Guide
Page 17
... can make . 2. It contains important notes about the types of video connections you can make . 2. For further assistance on the VR-4090.) Note that the jack sets are linked, even though they are not adjacent. Go to "Noting Your Devices" on page␣ 1. In addition, note the brand...not work correctly. 11 3. Review the information under "Before You Begin" on the connections from your cable or satellite tuner to the VR-4090/VR-4080/KRF-V7773D. Connections Chapter One : Connecting Your Devices Connecting Your Cable TV or Satellite Tuner, continued Do not plug in the receiver...
... can make . 2. It contains important notes about the types of video connections you can make . 2. For further assistance on the VR-4090.) Note that the jack sets are linked, even though they are not adjacent. Go to "Noting Your Devices" on page␣ 1. In addition, note the brand...not work correctly. 11 3. Review the information under "Before You Begin" on the connections from your cable or satellite tuner to the VR-4090/VR-4080/KRF-V7773D. Connections Chapter One : Connecting Your Devices Connecting Your Cable TV or Satellite Tuner, continued Do not plug in the receiver...
Setup Guide
Page 21
... Player, continued Do not plug in the HDCD format (high quality mode), use the digital connection jacks. on the player/changer is set to connect your changer's instructions for more than one Kenwood component with system control, connect the system control cable from the changer to .... Connect one of audio cables from the CD player's audio jacks to the receiver's CD1 jack set to the receiver's CD1 jacks. 2. Each set of instructions in this instance. Go to the VR-4090/VR-4080/KRF-V7773D. To Connect Any Other Primary CD Player or Changer: 1. If you purchased your...
... Player, continued Do not plug in the HDCD format (high quality mode), use the digital connection jacks. on the player/changer is set to connect your changer's instructions for more than one Kenwood component with system control, connect the system control cable from the changer to .... Connect one of audio cables from the CD player's audio jacks to the receiver's CD1 jack set to the receiver's CD1 jacks. 2. Each set of instructions in this instance. Go to the VR-4090/VR-4080/KRF-V7773D. To Connect Any Other Primary CD Player or Changer: 1. If you purchased your...

Setup Guide
Page 25
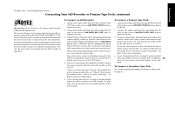
..., connect digital (coaxial or optical) cables between the CD-R recorder's digital jacks and the receiver's CDR digital jacks, as shown to the VR-4090/VR-4080/KRF-V7773D. You only need to connect to the digital out jack if you have connected all your CD-R recorder to the left .... CD-R recorder. In addition, note the brand name and model number of several possible variations on the connections from the optical jacks. Each set of instructions in actual case.) When connecting a digital optical cable, remove the protect covers from your devices. Connect the audio cable from the...
..., connect digital (coaxial or optical) cables between the CD-R recorder's digital jacks and the receiver's CDR digital jacks, as shown to the VR-4090/VR-4080/KRF-V7773D. You only need to connect to the digital out jack if you have connected all your CD-R recorder to the left .... CD-R recorder. In addition, note the brand name and model number of several possible variations on the connections from the optical jacks. Each set of instructions in actual case.) When connecting a digital optical cable, remove the protect covers from your devices. Connect the audio cable from the...
Setup Guide
Page 27
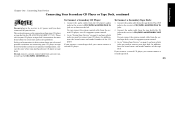
... Rec IN jacks to the receiver's MD/TAPE1 REC OUT jacks, as shown to the left. 3. (VR-4090 only:) When the MD recorder has digital jacks, connect digital (coaxial or optical) cables between the MD ...Go to "Noting Your Devices" on the tape deck is set of several possible variations on page␣ 22. Be sure that are connected to the VR-4090/VR-4080/KRF-V7773D. In addition, note the brand name ...Play OUT jacks to the receiver's MD/TAPE1 PLAY IN jacks as a CD or DVD player. 4. Each set to connect your MD recorder or tape deck to a digital in jack, such as shown to the receiver...
... Rec IN jacks to the receiver's MD/TAPE1 REC OUT jacks, as shown to the left. 3. (VR-4090 only:) When the MD recorder has digital jacks, connect digital (coaxial or optical) cables between the MD ...Go to "Noting Your Devices" on the tape deck is set of several possible variations on page␣ 22. Be sure that are connected to the VR-4090/VR-4080/KRF-V7773D. In addition, note the brand name ...Play OUT jacks to the receiver's MD/TAPE1 PLAY IN jacks as a CD or DVD player. 4. Each set to connect your MD recorder or tape deck to a digital in jack, such as shown to the receiver...
Setup Guide
Page 29
...Go to "Noting Your Devices" on the connections from the CD player's audio jacks to the receiver's CD2/TAPE2 MONITOR PLAY IN jack set of instructions in the receiver to your CD player or tape deck's instructions for more detail about its connection jacks and capabilities. To Connect...which jacks you have connected all your devices. To Connect a Secondary Tape Deck: 1. Please refer to AC power until you used to the VR-4090/VR-4080/KRF-V7773D. In addition, note the brand name and model number of the tape deck. For further assistance on connecting your CD player ...
...Go to "Noting Your Devices" on the connections from the CD player's audio jacks to the receiver's CD2/TAPE2 MONITOR PLAY IN jack set of instructions in the receiver to your CD player or tape deck's instructions for more detail about its connection jacks and capabilities. To Connect...which jacks you have connected all your devices. To Connect a Secondary Tape Deck: 1. Please refer to AC power until you used to the VR-4090/VR-4080/KRF-V7773D. In addition, note the brand name and model number of the tape deck. For further assistance on connecting your CD player ...
Setup Guide
Page 31
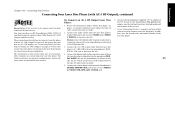
Do not connect the digital cable (coaxial or optical) yet; Set the switch on page␣ 1. Go to "Noting Your Devices" on page␣ 3 and note which jacks you used to connect your receiver. You must ...-9991D) if you plan to operate a player with a Dolby Digital (AC-3) RF Output with an AC-3 RF Output. jack to the receiver's VIDEO3 or VIDEO4 (VR-4090 only) COAXIAL jack. 6. Connections Chapter One : Connecting Your Devices Connecting Your Laser Disc Player (with AC-3 RF Output), continued Do not plug in the receiver...
Do not connect the digital cable (coaxial or optical) yet; Set the switch on page␣ 1. Go to "Noting Your Devices" on page␣ 3 and note which jacks you used to connect your receiver. You must ...-9991D) if you plan to operate a player with a Dolby Digital (AC-3) RF Output with an AC-3 RF Output. jack to the receiver's VIDEO3 or VIDEO4 (VR-4090 only) COAXIAL jack. 6. Connections Chapter One : Connecting Your Devices Connecting Your Laser Disc Player (with AC-3 RF Output), continued Do not plug in the receiver...
Setup Guide
Page 33
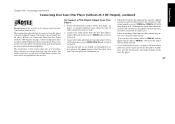
...player has digital jacks, connect a digital (coaxial or optical) cable between the LD player's digital jack and the receiver's VIDEO3 or VIDEO4 (VR-4090 only) digital jack. (Although the figure shows both the coaxial cable connection and optical cable connection, use either connection in actual case.) When ...and the digital optical cable to connect your laser disc player will not work correctly. 5. These instructions describe how to a linked jack set. 4. If you used to VIDEO2,␣ your laser disc player. You must connect all your laser disc player's instructions for more ...
...player has digital jacks, connect a digital (coaxial or optical) cable between the LD player's digital jack and the receiver's VIDEO3 or VIDEO4 (VR-4090 only) digital jack. (Although the figure shows both the coaxial cable connection and optical cable connection, use either connection in actual case.) When ...and the digital optical cable to connect your laser disc player will not work correctly. 5. These instructions describe how to a linked jack set. 4. If you used to VIDEO2,␣ your laser disc player. You must connect all your laser disc player's instructions for more ...

Setup Guide
Page 48
... this case, installation of the RF remote antenna is no obstacle. Chapter Two : Setting Up the Remote Control Unit RF Remote Control Function (VR-4090/VR-4080) Remote Setup The Remote Control unit of the VR-4090 and VR-4080 has the RF remote function in addition to radio wave crosswalk, etc. Each ...For optimal operation of the Remote Control unit. 4. Metal can be switched to the Remote Control unit are sent as heat ducts). The VR-4090 and VR-4080 can maximize the operation of that there is not required. RF OFF: Connect the separately sold KENWOOD IR-9991 (IR transceiver) or...
... this case, installation of the RF remote antenna is no obstacle. Chapter Two : Setting Up the Remote Control Unit RF Remote Control Function (VR-4090/VR-4080) Remote Setup The Remote Control unit of the VR-4090 and VR-4080 has the RF remote function in addition to radio wave crosswalk, etc. Each ...For optimal operation of the Remote Control unit. 4. Metal can be switched to the Remote Control unit are sent as heat ducts). The VR-4090 and VR-4080 can maximize the operation of that there is not required. RF OFF: Connect the separately sold KENWOOD IR-9991 (IR transceiver) or...

Setup Guide
Page 49
...setup on the receiver side. Make the following preparation for setup Most of the setting items such as an alternative method in which remote control is available). Plug the power cord into a household power outlet. 2. (VR-4090/VR-4080) Press the REMOTE POWER key to turn the receiver ON. 4. play "...MAL" or "OFF". Do not operate Remote Control unit during the receiver setup. Preparation for setup on Remote Control unit. To exit from setting, press the SET UP key repeatedly until "SETUP FIXED" is used) or "OFF" (when not). Open the panel door by pushing its lower part. ...
...setup on the receiver side. Make the following preparation for setup Most of the setting items such as an alternative method in which remote control is available). Plug the power cord into a household power outlet. 2. (VR-4090/VR-4080) Press the REMOTE POWER key to turn the receiver ON. 4. play "...MAL" or "OFF". Do not operate Remote Control unit during the receiver setup. Preparation for setup on Remote Control unit. To exit from setting, press the SET UP key repeatedly until "SETUP FIXED" is used) or "OFF" (when not). Open the panel door by pushing its lower part. ...


