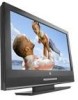
User Manual
Page 4
...Input 17 For PC connection with D-Sub and PC audio output jacks 18 How to remove the base 18 Watching TV 19 Installation ...19 Turning the LCD Display On and Off 20 Running Initial Setup 21 Menu Navigation ...23 Changing Channels 26 Adjusting The Volume 26 Selecting... Input Source 27 Controls & Adjustments 28 Power Consumption 28 Picture Control...28 Sound Control...31 Channel Management 33 Timer Setting...35 Viewing Closed Caption 37 Ratings Locks ...40...
...Input 17 For PC connection with D-Sub and PC audio output jacks 18 How to remove the base 18 Watching TV 19 Installation ...19 Turning the LCD Display On and Off 20 Running Initial Setup 21 Menu Navigation ...23 Changing Channels 26 Adjusting The Volume 26 Selecting... Input Source 27 Controls & Adjustments 28 Power Consumption 28 Picture Control...28 Sound Control...31 Channel Management 33 Timer Setting...35 Viewing Closed Caption 37 Ratings Locks ...40...

User Manual
Page 6
...'s instructions. 8. A grounding type plug has two blades and a third rounding prong. Keep these instructions. 2. Install in any way, such as power-supply cord or plug is used, use caution when moving the cart/apparatus combination to rain or moisture, does not operate normally, or has been... dropped. 4 Unplug this apparatus near any ventilation openings. Protect the power cord from being walked on or pinched particularly at plugs, convenience receptacles, and the point where they exit from tip-over. 13. Only...
...'s instructions. 8. A grounding type plug has two blades and a third rounding prong. Keep these instructions. 2. Install in any way, such as power-supply cord or plug is used, use caution when moving the cart/apparatus combination to rain or moisture, does not operate normally, or has been... dropped. 4 Unplug this apparatus near any ventilation openings. Protect the power cord from being walked on or pinched particularly at plugs, convenience receptacles, and the point where they exit from tip-over. 13. Only...
User Manual
Page 7
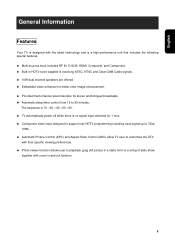
...;90. ‹ TV automatically power off while there is a high-performance unit that includes the following special features: ‹ Multi-sources input included RF IN, D-SUB, HDMI, Composite, and Component. ‹ Built-in and out function. 5 English General Information Features Your TV is designed with the... only HDTV programming including input signal up to 720p, 1080i. ‹ Automatic Picture Control (APC) and Aspect Ratio Control (ARC) allow TV user to customize the DTV with their specific viewing preferences. ‹ Photo viewer function allows user to playback .jpeg still picture in a...
...;90. ‹ TV automatically power off while there is a high-performance unit that includes the following special features: ‹ Multi-sources input included RF IN, D-SUB, HDMI, Composite, and Component. ‹ Built-in and out function. 5 English General Information Features Your TV is designed with the... only HDTV programming including input signal up to 720p, 1080i. ‹ Automatic Picture Control (APC) and Aspect Ratio Control (ARC) allow TV user to customize the DTV with their specific viewing preferences. ‹ Photo viewer function allows user to playback .jpeg still picture in a...

User Manual
Page 8
Accessories User Guide Remote Control & Batteries (AAAx2) Warranty Card Screw driver & Screws Power Cord Quick connect Quick Connect Guide NOTE 1 : The number of screws may differ depending on your purchase. 6
Accessories User Guide Remote Control & Batteries (AAAx2) Warranty Card Screw driver & Screws Power Cord Quick connect Quick Connect Guide NOTE 1 : The number of screws may differ depending on your purchase. 6
User Manual
Page 9
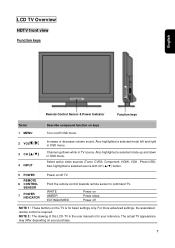
... right in the user manual is required. NOTE 2 : The drawing of this LCD-TV in OSD menu. For more advanced settings, the associated remote control is for basic settings only. LCD TV Overview HDTV front view Function keys English Remote Control Sensor & Power Indicator Function keys Terms 1 MENU Describe compound function on keys Turn on...
... right in the user manual is required. NOTE 2 : The drawing of this LCD-TV in OSD menu. For more advanced settings, the associated remote control is for basic settings only. LCD TV Overview HDTV front view Function keys English Remote Control Sensor & Power Indicator Function keys Terms 1 MENU Describe compound function on keys Turn on...
User Manual
Page 12
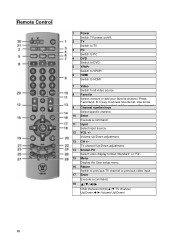
...Menu Display the User setup menu. 16 Return Switch to all video source 8 Favorite Select, remove or add your favorite channel. Remote Control 1 Power Switch TV power on/off. 2 TV Switch to TV 3 PC Switch to PC 4 DVD Switch to DVD 5 YPbPr Switch to YPbPr 6 HDMI Switch to HDMI 7 Video Switch to previous... TV channel or previous video input 17 Enter Execute a command. 18 Ÿ/ź/Ż/Ź OSD menual control(Ÿ/ź:TV channel Up/Down...
...Menu Display the User setup menu. 16 Return Switch to all video source 8 Favorite Select, remove or add your favorite channel. Remote Control 1 Power Switch TV power on/off. 2 TV Switch to TV 3 PC Switch to PC 4 DVD Switch to DVD 5 YPbPr Switch to YPbPr 6 HDMI Switch to HDMI 7 Video Switch to previous... TV channel or previous video input 17 Enter Execute a command. 18 Ÿ/ź/Ż/Ź OSD menual control(Ÿ/ź:TV channel Up/Down...
User Manual
Page 22
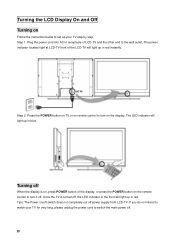
...and Off Turning on Follow the instruction below to set up your TV for very long, please unplug the power cord to switch the main power off. 20 The power indicator located right at LCD-TV front of LCD-TV and the other end to watch your TV step by step. If you do not intend to the wall... outlet. Tips: The Power on/off switch does not completely cut off power supply from LCD-TV. The LED...
...and Off Turning on Follow the instruction below to set up your TV for very long, please unplug the power cord to switch the main power off. 20 The power indicator located right at LCD-TV front of LCD-TV and the other end to watch your TV step by step. If you do not intend to the wall... outlet. Tips: The Power on/off switch does not completely cut off power supply from LCD-TV. The LED...
User Manual
Page 23
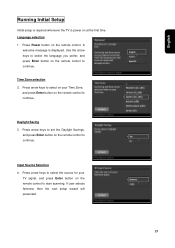
... 3. English Running Initial Setup Initial setup is required whenever the TV is displayed. Press arrow keys to select on your TV signal, and press Enter button on the remote control to start scanning. Language selection 1. A welcome message is power on the remote control. Press Power button on at the first time. If user selects...
... 3. English Running Initial Setup Initial setup is required whenever the TV is displayed. Press arrow keys to select on your TV signal, and press Enter button on the remote control to start scanning. Language selection 1. A welcome message is power on the remote control. Press Power button on at the first time. If user selects...
User Manual
Page 30
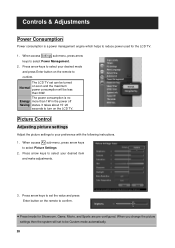
... the picture settings to select your desired mode and press Enter button on the LCD TV. When you change the picture settings then the system will set the value and press Enter button on soon and the maximum power consumption will be Custom mode automatically. 28 When access Settings sub-menu, press arrow...
... the picture settings to select your desired mode and press Enter button on the LCD TV. When you change the picture settings then the system will set the value and press Enter button on soon and the maximum power consumption will be Custom mode automatically. 28 When access Settings sub-menu, press arrow...

User Manual
Page 32
... input source, press Enter button on the remote control to produce a black bar in an opposite side. DPMS : Display Power Management Signaling 30 Adjusting PC settings Make sure the PC and display TV has been well connected; When access Settings sub-menu, press arrow keys to enable or disable the display...picture flickers. Set the time before DMPS goes into effect. Move the image in view of the current VGA input signal. While enable DPMS, TV will run power saving mode while no signal detected. (For more detail, please refer page 27) DMPS Timer Set the DPMS timer you want. When access ...
... input source, press Enter button on the remote control to produce a black bar in an opposite side. DPMS : Display Power Management Signaling 30 Adjusting PC settings Make sure the PC and display TV has been well connected; When access Settings sub-menu, press arrow keys to enable or disable the display...picture flickers. Set the time before DMPS goes into effect. Move the image in view of the current VGA input signal. While enable DPMS, TV will run power saving mode while no signal detected. (For more detail, please refer page 27) DMPS Timer Set the DPMS timer you want. When access ...

User Manual
Page 46
... sub-menu, press arrow keys and Enter button on memory; Power On Plug Set TV power on memory when un-plug power cord and re-plug it.(ON/automatic power-on the remote control to turn Power On Plug ON or OFF. 44 OFF/no automatic power-on) When access Settings sub-menu, press arrow keys and...
... sub-menu, press arrow keys and Enter button on memory; Power On Plug Set TV power on memory when un-plug power cord and re-plug it.(ON/automatic power-on the remote control to turn Power On Plug ON or OFF. 44 OFF/no automatic power-on) When access Settings sub-menu, press arrow keys and...
User Manual
Page 47
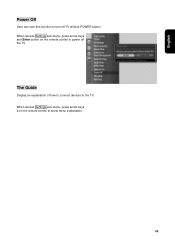
When access Settings sub-menu, press arrow keys and Enter button on the remote control to power off TV without POWER button. When access Settings sub-menu, press arrow keys a on the remote control to show menu explanation. 45 The Guide Display an explanation of how to connect devices to turn off the TV. English Power Off User can user this function to the TV.
When access Settings sub-menu, press arrow keys and Enter button on the remote control to power off TV without POWER button. When access Settings sub-menu, press arrow keys a on the remote control to show menu explanation. 45 The Guide Display an explanation of how to connect devices to turn off the TV. English Power Off User can user this function to the TV.

User Manual
Page 58
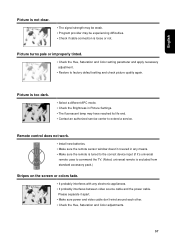
... service center to minimum. ƒ Make sure the "MUTE" button is not mis-pressed. Troubleshooting No picture or sound. ƒ Check if power cord is well connected with external devices correctly. No sound. ƒ Make sure the volume does not set to extend a service. ƒ Make... ƒ Make sure the BRIGHTNESS is invalid source selected. ƒ Make sure you select the correct source mode which match the connection with TV and power outlet. ƒ Verify if it is properly adjusted. ƒ The florescent lamp may be experiencing difficulties. ƒ Check if cable connection ...
... service center to minimum. ƒ Make sure the "MUTE" button is not mis-pressed. Troubleshooting No picture or sound. ƒ Check if power cord is well connected with external devices correctly. No sound. ƒ Make sure the volume does not set to extend a service. ƒ Make... ƒ Make sure the BRIGHTNESS is invalid source selected. ƒ Make sure you select the correct source mode which match the connection with TV and power outlet. ƒ Verify if it is properly adjusted. ƒ The florescent lamp may be experiencing difficulties. ƒ Check if cable connection ...
User Manual
Page 59
... Select a different APC mode. ƒ Check the Brightness in any electronic appliances. ƒ It probably interferes between video source cable and the power cable. English Picture is not clear. ƒ The signal strength may be weak. ƒ Program provider may have reached its life end. ... wind around each other. ƒ Check the Hue, Saturation and Color adjustments. 57 Please separate it 's universal remote uses to command the TV. (Noted, universal remote is excluded from standard accessory pack.) Stripes on the screen or colors fade. ƒ It probably interferes with any...
... Select a different APC mode. ƒ Check the Brightness in any electronic appliances. ƒ It probably interferes between video source cable and the power cable. English Picture is not clear. ƒ The signal strength may be weak. ƒ Program provider may have reached its life end. ... wind around each other. ƒ Check the Hue, Saturation and Color adjustments. 57 Please separate it 's universal remote uses to command the TV. (Noted, universal remote is excluded from standard accessory pack.) Stripes on the screen or colors fade. ƒ It probably interferes with any...
User Manual
Page 62
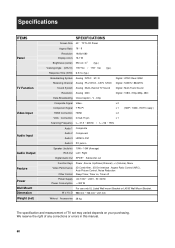
...Sleep Timer, Timer on your purchasing. Chip Composite Signal Video. We reserve the right of TV set may varied depends on , Timer off Power Supply AC 100V ~ 240V , 50 / 60Hz Power Consumption < 300 W For use only UL Listed Wall mount Bracket or L4030 Wall Mount ...Bracket. Specifications ITEMS Panel TV Function Video Input Audio Input Audio Output Feature Power Wall Mount Dimension Weight (net) SPECIFICATIONS Screen Size 40" TFT-LCD Panel Aspect Ratio 16Κ9 Resolution 1920x1080 Display colors 16.7 M Brightness (center) 550...
...Sleep Timer, Timer on your purchasing. Chip Composite Signal Video. We reserve the right of TV set may varied depends on , Timer off Power Supply AC 100V ~ 240V , 50 / 60Hz Power Consumption < 300 W For use only UL Listed Wall mount Bracket or L4030 Wall Mount ...Bracket. Specifications ITEMS Panel TV Function Video Input Audio Input Audio Output Feature Power Wall Mount Dimension Weight (net) SPECIFICATIONS Screen Size 40" TFT-LCD Panel Aspect Ratio 16Κ9 Resolution 1920x1080 Display colors 16.7 M Brightness (center) 550...

