User Manual
Page 3
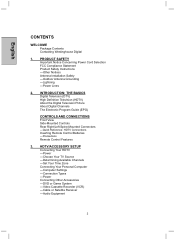
...HDTV) About the Digital Television Picture About Digital Channels The Electronic Program Guide (EPG) CONTROLS AND CONNECTIONS Front View Side-Mounted Controls Rear Right/Left Spine-Mounted Connectors -Quick Reference: HDTV Connections Inserting Remote Control Batteries -Precautions Remote Control Features 3. HDTV/ACCESSORY SETUP Connecting Your HDTV -Power -Choose Your TV Source -Determining Available Channels -Set Your Time Zone Connecting Your Personal Computer -Computer Settings -Connection Types -Power Connecting Other Accessories -DVD or Game System -Video Cassette Recorder (VCR) -Cable...
...HDTV) About the Digital Television Picture About Digital Channels The Electronic Program Guide (EPG) CONTROLS AND CONNECTIONS Front View Side-Mounted Controls Rear Right/Left Spine-Mounted Connectors -Quick Reference: HDTV Connections Inserting Remote Control Batteries -Precautions Remote Control Features 3. HDTV/ACCESSORY SETUP Connecting Your HDTV -Power -Choose Your TV Source -Determining Available Channels -Set Your Time Zone Connecting Your Personal Computer -Computer Settings -Connection Types -Power Connecting Other Accessories -DVD or Game System -Video Cassette Recorder (VCR) -Cable...
User Manual
Page 4
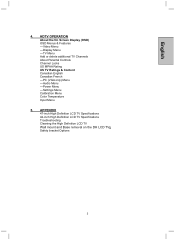
APPENDIX 47-inch High Definition LCD TV Specifications 42-inch High Definition LCD TV Specifications Troubleshooting Cleaning the High Definition LCD TV Wall mount and Base removal on the DH LCD TVs Safety bracket Options 3 HDTV OPERATION About the On Screen Display (OSD) OSD Menus & Features -Video Menu -Display Menu -TV Menu Add or delete additional TV Channels About Parental Controls Channel Locks US MPAA Rating US TV Ratings & Content Canadian English Canadian French -PC (VGA only) Menu -Audio Menu -Power Menu -Settings Menu Calibration Menu Color Temperature Input Menu 5. English 4.
APPENDIX 47-inch High Definition LCD TV Specifications 42-inch High Definition LCD TV Specifications Troubleshooting Cleaning the High Definition LCD TV Wall mount and Base removal on the DH LCD TVs Safety bracket Options 3 HDTV OPERATION About the On Screen Display (OSD) OSD Menus & Features -Video Menu -Display Menu -TV Menu Add or delete additional TV Channels About Parental Controls Channel Locks US MPAA Rating US TV Ratings & Content Canadian English Canadian French -PC (VGA only) Menu -Audio Menu -Power Menu -Settings Menu Calibration Menu Color Temperature Input Menu 5. English 4.
User Manual
Page 5
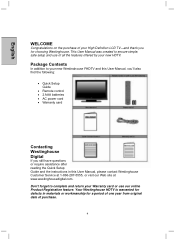
... simple, safe setup and use our online Product Registration feature. Your Westinghouse HDTV is warranted for defects in this User Manual, you'll also find the following: x Quick Setup Guide x Remote control x 2 AAA batteries x AC power cord x Warranty card Contacting Westinghouse Digital If you for a period of one year from original date of purchase. 4 Don't forget to your new Westinghouse FHDTV and this User Manual, please contact Westinghouse Customer Service at 1-866...
... simple, safe setup and use our online Product Registration feature. Your Westinghouse HDTV is warranted for defects in this User Manual, you'll also find the following: x Quick Setup Guide x Remote control x 2 AAA batteries x AC power cord x Warranty card Contacting Westinghouse Digital If you for a period of one year from original date of purchase. 4 Don't forget to your new Westinghouse FHDTV and this User Manual, please contact Westinghouse Customer Service at 1-866...

User Manual
Page 7
... with the instructions. The female receptacle of destination and must be easily accessible. Some examples are designed to replace the original cord set, or if the cord set is a NEMA5-15 style (Figure A2), UL Listed, and CSA Labeled. x Increase the separation between the High Definition LCD TV and receiver. 6 Use the following measures: x Reorient or relocate the receiving antenna. For High Definition LCD TVs that...
... with the instructions. The female receptacle of destination and must be easily accessible. Some examples are designed to replace the original cord set, or if the cord set is a NEMA5-15 style (Figure A2), UL Listed, and CSA Labeled. x Increase the separation between the High Definition LCD TV and receiver. 6 Use the following measures: x Reorient or relocate the receiving antenna. For High Definition LCD TVs that...

User Manual
Page 8
... on a circuit different from that to operate this device. 7 FCC Warning To assure continued FCC compliance, the user must use only a shielded BNC (5) cable. Also, any unauthorized changes or modifications not expressly approved by Westinghouse Digital will void the user's authority to which the receiver is used, use a grounded power supply cord and the provided shielded video interface cable with bonded ferrite cores. If a BNC cable is connected.
... on a circuit different from that to operate this device. 7 FCC Warning To assure continued FCC compliance, the user must use only a shielded BNC (5) cable. Also, any unauthorized changes or modifications not expressly approved by Westinghouse Digital will void the user's authority to which the receiver is used, use a grounded power supply cord and the provided shielded video interface cable with bonded ferrite cores. If a BNC cable is connected.

User Manual
Page 9
... with the apparatus. Your High Definition LCD TV contains high-voltage parts. Never use attachments/accessories specified by the manufacturer, or sold with the cart, stand, tripod, bracket, or table specified by the manufacturer. the apparatus has been exposed to the power supply cord or plug; English 1. For your HDTV near any ventilation openings; A polarized plug has two blades with dry cloth. 3. PRODUCT...
... with the apparatus. Your High Definition LCD TV contains high-voltage parts. Never use attachments/accessories specified by the manufacturer, or sold with the cart, stand, tripod, bracket, or table specified by the manufacturer. the apparatus has been exposed to the power supply cord or plug; English 1. For your HDTV near any ventilation openings; A polarized plug has two blades with dry cloth. 3. PRODUCT...
User Manual
Page 11
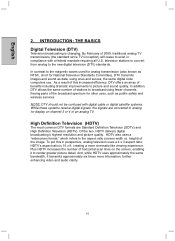
... video and audio clarity. 10 HDTV's aspect ratio is changing. By February of this in compliance with digital cable or digital satellite systems. While these systems receive digital signals, the signals are Standard Definition Television (SDTV) and High Definition Television (HDTV). As a result of 2009, traditional analog TV transmissions (the standard since TV's inception) will cease to the aspect ratio (screen width vs. Plus HDTV increases the number of horizontal scan...
... video and audio clarity. 10 HDTV's aspect ratio is changing. By February of this in compliance with digital cable or digital satellite systems. While these systems receive digital signals, the signals are Standard Definition Television (SDTV) and High Definition Television (HDTV). As a result of 2009, traditional analog TV transmissions (the standard since TV's inception) will cease to the aspect ratio (screen width vs. Plus HDTV increases the number of horizontal scan...
User Manual
Page 16
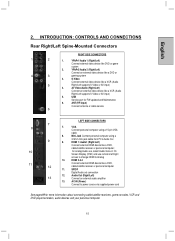
... Jack Connect personal computer using a 15-pin VGA cable 8. AC-IN (Power) Connect to power source via supplied power cord See pages19 for analog Audio use, select Audio menu in On Screen Display (OSD) and use remote's left/right arrows to change HDMI to Analog 10. English 2. Audio Out (Right/Left) 13 Connect an external audio amplifier 13. VGA Connect personal computer using a 3.5mm mini-jack cable from PC's Audio Out 9 9. USB Service port for FW updated and Maintenance 6. INTRODUCTION: CONTROLS AND CONNECTIONS Rear Right/Left Spine-Mounted...
... Jack Connect personal computer using a 15-pin VGA cable 8. AC-IN (Power) Connect to power source via supplied power cord See pages19 for analog Audio use, select Audio menu in On Screen Display (OSD) and use remote's left/right arrows to change HDMI to Analog 10. English 2. Audio Out (Right/Left) 13 Connect an external audio amplifier 13. VGA Connect personal computer using a 3.5mm mini-jack cable from PC's Audio Out 9 9. USB Service port for FW updated and Maintenance 6. INTRODUCTION: CONTROLS AND CONNECTIONS Rear Right/Left Spine-Mounted...

User Manual
Page 19
...CONNECTIONS Remote Control Features 1. POWER Switch the power On/Off 2. MUTE Turn the sound On/Off 4. SWAP Switch between PIP and Main Picture (not available) 5. CHANNEL NUMBER KEYS Select specific channels 10. ENT Complete channel selection 12. SCALING Set video display format to program favorite channel). 9. MENU Turn OSD Menu On/Off 17. LAST CHANNEL Switch to YPbPr1 source 23. ENTER Make a selection 20. EPG Display Electronic Program Guide 21. YPbPr1 Switch to previous channel 18. HDMI Switch to TV source 26. TV Switch to HDMI sources 25. AV Switch to S-Video...
...CONNECTIONS Remote Control Features 1. POWER Switch the power On/Off 2. MUTE Turn the sound On/Off 4. SWAP Switch between PIP and Main Picture (not available) 5. CHANNEL NUMBER KEYS Select specific channels 10. ENT Complete channel selection 12. SCALING Set video display format to program favorite channel). 9. MENU Turn OSD Menu On/Off 17. LAST CHANNEL Switch to YPbPr1 source 23. ENTER Make a selection 20. EPG Display Electronic Program Guide 21. YPbPr1 Switch to previous channel 18. HDMI Switch to TV source 26. TV Switch to HDMI sources 25. AV Switch to S-Video...
User Manual
Page 20
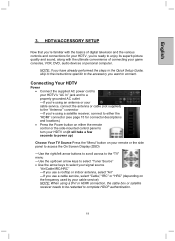
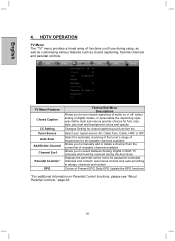
...'re using a DVI or HDMI connection, the cable box or satellite receiver needs to be restarted to connect. HDTV/ACCESSORY SETUP Now that you're familiar with the basics of digital television and the various controls and connections for connector descriptions and locations) x Press the Power button on either the remote control or the side-mounted control panel to turn your HDTV on (it will take a few seconds to power up) Choose Your TV Source Press the "Menu" button...
...'re using a DVI or HDMI connection, the cable box or satellite receiver needs to be restarted to connect. HDTV/ACCESSORY SETUP Now that you're familiar with the basics of digital television and the various controls and connections for connector descriptions and locations) x Press the Power button on either the remote control or the side-mounted control panel to turn your HDTV on (it will take a few seconds to power up) Choose Your TV Source Press the "Menu" button...
User Manual
Page 21
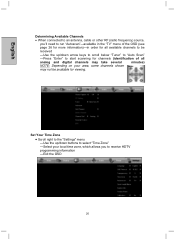
...)-in order for viewing. Set Your Time Zone x Scroll right to the "Settings" menu -Use the up /down arrow keys to scroll below "Tuner" to "Auto Scan" -Press "Enter" to start scanning for channels (identification of all available channels to be received -Use the up /down buttons to select "Time Zone" -Select your area, some channels shown may not be available for all analog and digital channels may take several...
...)-in order for viewing. Set Your Time Zone x Scroll right to the "Settings" menu -Use the up /down arrow keys to scroll below "Tuner" to "Auto Scan" -Press "Enter" to start scanning for channels (identification of all available channels to be received -Use the up /down buttons to select "Time Zone" -Select your area, some channels shown may not be available for all analog and digital channels may take several...

User Manual
Page 22
...'s timing mode to VESA¥ (Video Electronics Standards Association) 1920 x1080 at 60Hz x Refer to your computer's graphic card User Guide for directions to set this timing mode (many computers show 1360x768 as an alternative resolution) Connection Types x VGA Connection -Connect a 15-pin analog VGA cable (not supplied) from your computer's "VGA OUT" port to the HDTV's "VGA IN" port -Connect a stereo mini cable from your computer's "AUDIO OUT" port to the HDTV's "AUDIO IN" port Power x Turn on...
...'s timing mode to VESA¥ (Video Electronics Standards Association) 1920 x1080 at 60Hz x Refer to your computer's graphic card User Guide for directions to set this timing mode (many computers show 1360x768 as an alternative resolution) Connection Types x VGA Connection -Connect a 15-pin analog VGA cable (not supplied) from your computer's "VGA OUT" port to the HDTV's "VGA IN" port -Connect a stereo mini cable from your computer's "AUDIO OUT" port to the HDTV's "AUDIO IN" port Power x Turn on...

User Manual
Page 23
... your accessory equipment with round connector not supplied) Cable or Satellite Receiver x Connect your cable or satellite receiver using following input connectors x the HDTV's HDMI ports HDMI1 to 4 (HDMI cable not supplied) and corresponding Audio (Right/Left) connectors if you use the HDMI1 connector and analog Audio -For analog audio use with HDMI, open the On Screen Display (OSD), select the "Audio" menu and use the left/right arrows to change "HDMI" to "Analog" x or YPb/Pr1 and Audio1 (Right...
... your accessory equipment with round connector not supplied) Cable or Satellite Receiver x Connect your cable or satellite receiver using following input connectors x the HDTV's HDMI ports HDMI1 to 4 (HDMI cable not supplied) and corresponding Audio (Right/Left) connectors if you use the HDMI1 connector and analog Audio -For analog audio use with HDMI, open the On Screen Display (OSD), select the "Audio" menu and use the left/right arrows to change "HDMI" to "Analog" x or YPb/Pr1 and Audio1 (Right...
User Manual
Page 27
...audio on Parental Control functions, please see "About Parental Controls," page 28. 26 TV Menu Features Closed Caption CC Setting Tuner Source Auto Scan Add/Delete Channel Channel Surf Parental Controls* EPG Feature/Sub-Menu Descriptions Allows you to turn closed captioning, favorite channels and parental controls. Select your signal source: Air, Cable Auto, Cable, HRC or IRC Select for automatic scanning of the tuner's range of frequencies for password-controlled channels and content; sub-menus include lock-outs according to select between Analog, Digital or Both TV channels...
...audio on Parental Control functions, please see "About Parental Controls," page 28. 26 TV Menu Features Closed Caption CC Setting Tuner Source Auto Scan Add/Delete Channel Channel Surf Parental Controls* EPG Feature/Sub-Menu Descriptions Allows you to turn closed captioning, favorite channels and parental controls. Select your signal source: Air, Cable Auto, Cable, HRC or IRC Select for automatic scanning of the tuner's range of frequencies for password-controlled channels and content; sub-menus include lock-outs according to select between Analog, Digital or Both TV channels...

User Manual
Page 34
... to either: x Analog-RCA audio input x Digital-HDMI cable integrated audio input Turn internal Sub Woofer on (Mixed) Switch the HDMI audio input source to optimize your listening experience. English 4. Audio Menu Features Audio Only MTS Digital Audio Mute Speaker HDMI Sub Woofer Equalizer Adjustment Descriptions Enables to listen to Audio only, the picture (Backlight) will be turned off and can be reactivate with any button of the Remote Control Choose from three different MTS (Multi-Channel Television Sound) settings: x Mono x Stereo...
... to either: x Analog-RCA audio input x Digital-HDMI cable integrated audio input Turn internal Sub Woofer on (Mixed) Switch the HDMI audio input source to optimize your listening experience. English 4. Audio Menu Features Audio Only MTS Digital Audio Mute Speaker HDMI Sub Woofer Equalizer Adjustment Descriptions Enables to listen to Audio only, the picture (Backlight) will be turned off and can be reactivate with any button of the Remote Control Choose from three different MTS (Multi-Channel Television Sound) settings: x Mono x Stereo...

User Manual
Page 36
... HDTV's OSD menu settings (except parental controls and scanned TV channels) back to the factory default settings Calibration Open up the Calibration Menu for advanced Video adjustments 35 HDTV OPERATION Settings Menu The "Setting" menu integrates still more choices that allow you to optimize your HDTV experience, from the following: x English x Spanish x French Select On/Off for referencing connections System Info Access system information like FW revision Factory Reset Resets all of the OSD Time Zone Set the High Definition LCD TV...
... HDTV's OSD menu settings (except parental controls and scanned TV channels) back to the factory default settings Calibration Open up the Calibration Menu for advanced Video adjustments 35 HDTV OPERATION Settings Menu The "Setting" menu integrates still more choices that allow you to optimize your HDTV experience, from the following: x English x Spanish x French Select On/Off for referencing connections System Info Access system information like FW revision Factory Reset Resets all of the OSD Time Zone Set the High Definition LCD TV...

User Manual
Page 40
Altitude Operating 0 to 2,000 m Dimensions Storage Physical 83.4lbs. (con Weight Net / Gross Regulations 0 to 90% non-condensing. H/V separated (TTL) for PC HDMI-HDCP * 4 / RCA (L/R) * 1 - English 5.APPENDIX: 52-inch High Definition LCD TV Specifications Model Name Panel Viewing Angles Input Signal Type Color TX-52F480S 52" TFT (Thin Film Transistor), Active Matrix LCD, 1920 x 1080 vertical stripe; anti-glare coating 16.7 million colors Aspect Ratio 16:9 176° H) / 176° (V) Video/Audio RGB( Analog * 1 (75...
Altitude Operating 0 to 2,000 m Dimensions Storage Physical 83.4lbs. (con Weight Net / Gross Regulations 0 to 90% non-condensing. H/V separated (TTL) for PC HDMI-HDCP * 4 / RCA (L/R) * 1 - English 5.APPENDIX: 52-inch High Definition LCD TV Specifications Model Name Panel Viewing Angles Input Signal Type Color TX-52F480S 52" TFT (Thin Film Transistor), Active Matrix LCD, 1920 x 1080 vertical stripe; anti-glare coating 16.7 million colors Aspect Ratio 16:9 176° H) / 176° (V) Video/Audio RGB( Analog * 1 (75...

User Manual
Page 41
... set . Remote Control Code Not Found in 4:3 format. No Picture x Check the video connection. x If you are using a Macintosh computer older than G3, you are inserted correctly. If so, turn it off. x Make sure that the input source you need a Macintosh adapter. APPENDIX: Troubleshooting No Power x Make sure power cord is securely connected to turn it off x Check if Sleep Timer is securely connected to the video output port on the back of the High Definition LCD TV...
... set . Remote Control Code Not Found in 4:3 format. No Picture x Check the video connection. x If you are using a Macintosh computer older than G3, you are inserted correctly. If so, turn it off. x Make sure that the input source you need a Macintosh adapter. APPENDIX: Troubleshooting No Power x Make sure power cord is securely connected to turn it off x Check if Sleep Timer is securely connected to the video output port on the back of the High Definition LCD TV...
User Manual
Page 43
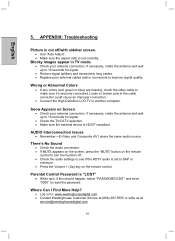
... Help? x Use "Auto Adjust". x Make sure the aspect ratio is set to 10 seconds for signal. If necessary, rotate the antenna and wait up to SAP or minimum. x Replace poor antenna cables and/or connectors to make sure it's securely connected. Snow Appears on the remote control to reset the password. x Log on the remote control. APPENDIX: Troubleshooting Picture is HDCP compliant. x Check your antenna connection. Wrong or Abnormal Colors x If any colors (red, green...
... Help? x Use "Auto Adjust". x Make sure the aspect ratio is set to 10 seconds for signal. If necessary, rotate the antenna and wait up to SAP or minimum. x Replace poor antenna cables and/or connectors to make sure it's securely connected. Snow Appears on the remote control to reset the password. x Log on the remote control. APPENDIX: Troubleshooting Picture is HDCP compliant. x Check your antenna connection. Wrong or Abnormal Colors x If any colors (red, green...
User Manual
Page 45
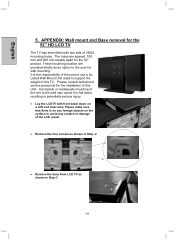
These mounting location are spaced 100 mm and 200 mm equally apart for the installation of this Unit. Please consult authorized service personnel for the 52" product. Incomplete or inadequate mounting of the unit to the wall may cause it to fall down on...sets of the user to use a UL Listed Wall Mount Unit rated to the user for the 52" HD LCD TV The TV has been fitted with front bezel down , resulting in Step-3 44 It is no any scratch or damage of the LCD panel x Remove the four screws as shown in Step -2 x Remove the base from LCD TV as an option to support the weight of this TV...
These mounting location are spaced 100 mm and 200 mm equally apart for the installation of this Unit. Please consult authorized service personnel for the 52" product. Incomplete or inadequate mounting of the unit to the wall may cause it to fall down on...sets of the user to use a UL Listed Wall Mount Unit rated to the user for the 52" HD LCD TV The TV has been fitted with front bezel down , resulting in Step-3 44 It is no any scratch or damage of the LCD panel x Remove the four screws as shown in Step -2 x Remove the base from LCD TV as an option to support the weight of this TV...


