
User Manual
Page 10
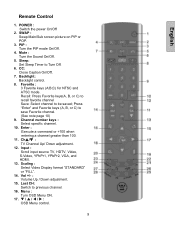
... Enter : Execute a command or +100 when entering a channel greater than 100. 11. Menu : Turn OSD Menu ON. 17. SWAP : Swap Main/Sub screen picture on PIP or POP. 3. Sleep: Set Sleep Timer to be saved; CC: Close Caption On/Off. 7. Backlight: Backlight control. 8. Recall: Press Favorite keys(A, B,..." and Favorite keys (A, B, or C) to previous channel. 16. Channel number keys : Select specific channel. 10. Input : Scroll input source TV, HDTV, Video, S-Video, YPbPr1, YPbPr2, VGA, and HDMI. 13. Scaling : Select Video Display format "STANDARD" or "FILL". 14. Ch▲/▼...
... Enter : Execute a command or +100 when entering a channel greater than 100. 11. Menu : Turn OSD Menu ON. 17. SWAP : Swap Main/Sub screen picture on PIP or POP. 3. Sleep: Set Sleep Timer to be saved; CC: Close Caption On/Off. 7. Backlight: Backlight control. 8. Recall: Press Favorite keys(A, B,..." and Favorite keys (A, B, or C) to previous channel. 16. Channel number keys : Select specific channel. 10. Input : Scroll input source TV, HDTV, Video, S-Video, YPbPr1, YPbPr2, VGA, and HDMI. 13. Scaling : Select Video Display format "STANDARD" or "FILL". 14. Ch▲/▼...
User Manual
Page 14
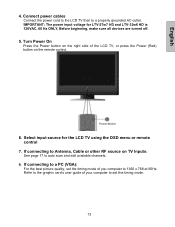
.... 8. English 4. Connect power cables Connect the power cord to the LCD TV then to a PC (VGA): For the best picture quality, set this timing mode. 13 If connecting to 1360 x 768 at 60Hz. IMPORTANT: The power input voltage for the LCD TV using the OSD menu or remote control 7. Turn Power On Press the... Power button on the right side of you computer to Antenna, Cable or other RF source on the remote control. 6. If connecting to a properly grounded AC outlet. Select input source for LTV-27w7 HD and LTV-32w6 HD ...
.... 8. English 4. Connect power cables Connect the power cord to the LCD TV then to a PC (VGA): For the best picture quality, set this timing mode. 13 If connecting to 1360 x 768 at 60Hz. IMPORTANT: The power input voltage for the LCD TV using the OSD menu or remote control 7. Turn Power On Press the... Power button on the right side of you computer to Antenna, Cable or other RF source on the remote control. 6. If connecting to a properly grounded AC outlet. Select input source for LTV-27w7 HD and LTV-32w6 HD ...
User Manual
Page 15
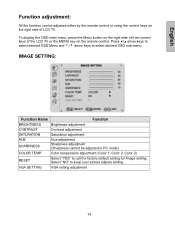
... 14 Select "NO" to select desired OSD sub-menu. Press ▼/▲ arrow keys to select desired OSD Menu and 3/4 arrow keys to keep your picture adjusts setting. English Function adjustment: All the function can be adjusted in PC mode) COLOR TEMP Color temperature adjustment (Color 1, Color 2, Color 3) RESET Select "YES... SHARPNESS Hue adjustment Sharpness adjustment (Sharpness cannot be adjusted either by the remote control or using the control keys on the right side of the LCD TV or the MENU key on the right side of front control keys of...
... 14 Select "NO" to select desired OSD sub-menu. Press ▼/▲ arrow keys to select desired OSD Menu and 3/4 arrow keys to keep your picture adjusts setting. English Function adjustment: All the function can be adjusted in PC mode) COLOR TEMP Color temperature adjustment (Color 1, Color 2, Color 3) RESET Select "YES... SHARPNESS Hue adjustment Sharpness adjustment (Sharpness cannot be adjusted either by the remote control or using the control keys on the right side of the LCD TV or the MENU key on the right side of front control keys of...

