

User Manual
Page 3
... 4 IMPORTANT SAFETY INSTRUCTIONS 5 Circuit Overload 6 Power Cord Protection 6 Ventilation 6 WARNINGS AND PRECAUTIONS 7 ANTENNA INSTALLATION SAFETY 8 Lightning 8 Power lines 8 CLEANING THE LED TV 9 Dolby-Digital Notice 9 SRS Trademark Information 9 PACKAGE CONTENTS 10 CONTROL PANEL 11 TERMINALS 12 REMOTE CONTROL 13 REMOTE CONTROL OPERATION 14 INSTALLING THE REMOTE CONTROL BATTERIES .. 14 REMOTE CONTROL TRANSMISSION RANGE .......... 14 LED TV BASE 15 INSTALLING THE LED TV BASE 15 REMOVING THE LED TV BASE 16 ANTENNA CONNECTION 17 OUTDOOR ANTENNA CONNECTION 17 CABLE TV (CTV...
... 4 IMPORTANT SAFETY INSTRUCTIONS 5 Circuit Overload 6 Power Cord Protection 6 Ventilation 6 WARNINGS AND PRECAUTIONS 7 ANTENNA INSTALLATION SAFETY 8 Lightning 8 Power lines 8 CLEANING THE LED TV 9 Dolby-Digital Notice 9 SRS Trademark Information 9 PACKAGE CONTENTS 10 CONTROL PANEL 11 TERMINALS 12 REMOTE CONTROL 13 REMOTE CONTROL OPERATION 14 INSTALLING THE REMOTE CONTROL BATTERIES .. 14 REMOTE CONTROL TRANSMISSION RANGE .......... 14 LED TV BASE 15 INSTALLING THE LED TV BASE 15 REMOVING THE LED TV BASE 16 ANTENNA CONNECTION 17 OUTDOOR ANTENNA CONNECTION 17 CABLE TV (CTV...
User Manual
Page 4
THROUGH CABLE/ SATELLITE BOX 22 WESTINGHOUSE HDTV SETUP - English TABLE OF CONTENTS CONNECTING AC POWER 20 INITIAL SETUP 20 WESTINGHOUSE HDTV SETUP 21 WESTINGHOUSE HDTV SETUP - NOT THROUGH CABLE/ SATELLITE BOX 25 BASIC OPERATIONS 28 TURNING THE POWER ON AND OFF 28 ADJUSTING THE VOLUME 28 CHANGING CHANNELS 29 SELECTING THE INPUT SOURCE 29 ADJUSTING THE DISPLAY FORMAT 30 ADJUSTING THE LED BACKLIGHT 30 SETUP MENUS 31 SETUP MENU OPERATION 31 PICTURE 32 AUDIO 36 VIEW MODE 40 VIEW MODE (VGA 40 TV PROGRAM 42 SETTINGS 46 WALL MOUNT OPTION 57 WALL MOUNT INSTALLATION REMINDERS...
THROUGH CABLE/ SATELLITE BOX 22 WESTINGHOUSE HDTV SETUP - English TABLE OF CONTENTS CONNECTING AC POWER 20 INITIAL SETUP 20 WESTINGHOUSE HDTV SETUP 21 WESTINGHOUSE HDTV SETUP - NOT THROUGH CABLE/ SATELLITE BOX 25 BASIC OPERATIONS 28 TURNING THE POWER ON AND OFF 28 ADJUSTING THE VOLUME 28 CHANGING CHANNELS 29 SELECTING THE INPUT SOURCE 29 ADJUSTING THE DISPLAY FORMAT 30 ADJUSTING THE LED BACKLIGHT 30 SETUP MENUS 31 SETUP MENU OPERATION 31 PICTURE 32 AUDIO 36 VIEW MODE 40 VIEW MODE (VGA 40 TV PROGRAM 42 SETTINGS 46 WALL MOUNT OPTION 57 WALL MOUNT INSTALLATION REMINDERS...

User Manual
Page 6
... original power supply. Always use the appropriate AC cord that may be connected to related operating and maintenance instructions in accordance with arrowhead inside an equilateral triangle symbol is certified for your specific country. CSA • Japan - The lightning flash with the installation instructions. There are listed below: • USA - UL • Canada - Refer all servicing requirements to qualified service personnel. • The plug should...
... original power supply. Always use the appropriate AC cord that may be connected to related operating and maintenance instructions in accordance with arrowhead inside an equilateral triangle symbol is certified for your specific country. CSA • Japan - The lightning flash with the installation instructions. There are listed below: • USA - UL • Canada - Refer all servicing requirements to qualified service personnel. • The plug should...
User Manual
Page 12
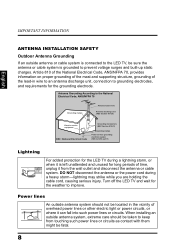
... should not be located in wire Antenna discharge unit (NEC Section 810-20) Electric service equipment NEC: National Electrical Code Grounding Conductors (NEC Section 810-21) Grounding clamps Power service grounding electrode system (NEC Art 250 part H) Lightning Z Z Z For added protection for the LED TV during a heavy storm-lightning may strike while you are holding the cable cord, causing serious...
... should not be located in wire Antenna discharge unit (NEC Section 810-20) Electric service equipment NEC: National Electrical Code Grounding Conductors (NEC Section 810-21) Grounding clamps Power service grounding electrode system (NEC Art 250 part H) Lightning Z Z Z For added protection for the LED TV during a heavy storm-lightning may strike while you are holding the cable cord, causing serious...
User Manual
Page 18
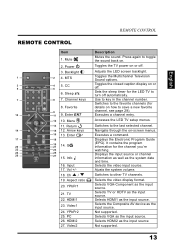
... closed caption display on or off. Selects the video display format. Selects HDMI1 as the input source Not supported. 13 Not supported. Power 3. CC C.C. Favorite 9 10 11 9. Vol +/- 18. PC 26. Adjusts the LED screen backlight. Sets the sleep timer for the LED TV to key in the channel number. Selects the video input source. Selects HDMI2 as the input source. Channel keys C ENT D 8. Return 14 15 12. Ch / 19. TV 22. Selects VGA as the input source. REMOTE CONTROL...
... closed caption display on or off. Selects the video display format. Selects HDMI1 as the input source Not supported. 13 Not supported. Power 3. CC C.C. Favorite 9 10 11 9. Vol +/- 18. PC 26. Adjusts the LED screen backlight. Sets the sleep timer for the LED TV to key in the channel number. Selects the video input source. Selects HDMI2 as the input source. Channel keys C ENT D 8. Return 14 15 12. Ch / 19. TV 22. Selects VGA as the input source. REMOTE CONTROL...

User Manual
Page 22
... channels. Since the signals of these channels is unknown, consult your cable TV company.) For more specific instructions on the rear I/O panel for normal viewing of these channels are used . If a channel is used , it may cause damage to the LED TV (e.g. ANTENNA CONNECTION English ANTENNA CONNECTION OUTDOOR ANTENNA CONNECTION Cable TV lead in VHF, UHF or VHF/UHF combination antenna 75 ohm coaxial cable (round) 300-75 ohm ADAPTER 300 ohm twin-lead (flat...
... channels. Since the signals of these channels is unknown, consult your cable TV company.) For more specific instructions on the rear I/O panel for normal viewing of these channels are used . If a channel is used , it may cause damage to the LED TV (e.g. ANTENNA CONNECTION English ANTENNA CONNECTION OUTDOOR ANTENNA CONNECTION Cable TV lead in VHF, UHF or VHF/UHF combination antenna 75 ohm coaxial cable (round) 300-75 ohm ADAPTER 300 ohm twin-lead (flat...
User Manual
Page 23
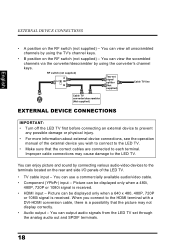
... audio/video cable. • Component (YPbPr) input - Improper cable connections may not display correctly. • Audio output - Picture can view the scrambled channels via the converter/descrambler by using the TV's channel keys. • B position on the RF switch (not supplied) - You can view all unscrambled channels by connecting various audio-video devices to the terminals located on the RF switch (not supplied) - You can enjoy picture and sound by using the converter's channel keys. You can output audio signals from the LED...
... audio/video cable. • Component (YPbPr) input - Improper cable connections may not display correctly. • Audio output - Picture can view the scrambled channels via the converter/descrambler by using the TV's channel keys. • B position on the RF switch (not supplied) - You can view all unscrambled channels by connecting various audio-video devices to the terminals located on the RF switch (not supplied) - You can enjoy picture and sound by using the converter's channel keys. You can output audio signals from the LED...

User Manual
Page 25
... SETUP Press on the control panel or on the remote control to turn on how to a proper AC outlet. Turn off all connected devices before plugging the AC adapter into the power outlet. Select the desired language and select Yes to be powered via an AC adapter. MENU VOL CH INPUT 20 C.C. POWER CONNECTION POWER CONNECTION CONNECTING AC POWER IMPORTANT: The LED TV is designed to use the SetupWizard. Connect the power cord of the AC adapter...
... SETUP Press on the control panel or on the remote control to turn on how to a proper AC outlet. Turn off all connected devices before plugging the AC adapter into the power outlet. Select the desired language and select Yes to be powered via an AC adapter. MENU VOL CH INPUT 20 C.C. POWER CONNECTION POWER CONNECTION CONNECTING AC POWER IMPORTANT: The LED TV is designed to use the SetupWizard. Connect the power cord of the AC adapter...
User Manual
Page 26
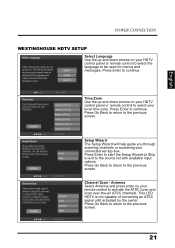
... and down arrows on your HDTV control panel or remote control to select your local time zone. Channel Scan - Antenna Select Antenna and press enter on your connected set-top-box. Press Enter to activate the ATSC tuner and scan over-the-air ATSC channels. Press Go Back to return to the previous screen. Setup Wizard The Setup Wizard will help guide you through scanning channels or accessing your HDTV control panel or remote control to select the language...
... and down arrows on your HDTV control panel or remote control to select your local time zone. Channel Scan - Antenna Select Antenna and press enter on your connected set-top-box. Press Enter to activate the ATSC tuner and scan over-the-air ATSC channels. Press Go Back to return to the previous screen. Setup Wizard The Setup Wizard will help guide you through scanning channels or accessing your HDTV control panel or remote control to select the language...

User Manual
Page 28
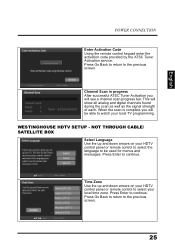
... HDTV control panel or remote control to select your connected set-top-box. Press Go Back to return to activate the ATSC tuner and scan cable/satellite ATSC channels. Channel Scan - Press Go Back to return to the previous screen. Press Go Back to return to the previous screen. English POWER CONNECTION Time Zone Use the up and down arrows on your remote control to the previous screen. 23 Setup Wizard The Setup Wizard will help guide...
... HDTV control panel or remote control to select your connected set-top-box. Press Go Back to return to activate the ATSC tuner and scan cable/satellite ATSC channels. Channel Scan - Press Go Back to return to the previous screen. Press Go Back to return to the previous screen. English POWER CONNECTION Time Zone Use the up and down arrows on your remote control to the previous screen. 23 Setup Wizard The Setup Wizard will help guide...
User Manual
Page 30
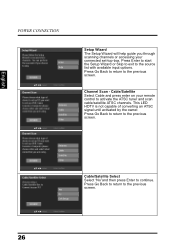
... to the previous screen. When the scan is complete you will show all analog and digital channels found during the scan as well as the signal strength of each. Time Zone Use the up and down arrows on your HDTV control panel or remote control to select the language to be able to select your local TV programming. Press Enter to continue. WESTINGHOUSE HDTV SETUP - Press Enter to...
... to the previous screen. When the scan is complete you will show all analog and digital channels found during the scan as well as the signal strength of each. Time Zone Use the up and down arrows on your HDTV control panel or remote control to select the language to be able to select your local TV programming. Press Enter to continue. WESTINGHOUSE HDTV SETUP - Press Enter to...
User Manual
Page 31
... screen. 26 Cable/Satellite Select Select "No"and then press Enter to the previous screen. This LED HDTV is not capable of converting an ATSC signal until activated by the owner. English POWER CONNECTION Setup Wizard The Setup Wizard will help guide you through scanning channels or accessing your remote control to the previous screen. Press Enter to start the Setup Wizard or Skip to exit to the source list with available input...
... screen. 26 Cable/Satellite Select Select "No"and then press Enter to the previous screen. This LED HDTV is not capable of converting an ATSC signal until activated by the owner. English POWER CONNECTION Setup Wizard The Setup Wizard will help guide you through scanning channels or accessing your remote control to the previous screen. Press Enter to start the Setup Wizard or Skip to exit to the source list with available input...

User Manual
Page 33
... Input Vol Ch YPbPr1 HDMI1 Video1 TV Mute Press to turn off the sound. The LED behavior will depend on the screen. Turns from none to red. Volume C.C. English BASIC OPERATIONS BASIC OPERATIONS TURNING THE POWER ON AND OFF Turning on the power Press on the control panel or on the remote control to turn on the sound. 28 Turn the power on the LED TV. Press again to none. Turn the power off . MENU VOL LED...
... Input Vol Ch YPbPr1 HDMI1 Video1 TV Mute Press to turn off the sound. The LED behavior will depend on the screen. Turns from none to red. Volume C.C. English BASIC OPERATIONS BASIC OPERATIONS TURNING THE POWER ON AND OFF Turning on the power Press on the control panel or on the remote control to turn on the sound. 28 Turn the power on the LED TV. Press again to none. Turn the power off . MENU VOL LED...

User Manual
Page 34
... channel to for 3 seconds. 3 The Channel Saved message appears to select the video input source. ZZZ MTS Favorite A B C ENT D Selecting favorite channels To select a favorite channel, press the Favorite button (A, B, C, or D) corresponding to change channels. Using the Ch / Buttons Input Vol Ch YPbPr1 HDMI1 Video1 TV Browse channels To browse through the available channels, press Ch / on the remote control or on the control panel. BASIC OPERATIONS English CHANGING CHANNELS Follow the instructions...
... channel to for 3 seconds. 3 The Channel Saved message appears to select the video input source. ZZZ MTS Favorite A B C ENT D Selecting favorite channels To select a favorite channel, press the Favorite button (A, B, C, or D) corresponding to change channels. Using the Ch / Buttons Input Vol Ch YPbPr1 HDMI1 Video1 TV Browse channels To browse through the available channels, press Ch / on the remote control or on the control panel. BASIC OPERATIONS English CHANGING CHANNELS Follow the instructions...

User Manual
Page 36
then INPUT Channel +/- Navigating the setup menu screen Use the buttons on the remote control or on the control panel to the previous screen. Applies the selected menu setting. then INPUT MENU INPUT 31 English SETUP MENUS SETUP MENUS SETUP MENU OPERATION Use the setup menus to navigate through the menu screens. Displaying the setup menu screen Press on the remote control or MENU on the control panel to configure the various operational settings of the LED TV. MENU VOL Enter CH INPUT Action Remote Control Displays or closes the menu bar. • Select and display...
then INPUT Channel +/- Navigating the setup menu screen Use the buttons on the remote control or on the control panel to the previous screen. Applies the selected menu setting. then INPUT MENU INPUT 31 English SETUP MENUS SETUP MENUS SETUP MENU OPERATION Use the setup menus to navigate through the menu screens. Displaying the setup menu screen Press on the remote control or MENU on the control panel to configure the various operational settings of the LED TV. MENU VOL Enter CH INPUT Action Remote Control Displays or closes the menu bar. • Select and display...

User Manual
Page 49
... and press . Auto Search automatically creates a list of receivable channels for superior TV viewing experience. • SAP: Allows second audio program from the speakers while watching a scene in the original program. Two options are available: • Cable: Choose this setting if you are receiving TV channels with a CATV (cable TV). • AIR: Choose this setting if you are available: • Mono: Allows mono output (useful when stereo...
... and press . Auto Search automatically creates a list of receivable channels for superior TV viewing experience. • SAP: Allows second audio program from the speakers while watching a scene in the original program. Two options are available: • Cable: Choose this setting if you are receiving TV channels with a CATV (cable TV). • AIR: Choose this setting if you are available: • Mono: Allows mono output (useful when stereo...

User Manual
Page 53
... Flashing. By default, only the Rating and Change Password submenu are displayed. English SETUP MENUS • Font: Can be set to As Broadcaster, Style 1, Style 2, Style 3, Style 4, Style 5, Style 6, or Style 7. • Size: Can be set to As Broadcaster, Small, Medium, or Large. • Font Color: Can be set to As Broadcaster, Black, White, Green, Blue, Red, Cyan, Yellow, or Magenta. • Background Color: Can be set...
... Flashing. By default, only the Rating and Change Password submenu are displayed. English SETUP MENUS • Font: Can be set to As Broadcaster, Style 1, Style 2, Style 3, Style 4, Style 5, Style 6, or Style 7. • Size: Can be set to As Broadcaster, Small, Medium, or Large. • Font Color: Can be set to As Broadcaster, Black, White, Green, Blue, Red, Cyan, Yellow, or Magenta. • Background Color: Can be set...

User Manual
Page 63
... sleep timer is turned off . TROUBLESHOOTING TROUBLESHOOTING English Problem No power Power is suddenly turned off . Replace batteries with new ones. • Purchase a separate learning remote control. • Go to www.wde.com for a list of remote codes. • Make sure the video input cable is properly connected to the AC-in another electrical device to the power outlet to display a computer screen, the PC input mode must be enabled. • Verify that the antenna...
... sleep timer is turned off . TROUBLESHOOTING TROUBLESHOOTING English Problem No power Power is suddenly turned off . Replace batteries with new ones. • Purchase a separate learning remote control. • Go to www.wde.com for a list of remote codes. • Make sure the video input cable is properly connected to the AC-in another electrical device to the power outlet to display a computer screen, the PC input mode must be enabled. • Verify that the antenna...

User Manual
Page 64
... TV mode (cutoff • Replace poor antenna cables and/or picture, snowy connectors to the LED TV's VGA port. Adjust the display settings. If necessary, rotate the antenna and wait up to adjust the Aspect ratio. • Check your antenna connection. in Picture menu. • Connect the TV to another computer and check if the problem is with the LED TV. • Wrong, abnormal or missing colors • If any colors (red, green...
... TV mode (cutoff • Replace poor antenna cables and/or picture, snowy connectors to the LED TV's VGA port. Adjust the display settings. If necessary, rotate the antenna and wait up to adjust the Aspect ratio. • Check your antenna connection. in Picture menu. • Connect the TV to another computer and check if the problem is with the LED TV. • Wrong, abnormal or missing colors • If any colors (red, green...
User Manual
Page 65
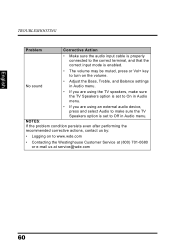
English TROUBLESHOOTING Problem Corrective Action • Make sure the audio input cable is properly connected to the correct terminal, and that the correct input mode is set to On in Audio menu. • If you are using an external audio device, press and select Audio to make sure the TV Speakers option is enabled. • The volume may be muted, press or Vol+ key to turn on to Off...
English TROUBLESHOOTING Problem Corrective Action • Make sure the audio input cable is properly connected to the correct terminal, and that the correct input mode is set to On in Audio menu. • If you are using an external audio device, press and select Audio to make sure the TV Speakers option is enabled. • The volume may be muted, press or Vol+ key to turn on to Off...


