
Product Specifications
Page 1
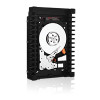
...disk media ensuring significantly less wear to 600 GB, double the capacity of the world. WD VelociRaptor® SATA Hard Drives WD VelociRaptor hard drives deliver maximum speed and reliability for performance enthusiast systems, workstations, and low-end servers. With a superbly engineered ...combination of WD VelociRaptor is enclosed in a backplane-ready 3.5-inch enterprise-class mounting frame with a built-in...
...disk media ensuring significantly less wear to 600 GB, double the capacity of the world. WD VelociRaptor® SATA Hard Drives WD VelociRaptor hard drives deliver maximum speed and reliability for performance enthusiast systems, workstations, and low-end servers. With a superbly engineered ...combination of WD VelociRaptor is enclosed in a backplane-ready 3.5-inch enterprise-class mounting frame with a built-in...

Product Specifications
Page 2
WD VelociRaptor Specifications1 Model number Interface Formatted capacity User sectors per drive Native command queuing SATA latching connector Actuator latch/auto park Form factor RoHS compliant2 Performance Data transfer rate (max) Buffer to host Host to/from drive (sustained) Cache (MB) Rotational speed (RPM) Average drive ready time (sec) Reliability/Data Integrity Load/unload cycles3...
WD VelociRaptor Specifications1 Model number Interface Formatted capacity User sectors per drive Native command queuing SATA latching connector Actuator latch/auto park Form factor RoHS compliant2 Performance Data transfer rate (max) Buffer to host Host to/from drive (sustained) Cache (MB) Rotational speed (RPM) Average drive ready time (sec) Reliability/Data Integrity Load/unload cycles3...

Product Overview
Page 1
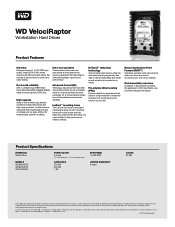
Ultra fast Rock-solid reliability High capacity WD VelociRaptor drives offer an unmatched combination of high-performance storage for workstations, high-end video and photo editing, low-end servers and performance enthusiasts' systems. WD VelociRaptor® Workstation Hard Drives 1 TB of high performance and high reliability, perfect for power users.
Ultra fast Rock-solid reliability High capacity WD VelociRaptor drives offer an unmatched combination of high-performance storage for workstations, high-end video and photo editing, low-end servers and performance enthusiasts' systems. WD VelociRaptor® Workstation Hard Drives 1 TB of high performance and high reliability, perfect for power users.
Product Overview
Page 2
... Specifications Interface SATA 6 Gb/s Models WD2500HHTZ WD5000HHTZ WD1000DHTZ Form factor 3.5-inch (2.5-inch hard drive in a 3.5-inch mounting frame) Capacities 250 GB 500 GB 1 TB Spin speed 10,000 RPM Limited Warranty 5 years Cache 64 MB Western Digital, WD, the WD logo, WD VelociRaptor, and Put Your Life On It are used in the U.S. Warranty may...
... Specifications Interface SATA 6 Gb/s Models WD2500HHTZ WD5000HHTZ WD1000DHTZ Form factor 3.5-inch (2.5-inch hard drive in a 3.5-inch mounting frame) Capacities 250 GB 500 GB 1 TB Spin speed 10,000 RPM Limited Warranty 5 years Cache 64 MB Western Digital, WD, the WD logo, WD VelociRaptor, and Put Your Life On It are used in the U.S. Warranty may...
User Manual
Page 3
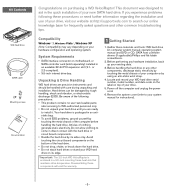
...® 7, Windows Vista®, Windows XP Note: Compatibility may vary depending on purchasing a WD VelociRaptor! Avoid touching the circuit board components on its sides only. Hard drives can be handled with the hard drive or circuit board components. • Handle the hard drive by rough handling, shock and vibration, or electrostatic discharge (ESD). Locate and record your...
...® 7, Windows Vista®, Windows XP Note: Compatibility may vary depending on purchasing a WD VelociRaptor! Avoid touching the circuit board components on its sides only. Hard drives can be handled with the hard drive or circuit board components. • Handle the hard drive by rough handling, shock and vibration, or electrostatic discharge (ESD). Locate and record your...

User Manual
Page 4
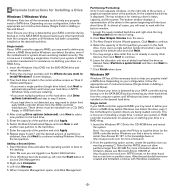
... device plug interface connector SATA power receptacle connector SATA receptacle interface connector SATA cable connection Motherboard SATA cable 2 Install the Hard Drive 1. Slide the hard drive into an available 3.5-inch drive bay and secure the drive with the four mounting screws (two on the computer. 6. Reconnect the power cord and power on each side). For further...
... device plug interface connector SATA power receptacle connector SATA receptacle interface connector SATA cable connection Motherboard SATA cable 2 Install the Hard Drive 1. Slide the hard drive into an available 3.5-inch drive bay and secure the drive with the four mounting screws (two on the computer. 6. Reconnect the power cord and power on each side). For further...
User Manual
Page 5
...system beginning with Windows installation. -3- Select Perform a quick format and then click Next to continue. 4. Depending on this hard drive. NTFS format, on the desired hard drive. Follow the onscreen prompts until Windows has been completely installed on the other devices, then click Next to continue. 6. ...the partitioning option screen, create the partition size you want to work with the bottom window. 1. Depending on defining your hard drive in the knowledge base at http://support.wdc.com for more information about this limitation, please see Microsoft Article 184006 at ...
...system beginning with Windows installation. -3- Select Perform a quick format and then click Next to continue. 4. Depending on this hard drive. NTFS format, on the desired hard drive. Follow the onscreen prompts until Windows has been completely installed on the other devices, then click Next to continue. 6. ...the partitioning option screen, create the partition size you want to work with the bottom window. 1. Depending on defining your hard drive in the knowledge base at http://support.wdc.com for more information about this limitation, please see Microsoft Article 184006 at ...

User Manual
Page 6
... Next. Choose Initialize from the menu. 3. Make sure the drive is CD 0, the second CD 1, etc.) b. Leave this process following the steps below: a. Click on the installed hard drives is not in the system beginning with the boot drive (drive 0). Note: Be sure you wish, then click Next to continue.... 6. Right-click on the right side of the screen, a graphical representation of the drives in use this wizard to write a...
... Next. Choose Initialize from the menu. 3. Make sure the drive is CD 0, the second CD 1, etc.) b. Leave this process following the steps below: a. Click on the installed hard drives is not in the system beginning with the boot drive (drive 0). Note: Be sure you wish, then click Next to continue.... 6. Right-click on the right side of the screen, a graphical representation of the drives in use this wizard to write a...


