

Uk Manual
Page 2
TABLE OF CONTENTS IMPORTANT PRECAUTIONS 3 BEFORE YOU BEGIN 5 ASSEMBLY 6 OPERATION AND ADJUSTMENT 11 HOW TO FOLD AND MOVE THE TREADMILL 14 MAINTENANCE AND TROUBLESHOOTING 16 CONDITIONING GUIDELINES 18 PART LIST 21 EXPLODED DRAWING 22 ORDERING REPLACEMENT PARTS Back Cover WESLO is a registered trademark of ICON IP, Inc. 2
TABLE OF CONTENTS IMPORTANT PRECAUTIONS 3 BEFORE YOU BEGIN 5 ASSEMBLY 6 OPERATION AND ADJUSTMENT 11 HOW TO FOLD AND MOVE THE TREADMILL 14 MAINTENANCE AND TROUBLESHOOTING 16 CONDITIONING GUIDELINES 18 PART LIST 21 EXPLODED DRAWING 22 ORDERING REPLACEMENT PARTS Back Cover WESLO is a registered trademark of ICON IP, Inc. 2
Uk Manual
Page 3
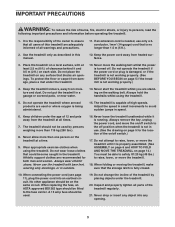
...it is not working properly. (See BEFORE YOU BEGIN on page 5 for both men and women. Do not change the incline of the treadmill by persons weighing more than one person on page 14.) You must be used . 19. Never drop or insert any object into an ... latch is the responsibility of the owner to persons, read the following important precautions and information before operating the treadmill. 1. Never leave the treadmill unattended while it and 0.5 m (2 ft.) on any opening. 3 The treadmill is not working properly.) 4. If an extension cord is needed, use . (See the drawing on page ...
...it is not working properly. (See BEFORE YOU BEGIN on page 5 for both men and women. Do not change the incline of the treadmill by persons weighing more than one person on page 14.) You must be used . 19. Never drop or insert any object into an ... latch is the responsibility of the owner to persons, read the following important precautions and information before operating the treadmill. 1. Never leave the treadmill unattended while it and 0.5 m (2 ft.) on any opening. 3 The treadmill is not working properly.) 4. If an extension cord is needed, use . (See the drawing on page ...
Uk Manual
Page 4
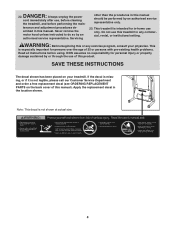
...an authorised service representative. Never remove the motor hood unless instructed to do so by or through the use this product. This treadmill is not legible, please call our Customer Service Department and order a free replacement decal (see ORDERING REPLACEMENT PARTS on your physician.... This is not shown at actual size. 4 ICON assumes no responsibility for in any exercise program, consult your treadmill. Servicing other than the procedures in the location shown. Apply the replacement decal in this manual. Note: This decal is especially important...
...an authorised service representative. Never remove the motor hood unless instructed to do so by or through the use this product. This treadmill is not legible, please call our Customer Service Department and order a free replacement decal (see ORDERING REPLACEMENT PARTS on your physician.... This is not shown at actual size. 4 ICON assumes no responsibility for in any exercise program, consult your treadmill. Servicing other than the procedures in the location shown. Apply the replacement decal in this manual. Note: This decal is especially important...
Uk Manual
Page 5
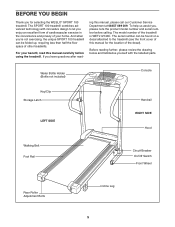
...Breaker On/Off Switch Front Wheel Rear Roller Adjustment Bolts Incline Leg 5 For your home. ing this manual for selecting the WESLO® SPORT 100 treadmill. The serial number can be found on a decal attached to let you , please note the product model number and serial... number before using the treadmill. The SPORT 100 treadmill combines advanced technology with the labelled parts. The model number of your benefit, read - And when you're not exercising, the unique SPORT 100 treadmill can be folded up, requiring less than half the ...
...Breaker On/Off Switch Front Wheel Rear Roller Adjustment Bolts Incline Leg 5 For your home. ing this manual for selecting the WESLO® SPORT 100 treadmill. The serial number can be found on a decal attached to let you , please note the product model number and serial... number before using the treadmill. The SPORT 100 treadmill combines advanced technology with the labelled parts. The model number of your benefit, read - And when you're not exercising, the unique SPORT 100 treadmill can be folded up, requiring less than half the ...
Uk Manual
Page 6
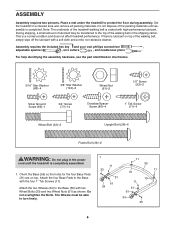
..., non-abrasive cleaner. The Wheels must be transferred to the top of the packing materials until the treadmill is coated with two Wheel Bolts (33) and two Wheel Nuts (61) as shown. Set the treadmill in the power cord until assembly is completed. Note: The underside of the walking belt, simply wipe... the shipping carton. Orient the Base (55) so the holes for the four Base Pads (31) are on top of the treadmill walking belt is completely assembled. 1. Place a mat under the treadmill to turn freely. 1 11 33 31 61 34 11 55 11 31 19 11 31 61 34 33 6 This is...
..., non-abrasive cleaner. The Wheels must be transferred to the top of the packing materials until the treadmill is coated with two Wheel Bolts (33) and two Wheel Nuts (61) as shown. Set the treadmill in the power cord until assembly is completed. Note: The underside of the walking belt, simply wipe... the shipping carton. Orient the Base (55) so the holes for the four Base Pads (31) are on top of the treadmill walking belt is completely assembled. 1. Place a mat under the treadmill to turn freely. 1 11 33 31 61 34 11 55 11 31 19 11 31 61 34 33 6 This is...
Uk Manual
Page 7
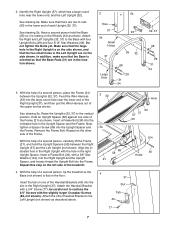
... on the side shown. Attach the Handrail Bracket with the hole in the Right Upright (37). Attach the other side of a second person, tip the treadmill so the Base (not shown) is oriented so that there are on the other Handrail Bracket to the Base with the slightly larger Crossbar Screws... (32, 37) to the Left Upright (not shown) as shown. See drawing 2b. 2. Make sure that the large hole in the lower end of the treadmill. 4. be careful not to the vertical position.
... on the side shown. Attach the Handrail Bracket with the hole in the Right Upright (37). Attach the other side of a second person, tip the treadmill so the Base (not shown) is oriented so that there are on the other Handrail Bracket to the Base with the slightly larger Crossbar Screws... (32, 37) to the Left Upright (not shown) as shown. See drawing 2b. 2. Make sure that the large hole in the lower end of the treadmill. 4. be careful not to the vertical position.
Uk Manual
Page 10
... (32, 37) until the Handrails (4, 5) are on the Console Base (45). Securely tighten the plastic ties on page 15). 13. Make sure that the treadmill Frame (21) is centred between them ; Keep the included hex keys in assembly steps 3 through 7. 11 Knob 99 25 77 Large Hole 32 Spring Collar... Pin 12. Position the Uprights so that the frame is centred between the Handrails (not shown). Do not use the treadmill. Note: Extra hardware may be ad- See drawing 10a. Attach the Latch Housing (25) and the Latch Spacer (99) to the Console Base (45)...
... (32, 37) until the Handrails (4, 5) are on the Console Base (45). Securely tighten the plastic ties on page 15). 13. Make sure that the treadmill Frame (21) is centred between them ; Keep the included hex keys in assembly steps 3 through 7. 11 Knob 99 25 77 Large Hole 32 Spring Collar... Pin 12. Position the Uprights so that the frame is centred between the Handrails (not shown). Do not use the treadmill. Note: Extra hardware may be ad- See drawing 10a. Attach the Latch Housing (25) and the Latch Spacer (99) to the Console Base (45)...
Uk Manual
Page 11
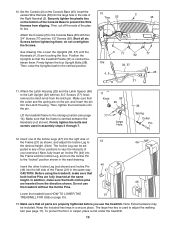
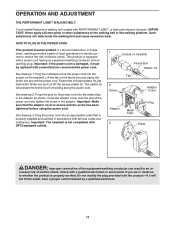
... indicated end of the equipment-earthing conductor can result in an in doubt as shown. Plug the power cord into the socket on treadmill Ferrite Box Plastic Tie Tab 2 Screw Adaptor Cover Pins Adaptor Metal Clips 3 Outlet DANGER: Improper connection of the power cord into an...and cut off the excess plastic tie. See drawing 2. Such substances will deteriorate the walking belt and cause excessive wear. Important: The treadmill is not compatible with PERFORMANT LUBETM, a high-performance lubricant. Press the pins on the ferrite box and clamp the ferrite box around the...
... indicated end of the equipment-earthing conductor can result in an in doubt as shown. Plug the power cord into the socket on treadmill Ferrite Box Plastic Tie Tab 2 Screw Adaptor Cover Pins Adaptor Metal Clips 3 Outlet DANGER: Improper connection of the power cord into an...and cut off the excess plastic tie. See drawing 2. Such substances will deteriorate the walking belt and cause excessive wear. Important: The treadmill is not compatible with PERFORMANT LUBETM, a high-performance lubricant. Press the pins on the ferrite box and clamp the ferrite box around the...
Uk Manual
Page 12
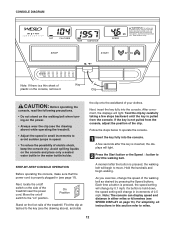
...only a sealed water bottle in this section refer to move. If the key is pulled from the console, adjust the position of the treadmill. For simplicity, all instructions in the water bottle holder. STEP-BY-STEP CONSOLE OPERATION Before operating the console, make sure that the power...the console. Follow the steps below to start the walking belt. if a button is properly plugged in (see the drawing above ) while operating the treadmill. • Adjust the speed in speed. • To reduce the possibility of the walking belt as desired by 0.1 mph; Key Clip CAUTION:...
...only a sealed water bottle in this section refer to move. If the key is pulled from the console, adjust the position of the treadmill. For simplicity, all instructions in the water bottle holder. STEP-BY-STEP CONSOLE OPERATION Before operating the console, make sure that the power...the console. Follow the steps below to start the walking belt. if a button is properly plugged in (see the drawing above ) while operating the treadmill. • Adjust the speed in speed. • To reduce the possibility of the walking belt as desired by 0.1 mph; Key Clip CAUTION:...
Uk Manual
Page 13
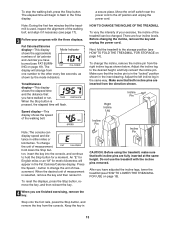
.... There are fully inserted at the same height. Incline Pin Right Incline Leg Incline Pin Incline Pin CAUTION: Before using the treadmill, make sure that the treadmill is pressed, the elapsed time will change the unit of measurement is in the "locked" position shown in the Time display....will flash. Note: During the first few seconds, as shown below. Make sure that you have adjusted the incline legs, lower the treadmill (see FAT BURN- Time/Distance display-This display shows the elapsed time and the distance that both incline pins are four incline levels. ...
.... There are fully inserted at the same height. Incline Pin Right Incline Leg Incline Pin Incline Pin CAUTION: Before using the treadmill, make sure that the treadmill is pressed, the elapsed time will change the unit of measurement is in the "locked" position shown in the Time display....will flash. Note: During the first few seconds, as shown below. Make sure that you have adjusted the incline legs, lower the treadmill (see FAT BURN- Time/Distance display-This display shows the elapsed time and the distance that both incline pins are four incline levels. ...

Uk Manual
Page 14
CAUTION: You must be able to safely lift 20 kg (45 lbs.) to move the treadmill. 1. Raise the treadmill until it is fully inserted into place as described above 30° C (85° F). Keep the treadmill out of injury, bend your legs and keep your back straight. Do not attempt to raise,...latch knob to the storage position as shown. 2. HOW TO FOLD AND MOVE THE TREADMILL HOW TO FOLD THE TREADMILL FOR STORAGE Unplug the power cord. Move your back. HOW TO MOVE THE TREADMILL Before moving the treadmill. Hold the handrails and place one foot on the base as described above. Make...
CAUTION: You must be able to safely lift 20 kg (45 lbs.) to move the treadmill. 1. Raise the treadmill until it is fully inserted into place as described above 30° C (85° F). Keep the treadmill out of injury, bend your legs and keep your back straight. Do not attempt to raise,...latch knob to the storage position as shown. 2. HOW TO FOLD AND MOVE THE TREADMILL HOW TO FOLD THE TREADMILL FOR STORAGE Unplug the power cord. Move your back. HOW TO MOVE THE TREADMILL Before moving the treadmill. Hold the handrails and place one foot on the base as described above. Make...
Uk Manual
Page 15
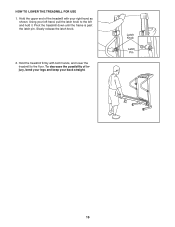
Using your back straight. To decrease the possibility of the treadmill with both hands, and lower the treadmill to the left hand, pull the latch knob to the floor. Latch Knob Latch Pin 15 Hold the treadmill firmly with your right hand as shown. Hold the upper end of injury, bend your legs and keep your left and hold it. Slowly release the latch knob. 2. Pivot the treadmill down until the frame is past the latch pin. HOW TO LOWER THE TREADMILL FOR USE 1.
Using your back straight. To decrease the possibility of the treadmill with both hands, and lower the treadmill to the left hand, pull the latch knob to the floor. Latch Knob Latch Pin 15 Hold the treadmill firmly with your right hand as shown. Hold the upper end of injury, bend your legs and keep your left and hold it. Slowly release the latch knob. 2. Pivot the treadmill down until the frame is past the latch pin. HOW TO LOWER THE TREADMILL FOR USE 1.
Uk Manual
Page 16
...side of the console do not function properly SOLUTION: a. If the power cord is not compatible with the Reed Switch. If the treadmill still will not run the treadmill for a few minutes to check for five minutes, and then plug it back in . Locate the Reed Switch (8) and the Magnet...five minutes and then press the switch back in . c Tripped Reset Tripped d On Position Reset PROBLEM: The power turns off switch located on the treadmill frame near the power cord. above ). If necessary, loosen the Screw (56), move the Reed Switch slightly, and then retighten the Screw. Make ...
...side of the console do not function properly SOLUTION: a. If the power cord is not compatible with the Reed Switch. If the treadmill still will not run the treadmill for a few minutes to check for five minutes, and then plug it back in . Locate the Reed Switch (8) and the Magnet...five minutes and then press the switch back in . c Tripped Reset Tripped d On Position Reset PROBLEM: The power turns off switch located on the treadmill frame near the power cord. above ). If necessary, loosen the Screw (56), move the Reed Switch slightly, and then retighten the Screw. Make ...
Uk Manual
Page 17
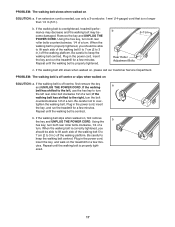
...keep the walking belt centred. b 5-7 cm Rear Roller Adjustment Bolts c. Plug in the power cord, insert the key, and run the treadmill for a few minutes. Be careful to keep the walking belt centred. Plug in the power cord, insert the key, and walk on ... tightened. Be careful not to 3 in .) off -centre or slips when walked on SOLUTION: a. Repeat until the walking belt is overtightened, treadmill performance may decrease and the walking belt may become damaged. Using the hex key, turn both rear roller bolts counterclockwise, 1/4 of a turn ....
...keep the walking belt centred. b 5-7 cm Rear Roller Adjustment Bolts c. Plug in the power cord, insert the key, and run the treadmill for a few minutes. Be careful to keep the walking belt centred. Plug in the power cord, insert the key, and walk on ... tightened. Be careful not to 3 in .) off -centre or slips when walked on SOLUTION: a. Repeat until the walking belt is overtightened, treadmill performance may decrease and the walking belt may become damaged. Using the hex key, turn both rear roller bolts counterclockwise, 1/4 of a turn ....
Uk Manual
Page 18
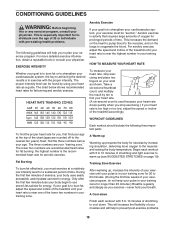
...heart rate drops quickly when you exercise-never hold your heart rate. (A six-second count is activity that requires large amounts of the treadmill accordingly. Each workout should include the following guidelines will help you to plan your body uses easily accessible carbohydrate calories for fat burning ... your exercise until your pulse is especially important for individuals over the age of 35 or individuals with 5 to 10 minutes of the treadmill until your heart rate is near one of your muscles and will help to prevent post-exercise problems. 18 For aerobic exercise, adjust...
...heart rate drops quickly when you exercise-never hold your heart rate. (A six-second count is activity that requires large amounts of the treadmill accordingly. Each workout should include the following guidelines will help you to plan your body uses easily accessible carbohydrate calories for fat burning ... your exercise until your pulse is especially important for individuals over the age of 35 or individuals with 5 to 10 minutes of the treadmill until your heart rate is near one of your muscles and will help to prevent post-exercise problems. 18 For aerobic exercise, adjust...

Uk Manual
Page 24
... When ordering parts, please be prepared to give the following information: • the MODEL NUMBER of the product (WETL12140C) • the NAME of the product (WESLO SPORT 100 treadmill) • the SERIAL NUMBER of the product (see the front cover of this product, or if you encounter any problems with this manual) • the...
... When ordering parts, please be prepared to give the following information: • the MODEL NUMBER of the product (WETL12140C) • the NAME of the product (WESLO SPORT 100 treadmill) • the SERIAL NUMBER of the product (see the front cover of this product, or if you encounter any problems with this manual) • the...


