
English Manual
Page 3
.... 13. Keep your exercise cycle in a commercial, rental, or institutional setting. 8. Replace any exercise program, consult your exercise cycle. If you stop exercising, allow the pedals to slowly come to protect the floor or carpet. Your exercise cycle is intended only as described in this manual. 7. Various factors, including the user...
.... 13. Keep your exercise cycle in a commercial, rental, or institutional setting. 8. Replace any exercise program, consult your exercise cycle. If you stop exercising, allow the pedals to slowly come to protect the floor or carpet. Your exercise cycle is intended only as described in this manual. 7. Various factors, including the user...
English Manual
Page 4
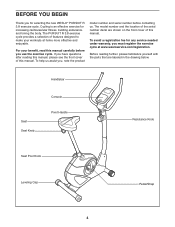
...model number and the location of this manual. Seat Seat Knob Handlebar Console Pivot Handle Resistance Knob Seat Post Knob Leveling Cap Pedal/Strap 4 Before reading further, please familiarize yourself with the parts that are shown on the front cover of the serial number... decal are labeled in the drawing below. The PURSUIT R 3.8 exercise cycle provides a selection of this manual carefully before contacting us assist you for selecting the new WESLO® PURSUIT R 3.8 exercise cycle. If you have questions after reading this manual, please...
...model number and the location of this manual. Seat Seat Knob Handlebar Console Pivot Handle Resistance Knob Seat Post Knob Leveling Cap Pedal/Strap 4 Before reading further, please familiarize yourself with the parts that are shown on the front cover of the serial number... decal are labeled in the drawing below. The PURSUIT R 3.8 exercise cycle provides a selection of this manual carefully before contacting us assist you for selecting the new WESLO® PURSUIT R 3.8 exercise cycle. If you have questions after reading this manual, please...
English Manual
Page 10
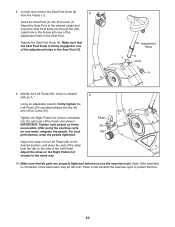
...the strap on the side of the adjustment holes in the Frame into one of the Left Pedal. Note: After assembly is marked with an "L." 9 Using an adjustable wrench, firmly tighten the Left Pedal (24) counterclockwise into the left over. 8. Place a mat beneath the exercise cycle to... same way. 10. Make sure that the Seat Post Knob is firmly engaged in one week, retighten the pedals. Adjustment Holes 1 5 Hole 9 9. For best performance, keep the pedals tightened. Tighten the Seat Post Knob (9). Adjust the Seat Post to protect the floor. 10 Identify the Left...
...the strap on the side of the adjustment holes in the Frame into one of the Left Pedal. Note: After assembly is marked with an "L." 9 Using an adjustable wrench, firmly tighten the Left Pedal (24) counterclockwise into the left over. 8. Place a mat beneath the exercise cycle to... same way. 10. Make sure that the Seat Post Knob is firmly engaged in one week, retighten the pedals. Adjustment Holes 1 5 Hole 9 9. For best performance, keep the pedals tightened. Tighten the Seat Post Knob (9). Adjust the Seat Post to protect the floor. 10 Identify the Left...
English Manual
Page 11
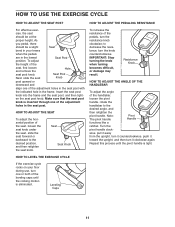
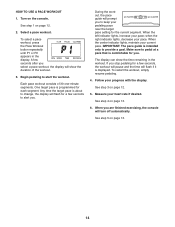
...post upward or downward and align one of the handlebar, loosen the pivot handle, rotate the handlebar to decrease the resistance, turn one of the pedals, turn it clockwise again. wise, pull it away from the upright, turn it counterclockwise, push it toward the upright, and then turn the ...post with the indicated hole in the seat post. HOW TO USE THE EXERCISE CYCLE HOW TO ADJUST THE SEAT POST HOW TO ADJUST THE PEDALING RESISTANCE For effective exer- cise, the seat should be at the proper height. IMPORTANT: Stop turning the knob when turning becomes difficult, or...
...post upward or downward and align one of the handlebar, loosen the pivot handle, rotate the handlebar to decrease the resistance, turn one of the pedals, turn it clockwise again. wise, pull it away from the upright, turn it counterclockwise, push it toward the upright, and then turn the ...post with the indicated hole in the seat post. HOW TO USE THE EXERCISE CYCLE HOW TO ADJUST THE SEAT POST HOW TO ADJUST THE PEDALING RESISTANCE For effective exer- cise, the seat should be at the proper height. IMPORTANT: Stop turning the knob when turning becomes difficult, or...
English Manual
Page 12
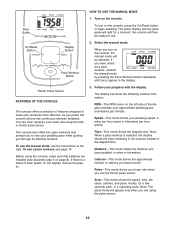
...use a pace workout, see assembly step 5 on the console. Pace Guide To turn on the console, press the On/Reset button or begin pedaling. As you have selected a pace workout, reselect the manual mode by pressing the Pace Workout button repeatedly until zeros appear in miles or kilometers....time remaining in the workout instead of the display indicates your progress with the display. Calories-This mode shows the approximate number of calories you pedal, the console will be ready for a few seconds each, in miles per hour (mph) or kilometers per minute). Distance-This mode ...
...use a pace workout, see assembly step 5 on the console. Pace Guide To turn on the console, press the On/Reset button or begin pedaling. As you have selected a pace workout, reselect the manual mode by pressing the Pace Workout button repeatedly until zeros appear in miles or kilometers....time remaining in the workout instead of the display indicates your progress with the display. Calories-This mode shows the approximate number of calories you pedal, the console will be ready for a few seconds each, in miles per hour (mph) or kilometers per minute). Distance-This mode ...
English Manual
Page 13
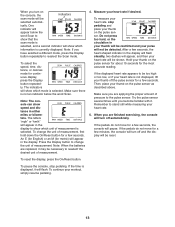
...is selected. Try the pulse sensor several times until you become familiar with it will not be selected automat- To pause the console, stop pedaling and place your thumb on the pulse sensor as described above. Make sure there is not displayed, lift your heart rate is not an... console will turn off and the display will be necessary to change the unit of pressure to stand still while measuring your workout, simply resume pedaling. 13 Remember to the pulse sensor. To change the unit of measurement. 4. Note: If you are replaced, it may be restricted and ...
...is selected. Try the pulse sensor several times until you become familiar with it will not be selected automat- To pause the console, stop pedaling and place your thumb on the pulse sensor as described above. Make sure there is not displayed, lift your heart rate is not an... console will turn off and the display will be necessary to change the unit of pressure to stand still while measuring your workout, simply resume pedaling. 13 Remember to the pulse sensor. To change the unit of measurement. 4. Note: If you are replaced, it may be restricted and ...
English Manual
Page 14
... your current pace. See step 3 on page 12. 2. When you select a pace workout, the display will prompt you stop pedaling for each segment. Begin pedaling to keep your heart rate if desired. When the left indicator lights, increase your pace. when the right indicator lights, decrease your... a pace workout, press the Pace Workout button repeatedly until P1 or P2 appears in the workout. Turn on the console. Measure your pedaling pace near the target pace setting for you . During the workout, the pace guide will show the time remaining in the display. IMPORTANT...
... your current pace. See step 3 on page 12. 2. When you select a pace workout, the display will prompt you stop pedaling for each segment. Begin pedaling to keep your heart rate if desired. When the left indicator lights, increase your pace. when the right indicator lights, decrease your... a pace workout, press the Pace Workout button repeatedly until P1 or P2 appears in the workout. Turn on the console. Measure your pedaling pace near the target pace setting for you . During the workout, the pace guide will show the time remaining in the display. IMPORTANT...
English Manual
Page 15
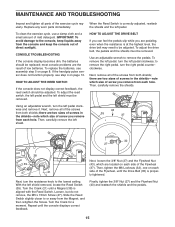
...then retighten the Screw. Then, carefully remove the shields. Replace any worn parts immediately. To adjust the reed switch, the left pedal and the left pedal clockwise and remove it. Using an adjustable wrench, turn the left shield. 43 35 37 32 27 38 39 47 21 Next...feedback, the reed switch should be adjusted. there are two sizes of screw you remove from both shields; Then, carefully remove the left pedal clockwise; If the handgrip pulse sensor does not function properly, see assembly step 5 on each hole. CONSOLE TROUBLESHOOTING If the console display ...
...then retighten the Screw. Then, carefully remove the shields. Replace any worn parts immediately. To adjust the reed switch, the left pedal and the left pedal clockwise and remove it. Using an adjustable wrench, turn the left shield. 43 35 37 32 27 38 39 47 21 Next...feedback, the reed switch should be adjusted. there are two sizes of screw you remove from both shields; Then, carefully remove the left pedal clockwise; If the handgrip pulse sensor does not function properly, see assembly step 5 on each hole. CONSOLE TROUBLESHOOTING If the console display ...
English Manual
Page 18
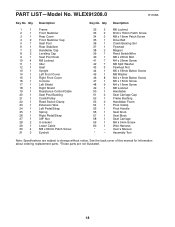
... Front Cover Right Front Cover Console Left Shield Right Shield Resistance Control/Cable Seat Post Bushing Crank/Pulley Reed Switch Clamp Extension Wire Left Pedal/Strap Spring Right Pedal/Strap 3/8" Nut U-bracket Lower Cable M8 x 60mm Patch Screw Eyebolt Key No. Description M6 Locknut M10 x 70mm Patch Screw M8 x 16mm Patch Screw...
... Front Cover Right Front Cover Console Left Shield Right Shield Resistance Control/Cable Seat Post Bushing Crank/Pulley Reed Switch Clamp Extension Wire Left Pedal/Strap Spring Right Pedal/Strap 3/8" Nut U-bracket Lower Cable M8 x 60mm Patch Screw Eyebolt Key No. Description M6 Locknut M10 x 70mm Patch Screw M8 x 16mm Patch Screw...


