

German Manual
Page 15
WLEVEX12890 6 30 3 R0699A 7 45 2 3 1 45 10 5 31 11 19 8 12 16 31 33 9 14 53 21 53 21 27 26 25 24 9 54 31 8 15 24 25 27 26 17 56 28 4 40 59 58 57 34 35 36 9 8 22 31 20 29 9 41 17 13 23 9 54 18 59 42 55 46 40 32 49 50 52 50 34 51 4 36 35 37 60 43 4 47 43 44 39 48 38 4 37 48 15 DETAILZEICHNUNG-Modell Nr.
WLEVEX12890 6 30 3 R0699A 7 45 2 3 1 45 10 5 31 11 19 8 12 16 31 33 9 14 53 21 53 21 27 26 25 24 9 54 31 8 15 24 25 27 26 17 56 28 4 40 59 58 57 34 35 36 9 8 22 31 20 29 9 41 17 13 23 9 54 18 59 42 55 46 40 32 49 50 52 50 34 51 4 36 35 37 60 43 4 47 43 44 39 48 38 4 37 48 15 DETAILZEICHNUNG-Modell Nr.

Uk Manual
Page 1
... at www.weslo.com new products, prizes, fitness tips, and much more! Write the serial number in this manual before using this manual for future reference. Keep this equipment. Unit 4 Revie Road Industrial Estate Revie Road Beeston Leeds, LS11 8JG, UK email: [email protected] CAUTION Read all precautions and instructions in the space above for future reference. Serial Number Decal...
... at www.weslo.com new products, prizes, fitness tips, and much more! Write the serial number in this manual before using this manual for future reference. Keep this equipment. Unit 4 Revie Road Industrial Estate Revie Road Beeston Leeds, LS11 8JG, UK email: [email protected] CAUTION Read all precautions and instructions in the space above for future reference. Serial Number Decal...

Uk Manual
Page 2
® TABLE OF CONTENTS IMPORTANT PRECAUTIONS 3 BEFORE YOU BEGIN 4 PART IDENTIFICATION CHART 5 ASSEMBLY 6 HOW TO USE THE PURSUIT 625s 8 CONDITIONING GUIDELINES 10 MAINTENANCE AND TROUBLE-SHOOTING 12 PART LIST 14 EXPLODED DRAWING 15 HOW TO ORDER REPLACEMENT PARTS Back Cover 2
® TABLE OF CONTENTS IMPORTANT PRECAUTIONS 3 BEFORE YOU BEGIN 4 PART IDENTIFICATION CHART 5 ASSEMBLY 6 HOW TO USE THE PURSUIT 625s 8 CONDITIONING GUIDELINES 10 MAINTENANCE AND TROUBLE-SHOOTING 12 PART LIST 14 EXPLODED DRAWING 15 HOW TO ORDER REPLACEMENT PARTS Back Cover 2

Uk Manual
Page 3
... exercise cycle are adequately informed of all instructions in the seat post (see the drawing on a level surface, with pre-existing health problems. Read all parts regularly. If you feel pain or dizziness at any worn parts immediately. 5. Do not use of this or any exercise program, consult your physician. This is the responsibility of the owner to order a free replacement decal. Apply the replacement...
... exercise cycle are adequately informed of all instructions in the seat post (see the drawing on a level surface, with pre-existing health problems. Read all parts regularly. If you feel pain or dizziness at any worn parts immediately. 5. Do not use of this or any exercise program, consult your physician. This is the responsibility of the owner to order a free replacement decal. Apply the replacement...

Uk Manual
Page 4
... workouts in the convenience and privacy of your benefit, read this manual for selecting the new WESLO PURSUIT® 625s exercise cycle. The PURSUIT 625s blends advanced engineering with the parts that are labelled. The model number is WLEVEX12890. If you , please mention the product model number and serial number when calling. For your own home. Towel Rack Console Water Bottle Holder (bottle not included) Handlebars Resistance Knob Seat Seat Post Seat Knob Pedal...
... workouts in the convenience and privacy of your benefit, read this manual for selecting the new WESLO PURSUIT® 625s exercise cycle. The PURSUIT 625s blends advanced engineering with the parts that are labelled. The model number is WLEVEX12890. If you , please mention the product model number and serial number when calling. For your own home. Towel Rack Console Water Bottle Holder (bottle not included) Handlebars Resistance Knob Seat Seat Post Seat Knob Pedal...

Uk Manual
Page 5
M8 Split Washer (53)-3 M10 Split Washer (31)-5 M10 x 25mm Button Screw (8)-5 M8 Nylon Locknut (21)-3 M4 x 16mm Screw (9)-5 5 If a part is not found in parenthesis below for shipping purposes. The number in the parts bag, check to the key number of the part. Note: Some parts may have been preattached for help identifying the small parts used in assembly. The second number refers to the quantity used in assembly. PART IDENTIFICATION CHART Use the chart below each part refers to see if it has been pre-attached.
M8 Split Washer (53)-3 M10 Split Washer (31)-5 M10 x 25mm Button Screw (8)-5 M8 Nylon Locknut (21)-3 M4 x 16mm Screw (9)-5 5 If a part is not found in parenthesis below for shipping purposes. The number in the parts bag, check to the key number of the part. Note: Some parts may have been preattached for help identifying the small parts used in assembly. The second number refers to the quantity used in assembly. PART IDENTIFICATION CHART Use the chart below each part refers to see if it has been pre-attached.

Uk Manual
Page 6
... Washers (53). The Console (7) requires two 1,5V batteries (not included). Locate the battery compartment on the back of the packing materials until assembly is completed. Connect the console wire to the Handlebar Post with an M4 x 16mm Screw (9). 2 Console Wire 9 54 31 8 15 1 2 7 7 Batteries 12 9 14 8 31 8 15 6 Attach the Console (7) to the Reed Switch Wire (54). Be careful to the inset drawing. Press the Seat Post Bushing (23...
... Washers (53). The Console (7) requires two 1,5V batteries (not included). Locate the battery compartment on the back of the packing materials until assembly is completed. Connect the console wire to the Handlebar Post with an M4 x 16mm Screw (9). 2 Console Wire 9 54 31 8 15 1 2 7 7 Batteries 12 9 14 8 31 8 15 6 Attach the Console (7) to the Reed Switch Wire (54). Be careful to the inset drawing. Press the Seat Post Bushing (23...
Uk Manual
Page 7
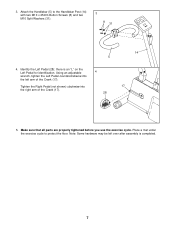
Using an adjustable wrench, tighten the Left Pedal counterclockwise into the right arm of the Crank (17). Make sure that all parts are properly tightened before you use the exercise cycle. Tighten the Right Pedal (not shown) clockwise into the left over after assembly is an "L" on the Left Pedal for identification. Identify the Left Pedal (28); Note: Some hardware may be left arm of the Crank (17...
Using an adjustable wrench, tighten the Left Pedal counterclockwise into the right arm of the Crank (17). Make sure that all parts are properly tightened before you use the exercise cycle. Tighten the Right Pedal (not shown) clockwise into the left over after assembly is an "L" on the Left Pedal for identification. Identify the Left Pedal (28); Note: Some hardware may be left arm of the Crank (17...

Uk Manual
Page 8
HOW TO ADJUST THE PEDALLING RESISTANCE To vary the intensity of the information on the console is printed in English. To increase the resistance, turn the Resistance Knob counterclockwise. If you pedal, there 19 should be a slight bend in your exercise, the pedalling resis- As you have not installed batteries, see assembly step 2 on the decal sheet that is 10 controlled with the hole in the lowest position...
HOW TO ADJUST THE PEDALLING RESISTANCE To vary the intensity of the information on the console is printed in English. To increase the resistance, turn the Resistance Knob counterclockwise. If you pedal, there 19 should be a slight bend in your exercise, the pedalling resis- As you have not installed batteries, see assembly step 2 on the decal sheet that is 10 controlled with the hole in the lowest position...

Uk Manual
Page 9
... time mode will show which mode is turned on the back of the five modes: Scan mode- play speed and dis- When the power is currently displayed. Speed, time, distance, or calorie mode-To select one of the console and move the switch back to miles, first remove the console from the Switch exercise cycle (see assembly step 2 on /reset button or simply begin pedalling. metres or miles. HOW TO OPERATE THE CONSOLE 1. Speed-Displays your workout. To change the...
... time mode will show which mode is turned on the back of the five modes: Scan mode- play speed and dis- When the power is currently displayed. Speed, time, distance, or calorie mode-To select one of the console and move the switch back to miles, first remove the console from the Switch exercise cycle (see assembly step 2 on /reset button or simply begin pedalling. metres or miles. HOW TO OPERATE THE CONSOLE 1. Speed-Displays your workout. To change the...

Uk Manual
Page 10
.... 10 Aerobic exercise is near the highest number in your training zone as you must be found by 10 to 10 minutes of your age. For aerobic exercise, adjust the intensity of 5 to find the three numbers to use stored fat calories for maximum fat burning; the highest number is the heart rate for energy. Then, stop exercising.) WORKOUT GUIDELINES Each workout should include...
.... 10 Aerobic exercise is near the highest number in your training zone as you must be found by 10 to 10 minutes of your age. For aerobic exercise, adjust the intensity of 5 to find the three numbers to use stored fat calories for maximum fat burning; the highest number is the heart rate for energy. Then, stop exercising.) WORKOUT GUIDELINES Each workout should include...

Uk Manual
Page 11
... exercise program, do not keep your heart rate in your training zone for each leg. Reach toward your hands against the inner thigh of knees and back. 2. Training zone exercise, consisting of 20 to 30 minutes of exercising with your heart rate in your training zone. (During the first few months of regular exercise, you reach down , with one day of rest between workouts...
... exercise program, do not keep your heart rate in your training zone for each leg. Reach toward your hands against the inner thigh of knees and back. 2. Training zone exercise, consisting of 20 to 30 minutes of exercising with your heart rate in your training zone. (During the first few months of regular exercise, you reach down , with one day of rest between workouts...

Uk Manual
Page 12
... correctly adjust- BATTERY REPLACEMENT If the console does not function properly, the batteries should be tightened in order to adjust the reed switch, the Left Side Shield (1) must be damaged. HOW TO TIGHTEN THE CRANK If the arms of direct sunlight or the display may be removed. Retighten the Screw. ed, reattach the left arm of the Crank and remove it from the Crank (17). Turn the Crank for a moment. The exercise cycle...
... correctly adjust- BATTERY REPLACEMENT If the console does not function properly, the batteries should be tightened in order to adjust the reed switch, the Left Side Shield (1) must be damaged. HOW TO TIGHTEN THE CRANK If the arms of direct sunlight or the display may be removed. Retighten the Screw. ed, reattach the left arm of the Crank and remove it from the Crank (17). Turn the Crank for a moment. The exercise cycle...

Uk Manual
Page 13
Turn the Crank (17) for a moment to make sure that there is turned to the highest setting, the Resistance Strap (47) may need to the instructions on page 12 and remove the left side shield must first be removed. Reattach the side shields and pedals. 13 HOW TO ADJUST THE RESISTANCE STRAP If there is not enough pedalling resistance when the resistance knob is not too much resistance. Locate and open the...
Turn the Crank (17) for a moment to make sure that there is turned to the highest setting, the Resistance Strap (47) may need to the instructions on page 12 and remove the left side shield must first be removed. Reattach the side shields and pedals. 13 HOW TO ADJUST THE RESISTANCE STRAP If there is not enough pedalling resistance when the resistance knob is not too much resistance. Locate and open the...

Uk Manual
Page 14
... Screw 46 1 Strap Buckle 47 1 Resistance Strap 48 2 Stabiliser Endcap 49 1 Large Spring 50 4 M4 Washer 51 1 M4 x 14mm Bolt 52 1 M4 Nut 53 3 M8 Split Washer 54 1 Reed Switch/Wire 55 1 Magnet 56 2 Crank Nut 57 1 Notched Crank Washer 58 1 Slotted Crank Nut 59 2 Bearing 60 1 Flywheel Spacer # 1 Console Decal Sheet # 1 Allen Wrench # 1 User's Manual Note: "#" indicates a non-illustrated part. See the back cover of...
... Screw 46 1 Strap Buckle 47 1 Resistance Strap 48 2 Stabiliser Endcap 49 1 Large Spring 50 4 M4 Washer 51 1 M4 x 14mm Bolt 52 1 M4 Nut 53 3 M8 Split Washer 54 1 Reed Switch/Wire 55 1 Magnet 56 2 Crank Nut 57 1 Notched Crank Washer 58 1 Slotted Crank Nut 59 2 Bearing 60 1 Flywheel Spacer # 1 Console Decal Sheet # 1 Allen Wrench # 1 User's Manual Note: "#" indicates a non-illustrated part. See the back cover of...

Uk Manual
Page 15
EXPLODED DRAWING-Model No. WLEVEX12890 6 30 3 R0601A 7 45 2 3 1 45 10 5 31 11 19 8 12 16 31 33 9 53 14 21 53 21 27 26 25 24 9 54 31 8 15 24 25 27 26 17 56 28 4 40 59 58 57 34 35 36 9 8 22 31 20 29 9 41 17 13 23 9 54 18 59 42 55 46 40 32 49 50 52 50 34 51 4 36 35 37 60 43 4 47 43 44 39 48 38 4 37 48 15
EXPLODED DRAWING-Model No. WLEVEX12890 6 30 3 R0601A 7 45 2 3 1 45 10 5 31 11 19 8 12 16 31 33 9 53 14 21 53 21 27 26 25 24 9 54 31 8 15 24 25 27 26 17 56 28 4 40 59 58 57 34 35 36 9 8 22 31 20 29 9 41 17 13 23 9 54 18 59 42 55 46 40 32 49 50 52 50 34 51 4 36 35 37 60 43 4 47 43 44 39 48 38 4 37 48 15

Uk Manual
Page 16
... the following information: • The MODEL NUMBER OF THE PRODUCT (WLEVEX12890). • The NAME OF THE PRODUCT (WESLO PURSUIT® 625s). • The SERIAL NUMBER OF THE PRODUCT (see the front cover of this manual) • The KEY NUMBER and DESCRIPTION of the part(s) (see the PART LIST on page 14 of ICON Health & Fitness, Inc. office, or write: ICON Health & Fitness Ltd. HOW TO ORDER REPLACEMENT PARTS To order replacement parts, contact the ICON Fitness Lifestyle...
... the following information: • The MODEL NUMBER OF THE PRODUCT (WLEVEX12890). • The NAME OF THE PRODUCT (WESLO PURSUIT® 625s). • The SERIAL NUMBER OF THE PRODUCT (see the front cover of this manual) • The KEY NUMBER and DESCRIPTION of the part(s) (see the PART LIST on page 14 of ICON Health & Fitness, Inc. office, or write: ICON Health & Fitness Ltd. HOW TO ORDER REPLACEMENT PARTS To order replacement parts, contact the ICON Fitness Lifestyle...


