
English Manual
Page 1
... from our factory. MST CAUTION Read all precautions and instructions in the space above for future reference. Keep this equipment. USERÕS MANUAL Visit our website at www.weslo.com new products, prizes, fitness tips, and much more! TO AVOID UNNECESSARY DELAYS, PLEASE CALL DIRECT TO OUR TOLL-FREE CUSTOMER HOT LINE. CUSTOMER HOT LINE: 1-800-999-3756...
... from our factory. MST CAUTION Read all precautions and instructions in the space above for future reference. Keep this equipment. USERÕS MANUAL Visit our website at www.weslo.com new products, prizes, fitness tips, and much more! TO AVOID UNNECESSARY DELAYS, PLEASE CALL DIRECT TO OUR TOLL-FREE CUSTOMER HOT LINE. CUSTOMER HOT LINE: 1-800-999-3756...
English Manual
Page 2
¨ TABLE OF CONTENTS IMPORTANT PRECAUTIONS 3 BEFORE YOU BEGIN 4 PART IDENTIFICATION CHART 5 ASSEMBLY 6 HOW TO USE THE EXERCISE CYCLE 8 CONDITIONING GUIDELINES 10 MAINTENANCE AND TROUBLE-SHOOTING 12 PART LIST 14 EXPLODED DRAWING 15 HOW TO ORDER REPLACEMENT PARTS Back Cover 2
¨ TABLE OF CONTENTS IMPORTANT PRECAUTIONS 3 BEFORE YOU BEGIN 4 PART IDENTIFICATION CHART 5 ASSEMBLY 6 HOW TO USE THE EXERCISE CYCLE 8 CONDITIONING GUIDELINES 10 MAINTENANCE AND TROUBLE-SHOOTING 12 PART LIST 14 EXPLODED DRAWING 15 HOW TO ORDER REPLACEMENT PARTS Back Cover 2

English Manual
Page 3
... a free replacement decal. When adjusting the seat, insert the seat knob through the use of this product. do not wear loose clothing that all users of the exercise cycle are adequately informed of all instructions before using. ICON assumes no responsibility for in-home use the exercise cycle in this or any worn parts immediately. 5. Read all parts regularly. Place the exercise cycle on page 4). Inspect and tighten all instructions in...
... a free replacement decal. When adjusting the seat, insert the seat knob through the use of this product. do not wear loose clothing that all users of the exercise cycle are adequately informed of all instructions before using. ICON assumes no responsibility for in-home use the exercise cycle in this or any worn parts immediately. 5. Read all parts regularly. Place the exercise cycle on page 4). Inspect and tighten all instructions in...
English Manual
Page 4
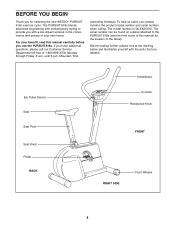
... PURSUIT 618s (see the front cover of the decal). If you have additional questions, please call our Customer Service Department toll-free at the drawing below and familiarize yourself with a low-impact workout in the convenience and privacy of your benefit, read this manual for selecting the new WESLO¨ PURSUIT 618s exercise cycle. The model number is WLEX25190. Ear Pulse Sensor Seat Seat Post Seat Knob Pedal BACK Handlebars Console Resistance Knob...
... PURSUIT 618s (see the front cover of the decal). If you have additional questions, please call our Customer Service Department toll-free at the drawing below and familiarize yourself with a low-impact workout in the convenience and privacy of your benefit, read this manual for selecting the new WESLO¨ PURSUIT 618s exercise cycle. The model number is WLEX25190. Ear Pulse Sensor Seat Seat Post Seat Knob Pedal BACK Handlebars Console Resistance Knob...
English Manual
Page 5
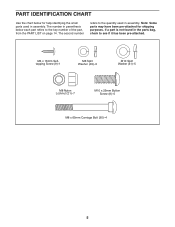
... Split Washer (41)Ð5 M8 Nylon Locknut (21)Ð7 M10 x 25mm Button Screw (8)Ð5 M8 x 65mm Carriage Bolt (30)Ð4 5 PART IDENTIFICATION CHART Use the chart below each part refers to the key number of the part, from the PART LIST on page 14. Note: Some parts may have been pre-attached for help identifying the small parts used in assembly. The number in parenthesis below for shipping purposes.
... Split Washer (41)Ð5 M8 Nylon Locknut (21)Ð7 M10 x 25mm Button Screw (8)Ð5 M8 x 65mm Carriage Bolt (30)Ð4 5 PART IDENTIFICATION CHART Use the chart below each part refers to the key number of the part, from the PART LIST on page 14. Note: Some parts may have been pre-attached for help identifying the small parts used in assembly. The number in parenthesis below for shipping purposes.

English Manual
Page 6
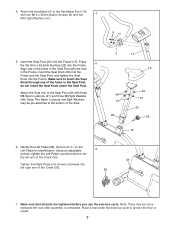
... excess console wire and Reed Switch Wire into the battery compartment. Attach the Knob Housing (12) to the Reed Switch Wire (50). Assembly requires the included allen wrench adjustable wrenches . , a phillips screwdriver and two 1. Attach the Front Stabilizer with three M10 x 25mm Button Screws (8) and three M10 Split Washers (41). Remove the Battery Cover (59), located on the underside of the exercise cycle in a cleared area and remove the packing materials. Connect the console wire...
... excess console wire and Reed Switch Wire into the battery compartment. Attach the Knob Housing (12) to the Reed Switch Wire (50). Assembly requires the included allen wrench adjustable wrenches . , a phillips screwdriver and two 1. Attach the Front Stabilizer with three M10 x 25mm Button Screws (8) and three M10 Split Washers (41). Remove the Battery Cover (59), located on the underside of the exercise cycle in a cleared area and remove the packing materials. Connect the console wire...
English Manual
Page 7
... the Seat Knob under the exercise cycle to the bottom of the Crank (33). 28 7. 4. Note: The Nylon Locknuts and Split Washers may be pre-attached to protect the floor or carpet. 7 Make sure that all parts are tightened before you use the exercise cycle. Note: There may be some hardware left arm of the Crank (33). 33 Tighten the Right Pedal (not...
... the Seat Knob under the exercise cycle to the bottom of the Crank (33). 28 7. 4. Note: The Nylon Locknuts and Split Washers may be pre-attached to protect the floor or carpet. 7 Make sure that all parts are tightened before you use the exercise cycle. Note: There may be some hardware left arm of the Crank (33). 33 Tighten the Right Pedal (not...
English Manual
Page 8
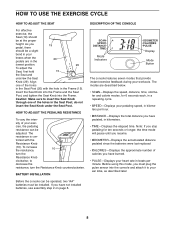
... distance you 19 pedal, there should be adjusted. to your pedaling speed, in kilometers. ¥ TIMEÑDisplays the elapsed time. To increase the resistance, 10 turn the Resistance Knob counterclockwise. DESCRIPTION OF THE CONSOLE Mode Indicators Display Mode Button The console features seven modes that provide instant exercise feedback during your exer- BATTERY INSTALLATION Before the console can be at the proper height. Before using this mode, you have burned. ¥ PULSEÑDisplays...
... distance you 19 pedal, there should be adjusted. to your pedaling speed, in kilometers. ¥ TIMEÑDisplays the elapsed time. To increase the resistance, 10 turn the Resistance Knob counterclockwise. DESCRIPTION OF THE CONSOLE Mode Indicators Display Mode Button The console features seven modes that provide instant exercise feedback during your exer- BATTERY INSTALLATION Before the console can be at the proper height. Before using this mode, you have burned. ¥ PULSEÑDisplays...
English Manual
Page 9
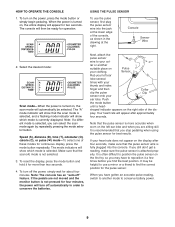
.... Console Sensor Wire 2. Select the desired mode: Scan modeÑWhen the power is more than two seconds. 4. Speed (S), distance (D), time (T), odometer (O), calorie (C), or pulse (h) modeÑTo select one of these modes for more accurate when worn on , the scan mode will appear after four seconds, make sure the pulse sensor is selected, you stop pedaling when using the pulse sensor for two seconds. To reset the display, press the mode button and...
.... Console Sensor Wire 2. Select the desired mode: Scan modeÑWhen the power is more than two seconds. 4. Speed (S), distance (D), time (T), odometer (O), calorie (C), or pulse (h) modeÑTo select one of these modes for more accurate when worn on , the scan mode will appear after four seconds, make sure the pulse sensor is selected, you stop pedaling when using the pulse sensor for two seconds. To reset the display, press the mode button and...
English Manual
Page 10
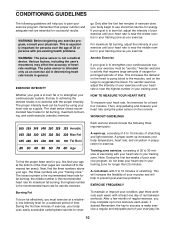
... your condition, plan three workouts each week, if desired.Remember, the key to success is near the lowest number in your training zone as an exercise aid in determining heart rate trends in your everyday life. 10 the middle number is not a medical device. A cool-down, with pre-existing health problems. WARNING: The pulse sensor is the recommended heart rate for a sustained period of...
... your condition, plan three workouts each week, if desired.Remember, the key to success is near the lowest number in your training zone as an exercise aid in determining heart rate trends in your everyday life. 10 the middle number is not a medical device. A cool-down, with pre-existing health problems. WARNING: The pulse sensor is the recommended heart rate for a sustained period of...

English Manual
Page 11
SUGGESTED STRETCHES The correct form for each leg. Toe Touch Stretch Stand with your toes as far as well. Allow your extended leg. Repeat 3 times. Calf/Achilles Stretch With one leg in the drawings below. Bend your front leg, lean forward and move your hips toward your other , reach ...as far as you reach down toward you and rest it against the inner thigh of the other hand. Stretches: Hamstrings, lower back and groin. 3. Hold for each leg. Reach 2 toward 3 the wall. Repeat 3 times for 15 counts, then relax. Quadriceps Stretch With one hand against ...
SUGGESTED STRETCHES The correct form for each leg. Toe Touch Stretch Stand with your toes as far as well. Allow your extended leg. Repeat 3 times. Calf/Achilles Stretch With one leg in the drawings below. Bend your front leg, lean forward and move your hips toward your other , reach ...as far as you reach down toward you and rest it against the inner thigh of the other hand. Stretches: Hamstrings, lower back and groin. 3. Hold for each leg. Reach 2 toward 3 the wall. Repeat 3 times for 15 counts, then relax. Quadriceps Stretch With one hand against ...

English Manual
Page 12
... reed switch wire. In addition, make sure that the arm of the exercise cycle regularly. HOW TO TIGHTEN THE CRANK If the arms of the Crank and remove it from the Left Side Shield. BATTERY REPLACEMENT If the console does not function properly, the batteries should be removed. MAINTENANCE AND TROUBLE-SHOOTING Inspect and tighten all parts of the Crank is in the position shown in the Pedal Strap with the 51 Reed Switch...
... reed switch wire. In addition, make sure that the arm of the exercise cycle regularly. HOW TO TIGHTEN THE CRANK If the arms of the Crank and remove it from the Left Side Shield. BATTERY REPLACEMENT If the console does not function properly, the batteries should be removed. MAINTENANCE AND TROUBLE-SHOOTING Inspect and tighten all parts of the Crank is in the position shown in the Pedal Strap with the 51 Reed Switch...
English Manual
Page 13
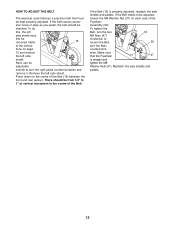
... rear pulleys. wise. sive noise or slips as you pedal, the belt should be from 1/4Ó to loosen the Belt, 32 turn the right pedal counterclockwise and remove it. To do this, the left side shield must be checked. To tighten the Belt, turn the two 16 M6 Nuts (47) clockwise; Refer 16 to be removed. There should be kept properly adjusted. If the Belt needs...
... rear pulleys. wise. sive noise or slips as you pedal, the belt should be from 1/4Ó to loosen the Belt, 32 turn the right pedal counterclockwise and remove it. To do this, the left side shield must be checked. To tighten the Belt, turn the two 16 M6 Nuts (47) clockwise; Refer 16 to be removed. There should be kept properly adjusted. If the Belt needs...

English Manual
Page 14
... Console M10 x 25mm Button Screw M4 x 16mm Self-tapping Screw Resistance Knob Resistance Cable Knob Housing Right Pedal Handlebar Post Frame Belt Front Stabilizer Rear Stabilizer Seat Seat Post M8 Nylon Locknut 25.4mm x 50.8mm Bushing 38.1mm x 63.5mm Bushing Wheel Hub Wheel M4 x 12mm Screw Ear Pulse Sensor Left Pedal Seat Knob M8 x 65mm Carriage Bolt Left Pedal Strap Key No. PARTS LISTÑModel No. See the back cover of this manual for information about ordering replacement parts...
... Console M10 x 25mm Button Screw M4 x 16mm Self-tapping Screw Resistance Knob Resistance Cable Knob Housing Right Pedal Handlebar Post Frame Belt Front Stabilizer Rear Stabilizer Seat Seat Post M8 Nylon Locknut 25.4mm x 50.8mm Bushing 38.1mm x 63.5mm Bushing Wheel Hub Wheel M4 x 12mm Screw Ear Pulse Sensor Left Pedal Seat Knob M8 x 65mm Carriage Bolt Left Pedal Strap Key No. PARTS LISTÑModel No. See the back cover of this manual for information about ordering replacement parts...
English Manual
Page 16
...; The NAME of the product (WESLO PURSUIT¨ 618s exercise cycle) ¥ The SERIAL NUMBER of the product (see the front cover of this manual) ¥ The KEY NUMBER and DESCRIPTION of the part(s) (see the PART LIST on how long an implied warranty lasts. ICON HEALTH & FITNESS, INC., 1500 S. 1000 W., LOGAN, UT 84321-9813 Part No. 160040 R1099A Printed in connection with the use or performance of the product...
...; The NAME of the product (WESLO PURSUIT¨ 618s exercise cycle) ¥ The SERIAL NUMBER of the product (see the front cover of this manual) ¥ The KEY NUMBER and DESCRIPTION of the part(s) (see the PART LIST on how long an implied warranty lasts. ICON HEALTH & FITNESS, INC., 1500 S. 1000 W., LOGAN, UT 84321-9813 Part No. 160040 R1099A Printed in connection with the use or performance of the product...


