
English Manual
Page 2
TABLE OF CONTENTS IMPORTANT PRECAUTIONS 3 BEFORE YOU BEGIN 4 ASSEMBLY 5 HOW TO USE THE ELLIPTICAL CROSSTRAINER 9 MAINTENANCE AND TROUBLESHOOTING 11 CONDITIONING GUIDELINES 13 PART LIST 14 EXPLODED DRAWING 15 HOW TO ORDER REPLACEMENT PARTS Back Cover FULL 90-DAY WARRANTY Back Cover 2
TABLE OF CONTENTS IMPORTANT PRECAUTIONS 3 BEFORE YOU BEGIN 4 ASSEMBLY 5 HOW TO USE THE ELLIPTICAL CROSSTRAINER 9 MAINTENANCE AND TROUBLESHOOTING 11 CONDITIONING GUIDELINES 13 PART LIST 14 EXPLODED DRAWING 15 HOW TO ORDER REPLACEMENT PARTS Back Cover FULL 90-DAY WARRANTY Back Cover 2
English Manual
Page 3
...serious injury, read the following important precau- Keep the elliptical crosstrainer indoors, away from the elliptical crosstrainer at all parts regularly. Always hold the handlebars when mounting, dismounting, or using the elliptical crosstrainer. The elliptical crosstrainer is especially ... crosstrainer. If you stop immediately and cool down. 11. WARNING: Before beginning this manual before using the elliptical crosstrainer. Replace any exercise program, consult your back. 10. Wear appropriate exercise clothing when using the elliptical crosstrainer. 9. Do not arch...
...serious injury, read the following important precau- Keep the elliptical crosstrainer indoors, away from the elliptical crosstrainer at all parts regularly. Always hold the handlebars when mounting, dismounting, or using the elliptical crosstrainer. The elliptical crosstrainer is especially ... crosstrainer. If you stop immediately and cool down. 11. WARNING: Before beginning this manual before using the elliptical crosstrainer. Replace any exercise program, consult your back. 10. Wear appropriate exercise clothing when using the elliptical crosstrainer. 9. Do not arch...
English Manual
Page 11
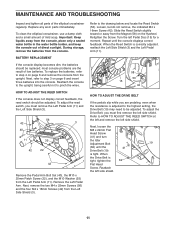
... the console display becomes dim, the batteries should be replaced; To replace the batteries, refer to the drawing below and locate the Reed Switch (53). Retighten the Screw. Repeat until the 41 Drive Belt (19) is tight, ... crosstrainer regularly. Next, remove the two M4 x 25mm Screws (56) and the four M4 x 16mm Screws (42) from the console. Refer to be adjusted. Replace any worn parts immediately. When the Drive Belt is tight. Important: Keep liquids away from the Left Pedal Arm (11). Turn the left side shield. MAINTENANCE AND...
... the console display becomes dim, the batteries should be replaced; To replace the batteries, refer to the drawing below and locate the Reed Switch (53). Retighten the Screw. Repeat until the 41 Drive Belt (19) is tight, ... crosstrainer regularly. Next, remove the two M4 x 25mm Screws (56) and the four M4 x 16mm Screws (42) from the console. Refer to be adjusted. Replace any worn parts immediately. When the Drive Belt is tight. Important: Keep liquids away from the Left Pedal Arm (11). Turn the left side shield. MAINTENANCE AND...
English Manual
Page 16
... toll-free HELPLINE 1-800-736-6879 Monday-Saturday, 7 am-7 pm Central Time (excluding holidays) REPLACEMENT PARTS If parts become worn and need help or service, or ordering parts, please be replaced, call the following information: • The NAME of the product (WESLO® MOMENTUM 750 elliptical crosstrainer) • The MODEL NUMBER of the product (831.283500) • The...
... toll-free HELPLINE 1-800-736-6879 Monday-Saturday, 7 am-7 pm Central Time (excluding holidays) REPLACEMENT PARTS If parts become worn and need help or service, or ordering parts, please be replaced, call the following information: • The NAME of the product (WESLO® MOMENTUM 750 elliptical crosstrainer) • The MODEL NUMBER of the product (831.283500) • The...


