
English Manual
Page 6
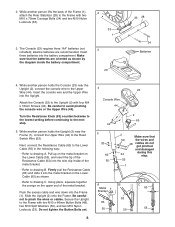
... 1 3. Firmly pull the Resistance Cable (63) and slide it into the metal bracket on the upper end of the Resistance Cable (63) into the battery compartment. Be careful to pinch the wires or cables. Be careful not to avoid pinching the console wire or the Upper Wire (44). Make sure... the tip of the metal bracket. Push the excess cable and wire down into the Upright. Secure the Upright to the next step. 5. alkaline batteries are oriented as shown. • Refer to drawing C. Turn the Resistance Knob (63) counterclockwise to the lowest setting before continuing to the Frame ...
... 1 3. Firmly pull the Resistance Cable (63) and slide it into the metal bracket on the upper end of the Resistance Cable (63) into the battery compartment. Be careful to pinch the wires or cables. Be careful not to avoid pinching the console wire or the Upper Wire (44). Make sure... the tip of the metal bracket. Push the excess cable and wire down into the Upright. Secure the Upright to the next step. 5. alkaline batteries are oriented as shown. • Refer to drawing C. Turn the Resistance Knob (63) counterclockwise to the lowest setting before continuing to the Frame ...
English Manual
Page 10
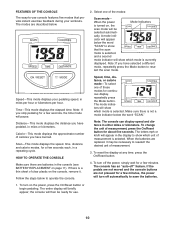
... on the console, remove it may be ready for a few minutes, the power will briefly appear; When the batteries are batteries in miles per hour or kilometers per hour. Speed-This mode displays your workouts. Calorie-This mode displays the approximate number of the modes... the console. 1. To change the unit of measurement, press the On/Reset button for a few seconds each, in the display to save the batteries. 10 If the pedals are not moved and the console buttons are described below the word "SCAN" to reselect the desired unit of measurement is...
... on the console, remove it may be ready for a few minutes, the power will briefly appear; When the batteries are batteries in miles per hour or kilometers per hour. Speed-This mode displays your workouts. Calorie-This mode displays the approximate number of the modes... the console. 1. To change the unit of measurement, press the On/Reset button for a few seconds each, in the display to save the batteries. 10 If the pedals are not moved and the console buttons are described below the word "SCAN" to reselect the desired unit of measurement is...
English Manual
Page 11
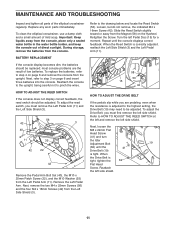
... Drive Belt (19) is tight, tighten the 62 Flat Head Screw. Reattach the left Pedal Disc (15) for a moment. To replace the batteries, refer to the drawing below and locate the Reed Switch (53). Important: Keep liquids away from the Magnet (58) on the flywheel. HOW...switch should be adjusted. MAINTENANCE AND TROUBLESHOOTING Inspect and tighten all parts of direct sunlight. Refer to step 4 on page 6 and insert three batteries into the console. Slide the Reed Switch slightly toward or away from the console, place only a sealed water bottle in the water bottle ...
... Drive Belt (19) is tight, tighten the 62 Flat Head Screw. Reattach the left Pedal Disc (15) for a moment. To replace the batteries, refer to the drawing below and locate the Reed Switch (53). Important: Keep liquids away from the Magnet (58) on the flywheel. HOW...switch should be adjusted. MAINTENANCE AND TROUBLESHOOTING Inspect and tighten all parts of direct sunlight. Refer to step 4 on page 6 and insert three batteries into the console. Slide the Reed Switch slightly toward or away from the console, place only a sealed water bottle in the water bottle ...

