
English Manual
Page 1
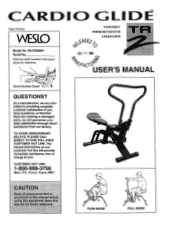
... the space above for reference. If you . C R Patent Pending WED Model No. WLCR28061 Serial No. Serial Number Decal QUESTIONS? TO AVOID UNNECESSARY DELAYS, PLEASE CALL DIRECT TO OUR TOLL-FREE CUSTOMER HOT LINE. The trained technicians on our customer hot line will guarantee complete satisfaction through direct assistance from our factory. MST LICE 4>i TARQET RESISTANCE TRAINER 0 WOISMIPNOWNOP ry DEC 1 1 1996 res4c-c&USER'S MANUAL...
... the space above for reference. If you . C R Patent Pending WED Model No. WLCR28061 Serial No. Serial Number Decal QUESTIONS? TO AVOID UNNECESSARY DELAYS, PLEASE CALL DIRECT TO OUR TOLL-FREE CUSTOMER HOT LINE. The trained technicians on our customer hot line will guarantee complete satisfaction through direct assistance from our factory. MST LICE 4>i TARQET RESISTANCE TRAINER 0 WOISMIPNOWNOP ry DEC 1 1 1996 res4c-c&USER'S MANUAL...
English Manual
Page 2
... link arms are adequately informed of 35 or persons with pre-existing health problems. Read all precautions. Keep small children and pets away from the TR 2 at all parts regularly. The resistance cylinder becomes very hot during use the TR 2 in -home use of the seat, make sure that all users of the TR 2 are securely connected to the upper or lower rollers on...
... link arms are adequately informed of 35 or persons with pre-existing health problems. Read all precautions. Keep small children and pets away from the TR 2 at all parts regularly. The resistance cylinder becomes very hot during use the TR 2 in -home use of the seat, make sure that all users of the TR 2 are securely connected to the upper or lower rollers on...
English Manual
Page 3
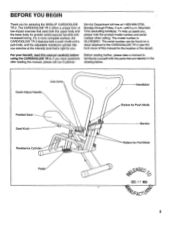
... CARDIOGLIDE TR 2 (see the front cover of this manual carefully before using the CARDIOGLIDE TR 2. Link Arms Quick Adjust Handle Padded Seat Seat Knob Resistance Cylinder Handlebar Rollers for Push Mode Monitor Rollers for the location of low-impact exercise that are labeled in the drawing below. For a more complete workout, the CARDIOGLIDE TR 2 features both the upper body and the lower body for greater cardiovascular benefits and increased...
... CARDIOGLIDE TR 2 (see the front cover of this manual carefully before using the CARDIOGLIDE TR 2. Link Arms Quick Adjust Handle Padded Seat Seat Knob Resistance Cylinder Handlebar Rollers for Push Mode Monitor Rollers for the location of low-impact exercise that are labeled in the drawing below. For a more complete workout, the CARDIOGLIDE TR 2 features both the upper body and the lower body for greater cardiovascular benefits and increased...
English Manual
Page 4
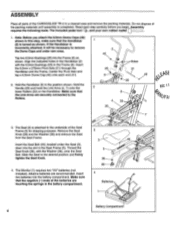
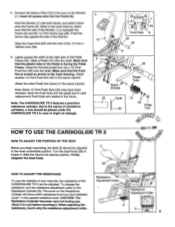
... (-) ends of the batteries are touching the springs in this step, make sure that the Handlebar (2) is incorrectly attached, it . 1 2 42 25 ---. . . Do not dispose of the packing materials until assembly is attached to the desired position and firmly tighten the Seat Knob. .0:0000 5 36 ------ 4 , ( 38-4 4. Hold the Handle (20) and hook the Link Arms (4, 7) onto the 2 lower Rollers (33) on...
... (-) ends of the batteries are touching the springs in this step, make sure that the Handlebar (2) is incorrectly attached, it . 1 2 42 25 ---. . . Do not dispose of the packing materials until assembly is attached to the desired position and firmly tighten the Seat Knob. .0:0000 5 36 ------ 4 , ( 38-4 4. Hold the Handle (20) and hook the Link Arms (4, 7) onto the 2 lower Rollers (33) on...
English Manual
Page 5
... desired position. To change the resistance, turn the resistance adjustment collar on the right side of the Monitor (1) is the easiest resistance level. CAUTION: The Resistance Cylinder becomes very hot during use. The arrow on the Monitor 5 (1). Allow it . Connect the Sensor Wire (15) to the inset drawing. Refer to the wire on the Resistance Cylinder will show which resistance level you begin exercising, the Seat (3) should be...
... desired position. To change the resistance, turn the resistance adjustment collar on the right side of the Monitor (1) is the easiest resistance level. CAUTION: The Resistance Cylinder becomes very hot during use. The arrow on the Monitor 5 (1). Allow it . Connect the Sensor Wire (15) to the inset drawing. Refer to the wire on the Resistance Cylinder will show which resistance level you begin exercising, the Seat (3) should be...
English Manual
Page 6
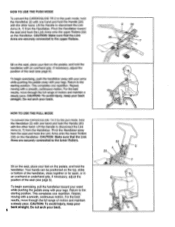
...Rollers. Do not arch your legs. If necessary, adjust the position of the seat (see page 5). If necessary, adjust the position of the seat (see page 5). Pivot the Handlebar toward your waist while pushing the pedals away with the other hand. CAUTION: Make sure that the Link Arms are securely connected to the lower Rollers. HOW TO USE THE PULL MODE...begin exercising, push the handlebar away with your arms while pushing the pedals away with a smooth, continuous motion. For the best results, move through the full range of motion and maintain a steady pace. Repeat, moving with...
...Rollers. Do not arch your legs. If necessary, adjust the position of the seat (see page 5). If necessary, adjust the position of the seat (see page 5). Pivot the Handlebar toward your waist while pushing the pedals away with the other hand. CAUTION: Make sure that the Link Arms are securely connected to the lower Rollers. HOW TO USE THE PULL MODE...begin exercising, push the handlebar away with your arms while pushing the pedals away with a smooth, continuous motion. For the best results, move through the full range of motion and maintain a steady pace. Repeat, moving with...
English Manual
Page 7
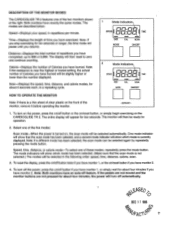
... repeatedly pressing the mode button. If the pedals are not moved and the monitor buttons are described below: Speed-Displays your speed, in repetitions per minute. Both monitors have an auto-off button or the on/reset button, or simply begin exercising on /reset button if you have burned will pause until you have exercised. Note: If you stop exercising for about 5 seconds each, in the following order: speed, time, distance, calorie...
... repeatedly pressing the mode button. If the pedals are not moved and the monitor buttons are described below: Speed-Displays your speed, in repetitions per minute. Both monitors have an auto-off button or the on/reset button, or simply begin exercising on /reset button if you have burned will pause until you have exercised. Note: If you stop exercising for about 5 seconds each, in the following order: speed, time, distance, calorie...
English Manual
Page 8
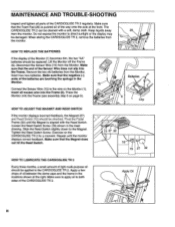
... and the frame in the locations shown at the front. Connect the Sensor Wire (15) to direct sunlight or the display may be replaced. Tighten the Reed Switch Screw. Exercise on page 5). MAINTENANCE AND TROUBLE-SHOOTING Inspect and tighten all parts of the batteries are touching the springs in the Monitor. Do not expose the monitor to the wire on the Monitor (1). Press the Monitor onto the Frame (see assembly step 5 on the CARDIOGLIDE TR...
... and the frame in the locations shown at the front. Connect the Sensor Wire (15) to direct sunlight or the display may be replaced. Tighten the Reed Switch Screw. Exercise on page 5). MAINTENANCE AND TROUBLE-SHOOTING Inspect and tighten all parts of the batteries are touching the springs in the Monitor. Do not expose the monitor to the wire on the Monitor (1). Press the Monitor onto the Frame (see assembly step 5 on the CARDIOGLIDE TR...
English Manual
Page 9
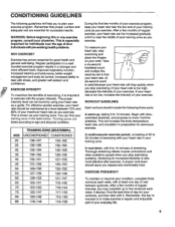
.... To measure your heart rate, stop exercising.) If your heart rate is to make exercise a regular and enjoyable part of your exercise. This will drop quickly when you stop exercising suddenly. If your heart rate is used because your training zone in preparation for good health and general well-being. After a few months of your exercise program, keep your heart rate near the middle of your exercise. Exercise has proven essential for...
.... To measure your heart rate, stop exercising.) If your heart rate is to make exercise a regular and enjoyable part of your exercise. This will drop quickly when you stop exercising suddenly. If your heart rate is used because your training zone in preparation for good health and general well-being. After a few months of your exercise program, keep your heart rate near the middle of your exercise. Exercise has proven essential for...
English Manual
Page 10
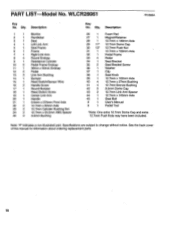
... included. See the back cover of this manual for information about ordering replacement parts. 10 WLCR28061 R1296A Key No. Description 1 1 Monitor 2 1 Handlebar 3 1 Seat 4 1 Left Link Arm 5 1 Seat Frame 6 1 Frame 7 1 Right Link Arm 8 4 Round Endcap 9 1 Resistance Cylinder 10 2 Pedal Frame Endcap 11 1 38mm x 50mm Endcap 12 2 Pedal 13 3 Link Arm Bushing 14 1 Bumper 15 1 Reed Switch/Sensor Wire 16 2 Handle Screw 17 1 Round Bumper 18 1 Reed Switch Screw 19 1 Center Link Arm 20 1 Handle 21...
... included. See the back cover of this manual for information about ordering replacement parts. 10 WLCR28061 R1296A Key No. Description 1 1 Monitor 2 1 Handlebar 3 1 Seat 4 1 Left Link Arm 5 1 Seat Frame 6 1 Frame 7 1 Right Link Arm 8 4 Round Endcap 9 1 Resistance Cylinder 10 2 Pedal Frame Endcap 11 1 38mm x 50mm Endcap 12 2 Pedal 13 3 Link Arm Bushing 14 1 Bumper 15 1 Reed Switch/Sensor Wire 16 2 Handle Screw 17 1 Round Bumper 18 1 Reed Switch Screw 19 1 Center Link Arm 20 1 Handle 21...
English Manual
Page 11
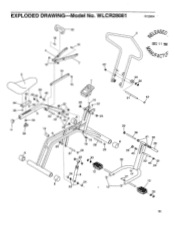
EXPLODED DRAWING Model No. WLCR28061 R1296A 16 4 20 16 9 13 7 42 19 3 34 35 11 29 4 29 43 I 40 13 25 5 22 .2 -to 8 4-36 44 15 37 C C -O-25 14 29 38 it 15 29 18 28 9 29 8 31 D'2 23 30 12 24 9 8 f(. 24 23 10 2 4`
EXPLODED DRAWING Model No. WLCR28061 R1296A 16 4 20 16 9 13 7 42 19 3 34 35 11 29 4 29 43 I 40 13 25 5 22 .2 -to 8 4-36 44 15 37 C C -O-25 14 29 38 it 15 29 18 28 9 29 8 31 D'2 23 30 12 24 9 8 f(. 24 23 10 2 4`
English Manual
Page 12
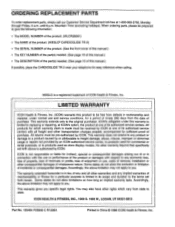
... is a registered trademark of ICON Health & Fitness, Inc. The warranty extended hereunder is in its scope and duration to give the following information: • The MODEL NUMBER of the product. (WLCR28061) • The NAME of the product. (WESLO® CARDIOGLIDE TR 2) • The SERIAL NUMBER of the product. (See the front cover of this manual.) • The KEY NUMBER of the part(s) needed. (See page 10...
... is a registered trademark of ICON Health & Fitness, Inc. The warranty extended hereunder is in its scope and duration to give the following information: • The MODEL NUMBER of the product. (WLCR28061) • The NAME of the product. (WESLO® CARDIOGLIDE TR 2) • The SERIAL NUMBER of the product. (See the front cover of this manual.) • The KEY NUMBER of the part(s) needed. (See page 10...


