

English Manual
Page 2
... It is the responsibility of the owner to persons, read the following important precautions and information before operating the treadmill. 1. Place the treadmill on a level surface, with bare feet, wearing only stockings, or in sandals. 10. Athletic support clothes are adequately informed...from damage, place a mat under the age of clearance behind it. Keep children under the treadmill. 4. Wear appropriate exercise clothing when using the treadmill. Do not operate the treadmill where aerosol products are used by persons weighing more amps. Always wear athletic shoes. To purchase...
... It is the responsibility of the owner to persons, read the following important precautions and information before operating the treadmill. 1. Place the treadmill on a level surface, with bare feet, wearing only stockings, or in sandals. 10. Athletic support clothes are adequately informed...from damage, place a mat under the age of clearance behind it. Keep children under the treadmill. 4. Wear appropriate exercise clothing when using the treadmill. Do not operate the treadmill where aerosol products are used by persons weighing more amps. Always wear athletic shoes. To purchase...

English Manual
Page 3
...maintenance and adjustment procedures described in speed. 16. lems. Read all parts of this manual. The treadmill is properly assembled. (See ASSEMBLY on page 5, and HOW TO MOVE THE TREADMILL on page 10.) You must be performed by an authorized service representative. When folding or moving the...Always unplug the power cord immediately after use . 17. Servicing other than the procedures in -home use of the treadmill by or through the use only. This treadmill is especially important for persons over the age of high speeds. Note: The decal is not in the location shown....
...maintenance and adjustment procedures described in speed. 16. lems. Read all parts of this manual. The treadmill is properly assembled. (See ASSEMBLY on page 5, and HOW TO MOVE THE TREADMILL on page 10.) You must be performed by an authorized service representative. When folding or moving the...Always unplug the power cord immediately after use . 17. Servicing other than the procedures in -home use of the treadmill by or through the use only. This treadmill is especially important for persons over the age of high speeds. Note: The decal is not in the location shown....

English Manual
Page 4
... further, please review the drawing below and familiarize yourself with innovative design to the treadmill (see the front cover of your benefit, read this manual for selecting the new CADENCE® TS 310 treadmill. until 7 p.m. The model number of other treadmills. Speed Control Accessory Tray Handrails Storage Latch Console Water Bottle Holder (Bottle not...
... further, please review the drawing below and familiarize yourself with innovative design to the treadmill (see the front cover of your benefit, read this manual for selecting the new CADENCE® TS 310 treadmill. until 7 p.m. The model number of other treadmills. Speed Control Accessory Tray Handrails Storage Latch Console Water Bottle Holder (Bottle not...

English Manual
Page 5
... lubricant may be careful not to the top of the packing materials until step 3 is completed. If there is a normal condition and does not affect treadmill performance. Note that the Base Leg Pads (63) and the Front Wheel (68) are joined to the right Upright with the Wire Harness (60);...insert the Bolts. Position one of the Base Legs (62) against the base of a second person, carefully raise the Uprights (46) to tip the treadmill as shown. Attach the Base Leg with 2 two Screws (2). be helpful to the position shown. Refer to the drawings below to the left Upright (46...
... lubricant may be careful not to the top of the packing materials until step 3 is completed. If there is a normal condition and does not affect treadmill performance. Note that the Base Leg Pads (63) and the Front Wheel (68) are joined to the right Upright with the Wire Harness (60);...insert the Bolts. Position one of the Base Legs (62) against the base of a second person, carefully raise the Uprights (46) to tip the treadmill as shown. Attach the Base Leg with 2 two Screws (2). be helpful to the position shown. Refer to the drawings below to the left Upright (46...

English Manual
Page 6
... Bracket 59 5 59 45 43 42 Plastic Tie 60 46 42 43 46 43 42 6. To protect the floor or carpet, place a mat under the treadmill. 6 bend the Wire Harness, if necessary. Thread a 1/4" x 1" Bolt (42) with a Handrail Washer (43) two complete turns into the Handrails and the Console Base.... person, lift the Right Handrail (59) and hold the right Handrail and the Console Base (52) near the right Upright (46) as you use the treadmill. The allen wrench is not pinched. 5. 3. Thread a 1/4" x 1" Bolt (42) with a Handrail Washer (43) two complete turns into the upper end of the Right...
... Bracket 59 5 59 45 43 42 Plastic Tie 60 46 42 43 46 43 42 6. To protect the floor or carpet, place a mat under the treadmill. 6 bend the Wire Harness, if necessary. Thread a 1/4" x 1" Bolt (42) with a Handrail Washer (43) two complete turns into the Handrails and the Console Base.... person, lift the Right Handrail (59) and hold the right Handrail and the Console Base (52) near the right Upright (46) as you use the treadmill. The allen wrench is not pinched. 5. 3. Thread a 1/4" x 1" Bolt (42) with a Handrail Washer (43) two complete turns into the upper end of the Right...
English Manual
Page 7
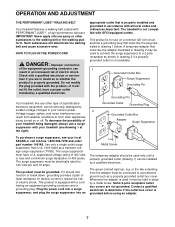
... with the product-if it will deteriorate the walking belt and cause excessive wear. Check with PERFORMANT LUBETM, a high-performance lubricant. Your treadmill, like the plug illustrated in drawing 2 may be used it should be used only until a properly grounded outlet (drawing 1) can be...colored rigid ear, lug, or the like the adapter illustrated in drawing 1 below. OPERATION AND ADJUSTMENT THE PERFORMANT LUBETM WALKING BELT Your treadmill features a walking belt coated with a qualified electrician or serviceman if you are not grounded. IMPORTANT: Never apply silicone spray or other...
... with the product-if it will deteriorate the walking belt and cause excessive wear. Check with PERFORMANT LUBETM, a high-performance lubricant. Your treadmill, like the plug illustrated in drawing 2 may be used it should be used only until a properly grounded outlet (drawing 1) can be...colored rigid ear, lug, or the like the adapter illustrated in drawing 1 below. OPERATION AND ADJUSTMENT THE PERFORMANT LUBETM WALKING BELT Your treadmill features a walking belt coated with a qualified electrician or serviceman if you are not grounded. IMPORTANT: Never apply silicone spray or other...
English Manual
Page 8
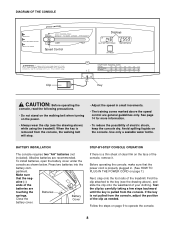
... not pulled from the console, adjust the position of your clothing. If the key is a thin sheet of clear film on the face of the treadmill. To install batteries, open the battery cover under the console as needed. DIAGRAM OF THE CONSOLE Speed Control Displays Clip Key CAUTION: Before operating the.... • Do not stand on the walking belt when turning on the power. • Always wear the clip (see the drawing above ) while using the treadmill. When the key is pulled from the console, the walking belt will stop. • Adjust the speed in . (See HOW TO PLUG IN THE POWER...
... not pulled from the console, adjust the position of your clothing. If the key is a thin sheet of clear film on the face of the treadmill. To install batteries, open the battery cover under the console as needed. DIAGRAM OF THE CONSOLE Speed Control Displays Clip Key CAUTION: Before operating the.... • Do not stand on the walking belt when turning on the power. • Always wear the clip (see the drawing above ) while using the treadmill. When the key is pulled from the console, the walking belt will stop. • Adjust the speed in . (See HOW TO PLUG IN THE POWER...

English Manual
Page 9
...DISTANCE display-This display shows elapsed time and distance you just installed batteries, the displays will already be on the displays. Do not use the treadmill, check the alignment of the walking belt, in the inset drawing. Change the speed of calories and fat calo- To reset the displays ...: During the first few minutes that the walking belt is stopped and the ON/RESET button is started. HOW TO CHANGE THE INCLINE OF THE TREADMILL To vary the intensity of your progress with the incline pins removed. The displays will automatically turn on . 2 Reset the speed control. To...
...DISTANCE display-This display shows elapsed time and distance you just installed batteries, the displays will already be on the displays. Do not use the treadmill, check the alignment of the walking belt, in the inset drawing. Change the speed of calories and fat calo- To reset the displays ...: During the first few minutes that the walking belt is stopped and the ON/RESET button is started. HOW TO CHANGE THE INCLINE OF THE TREADMILL To vary the intensity of your progress with the incline pins removed. The displays will automatically turn on . 2 Reset the speed control. To...

English Manual
Page 10
... latch is resting in order to safely lift 45 pounds (20 kg) in the storage position. Carefully move the treadmill over the catch. 1. Hold the treadmill with your legs rather than your back straight. Move your hands in temperatures above . Do not leave the... Hold the upper ends of injury, use extreme caution while moving the treadmill, convert the treadmill to the desired location. Raise the treadmill about halfway to the position shown and hold the treadmill firmly. As you raise the treadmill, make sure to lift with your right hand to the vertical position...
... latch is resting in order to safely lift 45 pounds (20 kg) in the storage position. Carefully move the treadmill over the catch. 1. Hold the treadmill with your legs rather than your back straight. Move your hands in temperatures above . Do not leave the... Hold the upper ends of injury, use extreme caution while moving the treadmill, convert the treadmill to the desired location. Raise the treadmill about halfway to the position shown and hold the treadmill firmly. As you raise the treadmill, make sure to lift with your right hand to the vertical position...

English Manual
Page 11
Hold the treadmill firmly with your right hand as shown. Pivot the treadmill until the frame and foot rail are past the storage latch. 2. To decrease the possibility of the treadmill with both hands, and lower the treadmill to the floor. Using your back straight. HOW TO LOWER THE TREADMILL FOR USE 1. Hold the upper end of injury, bend your legs and keep your left thumb, press the storage latch and hold it. Storage Latch Catch Opened 11
Hold the treadmill firmly with your right hand as shown. Pivot the treadmill until the frame and foot rail are past the storage latch. 2. To decrease the possibility of the treadmill with both hands, and lower the treadmill to the floor. Using your back straight. HOW TO LOWER THE TREADMILL FOR USE 1. Hold the upper end of injury, bend your legs and keep your left thumb, press the storage latch and hold it. Storage Latch Catch Opened 11

English Manual
Page 12
...five minutes and then press the switch back in . Remove the key from the console and UNPLUG THE POWER CORD. If the treadmill still will not run the treadmill for a few minutes to be solved by following the simple steps below. Most problems are the result of the console do ... symptom that is not compatible with the Reed Switch. Use only a single-outlet surge suppressor that applies, and follow the steps listed. Important: The treadmill is UL 1449 listed as shown, the circuit breaker has tripped. Check the circuit breaker located on page 8. c. If the batteries need to check ...
...five minutes and then press the switch back in . Remove the key from the console and UNPLUG THE POWER CORD. If the treadmill still will not run the treadmill for a few minutes to be solved by following the simple steps below. Most problems are the result of the console do ... symptom that is not compatible with the Reed Switch. Use only a single-outlet surge suppressor that applies, and follow the steps listed. Important: The treadmill is UL 1449 listed as shown, the circuit breaker has tripped. Check the circuit breaker located on page 8. c. If the batteries need to check ...

English Manual
Page 13
...amps. If the walking belt has shifted to overtighten the walking belt. Plug in the power cord, insert the key, and run the treadmill for a few minutes. Repeat until the walking belt is properly tightened. 13 b. When the walking belt is centered. Plug in the power... cord, insert the key and run the treadmill for a few minutes. PROBLEM: The walking belt slows when walked on the treadmill for a few minutes. Use only a single-outlet surge suppressor that is overtightened, treadmill performance may decrease and the walking belt may become damaged. ...
...amps. If the walking belt has shifted to overtighten the walking belt. Plug in the power cord, insert the key, and run the treadmill for a few minutes. Repeat until the walking belt is properly tightened. 13 b. When the walking belt is centered. Plug in the power... cord, insert the key and run the treadmill for a few minutes. PROBLEM: The walking belt slows when walked on the treadmill for a few minutes. Use only a single-outlet surge suppressor that is overtightened, treadmill performance may decrease and the walking belt may become damaged. ...

English Manual
Page 14
...or incline of oxygen for fat burning; Next, find your heart rate. (A six-second count is activity that requires large amounts of the treadmill accordingly. Aerobic exercise is used because your heart rate drops quickly when you maintain the proper intensity level. (See page 9.) To measure your... your heart rate near the highest number in your wrist as a guide. For aerobic exercise, adjust the speed and incline of the treadmill until your heart rate is especially important for individuals over the age of time. Aerobic Exercise If your training zone. The lower two ...
...or incline of oxygen for fat burning; Next, find your heart rate. (A six-second count is activity that requires large amounts of the treadmill accordingly. Aerobic exercise is used because your heart rate drops quickly when you maintain the proper intensity level. (See page 9.) To measure your... your heart rate near the highest number in your wrist as a guide. For aerobic exercise, adjust the speed and incline of the treadmill until your heart rate is especially important for individuals over the age of time. Aerobic Exercise If your training zone. The lower two ...

English Manual
Page 19
...(1-800-366-7278) The model number and serial number of your nearest SEARS Service Center. When requesting help assembling or operating the WESLO CADENCE TS 310 treadmill • a part is used commercially or for immediate purchase or special order when you may also have other rights which vary from... on a decal attached to be prepared to order parts by telephone, call the following information: • The NAME OF THE PRODUCT (WESLO CADENCE® TS 310 treadmill) • The MODEL NUMBER OF THE PRODUCT (831.294620) • The KEY NUMBER AND DESCRIPTION OF THE PART (see the EXPLODED...
...(1-800-366-7278) The model number and serial number of your nearest SEARS Service Center. When requesting help assembling or operating the WESLO CADENCE TS 310 treadmill • a part is used commercially or for immediate purchase or special order when you may also have other rights which vary from... on a decal attached to be prepared to order parts by telephone, call the following information: • The NAME OF THE PRODUCT (WESLO CADENCE® TS 310 treadmill) • The MODEL NUMBER OF THE PRODUCT (831.294620) • The KEY NUMBER AND DESCRIPTION OF THE PART (see the EXPLODED...


