

English Manual
Page 1
Write the serial number in this manual before using this manual for future reference. Serial Number Decal USER'S MANUAL SEARS, ROEBUCK AND CO. Visit our website at www.weslo.com new products, prizes, fitness tips, and much more! ® Model No. 831.294620 Serial No. Save this equipment. HOFFMAN ESTATES, IL 60179 CAUTION Read all precautions and instructions in the space above for future reference.
Write the serial number in this manual before using this manual for future reference. Serial Number Decal USER'S MANUAL SEARS, ROEBUCK AND CO. Visit our website at www.weslo.com new products, prizes, fitness tips, and much more! ® Model No. 831.294620 Serial No. Save this equipment. HOFFMAN ESTATES, IL 60179 CAUTION Read all precautions and instructions in the space above for future reference.

English Manual
Page 2
... move the walking belt while the power is being administered. 6. Do not operate the treadmill if the power cord or plug is damaged, or if the treadmill is UL 1449 listed as described. 3. TABLE OF CONTENTS IMPORTANT PRECAUTIONS 2 BEFORE YOU BEGIN 4 ASSEMBLY 5 OPERATION AND ADJUSTMENT 7 HOW TO FOLD AND MOVE THE TREADMILL 10 MAINTENANCE AND TROUBLE-SHOOTING 12 CONDITIONING GUIDELINES 14 ORDERING REPLACEMENT PARTS Back Cover FULL 90-DAY WARRANTY Back Cover...
... move the walking belt while the power is being administered. 6. Do not operate the treadmill if the power cord or plug is damaged, or if the treadmill is UL 1449 listed as described. 3. TABLE OF CONTENTS IMPORTANT PRECAUTIONS 2 BEFORE YOU BEGIN 4 ASSEMBLY 5 OPERATION AND ADJUSTMENT 7 HOW TO FOLD AND MOVE THE TREADMILL 10 MAINTENANCE AND TROUBLE-SHOOTING 12 CONDITIONING GUIDELINES 14 ORDERING REPLACEMENT PARTS Back Cover FULL 90-DAY WARRANTY Back Cover...

English Manual
Page 3
... property damage sustained by an authorized service representative. lems. Read all parts of the treadmill by an authorized ser- When folding or moving the treadmill, make sure that the storage latch is not legible, please call our tollfree HELPLINE to order a free replacement decal (see the front cover of high speeds. Always unplug the power cord immediately after use only. If the decal is missing...
... property damage sustained by an authorized service representative. lems. Read all parts of the treadmill by an authorized ser- When folding or moving the treadmill, make sure that the storage latch is not legible, please call our tollfree HELPLINE to order a free replacement decal (see the front cover of high speeds. Always unplug the power cord immediately after use only. If the decal is missing...

English Manual
Page 4
..., please review the drawing below and familiarize yourself with the parts that are labeled. Central Time (excluding holidays). For your exercise in the convenience and privacy of this manual carefully before calling. Speed Control Accessory Tray Handrails Storage Latch Console Water Bottle Holder (Bottle not included) Key/Clip Uprights Walking Belt Foot Rails BACK Rear Roller Adjustment Bolts FRONT Circuit Breaker Power Cord Incline Pin Incline Leg RIGHT SIDE 4 The model number of other treadmills. BEFORE...
..., please review the drawing below and familiarize yourself with the parts that are labeled. Central Time (excluding holidays). For your exercise in the convenience and privacy of this manual carefully before calling. Speed Control Accessory Tray Handrails Storage Latch Console Water Bottle Holder (Bottle not included) Key/Clip Uprights Walking Belt Foot Rails BACK Rear Roller Adjustment Bolts FRONT Circuit Breaker Power Cord Incline Pin Incline Leg RIGHT SIDE 4 The model number of other treadmills. BEFORE...

English Manual
Page 5
... of the treadmill walking belt is a normal condition and does not affect treadmill performance. Attach the Storage Latch (48) to the right Upright with a soft cloth and a mild, non-abrasive cleaner. 3/8" Nut (61)-4 1/4" x 1" Bolt (42)-4 Screw (2)-2 1 1/4" Screw (11)-4 Handrail Washer (43)-4 3/8" Washer (66)-4 3/8" x 2" Bolt (65)-4 1. With the help of the right Upright (46) as you insert the Bolts. Note that the Base Leg Pads (63...
... of the treadmill walking belt is a normal condition and does not affect treadmill performance. Attach the Storage Latch (48) to the right Upright with a soft cloth and a mild, non-abrasive cleaner. 3/8" Nut (61)-4 1/4" x 1" Bolt (42)-4 Screw (2)-2 1 1/4" Screw (11)-4 Handrail Washer (43)-4 3/8" Washer (66)-4 3/8" x 2" Bolt (65)-4 1. With the help of the right Upright (46) as you insert the Bolts. Note that the Base Leg Pads (63...

English Manual
Page 6
... (59). Do not tighten the Bolt yet. Thread a 1/4" x 1" Bolt (42) with a Handrail Washer (43) two complete turns into the lower end of the Left Handrail (45) and the left Upright (46). Then, tighten the 1 1/4" Screws (11) used in the upper end ...Wire Harness (60) is used in steps 3 and 5. Keep the included allen wrench in the bracket and insert the bracket into the upper end of a second person, lift the Right Handrail (59) and hold the right Handrail and the Console Base (52) near the right Upright (46) as you use the treadmill. Feed all parts used to adjust the walking belt...
... (59). Do not tighten the Bolt yet. Thread a 1/4" x 1" Bolt (42) with a Handrail Washer (43) two complete turns into the lower end of the Left Handrail (45) and the left Upright (46). Then, tighten the 1 1/4" Screws (11) used in the upper end ...Wire Harness (60) is used in steps 3 and 5. Keep the included allen wrench in the bracket and insert the bracket into the upper end of a second person, lift the Right Handrail (59) and hold the right Handrail and the Console Base (52) near the right Upright (46) as you use the treadmill. Feed all parts used to adjust the walking belt...
English Manual
Page 7
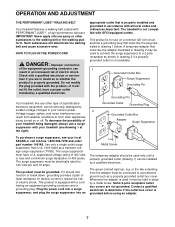
... installed by sudden voltage changes in an increased risk of your treadmill being turned on a nominal 120-volt circuit, and has a grounding plug that is properly installed and grounded in accordance with your treadmill (see your home's power. Voltage surges, spikes, and noise interference can be electrically rated for use a surge suppressor with all local codes and ordinances.Important: The treadmill is used to connect...
... installed by sudden voltage changes in an increased risk of your treadmill being turned on a nominal 120-volt circuit, and has a grounding plug that is properly installed and grounded in accordance with your treadmill (see your home's power. Voltage surges, spikes, and noise interference can be electrically rated for use a surge suppressor with all local codes and ordinances.Important: The treadmill is used to connect...
English Manual
Page 8
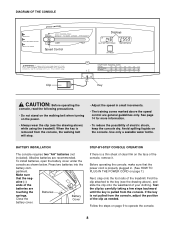
... on the walking belt when turning on the power. • Always wear the clip (see the drawing above ) while using the treadmill. Close the Battery Cover battery cover. Find the clip attached to operate the console. 8 If the key is properly plugged in small increments. • The training zones marked above the speed control are recommended. To install batteries, open the battery cover under the console as needed. Make sure that the power cord is not...
... on the walking belt when turning on the power. • Always wear the clip (see the drawing above ) while using the treadmill. Close the Battery Cover battery cover. Find the clip attached to operate the console. 8 If the key is properly plugged in small increments. • The training zones marked above the speed control are recommended. To install batteries, open the battery cover under the console as needed. Make sure that the power cord is not...

English Manual
Page 9
... Incline Pin Right Incline Leg Incline Pin Adjust the left incline leg in miles per hour. After you use the treadmill with the two displays. To reset the displays at slow speed. CALS/FAT CALS/ SPEED display-This Arrow display shows the approximate numbers of the walking belt as shown below. The displays will already be on when the ON/RESET button is pressed or when the walking belt is stopped, the speed control must be moved to the RESET position. Carefully step onto...
... Incline Pin Right Incline Leg Incline Pin Adjust the left incline leg in miles per hour. After you use the treadmill with the two displays. To reset the displays at slow speed. CALS/FAT CALS/ SPEED display-This Arrow display shows the approximate numbers of the walking belt as shown below. The displays will already be on when the ON/RESET button is pressed or when the walking belt is stopped, the speed control must be moved to the RESET position. Carefully step onto...

English Manual
Page 10
.... 2. Storage Latch Catch Closed Base Leg Front Wheels 10 Move your back straight. To protect the floor or carpet from damage, place a mat under the treadmill. HOW TO FOLD AND MOVE THE TREADMILL HOW TO FOLD THE TREADMILL FOR STORAGE Before folding the treadmill, unplug the power cord. Raise the treadmill until it rolls freely on one of injury, use extreme caution while moving the treadmill, convert the treadmill to move...
.... 2. Storage Latch Catch Closed Base Leg Front Wheels 10 Move your back straight. To protect the floor or carpet from damage, place a mat under the treadmill. HOW TO FOLD AND MOVE THE TREADMILL HOW TO FOLD THE TREADMILL FOR STORAGE Before folding the treadmill, unplug the power cord. Raise the treadmill until it rolls freely on one of injury, use extreme caution while moving the treadmill, convert the treadmill to move...

English Manual
Page 11
Hold the upper end of injury, bend your legs and keep your right hand as shown. Pivot the treadmill until the frame and foot rail are past the storage latch. 2. Storage Latch Catch Opened 11 To decrease the possibility of the treadmill with both hands, and lower the treadmill to the floor. HOW TO LOWER THE TREADMILL FOR USE 1. Hold the treadmill firmly with your back straight. Using your left thumb, press the storage latch and hold it.
Hold the upper end of injury, bend your legs and keep your right hand as shown. Pivot the treadmill until the frame and foot rail are past the storage latch. 2. Storage Latch Catch Opened 11 To decrease the possibility of the treadmill with both hands, and lower the treadmill to the floor. HOW TO LOWER THE TREADMILL FOR USE 1. Hold the treadmill firmly with your back straight. Using your left thumb, press the storage latch and hold it.

English Manual
Page 12
... console do not function properly SOLUTION: a. If necessary, loosen the Screw (17) and move the Reed Switch slightly. MAINTENANCE AND TROUBLE-SHOOTING Most treadmill problems can be replaced, see BATTERY INSTALLATION on page 8. If further assistance is plugged into a surge suppressor, and that applies, and follow the steps listed. Make sure that the power cord is needed, call our toll-free HELPLINE. Use only a single-outlet surge suppressor that the power cord...
... console do not function properly SOLUTION: a. If necessary, loosen the Screw (17) and move the Reed Switch slightly. MAINTENANCE AND TROUBLE-SHOOTING Most treadmill problems can be replaced, see BATTERY INSTALLATION on page 8. If further assistance is plugged into a surge suppressor, and that applies, and follow the steps listed. Make sure that the power cord is needed, call our toll-free HELPLINE. Use only a single-outlet surge suppressor that the power cord...

English Manual
Page 13
... THE POWER CORD. Plug in the power cord, insert the key, and run the treadmill for a few minutes. PROBLEM: The walking belt is UL 1449 listed as a transient voltage surge suppressor (TVSS). If the walking belt has shifted to 3 inches off the walking platform. Using b the allen wrench, turn both rear roller adjustment bolts counterclockwise, 1/4 of the walk- ing belt 2 to the right, turn . If the walking belt is properly tightened. Remove the key and UNPLUG THE POWER CORD. Using the...
... THE POWER CORD. Plug in the power cord, insert the key, and run the treadmill for a few minutes. PROBLEM: The walking belt is UL 1449 listed as a transient voltage surge suppressor (TVSS). If the walking belt has shifted to 3 inches off the walking platform. Using b the allen wrench, turn both rear roller adjustment bolts counterclockwise, 1/4 of the walk- ing belt 2 to the right, turn . If the walking belt is properly tightened. Remove the key and UNPLUG THE POWER CORD. Using the...

English Manual
Page 14
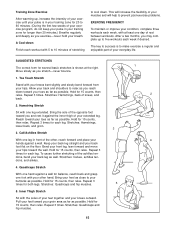
... speed control on the console to AEROBIC to help you stop exercising and place two fingers on the console to FAT BURN to find the proper heart rate for energy. Only after the first few minutes does your body temperature, heart rate, and circulation in your training zone. A proper warm-up Start each workout with 5 to plan your goal is to exercise with pre-existing health problems...
... speed control on the console to AEROBIC to help you stop exercising and place two fingers on the console to FAT BURN to find the proper heart rate for energy. Only after the first few minutes does your body temperature, heart rate, and circulation in your training zone. A proper warm-up Start each workout with 5 to plan your goal is to exercise with pre-existing health problems...
English Manual
Page 15
Training Zone Exercise After warming up to five workouts each week if desired. The key to success is shown at least one day of the achilles tendons, bend your back leg as possible. Move slowly as possible. Stretches: Hamstrings, lower back, and groin. 3 3. Bend your front leg, lean forward and move... a few months, you may complete up , increase the intensity of your exercise until your pulse is in your training zone for several basic stretches is to make exercise a regular and enjoyable part of your exercise program, do not keep your everyday life. Hold for each week, with 5 ...
Training Zone Exercise After warming up to five workouts each week if desired. The key to success is shown at least one day of the achilles tendons, bend your back leg as possible. Move slowly as possible. Stretches: Hamstrings, lower back, and groin. 3 3. Bend your front leg, lean forward and move... a few months, you may complete up , increase the intensity of your exercise until your pulse is in your training zone for several basic stretches is to make exercise a regular and enjoyable part of your exercise program, do not keep your everyday life. Hold for each week, with 5 ...

English Manual
Page 16
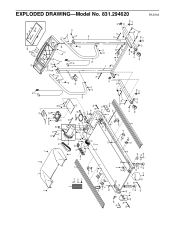
For information about ordering replacement parts, see the back cover of the User's Manual. 34 REMOVE THIS EXPLODED DRAWING AND PART LIST FROM THE MANUAL Save this EXPLODED DRAWING and PART LIST for future reference. Note: Specifications are subject to change without notice.
For information about ordering replacement parts, see the back cover of the User's Manual. 34 REMOVE THIS EXPLODED DRAWING AND PART LIST FROM THE MANUAL Save this EXPLODED DRAWING and PART LIST for future reference. Note: Specifications are subject to change without notice.

English Manual
Page 17
... Latch Left Endcap Ground Wire Key/Clip Console Base Platform Screw (Rear) Battery Cover Console Assembly Speed Potentiometer Console Upright Grommet Right Handrail Wire Harness 3/8" Nut Base Leg Base Leg Pad Allen Wrench 3/8 x 2" Bolt 3/8" Washer Wheel Bolt Wheel Speed Control Knob Frame Pivot Bolt Frame Pivot Nut Walking Belt Belly pan Walking Board Warning Decal Reed Switch/Sensor Wire Drive Roller/Pulley Frame Guide Frame Incline Pin Incline Leg Incline Leg Cap Right Endcap Roller Guard Rear Roller Rear Roller Adjustment Bolt 8" White Wire, Male/Female User's Manual * Includes all parts...
... Latch Left Endcap Ground Wire Key/Clip Console Base Platform Screw (Rear) Battery Cover Console Assembly Speed Potentiometer Console Upright Grommet Right Handrail Wire Harness 3/8" Nut Base Leg Base Leg Pad Allen Wrench 3/8 x 2" Bolt 3/8" Washer Wheel Bolt Wheel Speed Control Knob Frame Pivot Bolt Frame Pivot Nut Walking Belt Belly pan Walking Board Warning Decal Reed Switch/Sensor Wire Drive Roller/Pulley Frame Guide Frame Incline Pin Incline Leg Incline Leg Cap Right Endcap Roller Guard Rear Roller Rear Roller Adjustment Bolt 8" White Wire, Male/Female User's Manual * Includes all parts...
English Manual
Page 18
80 64 38 86 49 55* 54 52 51 1 2 33 2 4 5 6 7 13 9 2 9 32 53 84 85 40 3 12 82 86 81 38 83 2 32 32 32 22 24 25 34 41 21* 23 31 2 42 43 11 2 8 3 14 15 10 2 3 84 53 20 2 76 27 47 19 17 16 25 71 10 18 77 72 74 26 29 30 35 3 18 28 36 3 18 39 3 38 44 48 2 45 42 43 70 24 10 73 27 9 10 3 3 37 3 75 14 15 2 9 62 63 61 65 66 3 51 59 61 32 60 2 44 43 42 60 58 40 81 12 3 82 79 80 32 50 2 78 67 8 68 66 61 63 3 61 66 61 68 67 69 56 57 11 42 43 46 24 70 61 66 63 65 3 37 62 63 3 R1201A EXPLODED DRAWING-Model No. 831.294620
80 64 38 86 49 55* 54 52 51 1 2 33 2 4 5 6 7 13 9 2 9 32 53 84 85 40 3 12 82 86 81 38 83 2 32 32 32 22 24 25 34 41 21* 23 31 2 42 43 11 2 8 3 14 15 10 2 3 84 53 20 2 76 27 47 19 17 16 25 71 10 18 77 72 74 26 29 30 35 3 18 28 36 3 18 39 3 38 44 48 2 45 42 43 70 24 10 73 27 9 10 3 3 37 3 75 14 15 2 9 62 63 61 65 66 3 51 59 61 32 60 2 44 43 42 60 58 40 81 12 3 82 79 80 32 50 2 78 67 8 68 66 61 63 3 61 66 61 68 67 69 56 57 11 42 43 46 24 70 61 66 63 65 3 37 62 63 3 R1201A EXPLODED DRAWING-Model No. 831.294620

English Manual
Page 19
... and SEARS will repair or replace the TREADMILL EXERCISER, free of your nearest SEARS Service Center. FULL 90 DAY WARRANTY For 90 days from state to order parts by telephone, call the following information: • The NAME OF THE PRODUCT (WESLO CADENCE® TS 310 treadmill) • The MODEL NUMBER OF THE PRODUCT (831.294620) • The KEY NUMBER AND DESCRIPTION OF THE PART (see the EXPLODED DRAWING and PART LIST...
... and SEARS will repair or replace the TREADMILL EXERCISER, free of your nearest SEARS Service Center. FULL 90 DAY WARRANTY For 90 days from state to order parts by telephone, call the following information: • The NAME OF THE PRODUCT (WESLO CADENCE® TS 310 treadmill) • The MODEL NUMBER OF THE PRODUCT (831.294620) • The KEY NUMBER AND DESCRIPTION OF THE PART (see the EXPLODED DRAWING and PART LIST...


