
English Manual
Page 4
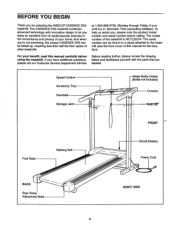
...us assist you, please note the product model number and serial number before using the treadmill. The model number of your benefit, read this manual for selecting the WESLO® CADENCE DX5 treadmill. The serial number can be found on a decal attached to let you enjoy an...other treadmills. The CADENCE DX5 treadmill combines advanced technology with the parts that are labeled. BEFORE YOU BEGIN Thank you for the location). Speed Control Accessory Tray Handrails 0 Storage Latch -Water Bottle Holder (Bottle not included) Console KeyiCTt FRONT Foot Rails Walking Belt BACK...
...us assist you, please note the product model number and serial number before using the treadmill. The model number of your benefit, read this manual for selecting the WESLO® CADENCE DX5 treadmill. The serial number can be found on a decal attached to let you enjoy an...other treadmills. The CADENCE DX5 treadmill combines advanced technology with the parts that are labeled. BEFORE YOU BEGIN Thank you for the location). Speed Control Accessory Tray Handrails 0 Storage Latch -Water Bottle Holder (Bottle not included) Console KeyiCTt FRONT Foot Rails Walking Belt BACK...
English Manual
Page 5
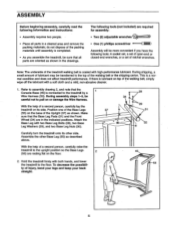
...), and two Base Leg Nuts (30). Note: The underside of the treadmill walking belt is a normal condition and does not affect treadmill performance. Assemble the other side. With the help of a second person, carefully lay the treadmill on its other Base Leg (55) as described above. To decrease the... 28 29 31 55 45 2. During assembly steps 1-3, be careful not to the treadmill by a Wire Harness (53). With the help of a second person, carefully raise the treadmill to the top of the walking belt or the shipping carton. The following tools (not included) are required for assembly: ...
...), and two Base Leg Nuts (30). Note: The underside of the treadmill walking belt is a normal condition and does not affect treadmill performance. Assemble the other side. With the help of a second person, carefully lay the treadmill on its other Base Leg (55) as described above. To decrease the... 28 29 31 55 45 2. During assembly steps 1-3, be careful not to the treadmill by a Wire Harness (53). With the help of a second person, carefully raise the treadmill to the top of the walking belt or the shipping carton. The following tools (not included) are required for assembly: ...

English Manual
Page 7
OPERATION AND ADJUSTMENT THE PERFORMANT LUBETM WALKING BELT Your treadmill features a walking belt coated with your treadmill. by a qualified electrician. *'• The green-colored rigid ear, lug, or the like the plug illustrated in drawing 1 below. Voltage surges, spikes, and noise interference ...
OPERATION AND ADJUSTMENT THE PERFORMANT LUBETM WALKING BELT Your treadmill features a walking belt coated with your treadmill. by a qualified electrician. *'• The green-colored rigid ear, lug, or the like the plug illustrated in drawing 1 below. Voltage surges, spikes, and noise interference ...
English Manual
Page 8
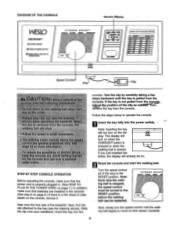
...Off Yt f !if adjust-the position.-of the treadmill. If you just installed batteries, the display will not turn on . Reset the console and start the walking belt. Next, find the clip attached to the RESET position before the walking belt canbarestarted. Carefully DIAGRAM OF THE CONSOLE Monitor Display WED ...Clip console. e Oat Note: Inserting the key will already be turned to the key (see the drawing above). steps backward until the walking belt begins to operate the console. 11 • ra Insert the key fully into the Turn the speed control all of clear plastic on page 6.)...
...Off Yt f !if adjust-the position.-of the treadmill. If you just installed batteries, the display will not turn on . Reset the console and start the walking belt. Next, find the clip attached to the RESET position before the walking belt canbarestarted. Carefully DIAGRAM OF THE CONSOLE Monitor Display WED ...Clip console. e Oat Note: Inserting the key will already be turned to the key (see the drawing above). steps backward until the walking belt begins to operate the console. 11 • ra Insert the key fully into the Turn the speed control all of clear plastic on page 6.)...
English Manual
Page 9
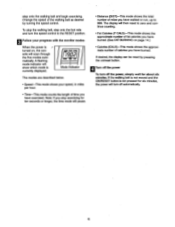
... not moved and the ON/RESET button is Mode Indicator currently displayed. Change the speed of miles you stop the walking belt, step onto the foot rails and turn off automatically. A flashing /)1731 mode indicator will scan through the five modes automatically. Note: If you have walked .... To stop exercising for ten seconds or longer, the time mode will pause. • Distance (DIST)-This mode shows the total number of the walking belt as desired by pressing the on , the console will show which mode is not pressed for about six minutes.
... not moved and the ON/RESET button is Mode Indicator currently displayed. Change the speed of miles you stop the walking belt, step onto the foot rails and turn off automatically. A flashing /)1731 mode indicator will scan through the five modes automatically. Note: If you have walked .... To stop exercising for ten seconds or longer, the time mode will pause. • Distance (DIST)-This mode shows the total number of the walking belt as desired by pressing the on , the console will show which mode is not pressed for about six minutes.
English Manual
Page 13
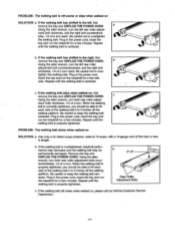
... , first remove the key and UNPLUG THE POWER CORD. When the walking belt is centered. If the walking belt is centered. Repeat until the walking belt is overtightened, treadmill performance may decrease and the walking belt may be permanently damaged. Plug in the power cord, insert the key and... run the treadmill for a few minutes. If the walking belt has shifted to over- Plug in the power cord, insert the key and run the treadmill for a few minutes. Use only a UL-listed surge protector, rated at...
... , first remove the key and UNPLUG THE POWER CORD. When the walking belt is centered. If the walking belt is centered. Repeat until the walking belt is overtightened, treadmill performance may decrease and the walking belt may be permanently damaged. Plug in the power cord, insert the key and... run the treadmill for a few minutes. If the walking belt has shifted to over- Plug in the power cord, insert the key and run the treadmill for a few minutes. Use only a UL-listed surge protector, rated at...

English Manual
Page 19
... 1 Description Frame Guide Screw Console Base Console Screw Console Cover Battery Cover Console Assembly Speed Potentiometer Speed Control Knob Ground Screw/Belt Guide Screw Wire Harness Grommet Base Leg Belly Pan Fastener Belly Pan Upright Spacer Motor Tension Washer Left Foot Rail Frame Pivot Nut... 4 30 6 31 4 32 2 33 2 34 2 35 1 36 2 37 1 38 1 39 1 40 8 41 4 42 1 43 1 Description Hood Adhesive Clip Motor Belt Motor Pivot Nut Pulley/Flywheel/Fan Motor/Pulley/FlywheeVFan Motor Reed Switch Clip Screw Reed Switch Clip Hood Anchor Screw Hood Anchor Front Roller Bolt...
... 1 Description Frame Guide Screw Console Base Console Screw Console Cover Battery Cover Console Assembly Speed Potentiometer Speed Control Knob Ground Screw/Belt Guide Screw Wire Harness Grommet Base Leg Belly Pan Fastener Belly Pan Upright Spacer Motor Tension Washer Left Foot Rail Frame Pivot Nut... 4 30 6 31 4 32 2 33 2 34 2 35 1 36 2 37 1 38 1 39 1 40 8 41 4 42 1 43 1 Description Hood Adhesive Clip Motor Belt Motor Pivot Nut Pulley/Flywheel/Fan Motor/Pulley/FlywheeVFan Motor Reed Switch Clip Screw Reed Switch Clip Hood Anchor Screw Hood Anchor Front Roller Bolt...


