

English Manual
Page 1
... the serial number in the space above for future reference. MST USER'S MANUAL JAN 1 2001 ,Cf)- (IPAC-\\Y a Ibis manual beforeusl crOtet#0: Mar- If you . www.weslo.com new products, prizes, fitness tips, and much more! WESLO® Model No. As a manufacturer, we will provide immediate assistance, free of charge to you have questions, or if there are missing or damaged parts, we...
... the serial number in the space above for future reference. MST USER'S MANUAL JAN 1 2001 ,Cf)- (IPAC-\\Y a Ibis manual beforeusl crOtet#0: Mar- If you . www.weslo.com new products, prizes, fitness tips, and much more! WESLO® Model No. As a manufacturer, we will provide immediate assistance, free of charge to you have questions, or if there are missing or damaged parts, we...

English Manual
Page 2
... 0 I S„ .. O • ,;• 0 toOrd.into.a ur e. TABLE OF CONTENTS IMPORTANT PRECAUTIONS BEFORE YOU BEGIN ASSEMBLY OPERATION AND ADJUSTMENT HOW TO FOLD AND MOVE THE TREADMILL MAINTENANCE AND TROUBLE-SHOOTING CONDITIONING GUIDELINES ORDERING REPLACEMENT PARTS LIMITED WARRANTY 2 4 5 7 10 12 14 Back Cover Back Cover Note: A PART LIST and an EXPLODED DRAWING are attached in a ntheMR Oro..., 4. 'ilerstal .treads ..1. 1 . . e :C un ortine.age ar 6 rte• admill Urn e6lgxhr0n0gc...
... 0 I S„ .. O • ,;• 0 toOrd.into.a ur e. TABLE OF CONTENTS IMPORTANT PRECAUTIONS BEFORE YOU BEGIN ASSEMBLY OPERATION AND ADJUSTMENT HOW TO FOLD AND MOVE THE TREADMILL MAINTENANCE AND TROUBLE-SHOOTING CONDITIONING GUIDELINES ORDERING REPLACEMENT PARTS LIMITED WARRANTY 2 4 5 7 10 12 14 Back Cover Back Cover Note: A PART LIST and an EXPLODED DRAWING are attached in a ntheMR Oro..., 4. 'ilerstal .treads ..1. 1 . . e :C un ortine.age ar 6 rte• admill Urn e6lgxhr0n0gc...
English Manual
Page 3
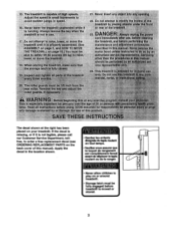
...% 4- Adjust the speed in Never leave the treadmill gna en e while it afe deft r iihtakS1le ctinta..an: 21. fast:' s ea mi Ivy.Dti.not USE ore beginnin It-Stelae;. Or rear t tread 2 .NE. hood "instructed noii*.ed er han tea:p ouid be fully engaged before treadmill is running. tSEM>*Y on and , .TO.MOYE ENE TREADMILL on or around treadmill. • Storage latch...
...% 4- Adjust the speed in Never leave the treadmill gna en e while it afe deft r iihtakS1le ctinta..an: 21. fast:' s ea mi Ivy.Dti.not USE ore beginnin It-Stelae;. Or rear t tread 2 .NE. hood "instructed noii*.ed er han tea:p ouid be fully engaged before treadmill is running. tSEM>*Y on and , .TO.MOYE ENE TREADMILL on or around treadmill. • Storage latch...
English Manual
Page 4
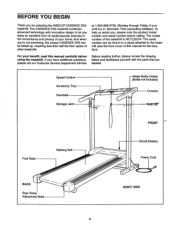
... unique CADENCE DX5 can be folded up, requiring less than half the floor space of other treadmills. For your home. Speed Control Accessory Tray Handrails 0 Storage Latch -Water Bottle Holder (Bottle not included) Console KeyiCTt FRONT Foot Rails Walking Belt BACK Rear Roller Adjustment Bolts Circuit Breaker Power Cord O RIGHT SIDE 4 To help us assist you have additional questions, please call our Customer Service Department toll-free Before reading further, please review...
... unique CADENCE DX5 can be folded up, requiring less than half the floor space of other treadmills. For your home. Speed Control Accessory Tray Handrails 0 Storage Latch -Water Bottle Holder (Bottle not included) Console KeyiCTt FRONT Foot Rails Walking Belt BACK Rear Roller Adjustment Bolts Circuit Breaker Power Cord O RIGHT SIDE 4 To help us assist you have additional questions, please call our Customer Service Department toll-free Before reading further, please review...
English Manual
Page 5
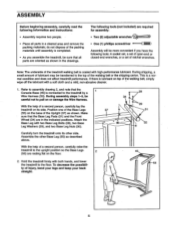
... the 1 Console Base (45) is connected to the floor. If there is coated with a soft cloth and a mild, non-abrasive cleaner. 1. Attach the Base Leg with both hands, and lower the treadmill to the treadmill by a Wire Harness (53). Carefully turn the treadmill onto its side. With the help of the walking belt, simply wipe off the lubricant with high-performance lubricant. Assemble the other...
... the 1 Console Base (45) is connected to the floor. If there is coated with a soft cloth and a mild, non-abrasive cleaner. 1. Attach the Base Leg with both hands, and lower the treadmill to the treadmill by a Wire Harness (53). Carefully turn the treadmill onto its side. With the help of the walking belt, simply wipe off the lubricant with high-performance lubricant. Assemble the other...
English Manual
Page 6
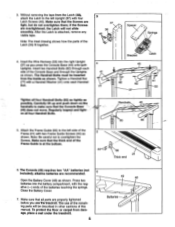
...- Handrails 45 , ..,... ■ of the Latch (38) fit together. 4. if the Screws are properly tightened before you press the Console Base (45) onto (loth Uprights. Press two batteries into the right Upright (37) as shown. Insert two Handrail Bolts (82) through the Uprights as shown. Attach the Frame Guide (66) to the left side of the Frame Guide is attached, remove any visible tape. Make sure that...
...- Handrails 45 , ..,... ■ of the Latch (38) fit together. 4. if the Screws are properly tightened before you press the Console Base (45) onto (loth Uprights. Press two batteries into the right Upright (37) as shown. Insert two Handrail Bolts (82) through the Uprights as shown. Attach the Frame Guide (66) to the left side of the Frame Guide is attached, remove any visible tape. Make sure that...

English Manual
Page 7
... Outlet Box Grounding Pin Treadmill Power Cord included) with your home's power. Voltage surges, spikes, and noise interference can be connected to reduce the o. Use only a UL- Whenever the adapter is for electric current to a permanent ground such as shown in length. If it must be installed r. flop Lug Metal Screw Grounding Pin Grounding Plug Surge Protector 7 They will deterioratelhe walking belt and cause excessive...
... Outlet Box Grounding Pin Treadmill Power Cord included) with your home's power. Voltage surges, spikes, and noise interference can be connected to reduce the o. Use only a UL- Whenever the adapter is for electric current to a permanent ground such as shown in length. If it must be installed r. flop Lug Metal Screw Grounding Pin Grounding Plug Surge Protector 7 They will deterioratelhe walking belt and cause excessive...
English Manual
Page 8
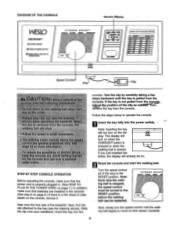
... THE POWER CORD on page 7.) In addition, make sure that batteries are installed in the console. (See step 6 on when the ON/RESET button is pressed or when the walking belt is pulled from the console. FITNESS GUIDE WWI UP WNW MOW RUIr Next, slowly turn the speed control until the key is started. Test the clip by carefully taking a few 42 a. If you just installed batteries, the display will turn on the console, remove...
... THE POWER CORD on page 7.) In addition, make sure that batteries are installed in the console. (See step 6 on when the ON/RESET button is pressed or when the walking belt is pulled from the console. FITNESS GUIDE WWI UP WNW MOW RUIr Next, slowly turn the speed control until the key is started. Test the clip by carefully taking a few 42 a. If you just installed batteries, the display will turn on the console, remove...
English Manual
Page 9
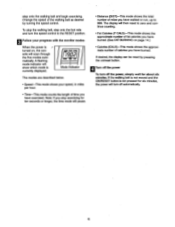
... turn off automatically. If the walking belt is not moved and the ON/RESET button is Mode Indicator currently displayed. Note: If you have burned. To stop exercising for about six minutes. The display will pause. • Distance (DIST)-This mode shows the total number of the walking belt as desired by pressing the on , the console will show which mode is not pressed for six minutes, the power will turn the speed control...
... turn off automatically. If the walking belt is not moved and the ON/RESET button is Mode Indicator currently displayed. Note: If you have burned. To stop exercising for about six minutes. The display will pause. • Distance (DIST)-This mode shows the total number of the walking belt as desired by pressing the on , the console will show which mode is not pressed for six minutes, the power will turn the speed control...
English Manual
Page 10
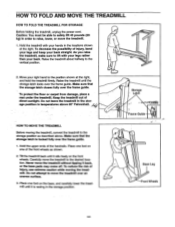
... keep your hands in the storage position. Storage Latch •'-Ctored Frame Guide Base Leg Front Wheels n HOW TO FOLD AND MOVE THE TREADMILL HOW TO FOLD THE TREADMILL FOR STORAGE Before folding the treadmill, unplug the power cord. To protect the floor or carpet from damage, place a mat under the treadmill. Place one of direct sunlight. Hold the treadmill with your legs rather than your back. As you...
... keep your hands in the storage position. Storage Latch •'-Ctored Frame Guide Base Leg Front Wheels n HOW TO FOLD AND MOVE THE TREADMILL HOW TO FOLD THE TREADMILL FOR STORAGE Before folding the treadmill, unplug the power cord. To protect the floor or carpet from damage, place a mat under the treadmill. Place one of direct sunlight. Hold the treadmill with your legs rather than your back. As you...
English Manual
Page 11
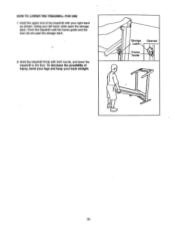
Pivot the treadmill until the frame guide and the foot rail are past the storage latch. 2. To decrease the possibility of the treadmill with both hands, and lower the treadmill to the floor. Storage Latch Frame Guide Opened 0 O 11 Hold the treadmill firmly with your back straight. Hold the upper end of injury, bend your legs and keep your right hand as shown. HOW TO LOWER THE TREADMILL FOR USE 1. Using your left hand, slide open the storage latch.
Pivot the treadmill until the frame guide and the foot rail are past the storage latch. 2. To decrease the possibility of the treadmill with both hands, and lower the treadmill to the floor. Storage Latch Frame Guide Opened 0 O 11 Hold the treadmill firmly with your back straight. Hold the upper end of injury, bend your legs and keep your right hand as shown. HOW TO LOWER THE TREADMILL FOR USE 1. Using your left hand, slide open the storage latch.
English Manual
Page 12
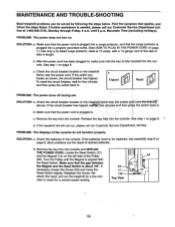
... move the Reed Switch slightly. until the Magnet is plugged in , make sure that applies, and follow the steps listed. After the power cord has been plugged in . c Tripped Reset PROBLEM: The power turns off during use SOLUTION: a. If the batteries need to check for five minutes and then press the switch back in length. See step 1 on the treaskrAframenear the•power-cprkd (see assembly step 6 on page 6. PROBLEM: The displays of the Pulley...
... move the Reed Switch slightly. until the Magnet is plugged in , make sure that applies, and follow the steps listed. After the power cord has been plugged in . c Tripped Reset PROBLEM: The power turns off during use SOLUTION: a. If the batteries need to check for five minutes and then press the switch back in length. See step 1 on the treaskrAframenear the•power-cprkd (see assembly step 6 on page 6. PROBLEM: The displays of the Pulley...
English Manual
Page 13
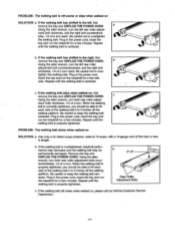
...-free Customer Service Department. 14 If the walking belt has shifted to overtighten the walking belt. tighten the walking belt. c Using the alien wrench, turn both rear roller adjustment bolts counterclockwise, 1/4 of a turn each side of the walking belt 2 to the left rear roller adjustment bolt clockwise, and the right bolt counterclockwise, 1/4 of a turn . Repeat until the walking belt is centered. utes. Plug in the power cord, insert the key and run the treadmill for a few min- If the walking belt is overtightened, treadmill...
...-free Customer Service Department. 14 If the walking belt has shifted to overtighten the walking belt. tighten the walking belt. c Using the alien wrench, turn both rear roller adjustment bolts counterclockwise, 1/4 of a turn each side of the walking belt 2 to the left rear roller adjustment bolt clockwise, and the right bolt counterclockwise, 1/4 of a turn . Repeat until the walking belt is centered. utes. Plug in the power cord, insert the key and run the treadmill for a few min- If the walking belt is overtightened, treadmill...
English Manual
Page 14
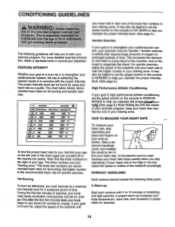
... YOUR HEART RATE To measure your heart rate, stop exercising.) If your heart rate is near the low end of your body temperature, heart rate, and circulation in your goal is to 10 minutes of oxygen for fat burning; The chart below shows recommended heart rates for a sustained period of the treadmill until A Warm-up increases your training zone. A proper warm-up Start each workout with 5 to exercise with : health...
... YOUR HEART RATE To measure your heart rate, stop exercising.) If your heart rate is near the low end of your body temperature, heart rate, and circulation in your goal is to 10 minutes of oxygen for fat burning; The chart below shows recommended heart rates for a sustained period of the treadmill until A Warm-up increases your training zone. A proper warm-up Start each workout with 5 to exercise with : health...
English Manual
Page 15
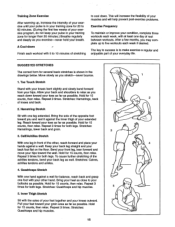
... your exercise program, do not keep your pulse in your training zone for 15 counts, then relax. The key to success is to make exercise a regular and enjoyable part of the achilles tendons, bend your back leg as possible. Hold for 15 counts, then relax. Hold for 15 counts, then relax. Bend your front leg, lean forward and move your...
... your exercise program, do not keep your pulse in your training zone for 15 counts, then relax. The key to success is to make exercise a regular and enjoyable part of the achilles tendons, bend your back leg as possible. Hold for 15 counts, then relax. Hold for 15 counts, then relax. Bend your front leg, lean forward and move your...
English Manual
Page 16
DX5 treadmill) • The SERIAL NUMBER of the product (see the PART LIST and the EXPLODED DRAWING in USA 2000 ICON Health & Fitness, Inc. This warranty extends only to any implied warranties of merchantability or fitness for which vary from detects in its authorized service centers. ICON HEALTH & FITNESS, INC., 1500 S. 1000 W., LOGAN, UT 84321-9813 Part No. 161752 R1200A Printed in the center of this manual) • The...
DX5 treadmill) • The SERIAL NUMBER of the product (see the PART LIST and the EXPLODED DRAWING in USA 2000 ICON Health & Fitness, Inc. This warranty extends only to any implied warranties of merchantability or fitness for which vary from detects in its authorized service centers. ICON HEALTH & FITNESS, INC., 1500 S. 1000 W., LOGAN, UT 84321-9813 Part No. 161752 R1200A Printed in the center of this manual) • The...

English Manual
Page 17
REMOVE THIS EXPLODED DRAWING AND PART LIST FROM THE MANUAL Save this EXPLODED DRAWING and PART LIST for future reference. .0" Note: Specifications are subject to change without notice. For information about ordering replacement parts, see the back cover of the User's Manual.
REMOVE THIS EXPLODED DRAWING AND PART LIST FROM THE MANUAL Save this EXPLODED DRAWING and PART LIST for future reference. .0" Note: Specifications are subject to change without notice. For information about ordering replacement parts, see the back cover of the User's Manual.

English Manual
Page 19
... Reed Switch Clip Screw Reed Switch Clip Hood Anchor Screw Hood Anchor Front Roller Bolt Magnet Platform Screw Motor Tension Nut Front Roller/Pulley Motor Tension Bolt Circuit BreakerPower Cord Grommet Frame Power Cord Controller Motor Pivot Bolt Screw Choke Electronics Bracket Base Leg Bolt Base Leg Washer Base Leg Nut Base Leg Pads Base Leg Endcap Wheel Bolt Wheel Allen Wrench Frame Pivot Bolt Upright Storage Latch Assembly 1" Hole Plug Latch Screw/Guide Screw Handrail Washer Key Clip Latch Decal Key No. Bolt Roller Adjustment Washer Rear Roller Ground Wire Walking Platform Walking Belt...
... Reed Switch Clip Screw Reed Switch Clip Hood Anchor Screw Hood Anchor Front Roller Bolt Magnet Platform Screw Motor Tension Nut Front Roller/Pulley Motor Tension Bolt Circuit BreakerPower Cord Grommet Frame Power Cord Controller Motor Pivot Bolt Screw Choke Electronics Bracket Base Leg Bolt Base Leg Washer Base Leg Nut Base Leg Pads Base Leg Endcap Wheel Bolt Wheel Allen Wrench Frame Pivot Bolt Upright Storage Latch Assembly 1" Hole Plug Latch Screw/Guide Screw Handrail Washer Key Clip Latch Decal Key No. Bolt Roller Adjustment Washer Rear Roller Ground Wire Walking Platform Walking Belt...


