

English Manual
Page 2
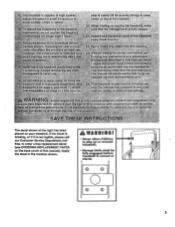
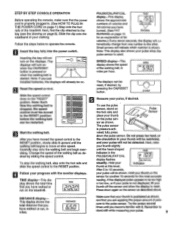
...'An TOect a lour atria ttPOTe`:rnat and er t ree e.6 .'a • *ow o rt..trerawdami11 in the tt4ctiti flat alt users of phis treadmill are adequate rroto" , recautiori hietic aticipOrttIothes are taboniMended.I th:iiieri;and•WOMeri..Allyay• kW arable eaadinillW Oa; 6 area m escn ann '...PRECAUTIONS To reduce the risk of burns, fire, electricshock,or injury to ersor1i:e read t owin ortanl recautions and information before operating the treadmill etas onsibili Of the owner to enSu .. , that Oyld become caught in a .hOtb era e:t e.4readmilt`>YYera.aarbs wets:are...
...'An TOect a lour atria ttPOTe`:rnat and er t ree e.6 .'a • *ow o rt..trerawdami11 in the tt4ctiti flat alt users of phis treadmill are adequate rroto" , recautiori hietic aticipOrttIothes are taboniMended.I th:iiieri;and•WOMeri..Allyay• kW arable eaadinillW Oa; 6 area m escn ann '...PRECAUTIONS To reduce the risk of burns, fire, electricshock,or injury to ersor1i:e read t owin ortanl recautions and information before operating the treadmill etas onsibili Of the owner to enSu .. , that Oyld become caught in a .hOtb era e:t e.4readmilt`>YYera.aarbs wets:are...
English Manual
Page 3
... )116. Apply the decal In the location shown. or iotie mue IMMONVIIStAM 0.4.:kapt.V The decal shown at the right has been placed on or around treadmill. • Storage latch must be fully engaged before pe rmin t e.rilartdrianceeri, 6 0r,u, ,n•n6i0n6g, e treadmiii unattended,W 6* vi *A 011 ,;e:no s ro onsibiti rp icist.i.i..i.g.. : • r...y.. t httead...
... )116. Apply the decal In the location shown. or iotie mue IMMONVIIStAM 0.4.:kapt.V The decal shown at the right has been placed on or around treadmill. • Storage latch must be fully engaged before pe rmin t e.rilartdrianceeri, 6 0r,u, ,n•n6i0n6g, e treadmiii unattended,W 6* vi *A 011 ,;e:no s ro onsibiti rp icist.i.i..i.g.. : • r...y.. t httead...
English Manual
Page 4
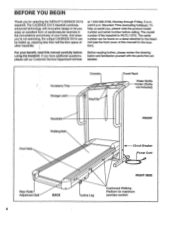
...manual for the location). And when you're not exercising, the unique CADENCE DX15 can be folded up, requiring less than half the floor space of the treadmill is WLTL11570. If you for maximum exercise comfort Mountain Time (excluding holidays...serial number before using the treadmill. The model number of other treadmills. Circuit Breaker Power Cord Rear Roller Adjustment Bolt 4 BACK 0 Incline Leg RIGHT SIDE Cushioned Walking Platform for selecting the WESLO® CADENCE DX15 treadmill. For your home. The CADENCE DX15 treadmill combines advanced technology with ...
...manual for the location). And when you're not exercising, the unique CADENCE DX15 can be folded up, requiring less than half the floor space of the treadmill is WLTL11570. If you for maximum exercise comfort Mountain Time (excluding holidays...serial number before using the treadmill. The model number of other treadmills. Circuit Breaker Power Cord Rear Roller Adjustment Bolt 4 BACK 0 Incline Leg RIGHT SIDE Cushioned Walking Platform for selecting the WESLO® CADENCE DX15 treadmill. For your home. The CADENCE DX15 treadmill combines advanced technology with ...
English Manual
Page 5
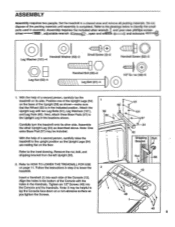
...to the upright position so the Upright Legs (54) are resting flat on page 11. With the help of a second person, carefully lay the treadmill on the base of the Console with two Leg Bolts (61), Leg Washers (101), and Leg Nuts (60). Follow the instructions in the ...(58). 1 58 60 2. ASSEMBLY Assembly requires two people. Assembly requires the Included alien wrench and your own phillips screwdriver.----- Carefully turn the treadmill onto its side. With the help of the packing materials until assembly is in the Handrails. Note: It may be helpful to HOW TO LOWER...
...to the upright position so the Upright Legs (54) are resting flat on page 11. With the help of a second person, carefully lay the treadmill on the base of the Console with two Leg Bolts (61), Leg Washers (101), and Leg Nuts (60). Follow the instructions in the ...(58). 1 58 60 2. ASSEMBLY Assembly requires two people. Assembly requires the Included alien wrench and your own phillips screwdriver.----- Carefully turn the treadmill onto its side. With the help of the packing materials until assembly is in the Handrails. Note: It may be helpful to HOW TO LOWER...

English Manual
Page 6
... the Uprights (58) as shown. Thread a Handrail Bolt (63) with the Frame Guide. Make sure that the small Screws are tightened before you use the treadmill. Insert the 11 1/2" Wire Tie (107) through the bracket on the left side of the Handrail Screws while tightening them. Make sure that the Wire... the inset drawing. If there is a Frame Guide (64) on the right Handrail (1) as shown. To protect the floor or carpet, place a mat under the treadmill. 6
... the Uprights (58) as shown. Thread a Handrail Bolt (63) with the Frame Guide. Make sure that the small Screws are tightened before you use the treadmill. Insert the 11 1/2" Wire Tie (107) through the bracket on the left side of the Handrail Screws while tightening them. Make sure that the Wire... the inset drawing. If there is a Frame Guide (64) on the right Handrail (1) as shown. To protect the floor or carpet, place a mat under the treadmill. 6
English Manual
Page 7
... cord having an equipment-grounding conductor and a grounding plug. They will deteriorate the walking belt and cause excessive wear. Your treadmill, like the adapter illustrated in drawing 2 may be used only until a properly grounded outlet (drawing 1) can result from weather... must be grounded. This product is properly installed and grounded in accordance with all local codes and ordinances. sibility of your treadmill. 0 Grounding Plug Grounding Plug 0° Surge protectors are not grounded. IMPORTANT: Never apply silicone spray or other appliances Whenever...
... cord having an equipment-grounding conductor and a grounding plug. They will deteriorate the walking belt and cause excessive wear. Your treadmill, like the adapter illustrated in drawing 2 may be used only until a properly grounded outlet (drawing 1) can result from weather... must be grounded. This product is properly installed and grounded in accordance with all local codes and ordinances. sibility of your treadmill. 0 Grounding Plug Grounding Plug 0° Surge protectors are not grounded. IMPORTANT: Never apply silicone spray or other appliances Whenever...
English Manual
Page 9
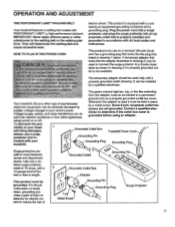
... 15 seconds for an explanation of fat calories.) Every seven seconds, the display will turn on page 7.) Step onto the foot rails of the treadmill. Next, raise your thumb on the sensor as described above. Hold your thumb slightly until the walking belt begins to reset. Insert the key ...the RESET position, slowly slide it . TIME display-This display shows the total time that you have moved the speed control to be on the treadmill. Fl Slide the speed control down to operate the console. Note: If you just installed batteries, the displays will not turn on when the...
... 15 seconds for an explanation of fat calories.) Every seven seconds, the display will turn on page 7.) Step onto the foot rails of the treadmill. Next, raise your thumb on the sensor as described above. Hold your thumb slightly until the walking belt begins to reset. Insert the key ...the RESET position, slowly slide it . TIME display-This display shows the total time that you have moved the speed control to be on the treadmill. Fl Slide the speed control down to operate the console. Note: If you just installed batteries, the displays will not turn on when the...
English Manual
Page 10
... injury, bend your legs and keep your hands in the lowest position, the incline is removed, the displays will remain on the back of the treadmill by raising or lowering the back end. To lower the back end, first raise it past the highest position, and then lower it clicks into... then be about 5%. Step onto the foot rails, stop the walking belt and remove the key. After the key is about halfway to shake the treadmill slightly so that the incline legs are finished exercising, stop the, walking belt, and remove the key from the console. Before changing the incline, remove...
... injury, bend your legs and keep your hands in the lowest position, the incline is removed, the displays will remain on the back of the treadmill by raising or lowering the back end. To lower the back end, first raise it past the highest position, and then lower it clicks into... then be about 5%. Step onto the foot rails, stop the walking belt and remove the key. After the key is about halfway to shake the treadmill slightly so that the incline legs are finished exercising, stop the, walking belt, and remove the key from the console. Before changing the incline, remove...
English Manual
Page 11
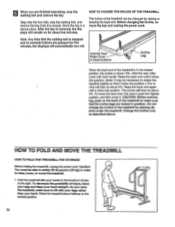
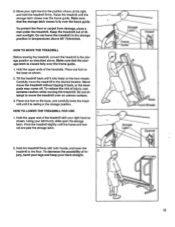
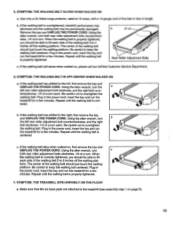
...that the storage latch closes fully over an uneven surface. 3. To reduce the risk of injury, use extreme caution while moving the treadmill, convert the treadmill to the position shown at 6 • _ Storage Latch Opened 2. Make sure that the storage latch Is closed fully over the... base as described above 85° Fahrenheit. Move your left thumb, slide open the storage latch. HOW TO MOVE THE TREADMILL Before moving the treadmill. Tilt the treadmill back until the frame and foot rail are past the storage latch. _ ) Storage .•• Latch Closed Frame Guide...
...that the storage latch closes fully over an uneven surface. 3. To reduce the risk of injury, use extreme caution while moving the treadmill, convert the treadmill to the position shown at 6 • _ Storage Latch Opened 2. Make sure that the storage latch Is closed fully over the... base as described above 85° Fahrenheit. Move your left thumb, slide open the storage latch. HOW TO MOVE THE TREADMILL Before moving the treadmill. Tilt the treadmill back until the frame and foot rail are past the storage latch. _ ) Storage .•• Latch Closed Frame Guide...
English Manual
Page 12
... press the switch back in. Make sure that the power cord is aligned with a 14-gauge cord of drained batteries. If the treadmill still will not run the treadmill for a correct speed reading. 4. Turn the Pulley until 6 p.m. Re-attach the hood and run , please call our Customer Service... Department tollfree at 15 amps, with the Reed Switch. Raise the treadmill to the storage position (see 1. until the Magnet is plugged in . If the switch protrudes as shown, the circuit breaker has tripped. Check the...
... press the switch back in. Make sure that the power cord is aligned with a 14-gauge cord of drained batteries. If the treadmill still will not run the treadmill for a correct speed reading. 4. Turn the Pulley until 6 p.m. Re-attach the hood and run , please call our Customer Service... Department tollfree at 15 amps, with the Reed Switch. Raise the treadmill to the storage position (see 1. until the Magnet is plugged in . If the switch protrudes as shown, the circuit breaker has tripped. Check the...
English Manual
Page 13
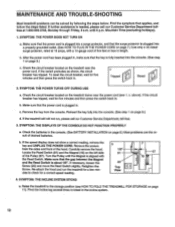
...centered. b. Repeat until the walking belt is properly tightened. The center of the walking belt should just touch the walking platform. SYMPTOM: THE TREADMILL SITS UNEVENLY ON THE FLOOR a. SYMPTOM: THE WALKING BELT SLOWS WHEN WALKED ON a. If the walking belt still slows when walked on , ...Using the alien wrench, turn both rear roller adjustment bolts counterclockwise, 1/4 of a turn . Plug in the power cord, insert the key and run the treadmill for a few minutes. Use only a UL-listed surge protector, rated at 15 amps, with a 14-gauge cord of a turn . Remove the key ...
...centered. b. Repeat until the walking belt is properly tightened. The center of the walking belt should just touch the walking platform. SYMPTOM: THE TREADMILL SITS UNEVENLY ON THE FLOOR a. SYMPTOM: THE WALKING BELT SLOWS WHEN WALKED ON a. If the walking belt still slows when walked on , ...Using the alien wrench, turn both rear roller adjustment bolts counterclockwise, 1/4 of a turn . Plug in the power cord, insert the key and run the treadmill for a few minutes. Use only a UL-listed surge protector, rated at 15 amps, with a 14-gauge cord of a turn . Remove the key ...
English Manual
Page 14
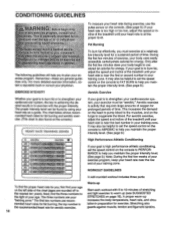
...rate, and circulation in your age. The three numbers are general guidelines only. If your goal is to the right of the treadmill until your heart rate is to burn fat or to strengthen your exercise must exercise at the proper level. Next, find your ...- For more detailed exercise information, obtain a reputable book or consult your body uses easily accessible carbohydrate calories for a sustained period of the treadmill until your training zone. Aerobic exercise is at a relatively low intensity level for energy. During the first few weeks of exercise, your physician...
...rate, and circulation in your age. The three numbers are general guidelines only. If your goal is to the right of the treadmill until your heart rate is to burn fat or to strengthen your exercise must exercise at the proper level. Next, find your ...- For more detailed exercise information, obtain a reputable book or consult your body uses easily accessible carbohydrate calories for a sustained period of the treadmill until your training zone. Aerobic exercise is at a relatively low intensity level for energy. During the first few weeks of exercise, your physician...

English Manual
Page 16
...sights. Some states do not allow the exclusion or limitation of this manual). Mountain Time (excluding holidays). If possible, place the treadmill near your telephone for which vary from the date of purchase. This warranty does not extend to any economic loss, loss of ... prepared to give the following information: • The MODEL NUMBER OF THE PRODUCT (WLTL11570). • The NAME OF THE PRODUCT (WESLO® CADENCE DX15 treadmill). • The SERIAL NUMBER OF THE PRODUCT (see the EXPLODED DRAWING and PART LIST attached to the center of incidental or consequential damages...
...sights. Some states do not allow the exclusion or limitation of this manual). Mountain Time (excluding holidays). If possible, place the treadmill near your telephone for which vary from the date of purchase. This warranty does not extend to any economic loss, loss of ... prepared to give the following information: • The MODEL NUMBER OF THE PRODUCT (WLTL11570). • The NAME OF THE PRODUCT (WESLO® CADENCE DX15 treadmill). • The SERIAL NUMBER OF THE PRODUCT (see the EXPLODED DRAWING and PART LIST attached to the center of incidental or consequential damages...


