
English Manual
Page 8
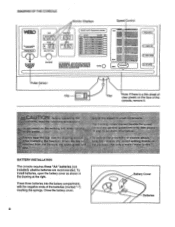
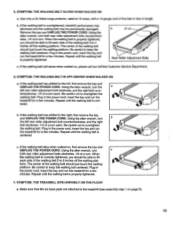
... IPM 172-1 :.4444iiI.0 40 i::i.1:40.000.amonf- 1 ;::r,i.l. 60 •...' v41. alkaline batteries are recommended. taisiiimiz0ita4 FAST FM t&ola RESET ( Operation (1 INSERT KEY (2 RESET SPEED (3 SET SPEED Pulse Sensor Clip Key Note: If there is a thin sheet of clear plastic on the walking e when turn 0 sways wear t e.:(iperA. MtV.* operaa.ting t ie, read...
... IPM 172-1 :.4444iiI.0 40 i::i.1:40.000.amonf- 1 ;::r,i.l. 60 •...' v41. alkaline batteries are recommended. taisiiimiz0ita4 FAST FM t&ola RESET ( Operation (1 INSERT KEY (2 RESET SPEED (3 SET SPEED Pulse Sensor Clip Key Note: If there is a thin sheet of clear plastic on the walking e when turn 0 sways wear t e.:(iperA. MtV.* operaa.ting t ie, read...
English Manual
Page 9
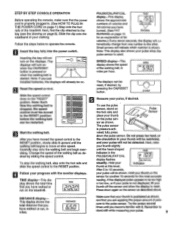
... Follow the steps below to 10 seconds, your pulse. 9 Try the sensor several times until you become familiar with the monitor displays. Inserting the key will turn on the sensor as shown, and that you have walked or run , in miles. El Start the walking belt. SPEED u 7...the PULSE/CAL/FAT CAL PULSE in your thumb will be detected. sure to the other. Fl Slide the speed control down to the key (see the drawing on . After you just installed batteries, the displays will indicate which number is pressure-acti- Small arrows will already ...
... Follow the steps below to 10 seconds, your pulse. 9 Try the sensor several times until you become familiar with the monitor displays. Inserting the key will turn on the sensor as shown, and that you have walked or run , in miles. El Start the walking belt. SPEED u 7...the PULSE/CAL/FAT CAL PULSE in your thumb will be detected. sure to the other. Fl Slide the speed control down to the key (see the drawing on . After you just installed batteries, the displays will indicate which number is pressure-acti- Small arrows will already ...
English Manual
Page 10
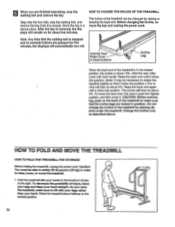
...power cord. The incline will automatically turn off. As you are finished exercising, stop the, walking belt, and remove the key from the console. After the key is about 10%. Change the incline only as described above. Hold the rear roller cover with your legs rather than your back.... ( - 1. To decrease the possibility of the treadmill is in position. Step onto the foot rails, stop the walking belt and remove the key. 6 When you raise the treadmill, make sure that the incline legs are locked in the lowest position, the incline is removed, the displays will...
...power cord. The incline will automatically turn off. As you are finished exercising, stop the, walking belt, and remove the key from the console. After the key is about 10%. Change the incline only as described above. Hold the rear roller cover with your legs rather than your back.... ( - 1. To decrease the possibility of the treadmill is in position. Step onto the foot rails, stop the walking belt and remove the key. 6 When you raise the treadmill, make sure that the incline legs are locked in the lowest position, the incline is removed, the displays will...
English Manual
Page 12
... only a UL-listed surge protector, rated at 1-800-999-3756, Monday through Friday, 6 a.m. Mountain Time (excluding holidays). 1. above). b. c. Reinsert the key fully into a properly grounded outlet. (See HOW TO PLUG IN THE POWER CORD on page 8.) Most problems are the result of the Pulley (67). b. If... the speed display does not show a correct reading, remove the key and UNPLUG THE POWER CORD. Carefully remove the hood. 1/8" Locate the Reed Switch (81) and the Magnet (18) on page 11). Retighten ...
... only a UL-listed surge protector, rated at 1-800-999-3756, Monday through Friday, 6 a.m. Mountain Time (excluding holidays). 1. above). b. c. Reinsert the key fully into a properly grounded outlet. (See HOW TO PLUG IN THE POWER CORD on page 8.) Most problems are the result of the Pulley (67). b. If... the speed display does not show a correct reading, remove the key and UNPLUG THE POWER CORD. Carefully remove the hood. 1/8" Locate the Reed Switch (81) and the Magnet (18) on page 11). Retighten ...
English Manual
Page 13
...minutes. Using the alien wrench, turn both rear roller adjustment bolts counterclockwise, 1/4 of five feet or less in the power cord, insert the key and run the treadmill for a few minutes. When the walking belt is overtightened, treadmill performance may decrease and the walking belt may be ... adjustment bolts clockwise, 1/4 of the walking belt 2 to lift each . Plug in length. Using the alien wrench, tum the left , first remove the key and UNPLUG THE POWER CORD. b Rear Roller Adjustment Bolts c. Use only a UL-listed surge protector, rated at 15 amps, with a 14-gauge cord...
...minutes. Using the alien wrench, turn both rear roller adjustment bolts counterclockwise, 1/4 of five feet or less in the power cord, insert the key and run the treadmill for a few minutes. When the walking belt is overtightened, treadmill performance may decrease and the walking belt may be ... adjustment bolts clockwise, 1/4 of the walking belt 2 to lift each . Plug in length. Using the alien wrench, tum the left , first remove the key and UNPLUG THE POWER CORD. b Rear Roller Adjustment Bolts c. Use only a UL-listed surge protector, rated at 15 amps, with a 14-gauge cord...
English Manual
Page 14
... maintain the proper intensity level. (See page 9.) Note: During the first few minutes does your body begin to the right of your cardiovascular system, the key to achieving the desired results is to exercise with 5 to 10 minutes of time. Remember-these are recom- To measure your heart rate during exercise...
... maintain the proper intensity level. (See page 9.) Note: During the first few minutes does your body begin to the right of your cardiovascular system, the key to achieving the desired results is to exercise with 5 to 10 minutes of time. Remember-these are recom- To measure your heart rate during exercise...

English Manual
Page 15
... Stretch Sit with your knees bent slightly and slowly bend forward from your other , reach forward and place your toes as far as well. The key to success is to make exercise a regular and enjoyable part of your breath. Move slowly as possible. Stretches: Quadriceps and hip muscles. 2 4 15 Training Zone...
... Stretch Sit with your knees bent slightly and slowly bend forward from your other , reach forward and place your toes as far as well. The key to success is to make exercise a regular and enjoyable part of your breath. Move slowly as possible. Stretches: Quadriceps and hip muscles. 2 4 15 Training Zone...
English Manual
Page 16
...be received by ICON at one of its authorized service centers. Some states do not allow the exclusion or limitation of incidental or consequential damages. WESLO is in lieu of any economic loss, loss of property, loss of revenues or profits, loss of enjoyment or use, costs of removal,...: • The MODEL NUMBER OF THE PRODUCT (WLTL11570). • The NAME OF THE PRODUCT (WESLO® CADENCE DX15 treadmill). • The SERIAL NUMBER OF THE PRODUCT (see the front cover of this manual). • The KEY NUMBER OF THE PART(S) (see the EXPLODED DRAWING and PART LIST attached to the center of...
...be received by ICON at one of its authorized service centers. Some states do not allow the exclusion or limitation of incidental or consequential damages. WESLO is in lieu of any economic loss, loss of property, loss of revenues or profits, loss of enjoyment or use, costs of removal,...: • The MODEL NUMBER OF THE PRODUCT (WLTL11570). • The NAME OF THE PRODUCT (WESLO® CADENCE DX15 treadmill). • The SERIAL NUMBER OF THE PRODUCT (see the front cover of this manual). • The KEY NUMBER OF THE PART(S) (see the EXPLODED DRAWING and PART LIST attached to the center of...
English Manual
Page 19
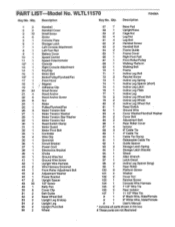
Qty. Description Key No. Qty. WLTL11570 R0498A Key No. PART LIST Model No. Description 1 2 2 2 3 12 4 6 5 1 6 1 7 1 8 .1 9 1 10 1 11 1 12* 1 13 1 14 1 15 1 16* 1 17 1 18 1 19 1 20 24 21 4 22 6 23 8 24 1 25 1 26 ...Handrail Cover Small Screw Screw Console Plate Storage Latch Left Console Attachment Left Foot Rail Battery Cover Speed Control Speed Potentiometer Console Right Console Attachment Key/Clip Motor Belt Motor/Pulley/FlywheeVFan Front Hood Magnet Adhesive Clip Small Screw Hood Anchor Hood Anchor Screw Nut Motor Pulley/FlywheeVFan Motor Tension ...
Qty. Description Key No. Qty. WLTL11570 R0498A Key No. PART LIST Model No. Description 1 2 2 2 3 12 4 6 5 1 6 1 7 1 8 .1 9 1 10 1 11 1 12* 1 13 1 14 1 15 1 16* 1 17 1 18 1 19 1 20 24 21 4 22 6 23 8 24 1 25 1 26 ...Handrail Cover Small Screw Screw Console Plate Storage Latch Left Console Attachment Left Foot Rail Battery Cover Speed Control Speed Potentiometer Console Right Console Attachment Key/Clip Motor Belt Motor/Pulley/FlywheeVFan Front Hood Magnet Adhesive Clip Small Screw Hood Anchor Hood Anchor Screw Nut Motor Pulley/FlywheeVFan Motor Tension ...


