
English Manual
Page 1
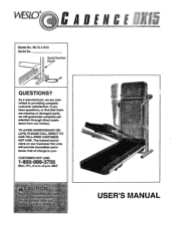
...;MMMEW* ,,,m~,MtWORP •V USER'S MANUAL CUS8TOMER HOT LIN7E:5 6 1 0 09 993 Mon.-Fri., 6 a.m.-6 p.m. As a manufacturer, we are missing or damaged parts, we will provide immediate assistance, free of charge to you have questions, or find that there are committed to providing complete customer satisfaction. Serial Number Decal QUESTIONS? If you . WLTL11570 Serial No. The trained technicians on our Customer...
...;MMMEW* ,,,m~,MtWORP •V USER'S MANUAL CUS8TOMER HOT LIN7E:5 6 1 0 09 993 Mon.-Fri., 6 a.m.-6 p.m. As a manufacturer, we are missing or damaged parts, we will provide immediate assistance, free of charge to you have questions, or find that there are committed to providing complete customer satisfaction. Serial Number Decal QUESTIONS? If you . WLTL11570 Serial No. The trained technicians on our Customer...

English Manual
Page 2
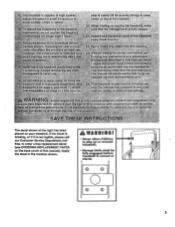
...ortanl recautions and information before operating the treadmill etas onsibili Of the owner to the center of this manual. raadMit pill riotbe'used or w ere.so en; TO PLUG IN 7ei-it.O.owtteColiii'6i-pt ?' (not Included) ac d plug #f sulrga00tOtq ... CONTENTS IMPORTANT PRECAUTIONS BEFORE YOU BEGIN ASSEMBLY OPERATION AND ADJUSTMENT HOW TO FOLD AND MOVE THE TREADMILL MAINTENANCE AND TROUBLE-SHOOTING CONDITIONING GUIDELINES ORDERING REPLACEMENT PARTS LIMITED WARRANTY 2 4 5 7 11 12 14 Back Cover Back Cover Note: An EXPLODED DRAWING and a PART LIST are attached to enSu .. , that Oyld ...
...ortanl recautions and information before operating the treadmill etas onsibili Of the owner to the center of this manual. raadMit pill riotbe'used or w ere.so en; TO PLUG IN 7ei-it.O.owtteColiii'6i-pt ?' (not Included) ac d plug #f sulrga00tOtq ... CONTENTS IMPORTANT PRECAUTIONS BEFORE YOU BEGIN ASSEMBLY OPERATION AND ADJUSTMENT HOW TO FOLD AND MOVE THE TREADMILL MAINTENANCE AND TROUBLE-SHOOTING CONDITIONING GUIDELINES ORDERING REPLACEMENT PARTS LIMITED WARRANTY 2 4 5 7 11 12 14 Back Cover Back Cover Note: An EXPLODED DRAWING and a PART LIST are attached to enSu .. , that Oyld ...
English Manual
Page 3
...far'longer t tie pulse sensor'is moved or stored. able,to safely lift 45pounds (20 kg),to raise lower, or move the treadmill •. • 00. e. vet ns an obiect.irlt0:AtI eni ways`unplug"the power.cord before treadmill is ' noY'4medlcaE... ' 0treadmill.is not legible, please call our Customer Service Department, tollfree, to order a free replacement decal (see ORDERING REPLACEMENT PARTS on your physician ....0#fitf9r persons aver the7 biefo.r..re..o..u..u..s..i..n.. Apply the decal In the location shown. ten''a Ofts of adjustthe speed in ;anycc meroiafi;
...far'longer t tie pulse sensor'is moved or stored. able,to safely lift 45pounds (20 kg),to raise lower, or move the treadmill •. • 00. e. vet ns an obiect.irlt0:AtI eni ways`unplug"the power.cord before treadmill is ' noY'4medlcaE... ' 0treadmill.is not legible, please call our Customer Service Department, tollfree, to order a free replacement decal (see ORDERING REPLACEMENT PARTS on your physician ....0#fitf9r persons aver the7 biefo.r..re..o..u..u..s..i..n.. Apply the decal In the location shown. ten''a Ofts of adjustthe speed in ;anycc meroiafi;
English Manual
Page 4
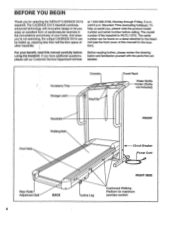
... this manual for the location). The serial number can be found on a decal attached to let you have additional questions, please call our Customer Service Department toll-free Before reading further, please review the drawing below and familiarize yourself with innovative design to the treadmill (see the front cover of the treadmill is WLTL11570. Circuit Breaker Power Cord Rear Roller Adjustment Bolt 4 BACK 0 Incline Leg RIGHT SIDE Cushioned Walking Platform...
... this manual for the location). The serial number can be found on a decal attached to let you have additional questions, please call our Customer Service Department toll-free Before reading further, please review the drawing below and familiarize yourself with innovative design to the treadmill (see the front cover of the treadmill is WLTL11570. Circuit Breaker Power Cord Rear Roller Adjustment Bolt 4 BACK 0 Incline Leg RIGHT SIDE Cushioned Walking Platform...
English Manual
Page 5
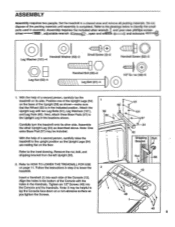
Refer to the rawings below to the Upright Leg in assembly. Handrail Bolt (63)-2 Leg Nut (60)-4 V\\\\\\ Leg Bolt (61)-4 0 Handrail Screw (62)-2 44i/// 1/2" Screw (48)-6 1. With the help of a second person, carefully raise the treadmill to HOW TO LOWER THE TREADMILL FOR USE on the floor. Next, attach three Base Pads (57) to identify the small parts used in the locations shown. Note: One extra Base Pad...
Refer to the rawings below to the Upright Leg in assembly. Handrail Bolt (63)-2 Leg Nut (60)-4 V\\\\\\ Leg Bolt (61)-4 0 Handrail Screw (62)-2 44i/// 1/2" Screw (48)-6 1. With the help of a second person, carefully raise the treadmill to HOW TO LOWER THE TREADMILL FOR USE on the floor. Next, attach three Base Pads (57) to identify the small parts used in the locations shown. Note: One extra Base Pad...

English Manual
Page 6
... not tighten the Handrail Bolts yet. Refer to the Upright Wire Harness (42). Route the Console Wire Harness (104) through the holes in the indicated 6 location. Tighten the Handrail Bolts (63). 12 83 63 58 ..=,• 63 83 58 5. Make sure that the thick end of each Upright and Handrail. Make sure that the small Screws are tightened before you use the treadmill. Thread a Handrail Bolt...
... not tighten the Handrail Bolts yet. Refer to the Upright Wire Harness (42). Route the Console Wire Harness (104) through the holes in the indicated 6 location. Tighten the Handrail Bolts (63). 12 83 63 58 ..=,• 63 83 58 5. Make sure that the thick end of each Upright and Handrail. Make sure that the small Screws are tightened before you use the treadmill. Thread a Handrail Bolt...
English Manual
Page 7
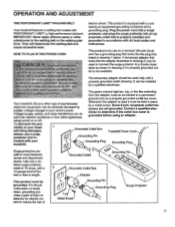
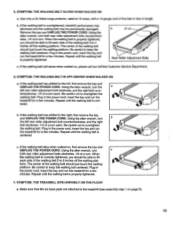
... Box Grounding Pin Treadmill Power Cord cluded) with your treadmill. 0 Grounding Plug Grounding Plug 0° Surge protectors are not grounded. If it .ihevi The temporary adapter should malfunction or break down, grounding provides a path of least resistance for use a surge protector (not in drawing 2 may be installed by a metal screw. OPERATION AND ADJUSTMENT THE PERFORMANT LUBETu WALKING BELT Your treadmill features a walking belt coated with all local codes and...
... Box Grounding Pin Treadmill Power Cord cluded) with your treadmill. 0 Grounding Plug Grounding Plug 0° Surge protectors are not grounded. If it .ihevi The temporary adapter should malfunction or break down, grounding provides a path of least resistance for use a surge protector (not in drawing 2 may be installed by a metal screw. OPERATION AND ADJUSTMENT THE PERFORMANT LUBETu WALKING BELT Your treadmill features a walking belt coated with all local codes and...
English Manual
Page 8
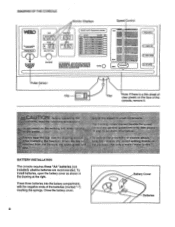
.... Press three batteries into the battery compartment, with the negative ends of the console, remove it. moved from flip {see t ad cnnsoie"t rawing' ak. Afe n ..,,gm6::11-1 •:,•Agar- 1 r--i ::#.0...... , TOM0 l ) IA WARNING:I LI CAL/FAT CAL 0 ON/RESET DIST E G. enthe walking elf wlit Age BATTERY INSTALLATION The console requires three "AA" batteries (not included); DIAGRAM OF THE CONSOLE Th" 711 THUMB PULSE • Monitor Displays Speed Control TIME...
.... Press three batteries into the battery compartment, with the negative ends of the console, remove it. moved from flip {see t ad cnnsoie"t rawing' ak. Afe n ..,,gm6::11-1 •:,•Agar- 1 r--i ::#.0...... , TOM0 l ) IA WARNING:I LI CAL/FAT CAL 0 ON/RESET DIST E G. enthe walking elf wlit Age BATTERY INSTALLATION The console requires three "AA" batteries (not included); DIAGRAM OF THE CONSOLE Th" 711 THUMB PULSE • Monitor Displays Speed Control TIME...
English Manual
Page 9
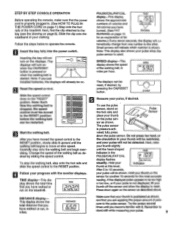
... the heart-shaped indicator in the PULSE/CAL/FAT CAL PULSE in your thumb will not turn on the treadmill. Remember to the pulse sensor. Inserting the key will be restricted, and your thumb is positioned as described above. To stop the walking belt, step onto the foot rails and slide the speed control to the RESET position. 4 Follow your pulse. 9 tomatically change from one number to the "RESET...
... the heart-shaped indicator in the PULSE/CAL/FAT CAL PULSE in your thumb will not turn on the treadmill. Remember to the pulse sensor. Inserting the key will be restricted, and your thumb is positioned as described above. To stop the walking belt, step onto the foot rails and slide the speed control to the RESET position. 4 Follow your pulse. 9 tomatically change from one number to the "RESET...
English Manual
Page 10
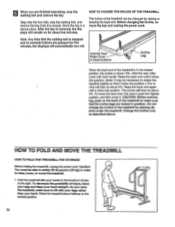
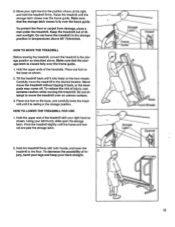
... the Rear Roller Cover in a secure place. Step onto the foot rails, stop the walking belt and remove the key. Store the key in these locations Incline Leg When the back end of the treadmill by raising or lowering the back end. Before changing the incline, remove the key and unplug the power cord. Raise the back end again until it . HOW TO FOLD AND MOVE THE TREADMILL HOW TO FOLD THE TREADMILL FOR STORAGE Before folding the treadmill...
... the Rear Roller Cover in a secure place. Step onto the foot rails, stop the walking belt and remove the key. Store the key in these locations Incline Leg When the back end of the treadmill by raising or lowering the back end. Before changing the incline, remove the key and unplug the power cord. Raise the back end again until it . HOW TO FOLD AND MOVE THE TREADMILL HOW TO FOLD THE TREADMILL FOR STORAGE Before folding the treadmill...
English Manual
Page 11
... foot on the front wheels. HOW TO LOWER THE TREADMILL FOR USE 1. Tilt the treadmill back until the storage latch closes over the frame guide. 1. Make sure that the storage latch Is closed fully over the frame guide. Move your left thumb, slide open the storage latch. HOW TO MOVE THE TREADMILL Before moving the treadmill. Using your right hand to move the treadmill without tipping it rolls freely on the...
... foot on the front wheels. HOW TO LOWER THE TREADMILL FOR USE 1. Tilt the treadmill back until the storage latch closes over the frame guide. 1. Make sure that the storage latch Is closed fully over the frame guide. Move your left thumb, slide open the storage latch. HOW TO MOVE THE TREADMILL Before moving the treadmill. Using your right hand to move the treadmill without tipping it rolls freely on the...
English Manual
Page 12
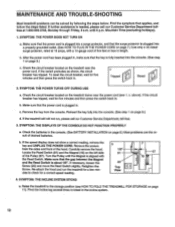
...- c Tripped Reset 2. b. Reinsert the key fully into the console. (See step 1 on page 9.) d. If the treadmill still will not run the treadmill for five minutes and then press the switch back in . If the speed display does not show a correct reading, remove the key and UNPLUG THE POWER CORD. Make sure that applies, and follow the steps listed. Raise the treadmill to break in the console. (See BATTERY INSTALLATION on...
...- c Tripped Reset 2. b. Reinsert the key fully into the console. (See step 1 on page 9.) d. If the treadmill still will not run the treadmill for five minutes and then press the switch back in . If the speed display does not show a correct reading, remove the key and UNPLUG THE POWER CORD. Make sure that applies, and follow the steps listed. Raise the treadmill to break in the console. (See BATTERY INSTALLATION on...
English Manual
Page 13
... . Plug in length. Repeat until the walking belt is properly tightened. If the walking belt slips when walked on , please call our toll-free Customer Service Department. 6. Make sure that the six base pads are attached to 4 inches off the walking platform. The center of five feet or less in the power cord, insert the key and run the treadmill for a few minutes. b Rear Roller Adjustment Bolts c. Using the alien wrench, turn .
... . Plug in length. Repeat until the walking belt is properly tightened. If the walking belt slips when walked on , please call our toll-free Customer Service Department. 6. Make sure that the six base pads are attached to 4 inches off the walking platform. The center of five feet or less in the power cord, insert the key and run the treadmill for a few minutes. b Rear Roller Adjustment Bolts c. Using the alien wrench, turn .
English Manual
Page 14
... heart rate during exercise, use stored fat calories for prolonged periods of time. If your goal is to help you must be "aerobic." It may also be helpful to set the speed control on the console to AEROBIC to bum fat, adjust the speed and incline of your exercise program, keep your heart rate near the last number in preparation for energy. The chart below shows recommended heart rates...
... heart rate during exercise, use stored fat calories for prolonged periods of time. If your goal is to help you must be "aerobic." It may also be helpful to set the speed control on the console to AEROBIC to bum fat, adjust the speed and incline of your exercise program, keep your heart rate near the last number in preparation for energy. The chart below shows recommended heart rates...

English Manual
Page 15
...slightly and slowly bend forward from your hips. SUGGESTED STRETCHES The correct form for 15 counts, then relax. Hold for 15 counts, then relax. Move slowly as you exercise-never hold your breath. Hold for 15 counts, then relax. Stretches...exercise program, do not keep your pulse in your training zone for longer than 20 minutes.) Breathe regularly and deeply as you stretch-never bounce. 1. This will increase the flexibility of your muscles and will help to prevent post-exercise problems. Exercise Frequency To maintain or improve your condition, complete three workouts each leg...
...slightly and slowly bend forward from your hips. SUGGESTED STRETCHES The correct form for 15 counts, then relax. Hold for 15 counts, then relax. Move slowly as you exercise-never hold your breath. Hold for 15 counts, then relax. Stretches...exercise program, do not keep your pulse in your training zone for longer than 20 minutes.) Breathe regularly and deeply as you stretch-never bounce. 1. This will increase the flexibility of your muscles and will help to prevent post-exercise problems. Exercise Frequency To maintain or improve your condition, complete three workouts each leg...
English Manual
Page 16
LIMITED WARRANTY ICON Health & Fitness, Inc. (ICON), warrants this product to be prepared to give the following information: • The MODEL NUMBER OF THE PRODUCT (WLTL11570). • The NAME OF THE PRODUCT (WESLO® CADENCE DX15 treadmill). • The SERIAL NUMBER OF THE PRODUCT (see the front cover of this manual). • The KEY NUMBER OF THE PART(S) (see the EXPLODED DRAWING and PART LIST attached to the center of this manual). • The DESCRIPTION...
LIMITED WARRANTY ICON Health & Fitness, Inc. (ICON), warrants this product to be prepared to give the following information: • The MODEL NUMBER OF THE PRODUCT (WLTL11570). • The NAME OF THE PRODUCT (WESLO® CADENCE DX15 treadmill). • The SERIAL NUMBER OF THE PRODUCT (see the front cover of this manual). • The KEY NUMBER OF THE PART(S) (see the EXPLODED DRAWING and PART LIST attached to the center of this manual). • The DESCRIPTION...
English Manual
Page 17
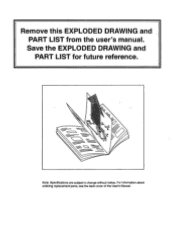
Save the EXPLODED DRAWING and PART LIST for future reference. - For information about ordering replacement parts, see the back cover of the User's Manual. Note: Specifications are subject to change without notice. Remove this EXPLODED DRAWING and PART LIST from the user's manual.
Save the EXPLODED DRAWING and PART LIST for future reference. - For information about ordering replacement parts, see the back cover of the User's Manual. Note: Specifications are subject to change without notice. Remove this EXPLODED DRAWING and PART LIST from the user's manual.

English Manual
Page 18
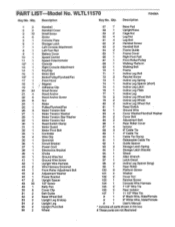
WLTL11570 10 • 11 14 12* R0498A 26 29 27 28 15 4 88 897-- 107 105 97 19 50 85 v 3 84 86 85 104 25 16* 24 1 13 81 r. 20 18 48 100 87 64 100 20 92 100 99 106 102 102 48 • 78 • 80 -750 23 20 48 83 76 23 80 • 79 78 68 69 67 23 87 66 87 5 70 2 103 71 73 74 26 98 65 48 5p3. 32 34 33 36 37 35 22 rF 21 • 48 2 20 61 20 1 20 39 20 2 38 94 93 45 44 63 83 J 59 95 56 a 23 60 • • 47 • I,-,./4•"••.' O 47 60 2 6 60 53 17 42 83 1-20 42 23 52 01 EXPLODED DRAWING-Model No.
WLTL11570 10 • 11 14 12* R0498A 26 29 27 28 15 4 88 897-- 107 105 97 19 50 85 v 3 84 86 85 104 25 16* 24 1 13 81 r. 20 18 48 100 87 64 100 20 92 100 99 106 102 102 48 • 78 • 80 -750 23 20 48 83 76 23 80 • 79 78 68 69 67 23 87 66 87 5 70 2 103 71 73 74 26 98 65 48 5p3. 32 34 33 36 37 35 22 rF 21 • 48 2 20 61 20 1 20 39 20 2 38 94 93 45 44 63 83 J 59 95 56 a 23 60 • • 47 • I,-,./4•"••.' O 47 60 2 6 60 53 17 42 83 1-20 42 23 52 01 EXPLODED DRAWING-Model No.
English Manual
Page 19
... Storage Latch Left Console Attachment Left Foot Rail Battery Cover Speed Control Speed Potentiometer Console Right Console Attachment Key/Clip Motor Belt Motor/Pulley/FlywheeVFan Front Hood Magnet Adhesive Clip Small Screw Hood Anchor Hood Anchor Screw Nut Motor Pulley/FlywheeVFan Motor Tension Bolt Motor Tension Washer Motor Tension Star Washer Motor Tension Nut Reed Switch Clamp Motor Guard Motor Pivot Bolt Controller Wire Clip Grommet Circuit Breaker Power Cord Electronics Bracket Choke Ground Wire Nut Ground Wire Screw Upright Wire Harness Wire Harness Grommet Front Roller Adjustment Bolt...
... Storage Latch Left Console Attachment Left Foot Rail Battery Cover Speed Control Speed Potentiometer Console Right Console Attachment Key/Clip Motor Belt Motor/Pulley/FlywheeVFan Front Hood Magnet Adhesive Clip Small Screw Hood Anchor Hood Anchor Screw Nut Motor Pulley/FlywheeVFan Motor Tension Bolt Motor Tension Washer Motor Tension Star Washer Motor Tension Nut Reed Switch Clamp Motor Guard Motor Pivot Bolt Controller Wire Clip Grommet Circuit Breaker Power Cord Electronics Bracket Choke Ground Wire Nut Ground Wire Screw Upright Wire Harness Wire Harness Grommet Front Roller Adjustment Bolt...


