
English Manual
Page 2
...or less in length. Do not use the treadmill with a 14-gauge cord of clearance behind it. Never start the treadmill while you are standing on page 4 if the treadmill is not working properly. (See BEFORE YOU BEGIN on the walking belt. To protect the floor or carpet from ... be on the treadmill at a time. 9. Keep the power cord and the surge protector away from the treadmill at 15 amps, with bare feet, wearing only stockings, or in sandals. 3. treadmill. The treadmill should be used or where oxygen is turned off. Never move the walking belt while the power...
...or less in length. Do not use the treadmill with a 14-gauge cord of clearance behind it. Never start the treadmill while you are standing on page 4 if the treadmill is not working properly. (See BEFORE YOU BEGIN on the walking belt. To protect the floor or carpet from ... be on the treadmill at a time. 9. Keep the power cord and the surge protector away from the treadmill at 15 amps, with bare feet, wearing only stockings, or in sandals. 3. treadmill. The treadmill should be used or where oxygen is turned off. Never move the walking belt while the power...
English Manual
Page 4
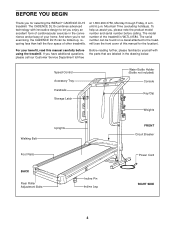
...technology with the parts that are labeled in the convenience and privacy of the treadmill is WLTL41584. The model number of your benefit, read this manual for selecting the WESLO® CADENCE DL15 treadmill. The serial number can be found on a decal attached to let you ...enjoy an excellent form of this manual carefully before calling. Speed Control Accessory Tray Handrails Storage Latch Water Bottle Holder (Bottle not included) Console Key/Clip Weights Walking Belt ...
...technology with the parts that are labeled in the convenience and privacy of the treadmill is WLTL41584. The model number of your benefit, read this manual for selecting the WESLO® CADENCE DL15 treadmill. The serial number can be found on a decal attached to let you ...enjoy an excellent form of this manual carefully before calling. Speed Control Accessory Tray Handrails Storage Latch Water Bottle Holder (Bottle not included) Console Key/Clip Weights Walking Belt ...
English Manual
Page 7
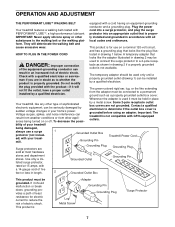
... box covers are in doubt as a properly grounded outlet box cover. Important: The treadmill is grounded before using an adapter. mill. OPERATION AND ADJUSTMENT THE PERFORMANT LUBETM WALKING BELT equipped with cord into an appropriate outlet that looks like the plug illus- HOW TO... illustrated in drawing 1 below. This product is for electric current to the walking belt or the walking plat- Check with a 14-gauge cord of electric shock. Grounded Outlet Box Grounding Pin Treadmill Power Cord Surge protectors are Grounding Plug Grounding Plug sold at 15 amps, ...
... box covers are in doubt as a properly grounded outlet box cover. Important: The treadmill is grounded before using an adapter. mill. OPERATION AND ADJUSTMENT THE PERFORMANT LUBETM WALKING BELT equipped with cord into an appropriate outlet that looks like the plug illus- HOW TO... illustrated in drawing 1 below. This product is for electric current to the walking belt or the walking plat- Check with a 14-gauge cord of electric shock. Grounded Outlet Box Grounding Pin Treadmill Power Cord Surge protectors are Grounding Plug Grounding Plug sold at 15 amps, ...
English Manual
Page 8
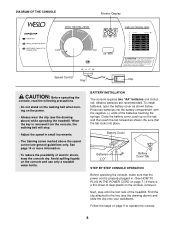
... 7.) If there is removed from the console, the walking belt will stop. • Adjust the speed in small increments. • The training zones marked above the speed control are recommended. When the key is a thin sheet of the treadmill. Press two batteries into place. Next, step onto ...THE CONSOLE Monitor Display Speed Control Key Clip CAUTION: Before operating the console, read the following precautions. • Do not stand on the walking belt when turning on the power. • Always wear the clip (see the drawing above) and slide the clip onto your waistband. BATTERY ...
... 7.) If there is removed from the console, the walking belt will stop. • Adjust the speed in small increments. • The training zones marked above the speed control are recommended. When the key is a thin sheet of the treadmill. Press two batteries into place. Next, step onto ...THE CONSOLE Monitor Display Speed Control Key Clip CAUTION: Before operating the console, read the following precautions. • Do not stand on the walking belt when turning on the power. • Always wear the clip (see the drawing above) and slide the clip onto your waistband. BATTERY ...
English Manual
Page 9
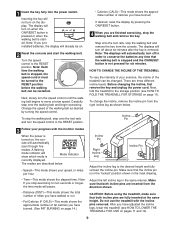
... leg as desired by pressing the ON/RESET button. 4 When you stop the walking belt, step onto the foot rails and turn off in miles per hour. CAUTION: Before using the treadmill, make sure that the walking belt is stopped and the ON/RESET button is not pressed for ten seconds or longer... When the power is started. If desired, reset the display by turning the speed control. HOW TO CHANGE THE INCLINE OF THE TREADMILL To vary the intensity of the walking belt as shown below . • Speed-This mode shows your speed, in order to the RESET position. Note: If you have burned...
... leg as desired by pressing the ON/RESET button. 4 When you stop the walking belt, step onto the foot rails and turn off in miles per hour. CAUTION: Before using the treadmill, make sure that the walking belt is stopped and the ON/RESET button is not pressed for ten seconds or longer... When the power is started. If desired, reset the display by turning the speed control. HOW TO CHANGE THE INCLINE OF THE TREADMILL To vary the intensity of the walking belt as shown below . • Speed-This mode shows your speed, in order to the RESET position. Note: If you have burned...
English Manual
Page 13
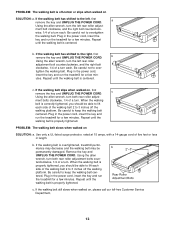
... and UNPLUG THE POWER CORD. tighten the walking belt. Be careful to overtighten the walking belt. b 2"-3" Rear Roller Adjustment Bolts c. Plug in the power cord, insert the key and run the treadmill for a few minutes. Repeat until the walking belt is properly tightened. If the walking belt is centered. If the walking belt slips when walked on , please call our toll-free...
... and UNPLUG THE POWER CORD. tighten the walking belt. Be careful to overtighten the walking belt. b 2"-3" Rear Roller Adjustment Bolts c. Plug in the power cord, insert the key and run the treadmill for a few minutes. Repeat until the walking belt is properly tightened. If the walking belt is centered. If the walking belt slips when walked on , please call our toll-free...

English Manual
Page 18
... Choke 59 2 Wire Clip 60 1 Motor Pivot Nut 61 3 8" Cable Tie 62 1 Reed Switch Clip 63 1 Reed Switch 64 1 Left Foot Rail 65 1 Magnet 66 1 Walking Platform 67 1 Walking Belt 68 1 Front Roller/Pulley 69 2 Frame Pivot Nut 70 1 Right Foot Rail 71 20 Belly Pan Fastener 72... 2 Belt Guide 73 1 Belly Pan 74 2 Weight Rack 75 1 Rear Belly Pan 76 1 Frame 77 1 Right Frame Guide 78 2 Incline Pin 79 2 Incline Leg 80 2...
... Choke 59 2 Wire Clip 60 1 Motor Pivot Nut 61 3 8" Cable Tie 62 1 Reed Switch Clip 63 1 Reed Switch 64 1 Left Foot Rail 65 1 Magnet 66 1 Walking Platform 67 1 Walking Belt 68 1 Front Roller/Pulley 69 2 Frame Pivot Nut 70 1 Right Foot Rail 71 20 Belly Pan Fastener 72... 2 Belt Guide 73 1 Belly Pan 74 2 Weight Rack 75 1 Rear Belly Pan 76 1 Frame 77 1 Right Frame Guide 78 2 Incline Pin 79 2 Incline Leg 80 2...


