
English Manual
Page 5
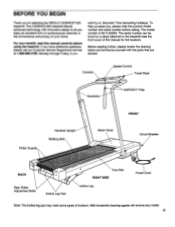
...questions, please call our Customer Service Department toll-free at 1-800-999-3756, Monday through Friday, 6 a.m. Mountain Time (excluding holidays). Console 11111 Handrails Speed Control Towel Rack - To help us assist you enjoy an excellent form of cardiovascular exercise in the convenience and privacy of...Leg .410110., Power Cord Note: The incline leg pad may mark some types of your benefit, read this manual for selecting the WESLO CADENCES 835 treadmill. The serial number can be found on a decal attached to let you , please note the product model number and serial number...
...questions, please call our Customer Service Department toll-free at 1-800-999-3756, Monday through Friday, 6 a.m. Mountain Time (excluding holidays). Console 11111 Handrails Speed Control Towel Rack - To help us assist you enjoy an excellent form of cardiovascular exercise in the convenience and privacy of...Leg .410110., Power Cord Note: The incline leg pad may mark some types of your benefit, read this manual for selecting the WESLO CADENCES 835 treadmill. The serial number can be found on a decal attached to let you , please note the product model number and serial number...
English Manual
Page 6
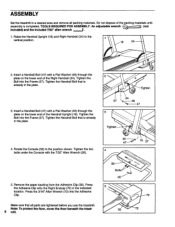
...57 3 Tighten Tighten 24 48 47 4. TOOLS REQUIRED FOR ASSEMBLY: An adjustable wrench (not Included) and the Included 7/32" alien wrench . 1. Rotate the Console (56) to the vertical position. 18 24 2. Press the 3/16" Allen Wrench (72) into the Frame (57). Tighten the Handrail Bolt that all packing... materials. Tighten the two 4 bolts under the Console with a Flat Washer (48) through the plate on the lower end of the Handrail Upright (18). Tighten the Bolt into the Adhesive Clip. ...
...57 3 Tighten Tighten 24 48 47 4. TOOLS REQUIRED FOR ASSEMBLY: An adjustable wrench (not Included) and the Included 7/32" alien wrench . 1. Rotate the Console (56) to the vertical position. 18 24 2. Press the 3/16" Allen Wrench (72) into the Frame (57). Tighten the Handrail Bolt that all packing... materials. Tighten the two 4 bolts under the Console with a Flat Washer (48) through the plate on the lower end of the Handrail Upright (18). Tighten the Bolt into the Adhesive Clip. ...
English Manual
Page 7
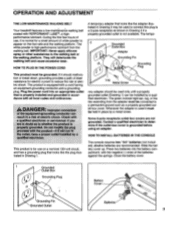
... CORD This product must be grounded. A temporary adapter that looks like the plug illustrated in place by a qualified electrician. HOW TO INSTALL BATTERIES IN THE CONSOLE The console requires two "AA" batteries (not included); alkaline batteries are not grounded. Press two batteries into the battery compartment, with PERFORMANT LUBEnl, a highperformance lubricant. Close...
... CORD This product must be grounded. A temporary adapter that looks like the plug illustrated in place by a qualified electrician. HOW TO INSTALL BATTERIES IN THE CONSOLE The console requires two "AA" batteries (not included); alkaline batteries are not grounded. Press two batteries into the battery compartment, with PERFORMANT LUBEnl, a highperformance lubricant. Close...
English Manual
Page 8
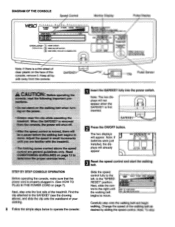
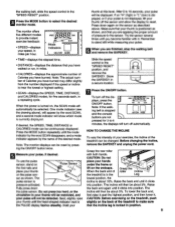
... increments the ,l..:• nes ''''''' r e.."ap0e0d004001i44:M r. Next, step onto the foot rails of your clothing. 8 Follow the simple steps below to operate the console: Slide the speed control fully to the left, to move . When.the FEKEY is first inserted. (E3 • 0 \ ON OFF ,n, V '---- Note...Note: If there is properly plugged in. (See HOW TO PLUG IN THE POWER CORD on page 7). Keep all liquids away from the console. 0 SAFEKEY ® Clip Pulse Sensor UTION: Before operating;the neonle, read the falloatingImportant precautie s. Note: The two displays will not...
... increments the ,l..:• nes ''''''' r e.."ap0e0d004001i44:M r. Next, step onto the foot rails of your clothing. 8 Follow the simple steps below to operate the console: Slide the speed control fully to the left, to move . When.the FEKEY is first inserted. (E3 • 0 \ ON OFF ,n, V '---- Note...Note: If there is properly plugged in. (See HOW TO PLUG IN THE POWER CORD on page 7). Keep all liquids away from the console. 0 SAFEKEY ® Clip Pulse Sensor UTION: Before operating;the neonle, read the falloatingImportant precautie s. Note: The two displays will not...
English Manual
Page 9
... twice. Press down the pulse sensor. Note: The actual number of pressure to select the desired monitor mode. The pulse sensor is stopped and the console ON/OFF MODE buttons are applying the proper amount of Calories you are finished, stop the walking belt and remove the SAFEKEY. OIPN OOFF o V L J Press...
... twice. Press down the pulse sensor. Note: The actual number of pressure to select the desired monitor mode. The pulse sensor is stopped and the console ON/OFF MODE buttons are applying the proper amount of Calories you are finished, stop the walking belt and remove the SAFEKEY. OIPN OOFF o V L J Press...
English Manual
Page 10
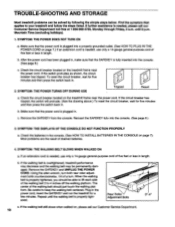
...able to lift each side of the walking belt 3 to your treadmill and follow the steps listed. b. Remove the SAFEKEY from the console. Using the alien wrench, turn both rear roller adjustment bolts counterclockwise, 1/4 of drained batteries. 4. If the walking belt still slows ... call our Customer Service Department toll-free at 1-800-999-3756, Monday through Friday, 6 a.m. When the walking belt is fully inserted into the console. (See page 8.) 3. After the power cord has been plugged in . 2. SYMPTOM: THE WALKING BELT SLOWS WHEN WALKED ON a. TROUBLE-SHOOTING ...
...able to lift each side of the walking belt 3 to your treadmill and follow the steps listed. b. Remove the SAFEKEY from the console. Using the alien wrench, turn both rear roller adjustment bolts counterclockwise, 1/4 of drained batteries. 4. If the walking belt still slows ... call our Customer Service Department toll-free at 1-800-999-3756, Monday through Friday, 6 a.m. When the walking belt is fully inserted into the console. (See page 8.) 3. After the power cord has been plugged in . 2. SYMPTOM: THE WALKING BELT SLOWS WHEN WALKED ON a. TROUBLE-SHOOTING ...
English Manual
Page 11
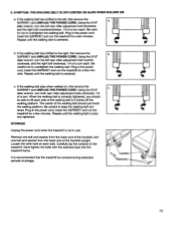
... cord, insert the SAFEKEY and run the treadmill for a few minutes. Remove- ) 11 Be careful not to keep the walking belt centered. Carefully lay the console on , first remove the SAFEKEY and UNPLUG THE POWER CORD. Be careful not to the right, first remove the SAFEKEY and UNPLUG THE POWER CORD...
... cord, insert the SAFEKEY and run the treadmill for a few minutes. Remove- ) 11 Be careful not to keep the walking belt centered. Carefully lay the console on , first remove the SAFEKEY and UNPLUG THE POWER CORD. Be careful not to the right, first remove the SAFEKEY and UNPLUG THE POWER CORD...
English Manual
Page 12
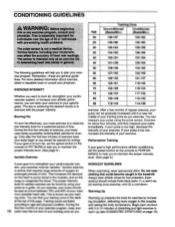
.... For more oxygen to oxygenate the blood. The key to achieving the desired results is to burn fat, set the speed control on the console to FAT BURN to help you exercise, your physician. If your goal is to exercise with 5 to 10 minutes of stretching and light exercise...As you to maintain the proper intensity level. (See page 8.) If your goal is high performance athletic conditioning, set the speed control on the console to PERFORMANCE to help you exercise. Always wear athletic shoes for prolonged periods of time. You can tailor your exercise to your goal is to...
.... For more oxygen to oxygenate the blood. The key to achieving the desired results is to burn fat, set the speed control on the console to FAT BURN to help you exercise, your physician. If your goal is to exercise with 5 to 10 minutes of stretching and light exercise...As you to maintain the proper intensity level. (See page 8.) If your goal is high performance athletic conditioning, set the speed control on the console to PERFORMANCE to help you exercise. Always wear athletic shoes for prolonged periods of time. You can tailor your exercise to your goal is to...
English Manual
Page 14
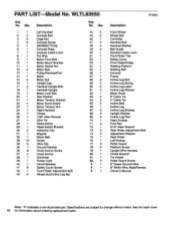
... 30 2 31 1 32 1 33 13 34 3 35 1 36 8 37 4 38 1 39 1 40 1 41 8 42 1 43 6 Description Left Handrail Console Bolt Cage Nut Console Screw SAFEKErm/Clip Console Plate Console Cable Loom Pot Wire Motor Pivot Bolt Motor Mount Bracket Motor Swivel Nut Motor Bolt Pulley/Flywheel/Fan Motor Motor Nut Upright... Controller Handrail Bolt Handrail Washer Belt Guide Handrail Cable Loom Front Roller Tab Safety Cover Front Roller/Pulley Walking Platform Walking Belt Console Frame Incline Leg Bolt Incline Leg Spring Incline Leg Latch Incline Leg Washer Motor Hood 8" Cable Tie 4" Cable Tie Incline ...
... 30 2 31 1 32 1 33 13 34 3 35 1 36 8 37 4 38 1 39 1 40 1 41 8 42 1 43 6 Description Left Handrail Console Bolt Cage Nut Console Screw SAFEKErm/Clip Console Plate Console Cable Loom Pot Wire Motor Pivot Bolt Motor Mount Bracket Motor Swivel Nut Motor Bolt Pulley/Flywheel/Fan Motor Motor Nut Upright... Controller Handrail Bolt Handrail Washer Belt Guide Handrail Cable Loom Front Roller Tab Safety Cover Front Roller/Pulley Walking Platform Walking Belt Console Frame Incline Leg Bolt Incline Leg Spring Incline Leg Latch Incline Leg Washer Motor Hood 8" Cable Tie 4" Cable Tie Incline ...


