
English Manual
Page 1
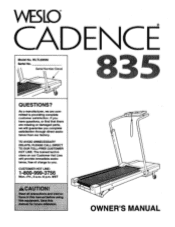
... satisfaction. WLTL83550 Serial No. Serial Number Decal QUESTIONS? TO AVOID UNNECESSARY DELAYS, PLEASE CALL DIRECT TO OUR TOLL-FREE CUSTOMER HOT LINE. CUSTOMER HOT LINE: 1-800-999-3756 Mon.-Fri., 6 a.m.-6 p.m. OWNER'S MANUAL The trained technicians on our Customer Hot Line will guarantee you . WESID CADENCE Model No. If you have questions, or find that there are missing or damaged parts, we...
... satisfaction. WLTL83550 Serial No. Serial Number Decal QUESTIONS? TO AVOID UNNECESSARY DELAYS, PLEASE CALL DIRECT TO OUR TOLL-FREE CUSTOMER HOT LINE. CUSTOMER HOT LINE: 1-800-999-3756 Mon.-Fri., 6 a.m.-6 p.m. OWNER'S MANUAL The trained technicians on our Customer Hot Line will guarantee you . WESID CADENCE Model No. If you have questions, or find that there are missing or damaged parts, we...
English Manual
Page 2
... IS IN LIEU OF ANY AND ALL OTHER WARRANTIES AND ANY IMPLIED WARRANTIES OF MERCHANTABILITY OR FITNESS FOR A PARTICULAR PURPOSE IS LIMITED IN ITS SCOPE AND DURATION TO THE TERMS SET FORTH HEREIN. LIMITED WARRANTY ICON Health & Fitness, Inc. ("ICON"), warrants this warranty is limited to replacing or repairing, at ICON's option, the product at one of its authorized service centers with all freight and other transportation...
... IS IN LIEU OF ANY AND ALL OTHER WARRANTIES AND ANY IMPLIED WARRANTIES OF MERCHANTABILITY OR FITNESS FOR A PARTICULAR PURPOSE IS LIMITED IN ITS SCOPE AND DURATION TO THE TERMS SET FORTH HEREIN. LIMITED WARRANTY ICON Health & Fitness, Inc. ("ICON"), warrants this warranty is limited to replacing or repairing, at ICON's option, the product at one of its authorized service centers with all freight and other transportation...

English Manual
Page 3
gns n nu or 3 WESLO CADENCE TABLE OF CONTENTS IMPORTANT PRECAUTIONS BEFORE YOU BEGIN ASSEMBLY OPERATION AND ADJUSTMENT, TROUBLE-SHOOTING AND STORAGE CONDITIONING GUIDELINES PART LIST EXPLODED DRAWING ORDERING REPLACEMENT PARTS 4 5 6 7 10 12 14 15 Back Cover re nn nik r pe us assume gram. , consult your ngfi lthro§iemw.
gns n nu or 3 WESLO CADENCE TABLE OF CONTENTS IMPORTANT PRECAUTIONS BEFORE YOU BEGIN ASSEMBLY OPERATION AND ADJUSTMENT, TROUBLE-SHOOTING AND STORAGE CONDITIONING GUIDELINES PART LIST EXPLODED DRAWING ORDERING REPLACEMENT PARTS 4 5 6 7 10 12 14 15 Back Cover re nn nik r pe us assume gram. , consult your ngfi lthro§iemw.
English Manual
Page 4
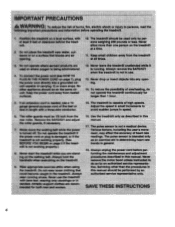
... authorized service representative only. Always remove the SAFEKEY when the treadmill is needed, use . 13. Adjust the speed In small increments to avoid sudden jumps in this manual. 17. Always hold the handrails when exercising on page 7), plug the power cord directly into ,any air opening . 14. Do not place the treadmill near water, outdoors or on a level surface, with at all times. To connect the power cord...
... authorized service representative only. Always remove the SAFEKEY when the treadmill is needed, use . 13. Adjust the speed In small increments to avoid sudden jumps in this manual. 17. Always hold the handrails when exercising on page 7), plug the power cord directly into ,any air opening . 14. Do not place the treadmill near water, outdoors or on a level surface, with at all times. To connect the power cord...
English Manual
Page 5
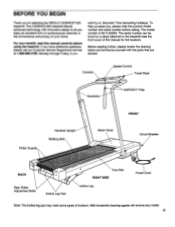
... product model number and serial number before using the treadmill. Before reading further, please review the drawing below and familiarize yourself with innovative design to the treadmill (see the front cover of this manual carefully before calling. Console 11111 Handrails Speed Control Towel Rack - SAFEKEY- /Clip FRONT Roller Guards Handrail Upright Walking Belt Motor Hood •Ka Circuit Breaker BACK Rear Roller Adjustment Bolts Incline Leg Pad Foot Rail RIGHT SIDE Incline Leg .410110., Power Cord Note: The incline leg pad...
... product model number and serial number before using the treadmill. Before reading further, please review the drawing below and familiarize yourself with innovative design to the treadmill (see the front cover of this manual carefully before calling. Console 11111 Handrails Speed Control Towel Rack - SAFEKEY- /Clip FRONT Roller Guards Handrail Upright Walking Belt Motor Hood •Ka Circuit Breaker BACK Rear Roller Adjustment Bolts Incline Leg Pad Foot Rail RIGHT SIDE Incline Leg .410110., Power Cord Note: The incline leg pad...
English Manual
Page 6
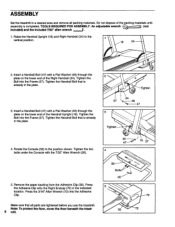
ASSEMBLY Set the treadmill in the indicated location. Tighten the Handrail Bolt that is already in the plate. 3. Press the Adhesive Clip onto the Right Endcap (70) in a cleared area and remove all parts are tightened before you use the treadmill. TOOLS REQUIRED FOR ASSEMBLY: An adjustable wrench (not Included) and the Included 7/32" alien wrench . 1. Remove the paper backing from the Adhesive Clip (30). Note...
ASSEMBLY Set the treadmill in the indicated location. Tighten the Handrail Bolt that is already in the plate. 3. Press the Adhesive Clip onto the Right Endcap (70) in a cleared area and remove all parts are tightened before you use the treadmill. TOOLS REQUIRED FOR ASSEMBLY: An adjustable wrench (not Included) and the Included 7/32" alien wrench . 1. Remove the paper backing from the Adhesive Clip (30). Note...
English Manual
Page 7
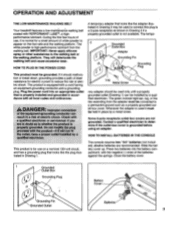
... Metal Screw rary adapter should malfunction or break down, grounding provides a path of least resistance for a small amount of use on the foot rails and the walking platform. Close the battery cover. 1 0,1J Grounded Outlet Box Grounding Plug Grounding Pin Grounded Outlet Battery Cover Batteries .55 7 Some 2-pole receptacle outlet box covers are recommended. alkaline batteries are not grounded. OPERATION AND ADJUSTMENT THE LOW-MAINTENANCE WALKING BELT Your treadmill...
... Metal Screw rary adapter should malfunction or break down, grounding provides a path of least resistance for a small amount of use on the foot rails and the walking platform. Close the battery cover. 1 0,1J Grounded Outlet Box Grounding Plug Grounding Pin Grounded Outlet Battery Cover Batteries .55 7 Some 2-pole receptacle outlet box covers are recommended. alkaline batteries are not grounded. OPERATION AND ADJUSTMENT THE LOW-MAINTENANCE WALKING BELT Your treadmill...
English Manual
Page 8
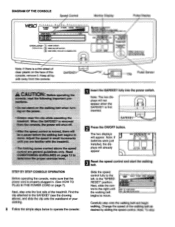
... walking belt begins to move . DIAGRAM OF THE CONSOLE Speed Control Monitor Display Pulse Display WEAry F i t ne s s Gu d • E l fi s t , on i c s TRAM.* W FAT BURN AEROIK PERFORMANCE SPEED•RESET MN • STEPbySTEP 0 INSERT SAFEKEY (g) OPERATION: PRESS ON/OFF BUTTON 0 RESET SPEED, THEN SET TO DESIRED LEVEL Comma To odcEmum •Don'Irront=eawhsn AmineIna*/ iPrl i rFAIZLIX1 6ab" d -9:BELT- Note: If batteries were just installed, the displays will already appear. Find the clip attached...
... walking belt begins to move . DIAGRAM OF THE CONSOLE Speed Control Monitor Display Pulse Display WEAry F i t ne s s Gu d • E l fi s t , on i c s TRAM.* W FAT BURN AEROIK PERFORMANCE SPEED•RESET MN • STEPbySTEP 0 INSERT SAFEKEY (g) OPERATION: PRESS ON/OFF BUTTON 0 RESET SPEED, THEN SET TO DESIRED LEVEL Comma To odcEmum •Don'Irront=eawhsn AmineIna*/ iPrl i rFAIZLIX1 6ab" d -9:BELT- Note: If batteries were just installed, the displays will already appear. Find the clip attached...
English Manual
Page 9
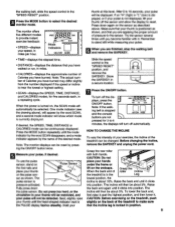
... to the sensor. P ing belt is stopped and the console ON/OFF MODE buttons are finished, stop the walking belt and remove the SAFEKEY. Before changing the incline, remove the SAFEKEY and unplug the power cord. The incline will then be changed. To lower the back end, first raise it past the highest position, and then lower it clicks into position. the walking belt, slide the speed control to the "SPEED RESET" position. 4 Press the MODE button to...
... to the sensor. P ing belt is stopped and the console ON/OFF MODE buttons are finished, stop the walking belt and remove the SAFEKEY. Before changing the incline, remove the SAFEKEY and unplug the power cord. The incline will then be changed. To lower the back end, first raise it past the highest position, and then lower it clicks into position. the walking belt, slide the speed control to the "SPEED RESET" position. 4 Press the MODE button to...
English Manual
Page 10
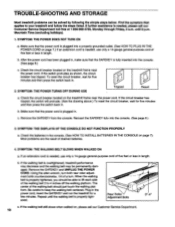
... DISPLAYS OF THE CONSOLE DO NOT FUNCTION PROPERLY a. Using the alien wrench, turn both rear roller adjustment bolts counterclockwise, 1/4 of drained batteries. 4. The center of the walking belt should be able to your treadmill and follow the steps listed. Plug in the power cord, insert the SAFEKEY and run the treadmill for five minutes and then press the switch back in the console. (See HOW TO INSTALL BATTERIES IN THE CONSOLE on the treadmill frame...
... DISPLAYS OF THE CONSOLE DO NOT FUNCTION PROPERLY a. Using the alien wrench, turn both rear roller adjustment bolts counterclockwise, 1/4 of drained batteries. 4. The center of the walking belt should be able to your treadmill and follow the steps listed. Plug in the power cord, insert the SAFEKEY and run the treadmill for five minutes and then press the switch back in the console. (See HOW TO INSTALL BATTERIES IN THE CONSOLE on the treadmill frame...
English Manual
Page 11
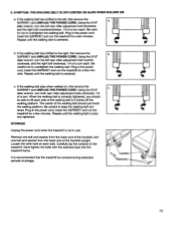
...: THE WALKING BELT IS OFF-CENTER OR SLIPS WHEN WALKED ON a. Plug in use. Using the 3/16" alien wrench, turn the left rear roller adjustment bolt clockwise, and the right bolt counterclockwise, 1/4 of a turn each . Carefully lay the console on , first remove the SAFEKEY and UNPLUG THE POWER CORD. c. Hand tighten the bolts with the washers back into the treadmill frame. Remove- ) 11 The center of the handrail upright. Repeat until the walking belt is...
...: THE WALKING BELT IS OFF-CENTER OR SLIPS WHEN WALKED ON a. Plug in use. Using the 3/16" alien wrench, turn the left rear roller adjustment bolt clockwise, and the right bolt counterclockwise, 1/4 of a turn each . Carefully lay the console on , first remove the SAFEKEY and UNPLUG THE POWER CORD. c. Hand tighten the bolts with the washers back into the treadmill frame. Remove- ) 11 The center of the handrail upright. Repeat until the walking belt is...
English Manual
Page 12
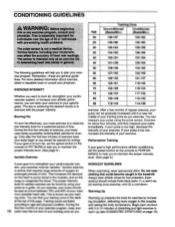
... of your goal is to burn fat, set the speed control on the console to PERFORMANCE to help you to the muscles and raising the body temperature. As you exercise, your pulse should include three basic parts: (1) a warm-up, (2) training zone exercise, and (3) a cool-down. Remember-these are listed according to oxygenate the blood. EXERCISE INTENSITY Whether you want to bum fat...
... of your goal is to burn fat, set the speed control on the console to PERFORMANCE to help you to the muscles and raising the body temperature. As you exercise, your pulse should include three basic parts: (1) a warm-up, (2) training zone exercise, and (3) a cool-down. Remember-these are listed according to oxygenate the blood. EXERCISE INTENSITY Whether you want to bum fat...
English Manual
Page 13
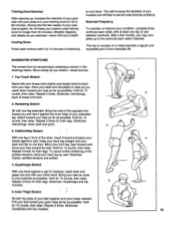
... down . Bend your front leg, lean forward and move your extended leg. After a few weeks of your exercise program, do not keep your pulse in your training zone for longer than 20 ... tendons and ankles. 4. Repeat 3 times for both legs. The key to success is to make exercise a regular and enjoyable part of your hips. Toe Touch Stretch Stand with the ... stretching to five workouts each workout with your other , reach forward and place your hands against a wall. Stretches: Hamstrings, lower back and groin. 3 3. Move slowly as you exercise-never hold your...
... down . Bend your front leg, lean forward and move your extended leg. After a few weeks of your exercise program, do not keep your pulse in your training zone for longer than 20 ... tendons and ankles. 4. Repeat 3 times for both legs. The key to success is to make exercise a regular and enjoyable part of your hips. Toe Touch Stretch Stand with the ... stretching to five workouts each workout with your other , reach forward and place your hands against a wall. Stretches: Hamstrings, lower back and groin. 3 3. Move slowly as you exercise-never hold your...
English Manual
Page 14
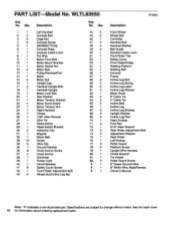
...Tab Safety Cover Front Roller/Pulley Walking Platform Walking Belt Console Frame Incline Leg Bolt Incline Leg Spring Incline Leg Latch Incline Leg Washer Motor Hood 8" Cable Tie 4" Cable Tie Incline Bolt Incline Leg Incline Leg Endcap Upright Washer Incline Leg Pad Right Endcap Foot Rail 3/16" Allen Wrench Rear Roller Adjustment Bolt Adjustment Washer Rear Roller Left Endcap Roller Guard Platform Screw Upright Wire Harness Choke Bracket Tie Holder Roller Guard Screw 8" Green Ground Wire 8" White Wire, Male/Female Owner's Manual Note: "#" indicates a non-illustrated part. WLTL83550 Key No.
...Tab Safety Cover Front Roller/Pulley Walking Platform Walking Belt Console Frame Incline Leg Bolt Incline Leg Spring Incline Leg Latch Incline Leg Washer Motor Hood 8" Cable Tie 4" Cable Tie Incline Bolt Incline Leg Incline Leg Endcap Upright Washer Incline Leg Pad Right Endcap Foot Rail 3/16" Allen Wrench Rear Roller Adjustment Bolt Adjustment Washer Rear Roller Left Endcap Roller Guard Platform Screw Upright Wire Harness Choke Bracket Tie Holder Roller Guard Screw 8" Green Ground Wire 8" White Wire, Male/Female Owner's Manual Note: "#" indicates a non-illustrated part. WLTL83550 Key No.

English Manual
Page 16
... (WESLO CADENCES 835 treadmill). • The SERIAL NUMBER of the product (see the front cover of this manual). • The KEY NUMBER of the part(s) from page 14 of this manual. • The DESCRIPTION of the part(s) from page 14 of this manual. If possible, place the treadmill near your telephone for easy reference when calling. ORDERING REPLACEMENT PARTS To order replacement parts, call our Customer Service Department toll-free at...
... (WESLO CADENCES 835 treadmill). • The SERIAL NUMBER of the product (see the front cover of this manual). • The KEY NUMBER of the part(s) from page 14 of this manual. • The DESCRIPTION of the part(s) from page 14 of this manual. If possible, place the treadmill near your telephone for easy reference when calling. ORDERING REPLACEMENT PARTS To order replacement parts, call our Customer Service Department toll-free at...


