

Canadian English Manual
Page 3
.... Always hold the handrails while exercising on the walking belt. 15. The pulse sensor is not working properly. (See BEFORE YOU BEGIN on page 9. Always unplug the power cord before using the treadmill. To reduce the possibility of the treadmill every three months. 21. WARNING: Before beginning this ...power cord or plug is damaged, or if the treadmill is not working properly.) 12. To change the incline level in any opening. 23. Do not attempt to change the incline level of this manual. Never move the walking belt while the power is not a medical device. ...
.... Always hold the handrails while exercising on the walking belt. 15. The pulse sensor is not working properly. (See BEFORE YOU BEGIN on page 9. Always unplug the power cord before using the treadmill. To reduce the possibility of the treadmill every three months. 21. WARNING: Before beginning this ...power cord or plug is damaged, or if the treadmill is not working properly.) 12. To change the incline level in any opening. 23. Do not attempt to change the incline level of this manual. Never move the walking belt while the power is not a medical device. ...

Canadian English Manual
Page 4
.... The serial number can be healthier in the convenience and privacy of this manual for selecting the WESLO CADENCE® 815 treadmill. The natural motion and versatility of treadmills have additional questions, please call our Customer Service Department toll-free at 1-888-936-4266, Monday through...(excluding holidays). BEFORE YOU BEGIN Thank you for the location). Console Speed Control Towel Rack Pulse Sensor Handrails Walking Belt Roller Guards Key/Clip Upright FRONT Circuit Breaker Motor Hood Power Cord BACK Rear Roller Adjustment Bolt 4 Foot Rail RIGHT...
.... The serial number can be healthier in the convenience and privacy of this manual for selecting the WESLO CADENCE® 815 treadmill. The natural motion and versatility of treadmills have additional questions, please call our Customer Service Department toll-free at 1-888-936-4266, Monday through...(excluding holidays). BEFORE YOU BEGIN Thank you for the location). Console Speed Control Towel Rack Pulse Sensor Handrails Walking Belt Roller Guards Key/Clip Upright FRONT Circuit Breaker Motor Hood Power Cord BACK Rear Roller Adjustment Bolt 4 Foot Rail RIGHT...

Canadian English Manual
Page 6
...8226; Always hold the handrails when stepping on and off the treadmill, and when exercising on the treadmill. • Always stand on the foot rails when turning on the treadmill. The drawing below demonstrates the proper form. If you slow the walking belt with your feet, it . • While walking on .... • To change the incline level any other way. Do not lean back or push forward against the walking belt with the negative (-) ends of the treadmill is important to a stop. The walking belt may come to maintain proper form when walking on the power or starting the walking...
...8226; Always hold the handrails when stepping on and off the treadmill, and when exercising on the treadmill. • Always stand on the foot rails when turning on the treadmill. The drawing below demonstrates the proper form. If you slow the walking belt with your feet, it . • While walking on .... • To change the incline level any other way. Do not lean back or push forward against the walking belt with the negative (-) ends of the treadmill is important to a stop. The walking belt may come to maintain proper form when walking on the power or starting the walking...

Canadian English Manual
Page 7
...grounding plug that DANGER: Improper connection of electric shock. Grounding Pin Treadmill Power Cord Grounding Grounding Plug Pin Surge protectors are not grounded. OPERATION AND ADJUSTMENT THE PERFORMANT LUBETM WALKING BELT risk of least resistance for use a surge protector (not included)... by a qualified electrician. Whenever the adapter is equipped with a cord having an equipment-grounding conductor and a Your treadmill features a walking belt coated with all local codes and form. trated in accordance with grounding plug. protector, and plug the surge protector into...
...grounding plug that DANGER: Improper connection of electric shock. Grounding Pin Treadmill Power Cord Grounding Grounding Plug Pin Surge protectors are not grounded. OPERATION AND ADJUSTMENT THE PERFORMANT LUBETM WALKING BELT risk of least resistance for use a surge protector (not included)... by a qualified electrician. Whenever the adapter is equipped with a cord having an equipment-grounding conductor and a Your treadmill features a walking belt coated with all local codes and form. trated in accordance with grounding plug. protector, and plug the surge protector into...

Canadian English Manual
Page 8
...Avoid spilling liquid on the power. • Always wear the clip while operating the treadmill. Next, step onto the foot rails of the walking belt as desired by sliding the speed control. Carefully step onto the walking belt and begin walking. On/Off Button Scan Button Clip Pulse Sensor Key CAUTION: Before ...ON/OFF button. Next, slide the control to the right until the walking belt begins to move . • Adjust the speed in (see the drawing above the speed control are guidelines only. Change the speed of the treadmill. Find the clip attached to the key (see HOW TO PLUG IN ...
...Avoid spilling liquid on the power. • Always wear the clip while operating the treadmill. Next, step onto the foot rails of the walking belt as desired by sliding the speed control. Carefully step onto the walking belt and begin walking. On/Off Button Scan Button Clip Pulse Sensor Key CAUTION: Before ...ON/OFF button. Next, slide the control to the right until the walking belt begins to move . • Adjust the speed in (see the drawing above the speed control are guidelines only. Change the speed of the treadmill. Find the clip attached to the key (see HOW TO PLUG IN ...

Canadian English Manual
Page 9
...the sensor several times until you have burned. There are applying the proper amount of the treadmill can be restricted, and your pulse is stopped and the console buttons are finished, stop the walking belt and remove the key. Before changing the incline, remove the key and unplug the power cord.... 1 Frame 2 Incline Pin Incline Leg Incline Pin To change the incline, carefully lay the treadmill on the sensor as shown, and that you ...
...the sensor several times until you have burned. There are applying the proper amount of the treadmill can be restricted, and your pulse is stopped and the console buttons are finished, stop the walking belt and remove the key. Before changing the incline, remove the key and unplug the power cord.... 1 Frame 2 Incline Pin Incline Leg Incline Pin To change the incline, carefully lay the treadmill on the sensor as shown, and that you ...

Canadian English Manual
Page 10
... about 1/8". Eastern Standard Time (excluding holidays). 1. Use only a UL-listed surge protector, rated at 15 amps, with a 14-gauge cord of the treadmill (see assembly step 5 on page 9). c. If the speed display does not show a correct reading, remove the key and UNPLUG THE POWER CORD. Re...-attach the hood and run the treadmill for a correct speed reading. c. If the walking belt still slows when walked on page 7). Reinsert the key fully into a properly grounded outlet (see HOW TO PLUG IN...
... about 1/8". Eastern Standard Time (excluding holidays). 1. Use only a UL-listed surge protector, rated at 15 amps, with a 14-gauge cord of the treadmill (see assembly step 5 on page 9). c. If the speed display does not show a correct reading, remove the key and UNPLUG THE POWER CORD. Re...-attach the hood and run the treadmill for a correct speed reading. c. If the walking belt still slows when walked on page 7). Reinsert the key fully into a properly grounded outlet (see HOW TO PLUG IN...

Canadian English Manual
Page 11
...use. Repeat until the walking belt is centered. STORAGE Unplug the power cord when the treadmill is centered. utes. Repeat until the walking belt is not in the power cord, insert the key and run the treadmill for a few minutes. Lay the upright on the treadmill. Remove Remove 11 Using ... adjustment bolt clockwise 1/4 of storage. Keep all bolts and washers in the power cord, insert the key and run the treadmill for a few min- SYMPTOM: THE WALKING BELT IS OFF-CENTER a. Remove the bolt and nut from the upper end of a turn b the rear roller adjustment bolt...
...use. Repeat until the walking belt is centered. STORAGE Unplug the power cord when the treadmill is centered. utes. Repeat until the walking belt is not in the power cord, insert the key and run the treadmill for a few minutes. Lay the upright on the treadmill. Remove Remove 11 Using ... adjustment bolt clockwise 1/4 of storage. Keep all bolts and washers in the power cord, insert the key and run the treadmill for a few min- SYMPTOM: THE WALKING BELT IS OFF-CENTER a. Remove the bolt and nut from the upper end of a turn b the rear roller adjustment bolt...
Canadian English Manual
Page 14
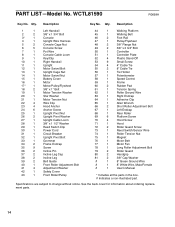
... Upright Pivot Bolt Grommet Frame Endcap Screw Incline Pin Incline Leg Cap Incline Leg Belt Guide Front Roller Adjustment Bolt Adjustment Washer Safety Cover Front Roller/Pulley 44 1 Walking Platform 45 1 Walking Belt 46 2 Foot Rail 47 1 Pulley/Flywheel 48 2 3/8" Flange Nut 49 ... 70 4 Hood Screw 71 1 Hood 72 2 Roller Guard Screw 73 1 Reed Switch/Sensor Wire 74 1 Roller Tension Nut 75 1 Magnet 76 1 Motor Belt 77 1 Motor Fan 78 1 Long Roller Adjustment Bolt 79 2 Roller Guard 80 2 Handgrip 81 2 3/8" Cap Washer # 1 8" Green Ground Wire #...
... Upright Pivot Bolt Grommet Frame Endcap Screw Incline Pin Incline Leg Cap Incline Leg Belt Guide Front Roller Adjustment Bolt Adjustment Washer Safety Cover Front Roller/Pulley 44 1 Walking Platform 45 1 Walking Belt 46 2 Foot Rail 47 1 Pulley/Flywheel 48 2 3/8" Flange Nut 49 ... 70 4 Hood Screw 71 1 Hood 72 2 Roller Guard Screw 73 1 Reed Switch/Sensor Wire 74 1 Roller Tension Nut 75 1 Magnet 76 1 Motor Belt 77 1 Motor Fan 78 1 Long Roller Adjustment Bolt 79 2 Roller Guard 80 2 Handgrip 81 2 3/8" Cap Washer # 1 8" Green Ground Wire #...


