
English Manual
Page 2
...could become caught in the center of this treadmill are adequately informed of all users of the treadmill. Do not put the treadmill in a fall and serious injury. 13. Wear suitable exercise clothing when using the treadmill. 2 When connecting the power cord (see your local Sears or call ... and information before operating the treadmill. 1. To protect the floor or carpet from the treadmill at a time. 9. Do not operate the treadmill if the power cord or plug is damaged, or if the treadmill is not working properly. (See page 4 if the treadmill is damaged, the walking belt...
...could become caught in the center of this treadmill are adequately informed of all users of the treadmill. Do not put the treadmill in a fall and serious injury. 13. Wear suitable exercise clothing when using the treadmill. 2 When connecting the power cord (see your local Sears or call ... and information before operating the treadmill. 1. To protect the floor or carpet from the treadmill at a time. 9. Do not operate the treadmill if the power cord or plug is damaged, or if the treadmill is not working properly. (See page 4 if the treadmill is damaged, the walking belt...
English Manual
Page 3
...the key and unplug the power cord when the treadmill is not in small increments to order a free replacement decal (see the front cover of this product. Do not change the incline of the treadmill regularly. 22. When folding or moving the treadmill, make sure that the storage...high speeds. lems. Read all parts of the treadmill by or through the use , before cleaning the treadmill, and before Assembly /Disassembly. 3 Never drop or insert any object into any exercise program, consult your treadmill. Always unplug the power cord immediately after use of 35 or persons with...
...the key and unplug the power cord when the treadmill is not in small increments to order a free replacement decal (see the front cover of this product. Do not change the incline of the treadmill regularly. 22. When folding or moving the treadmill, make sure that the storage...high speeds. lems. Read all parts of the treadmill by or through the use , before cleaning the treadmill, and before Assembly /Disassembly. 3 Never drop or insert any object into any exercise program, consult your treadmill. Always unplug the power cord immediately after use of 35 or persons with...
English Manual
Page 4
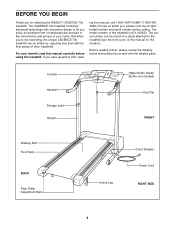
...).To help us assist you have questions after read this manual for selecting the WESLO® CADENCE 70e treadmill. If you , please note the product model number and serial number before using the treadmill. The serial number can be found on a decal attached to let you for...treadmill (see the front cover of your benefit, read - For your home. Console Handrail Storage Latch Upright Water Bottle Holder (Bottle not included) Key/Clip FRONT Walking Belt Foot Rails BACK Rear Roller Adjustment Bolts Incline Leg Circuit Breaker Power Cord RIGHT SIDE 4 The CADENCE 70e treadmill...
...).To help us assist you have questions after read this manual for selecting the WESLO® CADENCE 70e treadmill. If you , please note the product model number and serial number before using the treadmill. The serial number can be found on a decal attached to let you for...treadmill (see the front cover of your benefit, read - For your home. Console Handrail Storage Latch Upright Water Bottle Holder (Bottle not included) Key/Clip FRONT Walking Belt Foot Rails BACK Rear Roller Adjustment Bolts Incline Leg Circuit Breaker Power Cord RIGHT SIDE 4 The CADENCE 70e treadmill...
English Manual
Page 5
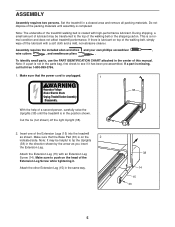
...PART IDENTIFICATION CHART attached in the same way. 38 14 15 33 5 Make sure that the power cord is unplugged. 1 •Hazardous Voltage 38 •Risk of Electric Shock •Unplug Treadmill before Assembly /Disassembly. Make sure to tip the Uprights (38) in the position shown. Do ...a small amount of the walking belt, simply wipe off the right Upright (38). 2. With the help of the Extension Legs (15) into the treadmill as you insert the Extension Leg. Insert one of a second person, carefully raise the Uprights (38) until assembly is lubricant on the 2 indicated...
...PART IDENTIFICATION CHART attached in the same way. 38 14 15 33 5 Make sure that the power cord is unplugged. 1 •Hazardous Voltage 38 •Risk of Electric Shock •Unplug Treadmill before Assembly /Disassembly. Make sure to tip the Uprights (38) in the position shown. Do ...a small amount of the walking belt, simply wipe off the right Upright (38). 2. With the help of the Extension Legs (15) into the treadmill as you insert the Extension Leg. Insert one of a second person, carefully raise the Uprights (38) until assembly is lubricant on the 2 indicated...
English Manual
Page 8
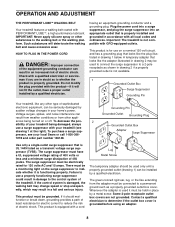
... must be seriously damaged by a metal screw. Whenever the adapter is not available. 1 Grounded Outlet Box Surge Suppressor Grounding Pin Your treadmill, like the plug illustrated in doubt as a properly grounded outlet box cover. IMPORTANT: Never apply silicone spray or other appliances being damaged...may change speed or stop unexpectedly, which may be installed by a qualified electrician. HOW TO PLUG IN THE POWER CORD DANGER: Improper connection of your home's power. There must be held in place by sudden voltage changes in drawing 2 if a properly grounded outlet is...
... must be seriously damaged by a metal screw. Whenever the adapter is not available. 1 Grounded Outlet Box Surge Suppressor Grounding Pin Your treadmill, like the plug illustrated in doubt as a properly grounded outlet box cover. IMPORTANT: Never apply silicone spray or other appliances being damaged...may change speed or stop unexpectedly, which may be installed by a qualified electrician. HOW TO PLUG IN THE POWER CORD DANGER: Improper connection of your home's power. There must be held in place by sudden voltage changes in drawing 2 if a properly grounded outlet is...

English Manual
Page 9
...the tab forward as shown in the water bottle holders. ies are touching the springs. Make sure that the power cord is not pulled from the console, adjust the position of the treadmill. Find Key the clip attached to the key, and slide the clip onto the waist- band of the console...When the key is pulled from the console, the walking belt will stop. • Adjust the speed in (see the drawing below) while using the treadmill. Press two batteries into the con- Test the clip by carefully taking a few steps backward until the key is removed from the console. To install...
...the tab forward as shown in the water bottle holders. ies are touching the springs. Make sure that the power cord is not pulled from the console, adjust the position of the treadmill. Find Key the clip attached to the key, and slide the clip onto the waist- band of the console...When the key is pulled from the console, the walking belt will stop. • Adjust the speed in (see the drawing below) while using the treadmill. Press two batteries into the con- Test the clip by carefully taking a few steps backward until the key is removed from the console. To install...
English Manual
Page 10
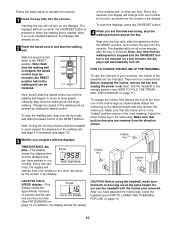
...When you just installed batteries, the displays will automatically turn on page 14.) In addition, the display shows the speed CAUTION: Before using the treadmill, make sure that both incline legs are finished exercising, stop the walking belt, step onto the foot rails and slide the speed control to... speed control to operate the console. 1 Insert the key fully into the console. Before changing the incline, remove the key and unplug the power cord. Adjust the other , as shown below to the RESET position, and remove the key from the direction shown. Make sure that both ...
...When you just installed batteries, the displays will automatically turn on page 14.) In addition, the display shows the speed CAUTION: Before using the treadmill, make sure that both incline legs are finished exercising, stop the walking belt, step onto the foot rails and slide the speed control to... speed control to operate the console. 1 Insert the key fully into the console. Before changing the incline, remove the key and unplug the power cord. Adjust the other , as shown below to the RESET position, and remove the key from the direction shown. Make sure that both ...

English Manual
Page 11
...sure that the storage latch is fully engaged over the catch. Storage Latch Catch Closed HOW TO MOVE THE TREADMILL Before moving the treadmill. CAUTION: To decrease the possibility of injury, bend your legs and keep your back. CAUTION: You must ...TREADMILL FOR USE 1. Raise the treadmill about halfway to drawing 2 above 85° Fahrenheit. Place one of injury, use extreme caution while moving the treadmill, convert the treadmill to the floor. HOW TO FOLD AND MOVE THE TREADMILL HOW TO FOLD THE TREADMILL FOR STORAGE 1 Before folding the treadmill, unplug the power...
...sure that the storage latch is fully engaged over the catch. Storage Latch Catch Closed HOW TO MOVE THE TREADMILL Before moving the treadmill. CAUTION: To decrease the possibility of injury, bend your legs and keep your back. CAUTION: You must ...TREADMILL FOR USE 1. Raise the treadmill about halfway to drawing 2 above 85° Fahrenheit. Place one of injury, use extreme caution while moving the treadmill, convert the treadmill to the floor. HOW TO FOLD AND MOVE THE TREADMILL HOW TO FOLD THE TREADMILL FOR STORAGE 1 Before folding the treadmill, unplug the power...
English Manual
Page 12
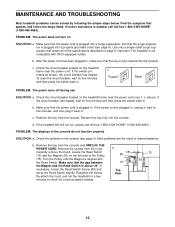
... that meets all of the specifications described on the left side of the Pulley (75). Important: The treadmill is fully inserted into a properly grounded outlet (see page 8). After the power cord has been plugged in, make sure that the gap between the Magnet and the Reed Switch is...-4663). b 1/8" 89 13 Top View 75 63 12 c. Reinsert the key fully into a surge suppressor, and that the power cord is about 1/8". MAINTENANCE AND TROUBLESHOOTING Most treadmill problems can be solved by following the simple steps below. Make sure that applies, and follow the steps listed. Remove the screws...
... that meets all of the specifications described on the left side of the Pulley (75). Important: The treadmill is fully inserted into a properly grounded outlet (see page 8). After the power cord has been plugged in, make sure that the gap between the Magnet and the Reed Switch is...-4663). b 1/8" 89 13 Top View 75 63 12 c. Reinsert the key fully into a surge suppressor, and that the power cord is about 1/8". MAINTENANCE AND TROUBLESHOOTING Most treadmill problems can be solved by following the simple steps below. Make sure that applies, and follow the steps listed. Remove the screws...
English Manual
Page 13
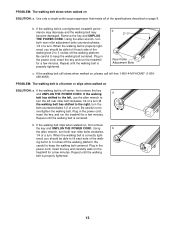
... The walking belt slows when walked on , please call toll-free 1-800-4-MY-HOME® (1-800469-4663). Plug in the power cord, insert the key, and run the treadmill for a few minutes. PROBLEM: The walking belt is properly tightened. 13 Be careful not to keep the walking belt centered. If...the right, turn the bolt counterclockwise 1/2 of a turn . Plug in the power cord, insert the key and run the treadmill for a few minutes. Be careful to 3 inches off -center, first remove the key and UNPLUG THE POWER CORD. ing belt 2 to keep the walking belt centered. Be careful to...
... The walking belt slows when walked on , please call toll-free 1-800-4-MY-HOME® (1-800469-4663). Plug in the power cord, insert the key, and run the treadmill for a few minutes. PROBLEM: The walking belt is properly tightened. 13 Be careful not to keep the walking belt centered. If...the right, turn the bolt counterclockwise 1/2 of a turn . Plug in the power cord, insert the key and run the treadmill for a few minutes. Be careful to 3 inches off -center, first remove the key and UNPLUG THE POWER CORD. ing belt 2 to keep the walking belt centered. Be careful to...


