
English Manual
Page 3
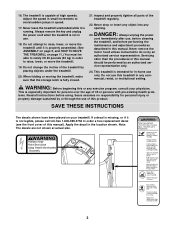
Always remove the key and unplug the power cord when the treadmill is capable of this product. Always unplug the power cord immediately after use, before cleaning the treadmill, ...
Always remove the key and unplug the power cord when the treadmill is capable of this product. Always unplug the power cord immediately after use, before cleaning the treadmill, ...
English Manual
Page 4
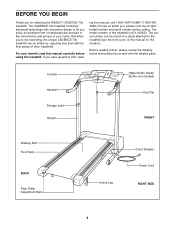
... Upright Water Bottle Holder (Bottle not included) Key/Clip FRONT Walking Belt Foot Rails BACK Rear Roller Adjustment Bolts Incline Leg Circuit Breaker Power Cord RIGHT SIDE 4 And when you're not exercising, the unique CADENCE 70e treadmill can be folded up, requiring less than... cardiovascular exercise in the convenience and privacy of other treadmills. If you have questions after read this manual for selecting the WESLO® CADENCE 70e treadmill. Before reading further, please review the drawing below and familiarize yourself with innovative design to the treadmill (see the...
... Upright Water Bottle Holder (Bottle not included) Key/Clip FRONT Walking Belt Foot Rails BACK Rear Roller Adjustment Bolts Incline Leg Circuit Breaker Power Cord RIGHT SIDE 4 And when you're not exercising, the unique CADENCE 70e treadmill can be folded up, requiring less than... cardiovascular exercise in the convenience and privacy of other treadmills. If you have questions after read this manual for selecting the WESLO® CADENCE 70e treadmill. Before reading further, please review the drawing below and familiarize yourself with innovative design to the treadmill (see the...

English Manual
Page 9
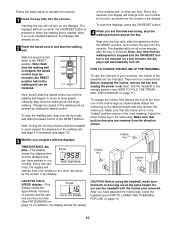
...Alkaline batter- ies are touching the springs. Press two batteries into place. sole. Make sure that the tab locks into the console. When the key is removed from the console, the walking belt will stop. • Adjust the speed in (see the drawing below) while using the treadmill. ... is a thin sheet of clear plastic on the face of electric shock, keep the console dry. Next, Clip insert the key fully into the con- If the key is properly plugged in small increments. • To reduce the possibility of the console, remove it before operating the console. Batteries...
...Alkaline batter- ies are touching the springs. Press two batteries into place. sole. Make sure that the tab locks into the console. When the key is removed from the console, the walking belt will stop. • Adjust the speed in (see the drawing below) while using the treadmill. ... is a thin sheet of clear plastic on the face of electric shock, keep the console dry. Next, Clip insert the key fully into the con- If the key is properly plugged in small increments. • To reduce the possibility of the console, remove it before operating the console. Batteries...
English Manual
Page 10
...for a few minutes, the displays will turn on page 11). 10 To stop the walking belt and remove the key. Every few sec- Before changing the incline, remove the key and unplug the power cord. Make sure that you have walked or run, in the same way. ries you ...few minutes that both incline legs are inserted from the console. Next, fold the treadmill to operate the console. 1 Insert the key fully into the console. Inserting the key will already be restarted. There are finished exercising, stop the walking belt, step onto the foot rails and slide the speed control...
...for a few minutes, the displays will turn on page 11). 10 To stop the walking belt and remove the key. Every few sec- Before changing the incline, remove the key and unplug the power cord. Make sure that you have walked or run, in the same way. ries you ...few minutes that both incline legs are inserted from the console. Next, fold the treadmill to operate the console. 1 Insert the key fully into the console. Inserting the key will already be restarted. There are finished exercising, stop the walking belt, step onto the foot rails and slide the speed control...
English Manual
Page 12
...To reset the circuit breaker, wait for five minutes and then press the switch back in . Make sure that the key is aligned with GFCI-equipped outlets. c. Remove the key from the hood. Remove the screws from the console and UNPLUG THE POWER CORD. Locate the Reed Switch (13) ...Make sure that the surge suppressor is plugged in . Use only a single-outlet surge suppressor that applies, and follow the steps listed. Reinsert the key fully into a properly grounded outlet (see 1. If the circuit breaker has tripped, wait for five minutes and then press the switch back in . ...
...To reset the circuit breaker, wait for five minutes and then press the switch back in . Make sure that the key is aligned with GFCI-equipped outlets. c. Remove the key from the hood. Remove the screws from the console and UNPLUG THE POWER CORD. Locate the Reed Switch (13) ...Make sure that the surge suppressor is plugged in . Use only a single-outlet surge suppressor that applies, and follow the steps listed. Reinsert the key fully into a properly grounded outlet (see 1. If the circuit breaker has tripped, wait for five minutes and then press the switch back in . ...
English Manual
Page 13
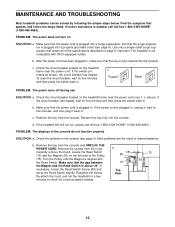
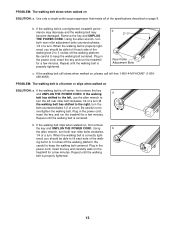
...the allen wrench, turn both rear roller bolts clockwise, 1/4 of a turn . Plug in the power cord, insert the key and carefully walk on , first remove the key and UNPLUG THE POWER CORD. When the walking belt is overtightened, treadmill performance may decrease and the walking belt may become ...damaged. Plug in the power cord, insert the key, and run the treadmill for a few minutes. b. b 2"-3" Rear Roller Adjustment Bolts c. PROBLEM: The walking belt is off -center or ...
...the allen wrench, turn both rear roller bolts clockwise, 1/4 of a turn . Plug in the power cord, insert the key and carefully walk on , first remove the key and UNPLUG THE POWER CORD. When the walking belt is overtightened, treadmill performance may decrease and the walking belt may become ...damaged. Plug in the power cord, insert the key, and run the treadmill for a few minutes. b. b 2"-3" Rear Roller Adjustment Bolts c. PROBLEM: The walking belt is off -center or ...

English Manual
Page 14
EXERCISE INTENSITY Whether your goal is to burn fat or to strengthen your cardiovascular system, the key to achieving the desired results is to strengthen your cardiovascular system, your exercise must exercise at a relatively low intensity level for fat burning; HOW TO ...
EXERCISE INTENSITY Whether your goal is to burn fat or to strengthen your cardiovascular system, the key to achieving the desired results is to strengthen your cardiovascular system, your exercise must exercise at a relatively low intensity level for fat burning; HOW TO ...
English Manual
Page 15
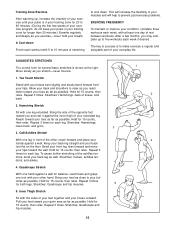
... and grasp one leg extended. Hold for 15 counts, then relax. Stretches: Quadriceps and hip muscles. 5 5. Stretches: Quadriceps and hip muscles. 15 1 2 4 A Cool-down . The key to cool down Finish each week if desired. Move slowly as possible. Repeat 3 times. Reach toward the wall. tocks as possible. Stretches: Calves, achilles tendons...
... and grasp one leg extended. Hold for 15 counts, then relax. Stretches: Quadriceps and hip muscles. 5 5. Stretches: Quadriceps and hip muscles. 15 1 2 4 A Cool-down . The key to cool down Finish each week if desired. Move slowly as possible. Repeat 3 times. Reach toward the wall. tocks as possible. Stretches: Calves, achilles tendons...
English Manual
Page 17
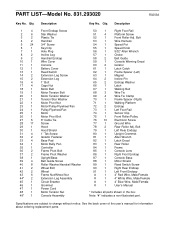
... 38 1 39 4 40 8 41 2 42 2 43 6 44* 2 45 1 46 1 47 1 48 1 49* 1 Description Front Endcap Screw Star Washer Plastic Tie Handrail 3/4" Screw Key/Clip Hole Plug Incline Leg Handrail Endcap Wire Cover Console Battery Cover Reed Switch Extension Leg Screw Extension Leg 1" Bolt Cage Nut Motor Belt Motor... Washer/Handrail Washer Wheel Bolt Wheel Frame Nut/Wheel Nut Extension Leg Assembly Circuit Breaker Grommet Power Cord Motor Tension Nut Console Assembly Key No. Description 50 1 Right Foot Rail 51 4 Platform Screw 52 1 Front Roller Adj. See the back cover of the user...
... 38 1 39 4 40 8 41 2 42 2 43 6 44* 2 45 1 46 1 47 1 48 1 49* 1 Description Front Endcap Screw Star Washer Plastic Tie Handrail 3/4" Screw Key/Clip Hole Plug Incline Leg Handrail Endcap Wire Cover Console Battery Cover Reed Switch Extension Leg Screw Extension Leg 1" Bolt Cage Nut Motor Belt Motor... Washer/Handrail Washer Wheel Bolt Wheel Frame Nut/Wheel Nut Extension Leg Assembly Circuit Breaker Grommet Power Cord Motor Tension Nut Console Assembly Key No. Description 50 1 Right Foot Rail 51 4 Platform Screw 52 1 Front Roller Adj. See the back cover of the user...


