
English Manual
Page 4
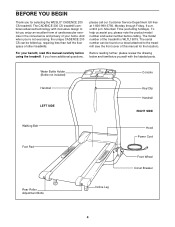
...to let you enjoy an excellent form of cardiovascular exercise in the convenience and privacy of other treadmills. Water Bottle Holder (Bottle not included) Handrail LEFT SIDE Console Key/Clip Handrail RIGHT SIDE Walking Belt Foot Pad Hood Power Cord Front Wheel Circuit Breaker ... the floor space of your benefit, read this manual for selecting the WESLO® CADENCE 200 CS treadmill. The model number of this manual carefully before calling. For your home. The CADENCE 200 CS treadmill combines advanced technology with the labeled parts. Mountain Time (excluding holidays). ...
...to let you enjoy an excellent form of cardiovascular exercise in the convenience and privacy of other treadmills. Water Bottle Holder (Bottle not included) Handrail LEFT SIDE Console Key/Clip Handrail RIGHT SIDE Walking Belt Foot Pad Hood Power Cord Front Wheel Circuit Breaker ... the floor space of your benefit, read this manual for selecting the WESLO® CADENCE 200 CS treadmill. The model number of this manual carefully before calling. For your home. The CADENCE 200 CS treadmill combines advanced technology with the labeled parts. Mountain Time (excluding holidays). ...

English Manual
Page 6
... 4b. the Battery Cover should slide into the hole as shown. Do not 55 tighten the Screws yet. If there is inserted into the Console Plate and the Console Base in a secure place. Make sure that the Wire Harness (22) is used to securely hold the Frame (55). Then, tighten the three... the boss (see drawing 5). 7. See inset drawing 4c. Insert the hinge of the Right Handrail (6) and around the Wire Harness (22) as you use the treadmill. With the help of the Wire Harness (22). If 41 69 69 Hole needed, push the Left Handrail inward as shown. To protect the floor...
... 4b. the Battery Cover should slide into the hole as shown. Do not 55 tighten the Screws yet. If there is inserted into the Console Plate and the Console Base in a secure place. Make sure that the Wire Harness (22) is used to securely hold the Frame (55). Then, tighten the three... the boss (see drawing 5). 7. See inset drawing 4c. Insert the hinge of the Right Handrail (6) and around the Wire Harness (22) as you use the treadmill. With the help of the Wire Harness (22). If 41 69 69 Hole needed, push the Left Handrail inward as shown. To protect the floor...
English Manual
Page 8
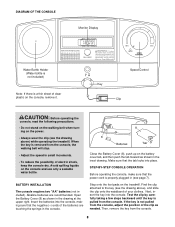
.... Then, remove the key from the console. Avoid spilling liquids on the treadmill. Make sure that the power cord is a thin sheet of electric shock, keep the console dry. STEP-BY-STEP CONSOLE OPERATION Before operating the console, make sure that the tab locks into the console. DIAGRAM OF THE CONSOLE Monitor Display Water Bottle Holder (Water...
.... Then, remove the key from the console. Avoid spilling liquids on the treadmill. Make sure that the power cord is a thin sheet of electric shock, keep the console dry. STEP-BY-STEP CONSOLE OPERATION Before operating the console, make sure that the tab locks into the console. DIAGRAM OF THE CONSOLE Monitor Display Water Bottle Holder (Water...
English Manual
Page 9
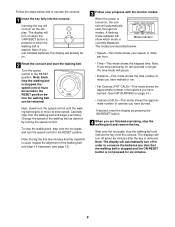
...steps below . • Speed-This mode shows your progress with the monitor modes. To stop the walking belt and remove the key from the console. The modes are finished exercising, stop exercising for six minutes. 9 Note: The display will pause. • Distance-This mode shows the total ...belt is stopped and the ON/RESET button is stopped, the speed control must be turned to conserve the batteries any time that the treadmill is used, inspect the alignment of calories you have burned. Carefully step onto the walking belt and begin exercising. Turn the speed ...
...steps below . • Speed-This mode shows your progress with the monitor modes. To stop the walking belt and remove the key from the console. The modes are finished exercising, stop exercising for six minutes. 9 Note: The display will pause. • Distance-This mode shows the total ...belt is stopped and the ON/RESET button is stopped, the speed control must be turned to conserve the batteries any time that the treadmill is used, inspect the alignment of calories you have burned. Carefully step onto the walking belt and begin exercising. Turn the speed ...
English Manual
Page 12
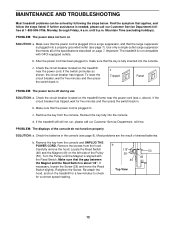
... the screws from the hood. Retighten the Screw. c. If further assistance is about 1/8". Check the batteries in . Important: The treadmill is plugged in the console (see page 7). Re-attach the hood, and run , please call our Customer Service Department tollfree at 1-800-999-3756, Monday...not compatible with the Reed Switch. MAINTENANCE AND TROUBLESHOOTING Most treadmill problems can be solved by following the steps below. Reinsert the key fully into the console. If the treadmill still will not run the treadmill for a few minutes to check for a correct speed ...
... the screws from the hood. Retighten the Screw. c. If further assistance is about 1/8". Check the batteries in . Important: The treadmill is plugged in the console (see page 7). Re-attach the hood, and run , please call our Customer Service Department tollfree at 1-800-999-3756, Monday...not compatible with the Reed Switch. MAINTENANCE AND TROUBLESHOOTING Most treadmill problems can be solved by following the steps below. Reinsert the key fully into the console. If the treadmill still will not run the treadmill for a few minutes to check for a correct speed ...

English Manual
Page 16
PART IDENTIFICATION CHART Remove this chart and the EXPLODED DRAWING/PART LIST for future reference. Save this chart and use it to identify small parts during assembly. Console Bolt (9)-2 Screw (5)-3 Formed Washer (31)-4 Handrail Bolt (12)-4 Star Washer (33)-2 Handrail Washer (11)-4 Wheel Bolt (14)-2 Frame Bolt (10)-2 Lock Nut (42)-6
PART IDENTIFICATION CHART Remove this chart and the EXPLODED DRAWING/PART LIST for future reference. Save this chart and use it to identify small parts during assembly. Console Bolt (9)-2 Screw (5)-3 Formed Washer (31)-4 Handrail Bolt (12)-4 Star Washer (33)-2 Handrail Washer (11)-4 Wheel Bolt (14)-2 Frame Bolt (10)-2 Lock Nut (42)-6

English Manual
Page 17
... 1 23 1 24 2 25 1 26 4 27 2 28 2 29 1 30 1 31 4 32 1 33 4 34 1 35 1 36 1 37 1 38 1 39 1 40 1 Description Console Speed Control Key/Clip Console Plate Screw Right Handrail Left Handrail Battery Cover Console Bolt/Motor Tension Bolt Frame Pivot Bolt Handrail Washer Handrail Bolt Frame Spacer Wheel Bolt Wheel Base Cap Handrail...
... 1 23 1 24 2 25 1 26 4 27 2 28 2 29 1 30 1 31 4 32 1 33 4 34 1 35 1 36 1 37 1 38 1 39 1 40 1 Description Console Speed Control Key/Clip Console Plate Screw Right Handrail Left Handrail Battery Cover Console Bolt/Motor Tension Bolt Frame Pivot Bolt Handrail Washer Handrail Bolt Frame Spacer Wheel Bolt Wheel Base Cap Handrail...


