
English Manual
Page 1
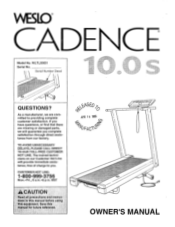
... Customer Hot Line will guarantee you . Save this equipment. CUSTOMER HOT LINE: 1-800-999-3756 Mon.-Fri., 6 a.m.-6 p.m. OWNER'S MANUAL CNNFS DE Model No. QUESTIONS? Serial Number Decal CE 7- MST ACAUTION Read all precautions and instructions in this manual before using this manual for future reference. WLTL20051 Serial No. TO AVOID UNNECESSARY DELAYS, PLEASE CALL DIRECT TO OUR TOLL-FREE CUSTOMER HOT LINE.
... Customer Hot Line will guarantee you . Save this equipment. CUSTOMER HOT LINE: 1-800-999-3756 Mon.-Fri., 6 a.m.-6 p.m. OWNER'S MANUAL CNNFS DE Model No. QUESTIONS? Serial Number Decal CE 7- MST ACAUTION Read all precautions and instructions in this manual before using this manual for future reference. WLTL20051 Serial No. TO AVOID UNNECESSARY DELAYS, PLEASE CALL DIRECT TO OUR TOLL-FREE CUSTOMER HOT LINE.
English Manual
Page 2
... ENJOYMENT OR USE, COSTS OF REMOVAL, INSTALLATION OR OTHER CONSEQUENTIAL DAMAGES OF WHATSOEVER NATURE. ICON HEALTH & FITNESS, INC., 1500 S. 1000 W., LOGAN UT 84321-9813 2 No other warranty beyond that specifically set forth above is authorized by ICON. THE WARRANTY EXTENDED HEREUNDER IS IN LIEU OF ANY AND ALL OTHER WARRANTIES AND ANY IMPLIED WARRANTIES OF MERCHANTABILITY OR FITNESS FOR A PARTICULAR PURPOSE IS LIMITED IN ITS...
... ENJOYMENT OR USE, COSTS OF REMOVAL, INSTALLATION OR OTHER CONSEQUENTIAL DAMAGES OF WHATSOEVER NATURE. ICON HEALTH & FITNESS, INC., 1500 S. 1000 W., LOGAN UT 84321-9813 2 No other warranty beyond that specifically set forth above is authorized by ICON. THE WARRANTY EXTENDED HEREUNDER IS IN LIEU OF ANY AND ALL OTHER WARRANTIES AND ANY IMPLIED WARRANTIES OF MERCHANTABILITY OR FITNESS FOR A PARTICULAR PURPOSE IS LIMITED IN ITS...

English Manual
Page 3
WESLO® CADENCE® TABLE OF CONTENTS LIMITED WARRANTY IMPORTANT PRECAUTIONS BEFORE YOU BEGIN ASSEMBLY OPERATION AND ADJUSTMENT TROUBLE-SHOOTING AND STORAGE CONDITIONING GUIDELINES PART LIST EXPLODED DRAWING ORDERING REPLACEMENT PARTS 2 4 5 6 7 10 12 14 15 Back Cover WARNIN,G..: Before pyexercie pro" gram, conoult.your is especially important for per.0.00::.g.ver..:•::the age of 34;4i.•perscins.*ith 1.3....#0.,01..!::10)#fri4Ofip...t*:15......eft.•.000in4...
WESLO® CADENCE® TABLE OF CONTENTS LIMITED WARRANTY IMPORTANT PRECAUTIONS BEFORE YOU BEGIN ASSEMBLY OPERATION AND ADJUSTMENT TROUBLE-SHOOTING AND STORAGE CONDITIONING GUIDELINES PART LIST EXPLODED DRAWING ORDERING REPLACEMENT PARTS 2 4 5 6 7 10 12 14 15 Back Cover WARNIN,G..: Before pyexercie pro" gram, conoult.your is especially important for per.0.00::.g.ver..:•::the age of 34;4i.•perscins.*ith 1.3....#0.,01..!::10)#fri4Ofip...t*:15......eft.•.000in4...

English Manual
Page 4
.... PLUG IN.THE POWER CORD on the walking belt. Servicing other appliance should be used or wilor:, OXyL,, 11 is the responsibility of the owner to ensure that could become caught in a garage or covered patio, or near water. Never start the treadmill while you are adequately informed of the treadmill overheating, do not operate the treadmill continuously for both men and women. Adjust the speed...
.... PLUG IN.THE POWER CORD on the walking belt. Servicing other appliance should be used or wilor:, OXyL,, 11 is the responsibility of the owner to ensure that could become caught in a garage or covered patio, or near water. Never start the treadmill while you are adequately informed of the treadmill overheating, do not operate the treadmill continuously for both men and women. Adjust the speed...
English Manual
Page 5
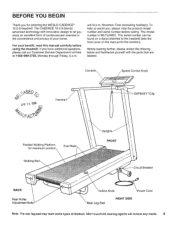
.... The serial number can be found on a decal attached to let you for selecting the WESLO CADENCE® 10.0 S treadmill. BEFORE YOU BEGIN Thank you enjoy an excellent form of cardiovascular exercise in the convenience and privacy of your benefit, read this manual for maximum comfort Foot Rails Uprights FRONT Walking Belt • Circuit Breaker BACK Rear Roller Adjustment Bolts Incline Knob Power Cord Rear Leg Pad RIGHT SIDE Note: The rear leg pad may...
.... The serial number can be found on a decal attached to let you for selecting the WESLO CADENCE® 10.0 S treadmill. BEFORE YOU BEGIN Thank you enjoy an excellent form of cardiovascular exercise in the convenience and privacy of your benefit, read this manual for maximum comfort Foot Rails Uprights FRONT Walking Belt • Circuit Breaker BACK Rear Roller Adjustment Bolts Incline Knob Power Cord Rear Leg Pad RIGHT SIDE Note: The rear leg pad may...
English Manual
Page 6
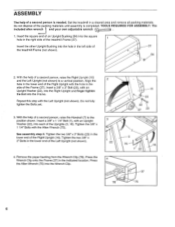
... from the Wrench Clip (78). Tighten the two 3/8" x 3" Bolts in the lower end of the treadmill Frame (not shown). 37 94 2. Press the Allen Wrench (75) into the Frame. With the help of the Uprights (3, 16). Tighten the 3/8" x 1 1/4" Bolts with the Allen Wrench (75). See assembly step 2. ASSEMBLY The help of the packing materials until assembly is needed. Do not dispose of a second...
... from the Wrench Clip (78). Tighten the two 3/8" x 3" Bolts in the lower end of the treadmill Frame (not shown). 37 94 2. Press the Allen Wrench (75) into the Frame. With the help of the Uprights (3, 16). Tighten the 3/8" x 1 1/4" Bolts with the Allen Wrench (75). See assembly step 2. ASSEMBLY The help of the packing materials until assembly is needed. Do not dispose of a second...
English Manual
Page 7
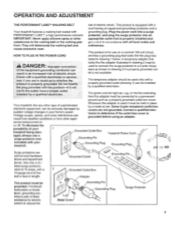
... temporary adapter should be used it must be connected to a permanent ground such as to whether the product is properly installed and substances to determine if the outlet box cover is equipped with a cord having an equipment-grounding conductor and a Your treadmill features a walking belt coated with your treadmill being turned on a nominal 120-volt circuit, HOW TO PLUG IN THE POWER CORD and...
... temporary adapter should be used it must be connected to a permanent ground such as to whether the product is properly installed and substances to determine if the outlet box cover is equipped with a cord having an equipment-grounding conductor and a Your treadmill features a walking belt coated with your treadmill being turned on a nominal 120-volt circuit, HOW TO PLUG IN THE POWER CORD and...
English Manual
Page 8
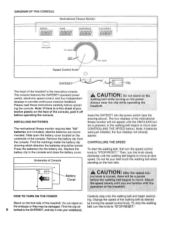
... "STOP/RESET." Speed STOP RESET • mse • Max. Find the markings inside the battery clip showing which direction the batteries should be damaged. belt, turn the speed control knob to move (see the drawing above). Slide open the battery cover located on the face of the console, peel it onto your feet touch the walking belt when standing on the foot rails of the treadmill.. A CAUTION•- Press the batteries into the power switch (see CONTROLLING THE SPEED...
... "STOP/RESET." Speed STOP RESET • mse • Max. Find the markings inside the battery clip showing which direction the batteries should be damaged. belt, turn the speed control knob to move (see the drawing above). Slide open the battery cover located on the face of the console, peel it onto your feet touch the walking belt when standing on the foot rails of the treadmill.. A CAUTION•- Press the batteries into the power switch (see CONTROLLING THE SPEED...
English Manual
Page 9
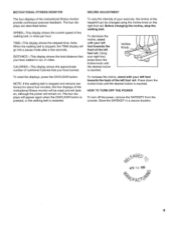
.... Press down the incline knob until the desired incline is reached. Before changing the incline, stop the walking belt. Incline Knob To reset the displays, press the ON/CLEAR button. The four displays are described below: SPEED-This display shows the current speed of nutritional Calories that you have walked or run, in a secure location. \-ckSEL) APR 1 6 1996 /4virA CI 9 HOW TO TURN OFF THE POWER To turn off the power, remove the SAFEKEY from the console...
.... Press down the incline knob until the desired incline is reached. Before changing the incline, stop the walking belt. Incline Knob To reset the displays, press the ON/CLEAR button. The four displays are described below: SPEED-This display shows the current speed of nutritional Calories that you have walked or run, in a secure location. \-ckSEL) APR 1 6 1996 /4virA CI 9 HOW TO TURN OFF THE POWER To turn off the power, remove the SAFEKEY from the console...
English Manual
Page 10
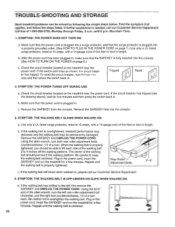
... and then press the switch back in length. When the walking belt is plugged into a surge protector, and that the SAFEKEY is properly tightened. Rear Roller Adjustment Bolts 3"-4" c. until the walking belt is fully inserted into the console. 3. SYMPTOM: THE POWER DOES NOT TURN ON a. b. Reinsert the SAFEKEY fully into the console. (See HOW TO TURN ON THE POWER on , please call our Customer Service Department toll-free at 15...
... and then press the switch back in length. When the walking belt is plugged into a surge protector, and that the SAFEKEY is properly tightened. Rear Roller Adjustment Bolts 3"-4" c. until the walking belt is fully inserted into the console. 3. SYMPTOM: THE POWER DOES NOT TURN ON a. b. Reinsert the SAFEKEY fully into the console. (See HOW TO TURN ON THE POWER on , please call our Customer Service Department toll-free at 15...
English Manual
Page 11
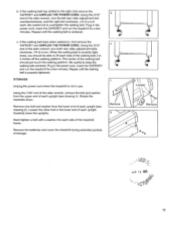
... the walking belt 3 to overtighten the walking belt. Remove the batteries and cover the treadmill during extended periods of a turn . Carefully lower the uprights. Using the 3/16" end of the alien wrench, turn both rear roller adjustment bolts clockwise, 1/4 of each . Plug in the power cord, insert the SAFEKEY and run the treadmill for a few minutes. STORAGE Unplug the power cord when the treadmill is properly tightened. Using the 7/32" end of the alien wrench, remove the bolt and...
... the walking belt 3 to overtighten the walking belt. Remove the batteries and cover the treadmill during extended periods of a turn . Carefully lower the uprights. Using the 3/16" end of the alien wrench, turn both rear roller adjustment bolts clockwise, 1/4 of each . Plug in the power cord, insert the SAFEKEY and run the treadmill for a few minutes. STORAGE Unplug the power cord when the treadmill is properly tightened. Using the 7/32" end of the alien wrench, remove the bolt and...
English Manual
Page 12
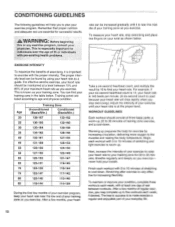
... health problems. rate can find your wrist as you exercise. Breathe regularly and deeply as you exercise. You can be increased gradually until your heart rate is to make exercise a regular and enjoyable part of your training zone as shown below . For effective aerobic exercise, your heart rate should consist of stretching to the muscles and raising the body temperature. Finish each workout with 5 to 10...
... health problems. rate can find your wrist as you exercise. Breathe regularly and deeply as you exercise. You can be increased gradually until your heart rate is to make exercise a regular and enjoyable part of your training zone as shown below . For effective aerobic exercise, your heart rate should consist of stretching to the muscles and raising the body temperature. Finish each workout with 5 to 10...
English Manual
Page 13
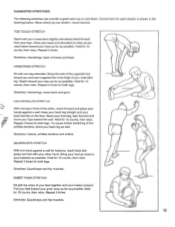
... stretch-never bounce. Repeat 3 times. Repeat 3 times for both legs. Bend your front leg, lean forward and move your hips toward you reach down . QUADRICEPS STRETCH With one leg in the drawings below. Correct form for balance, reach back and grasp one leg extended. Stretches: Hamstrings, lower back and groin. Hold for 15 counts, then relax. HAMSTRING...
... stretch-never bounce. Repeat 3 times. Repeat 3 times for both legs. Bend your front leg, lean forward and move your hips toward you reach down . QUADRICEPS STRETCH With one leg in the drawings below. Correct form for balance, reach back and grasp one leg extended. Stretches: Hamstrings, lower back and groin. Hold for 15 counts, then relax. HAMSTRING...
English Manual
Page 14
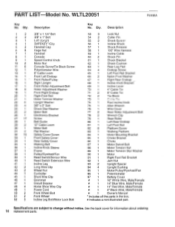
... Safety Cover Screw 33 1 Front Safety Cover 34 1 Rear Safety Cover 35 1 Walking Belt 36 1 _ Incline Knob Sleeve 37 1 Frame 38 1 Pulley/Flywheel/Fan 39 1 Reed Switch/Sensor Wire 40 1 Reed Switch Extension Wire 41 1 Incline Leg 42 2 Long Wire Clip 43 2 Wheel Nut 44 1 Controller 45 1 Short Wire Clip 46 1 Grommet 47 1 Circuit Breaker 48 4 Horse Shoe Wire Clip 49 1 Power Cord 50 2 Front Wheel Bolt 51 2 Front Wheel 52 3 Incline Leg Bolt/Motor Lock Bolt Key No. Description 1 2 3/8" x 1 1/4" Bolt 2 2 3/8" x 1" Bolt 3 1 Left Upright 4 1 SAFEKEY...
... Safety Cover Screw 33 1 Front Safety Cover 34 1 Rear Safety Cover 35 1 Walking Belt 36 1 _ Incline Knob Sleeve 37 1 Frame 38 1 Pulley/Flywheel/Fan 39 1 Reed Switch/Sensor Wire 40 1 Reed Switch Extension Wire 41 1 Incline Leg 42 2 Long Wire Clip 43 2 Wheel Nut 44 1 Controller 45 1 Short Wire Clip 46 1 Grommet 47 1 Circuit Breaker 48 4 Horse Shoe Wire Clip 49 1 Power Cord 50 2 Front Wheel Bolt 51 2 Front Wheel 52 3 Incline Leg Bolt/Motor Lock Bolt Key No. Description 1 2 3/8" x 1 1/4" Bolt 2 2 3/8" x 1" Bolt 3 1 Left Upright 4 1 SAFEKEY...
English Manual
Page 16
... (WESLO CADENCES 10.0 S treadmill). • The SERIAL NUMBER of the product (see the front cover of this manual). • The KEY NUMBER of the part(s) (see page 14 of this manual). • The DESCRIPTION of the part(s) (see page 14 of this manual). If possible, place the treadmill near your telephone for easy reference when calling. Part No. 127463 F00697-C R0496A Printed in USA © 1995 ICON Health & Fitness...
... (WESLO CADENCES 10.0 S treadmill). • The SERIAL NUMBER of the product (see the front cover of this manual). • The KEY NUMBER of the part(s) (see page 14 of this manual). • The DESCRIPTION of the part(s) (see page 14 of this manual). If possible, place the treadmill near your telephone for easy reference when calling. Part No. 127463 F00697-C R0496A Printed in USA © 1995 ICON Health & Fitness...


