
Owners Manual
Page 1
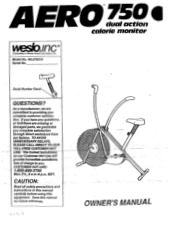
...:. MST. O'' OWNER'S MANUAL ifigE A Subsidiary of charge to providing you complete satisfaction through direct assistance from our factory. WL075010 Serial No. 0 750 dual action calorie monitor SerialNumber Decal QUESTIONS? ModelNo. TO AVOID UNNECESSARY DELAYS, PLEASE CALL DIRECT TO OUR TOLL-FREE CUSTOMER HOT UNE.-TheTrained technTalans on our CustomerHot Line will provide immediate assistance, free of Weider Health and Fitness:Inc.
...:. MST. O'' OWNER'S MANUAL ifigE A Subsidiary of charge to providing you complete satisfaction through direct assistance from our factory. WL075010 Serial No. 0 750 dual action calorie monitor SerialNumber Decal QUESTIONS? ModelNo. TO AVOID UNNECESSARY DELAYS, PLEASE CALL DIRECT TO OUR TOLL-FREE CUSTOMER HOT UNE.-TheTrained technTalans on our CustomerHot Line will provide immediate assistance, free of Weider Health and Fitness:Inc.
Owners Manual
Page 2
... DO NOT ALLOW THE EXCLUSION OR LIMITATION OF INCIDENTAL OR CONSEQUENTIAL DAMAGES. LIMITED WARRANTY WESLO, Inc. ("WESLO"), warrants this warranty is limited to replacing or repairing, at WESLO's option, the product at one of its authorized service centers with all freight and other rights which warranty claim is authorized by WESLO. This warranty gives you specific legal rights. This warranty does not extend to any product...
... DO NOT ALLOW THE EXCLUSION OR LIMITATION OF INCIDENTAL OR CONSEQUENTIAL DAMAGES. LIMITED WARRANTY WESLO, Inc. ("WESLO"), warrants this warranty is limited to replacing or repairing, at WESLO's option, the product at one of its authorized service centers with all freight and other rights which warranty claim is authorized by WESLO. This warranty gives you specific legal rights. This warranty does not extend to any product...
Owners Manual
Page 3
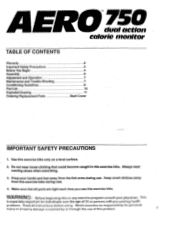
... pre-existing health problems. Read all parts are tight each time you use . 4. Weslo assumes no responsibility for individuals over the age of this exercise bike during use. ac°tion calorie monitor TABLE OF CONTENTS Warranty Important Safety Precautions Before You Begin Assembly Adjustment and Operation Maintenance and Trouble-Shooting Conditioning Guidelines Part List Exploded Drawing Ordering Replacement Parts 2 3 4 5 7 7 8 10 11 Back Cover IMPORTANT SAFETY PRECAUTIONS 1. Use this exercise bike. Always...
... pre-existing health problems. Read all parts are tight each time you use . 4. Weslo assumes no responsibility for individuals over the age of this exercise bike during use. ac°tion calorie monitor TABLE OF CONTENTS Warranty Important Safety Precautions Before You Begin Assembly Adjustment and Operation Maintenance and Trouble-Shooting Conditioning Guidelines Part List Exploded Drawing Ordering Replacement Parts 2 3 4 5 7 7 8 10 11 Back Cover IMPORTANT SAFETY PRECAUTIONS 1. Use this exercise bike. Always...
Owners Manual
Page 4
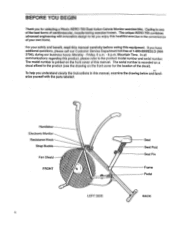
... this equipment. The serial number is printed on the front cover for selecting a Weslo AERO 750 Dual Action Calorie Monitor exercise bike. Handlebar Electronic Monitor Resistance Knob Strap Buckle Fan Shield FRONT 4 4) I • LEFT SIDE Seat Seat Post Seat Pin Frame Pedal BACK Mountain Time. To help you understand clearly the instructions in the convenience of your safety and benefit, read this manual carefully before using this healthful exercise in this product, please...
... this equipment. The serial number is printed on the front cover for selecting a Weslo AERO 750 Dual Action Calorie Monitor exercise bike. Handlebar Electronic Monitor Resistance Knob Strap Buckle Fan Shield FRONT 4 4) I • LEFT SIDE Seat Seat Post Seat Pin Frame Pedal BACK Mountain Time. To help you understand clearly the instructions in the convenience of your safety and benefit, read this manual carefully before using this healthful exercise in this product, please...
Owners Manual
Page 5
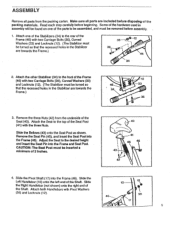
...the rear of the Seat (40). Remove the Seat Pin (45), and insert the Seat Post into the Frame (46). Slide the Pivot Shaft (17) into the Frame (46). Attach both Handlebars with two Carriage Bolts (...12 33 36 3. Read each step carefully before assembly. 1. Remove the three Nuts (42) from the packing carton. Some of the hardware used in assembly will be turned so that the recessed holes ...in the Stabilizer 36 are towards the Frame.) 46 V 34 2. Make sure all parts from the underside of...
...the rear of the Seat (40). Remove the Seat Pin (45), and insert the Seat Post into the Frame (46). Slide the Pivot Shaft (17) into the Frame (46). Attach both Handlebars with two Carriage Bolts (...12 33 36 3. Read each step carefully before assembly. 1. Remove the three Nuts (42) from the packing carton. Some of the hardware used in assembly will be turned so that the recessed holes ...in the Stabilizer 36 are towards the Frame.) 46 V 34 2. Make sure all parts from the underside of...
Owners Manual
Page 6
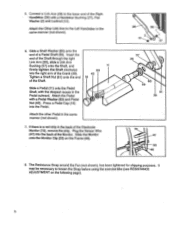
... end of the Electronic Monitor (19), remove the strip. Slide a Pedal (11) onto the Pedal Shaft, with a Pedal Washer (63) and Pedal Nut (42). It may be necessary to loosen the Strap before using the exercise bike (see RESISTANCE ADJUSTMENT on the Frame (46). 26 38 2 12 2 57 26 60 59 61 39 19 47 53 46 8. Connect a Link Arm (26) to the Left...
... end of the Electronic Monitor (19), remove the strip. Slide a Pedal (11) onto the Pedal Shaft, with a Pedal Washer (63) and Pedal Nut (42). It may be necessary to loosen the Strap before using the exercise bike (see RESISTANCE ADJUSTMENT on the Frame (46). 26 38 2 12 2 57 26 60 59 61 39 19 47 53 46 8. Connect a Link Arm (26) to the Left...
Owners Manual
Page 7
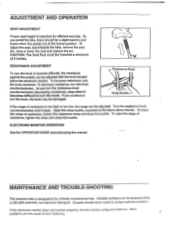
... the pedals can be cleaned using new batteries. ADJUSTMENT AND OPERATION SEAT ADJUSTMENT Proper seat height is designed to be virtually maintenance-free. CAUTION: The Seat Post must be adjusted. To decrease resistance, turn the knob clockwise. MAINTENANCE AND TROUBLE-SHOOTING This exercise bike is important for efficient exercise. Resistance Knob Strap Buckle If the range of worn batteries. 7 To lower the range of resistance, tighten the strap and close the buckle. ELECTRONIC MONITOR OPERATION See the OPERATION GUIDE...
... the pedals can be cleaned using new batteries. ADJUSTMENT AND OPERATION SEAT ADJUSTMENT Proper seat height is designed to be virtually maintenance-free. CAUTION: The Seat Post must be adjusted. To decrease resistance, turn the knob clockwise. MAINTENANCE AND TROUBLE-SHOOTING This exercise bike is important for efficient exercise. Resistance Knob Strap Buckle If the range of worn batteries. 7 To lower the range of resistance, tighten the strap and close the buckle. ELECTRONIC MONITOR OPERATION See the OPERATION GUIDE...
Owners Manual
Page 8
... not properly adjusted, remove the screws securing the fan shield and lift off the side shield. 3. Remove the right pedal assembly. 2. Reattach the fan shield, the side shield and the pedal assembly. A few drops of the fan axle. You can be determined using the heart rate as a guide. Loosen the axle nuts on the front end of exertion can .find your Training Zone...
... not properly adjusted, remove the screws securing the fan shield and lift off the side shield. 3. Remove the right pedal assembly. 2. Reattach the fan shield, the side shield and the pedal assembly. A few drops of the fan axle. You can be determined using the heart rate as a guide. Loosen the axle nuts on the front end of exertion can .find your Training Zone...
Owners Manual
Page 9
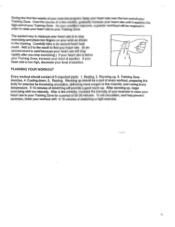
..., finish your Training Zone for exercise by increasing circulation, delivering more oxygen to stop exercising.) If your heart rate is used because your heart rate will be a part of every workout, preparing the body for a period of 20-30 minutes. Carefully take a six-second heart beat count. Training Zone exercise, 4. After warming up . During the first few weeks of your exercise program, keep your heart rate near the low...
..., finish your Training Zone for exercise by increasing circulation, delivering more oxygen to stop exercising.) If your heart rate is used because your heart rate will be a part of every workout, preparing the body for a period of 20-30 minutes. Carefully take a six-second heart beat count. Training Zone exercise, 4. After warming up . During the first few weeks of your exercise program, keep your heart rate near the low...
Owners Manual
Page 10
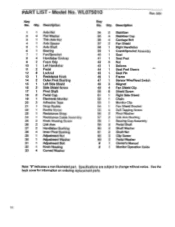
Model No. Seat Pin 46 1 Frame 47 1 Sensor Wire/Reed Switch 48 3 Magnet 49 4 Fan Shield Clip 50 • 6 Shield Screw 51 1 Right Side Shield 52 1 Chain 53 1 Monitor Clip 54 1 Fan Shield Bracket 55 4 Self-Tapping Screw 56 2 Pivot Washer 57 2 Link Arm Bushing 58 1 Bearing Cup Assembly 59 2 Pedal Shaft 60 2 Shaft Washer 61 2 Shaft Nut 62 2 Clip Screw 63 2 Pedal Washer # 1 Owner's Manual # 1 Monitor Operation Guide Note...
Model No. Seat Pin 46 1 Frame 47 1 Sensor Wire/Reed Switch 48 3 Magnet 49 4 Fan Shield Clip 50 • 6 Shield Screw 51 1 Right Side Shield 52 1 Chain 53 1 Monitor Clip 54 1 Fan Shield Bracket 55 4 Self-Tapping Screw 56 2 Pivot Washer 57 2 Link Arm Bushing 58 1 Bearing Cup Assembly 59 2 Pedal Shaft 60 2 Shaft Washer 61 2 Shaft Nut 62 2 Clip Screw 63 2 Pedal Washer # 1 Owner's Manual # 1 Monitor Operation Guide Note...
Owners Manual
Page 11
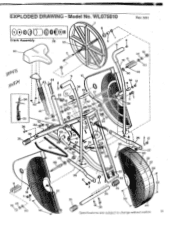
r*Z 35 50 51 34 18 42vt< C')) 63 55 35 36 49 Specifications are subject to change without notice. 11 Model No. WL075010 7 6 Rev. 5/91 Crank Assembly 39 58 1 4 8 40 5 43, - .., ........li 3 9 15 44 8 38 19 45 13 ss 17 24 42 • 41 14 56 ! 46721`6`,Y • 3 •••• 28 10 11 60 42 18\ ek,„ 63 59 56 12 2 28 1-23 36 12 61 46 33!''35 -- 34 et 35 78-7. 39 52 ;NN,A • 60 59 i2 22 25 20 47 61 23 31 30 ' 29 1,>,1 1 I 26 2 12 27 49 37 26 54 12 12 -- 11 27 ..---. ... .- Ain EXPLODED DRAWING -
r*Z 35 50 51 34 18 42vt< C')) 63 55 35 36 49 Specifications are subject to change without notice. 11 Model No. WL075010 7 6 Rev. 5/91 Crank Assembly 39 58 1 4 8 40 5 43, - .., ........li 3 9 15 44 8 38 19 45 13 ss 17 24 42 • 41 14 56 ! 46721`6`,Y • 3 •••• 28 10 11 60 42 18\ ek,„ 63 59 56 12 2 28 1-23 36 12 61 46 33!''35 -- 34 et 35 78-7. 39 52 ;NN,A • 60 59 i2 22 25 20 47 61 23 31 30 ' 29 1,>,1 1 I 26 2 12 27 49 37 26 54 12 12 -- 11 27 ..---. ... .- Ain EXPLODED DRAWING -
Owners Manual
Page 12
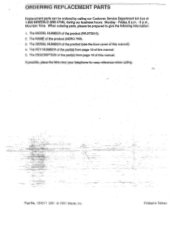
The MODEL NUMBER of this manual. 5. The KEY NUMBER of the part(s) from page 10 of this manual. ORDERING REPLACEMENT PARTS Replacement parts can be prepared to give the following information: 1. When ordering parts, please be ordered by calling our Customer Service Department toll-free at 1-800-99WESLO (999-3756), during our business hours: Monday - If possible, place the bike near your telephone for easy reference when...
The MODEL NUMBER of this manual. 5. The KEY NUMBER of the part(s) from page 10 of this manual. ORDERING REPLACEMENT PARTS Replacement parts can be prepared to give the following information: 1. When ordering parts, please be ordered by calling our Customer Service Department toll-free at 1-800-99WESLO (999-3756), during our business hours: Monday - If possible, place the bike near your telephone for easy reference when...


