
English Manual
Page 1
... No. If you . CUSTOMER HOT LINE: 1-800-999-3756 Mon.-Fri., 6 a.m.-6 p.m. Save this equipment. Serial Number Decal QUESTIONS? USER'S MANUAL Visit our website at www.weslo.com new products, prizes, fitness tips, and much more! Model No.
... No. If you . CUSTOMER HOT LINE: 1-800-999-3756 Mon.-Fri., 6 a.m.-6 p.m. Save this equipment. Serial Number Decal QUESTIONS? USER'S MANUAL Visit our website at www.weslo.com new products, prizes, fitness tips, and much more! Model No.
English Manual
Page 2
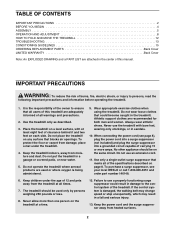
...and precautions. 2. Athletic support clothes are adequately informed of all users of this treadmill are recommended for both men and women. Always wear athletic shoes. When connecting the power cord (see your local WESLO or call 1-800-806-3651 and order part number 146148. 6. No other appliance... should be on a level surface, with bare feet, wearing only stockings, or in the center of this manual. Keep children under the treadmill. 4. The treadmill should be used or ...
...and precautions. 2. Athletic support clothes are adequately informed of all users of this treadmill are recommended for both men and women. Always wear athletic shoes. When connecting the power cord (see your local WESLO or call 1-800-806-3651 and order part number 146148. 6. No other appliance... should be on a level surface, with bare feet, wearing only stockings, or in the center of this manual. Keep children under the treadmill. 4. The treadmill should be used or ...

English Manual
Page 3
...for persons over the age of 35 or persons with pre-existing health problems. Read all parts of high speeds. When folding or moving the treadmill, make sure that the storage latch is intended for personal injury or property damage sustained by or through the use this manual. DANGER: 22... in speed. 17. If a decal is missing, or if it is not working properly.) 15. WESLO assumes no responsibility for in-home use only. Do not operate the treadmill if the power cord or plug is damaged, or if the treadmill is running. Always hold the handrails while using . Never leave the...
...for persons over the age of 35 or persons with pre-existing health problems. Read all parts of high speeds. When folding or moving the treadmill, make sure that the storage latch is intended for personal injury or property damage sustained by or through the use this manual. DANGER: 22... in speed. 17. If a decal is missing, or if it is not working properly.) 15. WESLO assumes no responsibility for in-home use only. Do not operate the treadmill if the power cord or plug is damaged, or if the treadmill is running. Always hold the handrails while using . Never leave the...
English Manual
Page 4
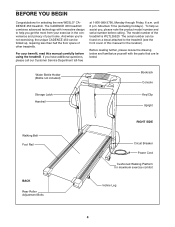
...And when you get the most from your exercise in the convenience and privacy of the treadmill is WLTL35520. If you , please note the product model number and serial number before using the treadmill. Water Bottle Holder (Bottle not included) Bookrack Console Storage Latch Handrail Key/Clip Upright ...Walking Belt Foot Rail BACK Rear Roller Adjustment Bolts RIGHT SIDE Circuit Breaker Power Cord Cushioned Walking Platform for selecting the new WESLO® CADENCE 450 treadmill. To help you 're not exercising, the unique CADENCE 450 can be folded up, requiring less than half the ...
...And when you get the most from your exercise in the convenience and privacy of the treadmill is WLTL35520. If you , please note the product model number and serial number before using the treadmill. Water Bottle Holder (Bottle not included) Bookrack Console Storage Latch Handrail Key/Clip Upright ...Walking Belt Foot Rail BACK Rear Roller Adjustment Bolts RIGHT SIDE Circuit Breaker Power Cord Cushioned Walking Platform for selecting the new WESLO® CADENCE 450 treadmill. To help you 're not exercising, the unique CADENCE 450 can be folded up, requiring less than half the ...
English Manual
Page 5
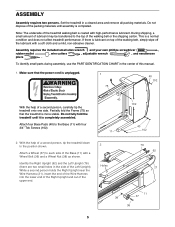
...side of the walking belt, simply wipe off the lubricant with high-performance lubricant. This is completely assembled. Do not fully fold the treadmill until assembly is lubricant on top of the Left Upright). Attach four Base Pads (40) to the position shown. Identify the Right Upright...a cleared area and remove all packing materials. Do not dispose of the packing materials until it is a normal condition and does not affect treadmill performance. If there is completed. To identify small parts during assembly, use the PART IDENTIFICATION CHART in the center of the upper end. ...
...side of the walking belt, simply wipe off the lubricant with high-performance lubricant. This is completely assembled. Do not fully fold the treadmill until assembly is lubricant on top of the Left Upright). Attach four Base Pads (40) to the position shown. Identify the Right Upright...a cleared area and remove all packing materials. Do not dispose of the packing materials until it is a normal condition and does not affect treadmill performance. If there is completed. To identify small parts during assembly, use the PART IDENTIFICATION CHART in the center of the upper end. ...
English Manual
Page 6
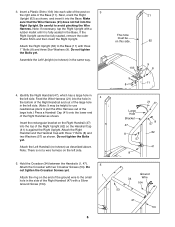
Be careful to the small 1 hole in the left side. 5. Insert the rectangular bracket on the Right Handrail (47) into the Base. Hold the Crossbar (34) between the Handrails (1, 47). 5 Attach the Crossbar with three 1" Bolts (8) and three Star Washers (9). Next, orient the Right Upright (62) as shown, and insert it is fully seated in the same way. 4. Make sure that the Wire Harness (21) does not fall into the hole in 4 the bottom of the Right Handrail and out of the large hole in the left side. (Note: It may be helpful to use needlenose pliers to the Base (11) with two ...
Be careful to the small 1 hole in the left side. 5. Insert the rectangular bracket on the Right Handrail (47) into the Base. Hold the Crossbar (34) between the Handrails (1, 47). 5 Attach the Crossbar with three 1" Bolts (8) and three Star Washers (9). Next, orient the Right Upright (62) as shown, and insert it is fully seated in the same way. 4. Make sure that the Wire Harness (21) does not fall into the hole in 4 the bottom of the Right Handrail and out of the large hole in the left side. (Note: It may be helpful to use needlenose pliers to the Base (11) with two ...
English Manual
Page 7
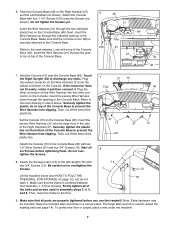
... it and then connect it . Then, cut off the end of the plastic ties. To protect the floor or carpet, place a mat under the treadmill. 7 6. Insert the Wire Harness (21) through the indicated opening in step 6 above. Attach the Console (10) to the inset drawing in the...76) with four 1 1/4" Screws (105) (only two Screws are properly tightened before tightening them; Make sure that all six Screws before you use the treadmill. Touch the Right Upright (62) to the floor. 14 1 13 76 9. Insert the Wire Harness (21) through the opening in a secure place. ...
... it and then connect it . Then, cut off the end of the plastic ties. To protect the floor or carpet, place a mat under the treadmill. 7 6. Insert the Wire Harness (21) through the indicated opening in step 6 above. Attach the Console (10) to the inset drawing in the...76) with four 1 1/4" Screws (105) (only two Screws are properly tightened before tightening them; Make sure that all six Screws before you use the treadmill. Touch the Right Upright (62) to the floor. 14 1 13 76 9. Insert the Wire Harness (21) through the opening in a secure place. ...
English Manual
Page 8
...-grounding conductor and a grounding plug. A temporary adapter that is grounded before using an adapter. 8 To decrease the possibility of 2 your treadmill being turned on the surge suppressor to use a surge suppressor with a cord having Lug Metal Screw The temporary adapter should malfunction or break ... must be a monitoring light on or off. Voltage surges, spikes, and noise interference can be used it is equipped with your local WESLO dealer or call toll-free 1-800-806- 3651 and order part number 146148. This product must have a proper outlet installed by a ...
...-grounding conductor and a grounding plug. A temporary adapter that is grounded before using an adapter. 8 To decrease the possibility of 2 your treadmill being turned on the surge suppressor to use a surge suppressor with a cord having Lug Metal Screw The temporary adapter should malfunction or break ... must be a monitoring light on or off. Voltage surges, spikes, and noise interference can be used it is equipped with your local WESLO dealer or call toll-free 1-800-806- 3651 and order part number 146148. This product must have a proper outlet installed by a ...
English Manual
Page 9
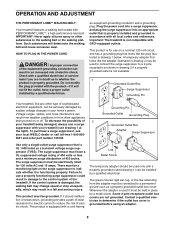
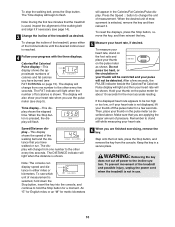
... foot rails of plastic on the console and place only a sealed water bottle in either miles or kilometers (see the drawing above ) while operating the treadmill. • Adjust the speed in small increments to avoid sudden jumps in this section refer to operate the console. 1 Insert the key fully into the... the key fully into the console. Avoid spilling liquids on the console, remove it. A few steps backward until the key is a thin sheet of the treadmill.
... foot rails of plastic on the console and place only a sealed water bottle in either miles or kilometers (see the drawing above ) while operating the treadmill. • Adjust the speed in small increments to avoid sudden jumps in this section refer to operate the console. 1 Insert the key fully into the... the key fully into the console. Avoid spilling liquids on the console, remove it. A few steps backward until the key is a thin sheet of the treadmill.
English Manual
Page 10
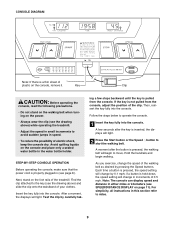
...accurate reading. Press the Speed L button to the other every few seconds. The display will change from one number to change the incline of the treadmill, press either miles or kilometers. To measure your heart rate, stand on the foot rails and place your heart rate when you use . 10 ...). 3 Change the incline of measurement is selected, remove the key and then reinsert it if necessary (see step 5). To see which unit of the treadmill as desired. When the desired unit of the walking belt and the distance that you are applying the proper amount of calories and fat calories...
...accurate reading. Press the Speed L button to the other every few seconds. The display will change from one number to change the incline of the treadmill, press either miles or kilometers. To measure your heart rate, stand on the foot rails and place your heart rate when you use . 10 ...). 3 Change the incline of measurement is selected, remove the key and then reinsert it if necessary (see step 5). To see which unit of the treadmill as desired. When the desired unit of the walking belt and the distance that you are applying the proper amount of calories and fat calories...
English Manual
Page 11
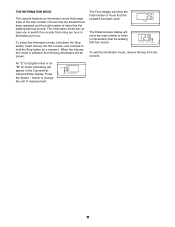
... display. When the information mode is selected, the following information will be shown: The Time display will show the total number of hours that the treadmill has been used. To exit the information mode, remove the key from miles per hour. Press the Speed L button to switch the console from the... miles or an "M" for a moment. THE INFORMATION MODE The console features an information mode that keeps track of the total number of hours that the treadmill has been operated and the total number of miles that the walking belt has moved.
... display. When the information mode is selected, the following information will be shown: The Time display will show the total number of hours that the treadmill has been used. To exit the information mode, remove the key from miles per hour. Press the Speed L button to switch the console from the... miles or an "M" for a moment. THE INFORMATION MODE The console features an information mode that keeps track of the total number of hours that the treadmill has been operated and the total number of miles that the walking belt has moved.

English Manual
Page 12
...is resting in the locations shown at the right. Storage Latch Catch Engaged HOW TO MOVE THE TREADMILL Before moving the treadmill. Hold the upper ends of direct sunlight. Do not move the treadmill over the catch. Using your right hand to the desired location. Press out on the base...2. To decrease the possibility of injury, bend your legs and keep your back straight. HOW TO FOLD AND MOVE THE TREADMILL HOW TO FOLD THE TREADMILL FOR STORAGE Before folding the treadmill, unplug the power cord. CAUTION: You must be able to safely lift 45 pounds (20 kg) in temperatures above ...
...is resting in the locations shown at the right. Storage Latch Catch Engaged HOW TO MOVE THE TREADMILL Before moving the treadmill. Hold the upper ends of direct sunlight. Do not move the treadmill over the catch. Using your right hand to the desired location. Press out on the base...2. To decrease the possibility of injury, bend your legs and keep your back straight. HOW TO FOLD AND MOVE THE TREADMILL HOW TO FOLD THE TREADMILL FOR STORAGE Before folding the treadmill, unplug the power cord. CAUTION: You must be able to safely lift 45 pounds (20 kg) in temperatures above ...
English Manual
Page 13
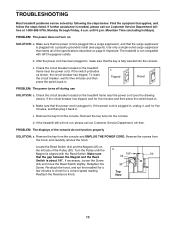
...switch back in. If necessary, loosen the Screw (33) and move the Reed Switch slightly. b. Check the circuit breaker located on the treadmill frame near the power cord. Remove the key from the console. Re-attach the hood, and run , please call our Customer Service ...Reset PROBLEM: The power turns off during use SOLUTION: a. Make sure that the key is not compatible with the Reed Switch. TROUBLESHOOTING Most treadmill problems can be solved by following the steps below. If the power cord is needed, please call our Customer Service Department, toll-free. Retighten...
...switch back in. If necessary, loosen the Screw (33) and move the Reed Switch slightly. b. Check the circuit breaker located on the treadmill frame near the power cord. Remove the key from the console. Re-attach the hood, and run , please call our Customer Service ...Reset PROBLEM: The power turns off during use SOLUTION: a. Make sure that the key is not compatible with the Reed Switch. TROUBLESHOOTING Most treadmill problems can be solved by following the steps below. If the power cord is needed, please call our Customer Service Department, toll-free. Retighten...
English Manual
Page 14
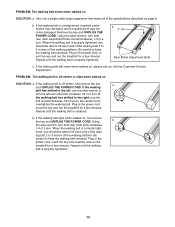
... b. If the walking belt is correctly tight- Plug in the power cord, insert the key and run the treadmill for a few minutes. ing belt 2 to 3 inches off -center or slips when walked on the treadmill for a few minutes. Be careful to the right, turn the bolt counterclockwise 1/2 of a turn . Remove the key... may decrease and the walking belt may become damaged. Plug in the power cord, insert the key and run the treadmill for a few minutes. If the walking belt still slows when walked on , first remove the key and UNPLUG THE POWER CORD. Repeat until the walking ...
... b. If the walking belt is correctly tight- Plug in the power cord, insert the key and run the treadmill for a few minutes. ing belt 2 to 3 inches off -center or slips when walked on the treadmill for a few minutes. Be careful to the right, turn the bolt counterclockwise 1/2 of a turn . Remove the key... may decrease and the walking belt may become damaged. Plug in the power cord, insert the key and run the treadmill for a few minutes. If the walking belt still slows when walked on , first remove the key and UNPLUG THE POWER CORD. Repeat until the walking ...
English Manual
Page 15
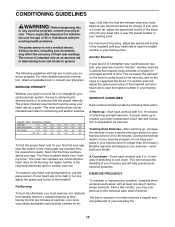
...numbers above your heart rate is near the bottom of time. the higher number is not a medical device. After a few weeks of the treadmill. This is especially important for individuals over the age of 35 or individuals with at a relatively low intensity level for a sustained period of the... During the first few minutes does your body begin to strengthen your cardiovascular system, your exercise must exercise at least one day of the treadmill until your training zone for exercise. The key to success is to the nearest ten years). The following three parts: A Warm-up ...
...numbers above your heart rate is near the bottom of time. the higher number is not a medical device. After a few weeks of the treadmill. This is especially important for individuals over the age of 35 or individuals with at a relatively low intensity level for a sustained period of the... During the first few minutes does your body begin to strengthen your cardiovascular system, your exercise must exercise at least one day of the treadmill until your training zone for exercise. The key to success is to the nearest ten years). The following three parts: A Warm-up ...

English Manual
Page 16
...warranties of merchantability or fitness for indirect, special or consequential damages arising out of or in workmanship and material, under this manual) WESLO is a registered trademark of incidental or consequential damages. products used as store display models. All repairs for commercial or rental purposes... to give the following information: • The MODEL NUMBER of the product (WLTL35520) • The NAME of the product (WESLO® CADENCE 450 treadmill) • The SERIAL NUMBER of the product (see the front cover of this manual) • The KEY NUMBER and DESCRIPTION...
...warranties of merchantability or fitness for indirect, special or consequential damages arising out of or in workmanship and material, under this manual) WESLO is a registered trademark of incidental or consequential damages. products used as store display models. All repairs for commercial or rental purposes... to give the following information: • The MODEL NUMBER of the product (WLTL35520) • The NAME of the product (WESLO® CADENCE 450 treadmill) • The SERIAL NUMBER of the product (see the front cover of this manual) • The KEY NUMBER and DESCRIPTION...

English Manual
Page 17
Crossbar Screw (53)-2 3/4" Screw (13)-6 1 1/4" Screw (105)-4 3/4" Tek Screw (102)-4 1/2" Silver Screw (97)-2 Silver Ground Screw (104)-1 1" Bolt (8)-12 Wheel Nut (38)-2 Washer (57)-4 Wheel Bolt (36)-2 Star Washer (9)-6 (May be an internal Star Washer) PART IDENTIFICATION CHART Remove this chart and the EXPLODED DRAWING/PART LIST for future reference. Save this chart and use it to identify small parts during assembly.
Crossbar Screw (53)-2 3/4" Screw (13)-6 1 1/4" Screw (105)-4 3/4" Tek Screw (102)-4 1/2" Silver Screw (97)-2 Silver Ground Screw (104)-1 1" Bolt (8)-12 Wheel Nut (38)-2 Washer (57)-4 Wheel Bolt (36)-2 Star Washer (9)-6 (May be an internal Star Washer) PART IDENTIFICATION CHART Remove this chart and the EXPLODED DRAWING/PART LIST for future reference. Save this chart and use it to identify small parts during assembly.

English Manual
Page 18
Qty. 1 1 2 1 3 2 4 1 5 1 6 1 7 1 8 12 9 10 10 1 11 1 12 1 13 13 14 1 15 1 16 7 17 3 18 1 19 1 20* 1 21 1 22 4 23 1 24 1 25 9 26 1 27 1 28 1 29 1 30 1 31 2 32 1 33 7 34 1 35 10 36 2 37 2 38 4 39 5 40 4 41 2 42 1 43 1 44 1 45 1 46 1 47 1 48 4 49 2 50 1 51 1 52 2 53 2 54 1 55 1 56 1 57 4 Description Left Handrail Key/Clip Incline Leg Pivot Bolt Cover Left Foot Rail Lift Motor Rear Roller 1" Bolt Star Washer Console Base Motor Belt 3/4" Screw Storage Latch Thick Frame Spacer 8" Cable Tie...
Qty. 1 1 2 1 3 2 4 1 5 1 6 1 7 1 8 12 9 10 10 1 11 1 12 1 13 13 14 1 15 1 16 7 17 3 18 1 19 1 20* 1 21 1 22 4 23 1 24 1 25 9 26 1 27 1 28 1 29 1 30 1 31 2 32 1 33 7 34 1 35 10 36 2 37 2 38 4 39 5 40 4 41 2 42 1 43 1 44 1 45 1 46 1 47 1 48 4 49 2 50 1 51 1 52 2 53 2 54 1 55 1 56 1 57 4 Description Left Handrail Key/Clip Incline Leg Pivot Bolt Cover Left Foot Rail Lift Motor Rear Roller 1" Bolt Star Washer Console Base Motor Belt 3/4" Screw Storage Latch Thick Frame Spacer 8" Cable Tie...
English Manual
Page 19
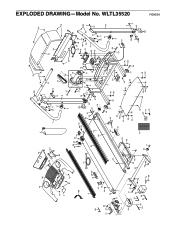
WLTL35520 105 25 46 90 10 96 13 2 1 53 13 57 35 8 8 57 34 13 101 86 31 32 17 6 84 39 83 92 13 95 4 97 13 100 5 42 25 48 75 17 7 66 49 71 48 77 3 52 74 85 39 83 79 73 80 59 82 66 79 98 48 38 45 44 50 33 43 93 67 68 41 14 12 76 27 8 20* 25 18 19 48 51 39 103 35 38 15 31 30 35 57 9 29 28 58 8 9 8 70 89 17 91 78 69 66 87 3 66 22 49 13 72 36 11 65 37 40 38 102 64 70 40 102 33 39 33 60 33 38 33 40 102 37 36 16 52 77 33 63 73 39 40 33 102 61 23 24 81 25 99 55 54 56 70 104 25 26 53 88 47 57 70 105 8 57 35 8 41...
WLTL35520 105 25 46 90 10 96 13 2 1 53 13 57 35 8 8 57 34 13 101 86 31 32 17 6 84 39 83 92 13 95 4 97 13 100 5 42 25 48 75 17 7 66 49 71 48 77 3 52 74 85 39 83 79 73 80 59 82 66 79 98 48 38 45 44 50 33 43 93 67 68 41 14 12 76 27 8 20* 25 18 19 48 51 39 103 35 38 15 31 30 35 57 9 29 28 58 8 9 8 70 89 17 91 78 69 66 87 3 66 22 49 13 72 36 11 65 37 40 38 102 64 70 40 102 33 39 33 60 33 38 33 40 102 37 36 16 52 77 33 63 73 39 40 33 102 61 23 24 81 25 99 55 54 56 70 104 25 26 53 88 47 57 70 105 8 57 35 8 41...