
English Manual
Page 1
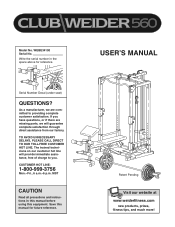
MST CAUTION Read all precautions and instructions in the space above for future reference. If you have questions, or if there are missing parts, we are committed to you. Serial Number Decal (under seat) QUESTIONS? As a manufacturer, we will provide immediate assistance, free of charge to providing complete customer ...
MST CAUTION Read all precautions and instructions in the space above for future reference. If you have questions, or if there are missing parts, we are committed to you. Serial Number Decal (under seat) QUESTIONS? As a manufacturer, we will provide immediate assistance, free of charge to providing complete customer ...
English Manual
Page 2
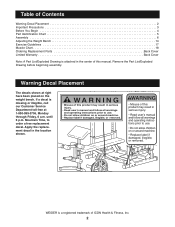
... in the center of this manual. WEIDER is missing or illegible, call our Customer Service Department toll-free at right have been placed on or around machine. ¥ Replace label if damaged, illegible, or removed. ! Table of Contents Warning Decal Placement 2 Important Precautions 3 Before You Begin 4 Part Identification Chart 5 Assembly 6 Adjusting the...
... in the center of this manual. WEIDER is missing or illegible, call our Customer Service Department toll-free at right have been placed on or around machine. ¥ Replace label if damaged, illegible, or removed. ! Table of Contents Warning Decal Placement 2 Important Precautions 3 Before You Begin 4 Part Identification Chart 5 Assembly 6 Adjusting the...
English Manual
Page 3
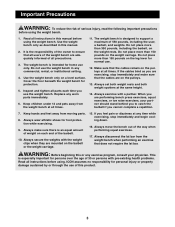
... pounds, including the user, a barbell, and weights. Keep hands and feet away from the weight bench when performing an exercise that all parts each end of this manual before using the weight bench. Read all times. The weight bench is designed to catch the barbell if you ...press exercises, squat exercises, or toe raise exercises, your physician. If the cables bind as described in any worn parts immediately. 6. Always disconnect the lat bar from moving parts. 8. The weight bench is the responsibility of the owner to ensure that does not require the lat bar. Always...
... pounds, including the user, a barbell, and weights. Keep hands and feet away from the weight bench when performing an exercise that all parts each end of this manual before using the weight bench. Read all times. The weight bench is designed to catch the barbell if you ...press exercises, squat exercises, or toe raise exercises, your physician. If the cables bind as described in any worn parts immediately. 6. Always disconnect the lat bar from moving parts. 8. The weight bench is the responsibility of the owner to ensure that does not require the lat bar. Always...
English Manual
Page 4
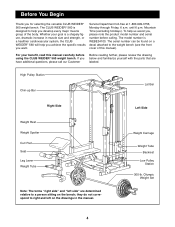
...to a person sitting on the drawings in muscle size and strength, or a healthier cardiovascular system, the CLUB WEIDER¨ 560 will help you for selecting the versatile CLUB WEIDER¨ 560 weight bench. they do not correspond to the weight bench (see the front cover of the body....please review the drawing below and familiarize yourself with the parts that are determined relative to help you achieve the specific results you , please note the product model number and serial number before using the CLUB WEIDER¨ 560 weight bench. Mountain Time (excluding holidays). High Pulley...
...to a person sitting on the drawings in muscle size and strength, or a healthier cardiovascular system, the CLUB WEIDER¨ 560 will help you for selecting the versatile CLUB WEIDER¨ 560 weight bench. they do not correspond to the weight bench (see the front cover of the body....please review the drawing below and familiarize yourself with the parts that are determined relative to help you achieve the specific results you , please note the product model number and serial number before using the CLUB WEIDER¨ 560 weight bench. Mountain Time (excluding holidays). High Pulley...

English Manual
Page 5
... x 66mm Bolt (74)Ð2 M10 x 75mm Bolt (73)Ð3 M8 x 72mm Bolt (72)Ð4 M10 x 78mm Bolt (70)Ð36 M10 x 178mm Bolt (81)Ð1 5 Part Identification ChartÑModel No.
... x 66mm Bolt (74)Ð2 M10 x 75mm Bolt (73)Ð3 M8 x 72mm Bolt (72)Ð4 M10 x 78mm Bolt (70)Ð36 M10 x 178mm Bolt (81)Ð1 5 Part Identification ChartÑModel No.
English Manual
Page 6
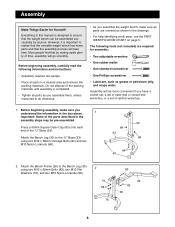
...pre-assembled. Everything in the box above. 1 Important: Some of time, assembly will take time. Before beginning assembly, make sure all parts as shown in the assembly steps may be assembled successfully by anyone. Do not dispose of the packing materials until assembly is designed to...26 83 30 6 Attach the Bench Leg (30) to ensure that by setting aside plenty of the parts described in the drawings. ¥ For help identifying small parts, use the PART IDENTIFICATION CHART on page 5. Before beginning assembly, carefully read the following tools (not included) are oriented ...
...pre-assembled. Everything in the box above. 1 Important: Some of time, assembly will take time. Before beginning assembly, make sure all parts as shown in the assembly steps may be assembled successfully by anyone. Do not dispose of the packing materials until assembly is designed to...26 83 30 6 Attach the Bench Leg (30) to ensure that by setting aside plenty of the parts described in the drawings. ¥ For help identifying small parts, use the PART IDENTIFICATION CHART on page 5. Before beginning assembly, carefully read the following tools (not included) are oriented ...
English Manual
Page 13
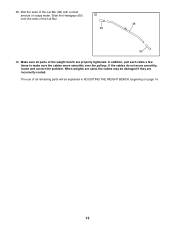
Wet the ends of the Lat Bar (38) with a small amount of the Lat Bar. 38 60 60 26. Slide the Handgrips (60) 25 onto the ends of soapy water. The use of all parts of the weight bench are incorrectly routed. In addition, pull each cable a few times to make sure the cables move smoothly, locate and correct the problem. If the cables do not move smoothly over the pulleys. Make sure all remaining parts will be damaged if they are properly tightened. When weights are used, the cables may be explained in ADJUSTING THE WEIGHT BENCH, beginning on page 14. 13 25.
Wet the ends of the Lat Bar (38) with a small amount of the Lat Bar. 38 60 60 26. Slide the Handgrips (60) 25 onto the ends of soapy water. The use of all parts of the weight bench are incorrectly routed. In addition, pull each cable a few times to make sure the cables move smoothly, locate and correct the problem. If the cables do not move smoothly over the pulleys. Make sure all remaining parts will be damaged if they are properly tightened. When weights are used, the cables may be explained in ADJUSTING THE WEIGHT BENCH, beginning on page 14. 13 25.
English Manual
Page 14
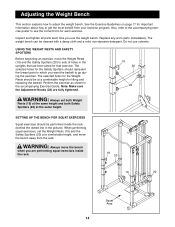
See the Exercise Guidelines on page 17 for each time you use solvents. Inspect and tighten all parts each exercise. Perform the exercise as shown in the picture). SETTING UP THE BENCH FOR SQUAT EXERCISES Squat exercises should be performed inside the rack. .... When performing squat exercises, set both Weight Rests (19) at the same height and both Safety Spotters (20) at the same height. Replace any worn parts immediately. The selected holes for the Weight Rests should represent the lowest point to which you are fully tightened. 19 20 22 WARNING: Always set...
See the Exercise Guidelines on page 17 for each time you use solvents. Inspect and tighten all parts each exercise. Perform the exercise as shown in the picture). SETTING UP THE BENCH FOR SQUAT EXERCISES Squat exercises should be performed inside the rack. .... When performing squat exercises, set both Weight Rests (19) at the same height and both Safety Spotters (20) at the same height. Replace any worn parts immediately. The selected holes for the Weight Rests should represent the lowest point to which you are fully tightened. 19 20 22 WARNING: Always set...
English Manual
Page 17
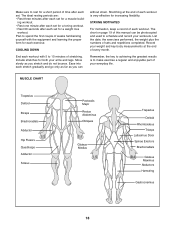
... variety to 30 minutes of aerobic exercise, such as cycling, running, or swimming on page 18 to warm up . This requires moving only the appropriate parts of 12 repetitions without pausing. On the exercise poster accompanying this . When you . You can complete 3 sets of the body. Complete as many sets of...
... variety to 30 minutes of aerobic exercise, such as cycling, running, or swimming on page 18 to warm up . This requires moving only the appropriate parts of 12 repetitions without pausing. On the exercise poster accompanying this . When you . You can complete 3 sets of the body. Complete as many sets of...
English Manual
Page 18
... each workout with the equipment and learning the proper form for increasing flexibility. COOLING DOWN End each workout is to make exercise a regular and enjoyable part of this manual can without strain. Record your arms and legs.
... each workout with the equipment and learning the proper form for increasing flexibility. COOLING DOWN End each workout is to make exercise a regular and enjoyable part of this manual can without strain. Record your arms and legs.
English Manual
Page 20
...to give the following information when calling: ¥ The MODEL NUMBER of the product (WEBE34100) ¥ The NAME of the product (CLUB WEIDER¨ 560 weight bench) ¥ The SERIAL NUMBER of the product (see the front cover of this manual) ¥ The KEY NUMBER and ... set forth above is not responsible or liable for commercial or rental purposes, or products used as store display models. Ordering Replacement Parts To order replacement parts, simply call our Customer Service Department toll-free at one of its authorized service centers. ICON HEALTH & FITNESS, INC., 1500 ...
...to give the following information when calling: ¥ The MODEL NUMBER of the product (WEBE34100) ¥ The NAME of the product (CLUB WEIDER¨ 560 weight bench) ¥ The SERIAL NUMBER of the product (see the front cover of this manual) ¥ The KEY NUMBER and ... set forth above is not responsible or liable for commercial or rental purposes, or products used as store display models. Ordering Replacement Parts To order replacement parts, simply call our Customer Service Department toll-free at one of its authorized service centers. ICON HEALTH & FITNESS, INC., 1500 ...

English Manual
Page 21
REMOVE THIS PART LIST/EXPLODED DRAWING FROM THE MANUAL SAVE THIS PART LIST/EXPLODED DRAWING FOR FUTURE REFERENCE
REMOVE THIS PART LIST/EXPLODED DRAWING FROM THE MANUAL SAVE THIS PART LIST/EXPLODED DRAWING FOR FUTURE REFERENCE
English Manual
Page 22
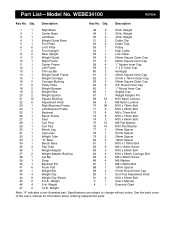
... Round Inner Cap 90 1 Curl Post Adjustment Knob 91 2 M10 x 50mm Bolt # 1 UserÕs Manual # 1 Exercise Chart Note: Ò#Ó indicates a non-illustrated part. Specifications are subject to change without notice. Weight 47 2 10-lb. Qty. Weight 50 2 45-lb. WEBE34100 R0700A Key No. Description 1 1 Right Base 2 1 Center ...Weight Clip Sleeve 45 2 2.5-lb. Weight 49 2 35-lb. See the back cover of the userÕs manual for information about ordering replacement parts. Part ListÑModel No. Qty. Description Key No. Weight 46 4 5-lb.
... Round Inner Cap 90 1 Curl Post Adjustment Knob 91 2 M10 x 50mm Bolt # 1 UserÕs Manual # 1 Exercise Chart Note: Ò#Ó indicates a non-illustrated part. Specifications are subject to change without notice. Weight 47 2 10-lb. Qty. Weight 50 2 45-lb. WEBE34100 R0700A Key No. Description 1 1 Right Base 2 1 Center ...Weight Clip Sleeve 45 2 2.5-lb. Weight 49 2 35-lb. See the back cover of the userÕs manual for information about ordering replacement parts. Part ListÑModel No. Qty. Description Key No. Weight 46 4 5-lb.


