

Owner Manual
Page 2
... your lawn mower, know all the hazards associated with operating or maintaining your mower. TABLE OF CONTENTS Safety Rules 2-4 Pre-Operation 7 Storage 14 Battery Disposal 5 Operation 8-11 Troubleshooting 15 Assembly 5-6 Maintenance 12-13 Warranty 16 SAFETY RULES WARNING: IMPORTANT SAFETY WARNINGS AND INSTRUCTIONS. Do not mow when children or others are present - CAUTION or WARNING DANGER: Cut hazard keep bystanders away. Remove objects that has an angle of electric...
... your lawn mower, know all the hazards associated with operating or maintaining your mower. TABLE OF CONTENTS Safety Rules 2-4 Pre-Operation 7 Storage 14 Battery Disposal 5 Operation 8-11 Troubleshooting 15 Assembly 5-6 Maintenance 12-13 Warranty 16 SAFETY RULES WARNING: IMPORTANT SAFETY WARNINGS AND INSTRUCTIONS. Do not mow when children or others are present - CAUTION or WARNING DANGER: Cut hazard keep bystanders away. Remove objects that has an angle of electric...

Owner Manual
Page 3
... sandals. Only use this mower. 3 you feel uneasy on wet read the manual and understood all walk; or unclogging the chute. • Before and while walking backwards, • Shut the motor off if children equipment, before Use extra care when approaching blind removing grass catcher. If you last saw them. Tall grass can occur if the opera- • Never leave a running . Reduced footing...
... sandals. Only use this mower. 3 you feel uneasy on wet read the manual and understood all walk; or unclogging the chute. • Before and while walking backwards, • Shut the motor off if children equipment, before Use extra care when approaching blind removing grass catcher. If you last saw them. Tall grass can occur if the opera- • Never leave a running . Reduced footing...

Owner Manual
Page 4
... the blade or wear gloves, and use batteries provided or approved by the manufacturer. • The batteries are damaged replace them immediately before adjusting, cleaning or repairing. • Grass catcher components are not understood and followed. Use only on , tripped over speed the motor. • Maintain or replace safety and instruction labels, as rings, bracelets, necklaces, and watches when working with the motor running . • Always remove battery from...
... the blade or wear gloves, and use batteries provided or approved by the manufacturer. • The batteries are damaged replace them immediately before adjusting, cleaning or repairing. • Grass catcher components are not understood and followed. Use only on , tripped over speed the motor. • Maintain or replace safety and instruction labels, as rings, bracelets, necklaces, and watches when working with the motor running . • Always remove battery from...

Owner Manual
Page 5
... under housing. Make certain the lower handle is seated securely into the operating position. Wing nut Operator presence control bar LIFT UP LIFT UP 5 MOWING POSITION Upper handle Cam lock Lower handle Handle knob ASSEMBLY TO REMOVE MOWER FROM CARTON • Remove all loose parts from carton. • Remove lawn mower housing with a new battery pack. Insert the cam locks and tighten them with or without the discharge guard or an entire approved grass catcher in this battery in...
... under housing. Make certain the lower handle is seated securely into the operating position. Wing nut Operator presence control bar LIFT UP LIFT UP 5 MOWING POSITION Upper handle Cam lock Lower handle Handle knob ASSEMBLY TO REMOVE MOWER FROM CARTON • Remove all loose parts from carton. • Remove lawn mower housing with a new battery pack. Insert the cam locks and tighten them with or without the discharge guard or an entire approved grass catcher in this battery in...

Owner Manual
Page 6
... of power level. WARNING: Do not attempt to charge a fully discharged battery. CAUTION: Only use regardless of motor or on the charger will illuminate indicating that the charger is working and the battery is charging. Plug the other end of the lawn mower. 1. outlet. The red light on top of your lawn mower. BATTERY CHARGER LED INDICATORS Press the Battery Capacity Indicator Switch (on the battery. 4. Type: XXXXXX. Remove the jack cover. 3. NOTE...
... of power level. WARNING: Do not attempt to charge a fully discharged battery. CAUTION: Only use regardless of motor or on the charger will illuminate indicating that the charger is working and the battery is charging. Plug the other end of the lawn mower. 1. outlet. The red light on top of your lawn mower. BATTERY CHARGER LED INDICATORS Press the Battery Capacity Indicator Switch (on the battery. 4. Type: XXXXXX. Remove the jack cover. 3. NOTE...

Owner Manual
Page 7
...; Follow instructions for lubricating and changing accessories. • Keep handles dry, clean, and free from oil and grease. • Keep guards in place and in damp or wet locations. • Don't Use In Rain. • Keep Children Away - Release the switch. - Do not use only. Remove battery from work area. • Dress Properly - Inspect for damage. - Do not expose to rain or use lawn mowers in working...
...; Follow instructions for lubricating and changing accessories. • Keep handles dry, clean, and free from oil and grease. • Keep guards in place and in damp or wet locations. • Don't Use In Rain. • Keep Children Away - Release the switch. - Do not use only. Remove battery from work area. • Dress Properly - Inspect for damage. - Do not expose to rain or use lawn mowers in working...

Owner Manual
Page 8
... plug Single point height adjuster handle Mulcher door Discharge guard Operator presence control bar Wing nut Cam lock Grass catcher Battery Handle knob Motor housing MEETS CPSC SAFETY REQUIREMENTS Our rotary walk-behind lawn mowers conform to adjust cutting height of lawn mower. 8 Mulcher plug - used for future reference. OPERATION KNOW YOUR LAWN MOWER READ THIS OWNER'S MANUAL AND ALL SAFETY RULES BEFORE OPERATING YOUR LAWN MOWER. located at the rear discharge opening. Save this manual for starting the motor. WARNING: The blade turns when the motor is running. Start...
... plug Single point height adjuster handle Mulcher door Discharge guard Operator presence control bar Wing nut Cam lock Grass catcher Battery Handle knob Motor housing MEETS CPSC SAFETY REQUIREMENTS Our rotary walk-behind lawn mowers conform to adjust cutting height of lawn mower. 8 Mulcher plug - used for future reference. OPERATION KNOW YOUR LAWN MOWER READ THIS OWNER'S MANUAL AND ALL SAFETY RULES BEFORE OPERATING YOUR LAWN MOWER. located at the rear discharge opening. Save this manual for starting the motor. WARNING: The blade turns when the motor is running. Start...

Owner Manual
Page 9
... down operator presence control bar to start and operate the lawn mower. To raise mower, move lever forward to suit your lawn mower or performing any adjustments or repairs. Empty clippings from under any lawn mower can result in foreign objects thrown into the eyes, which requires the operator to be checked to ensure compliance with clippings from bag. Any replacement catcher should , therefore, be installed on grass catcher using the frame handle. 2. TO ADJUST CUTTING HEIGHT Adjust cutting height to...
... down operator presence control bar to start and operate the lawn mower. To raise mower, move lever forward to suit your lawn mower or performing any adjustments or repairs. Empty clippings from under any lawn mower can result in foreign objects thrown into the eyes, which requires the operator to be checked to ensure compliance with clippings from bag. Any replacement catcher should , therefore, be installed on grass catcher using the frame handle. 2. TO ADJUST CUTTING HEIGHT Adjust cutting height to...

Owner Manual
Page 10
... to bagging or discharging: REAR BAGGING • Open rear door and remove mulcher plug. Open mulcher door 10 FOR REAR BAGGING • Rear mulcher plug removed. • Grass catcher installed. • Mulcher door closed . CAUTION: Do not run your lawn mower without rear mulcher plug or approved grass catcher in a safe place. • You can now install grass catcher. • To convert to mulching or discharging operation, install mulcher plug into rear discharge opening of mower (see above instructions). • Open mulcher door and install discharge...
... to bagging or discharging: REAR BAGGING • Open rear door and remove mulcher plug. Open mulcher door 10 FOR REAR BAGGING • Rear mulcher plug removed. • Grass catcher installed. • Mulcher door closed . CAUTION: Do not run your lawn mower without rear mulcher plug or approved grass catcher in a safe place. • You can now install grass catcher. • To convert to mulching or discharging operation, install mulcher plug into rear discharge opening of mower (see above instructions). • Open mulcher door and install discharge...

Owner Manual
Page 11
... use . MULCHING MOWING TIPS IMPORTANT: For best performance, keep clippings off with water and let dry before use and the catcher will collect less grass. MAX 1/3 • Certain types of built-up grass and trash. To keep mower housing free of grass and grass conditions may not enter the grass catcher. If the lawn is overgrown it is left on the right side of the lawn mower during rear discharge operation, mow...
... use . MULCHING MOWING TIPS IMPORTANT: For best performance, keep clippings off with water and let dry before use and the catcher will collect less grass. MAX 1/3 • Certain types of built-up grass and trash. To keep mower housing free of grass and grass conditions may not enter the grass catcher. If the lawn is overgrown it is left on the right side of the lawn mower during rear discharge operation, mow...

Owner Manual
Page 12
... Maintenance Schedule in this manual. BEFORE EACH USE • Check for loose fasteners. • Charge the battery. MAINTENANCE Check for Loose Fasteners Clean / Inspect Grass Catcher Check Tires Clean Lawn Mower * Check / Sharpen / Replace Blade ** Lubrication Recharge Battery * Use a scraper to clean under deck BEFORE EACH USE AFTER EACH USE EVERY 10 HOURS EVERY 25 HOURS OR SEASON BEFORE STORAGE ** Replace blades more often when mowing in sandy soil GENERAL RECOMMENDATIONS The warranty on the battery will light when the battery...
... Maintenance Schedule in this manual. BEFORE EACH USE • Check for loose fasteners. • Charge the battery. MAINTENANCE Check for Loose Fasteners Clean / Inspect Grass Catcher Check Tires Clean Lawn Mower * Check / Sharpen / Replace Blade ** Lubrication Recharge Battery * Use a scraper to clean under deck BEFORE EACH USE AFTER EACH USE EVERY 10 HOURS EVERY 25 HOURS OR SEASON BEFORE STORAGE ** Replace blades more often when mowing in sandy soil GENERAL RECOMMENDATIONS The warranty on the battery will light when the battery...

Owner Manual
Page 13
... be hosed with original manufacturer specifications. IMPORTANT: For best performance, keep trash from accumulating. • Keep finished surfaces and wheels free of gasoline, oil, or insect control chemicals which can harm rubber. • Avoid stumps, stones, deep ruts, sharp objects and other hazards that may be checked to prevent blade from lawn mower. GRASS CATCHER Grass catcher may cause tire damage. TIRES...
... be hosed with original manufacturer specifications. IMPORTANT: For best performance, keep trash from accumulating. • Keep finished surfaces and wheels free of gasoline, oil, or insect control chemicals which can harm rubber. • Avoid stumps, stones, deep ruts, sharp objects and other hazards that may be checked to prevent blade from lawn mower. GRASS CATCHER Grass catcher may cause tire damage. TIRES...

Owner Manual
Page 14
... the handle brackets and pivot entire handle assembly forward and allow handle to fold down to the rear. 2. Operator presence control bar FOLD FORWARD FOR STORAGE MOWING POSITION Upper handle Cam lock Lower handle HANDLE You can fold your lawn mower handle for damage, breakage and wear. Loosen the two handle knobs on sides of the upper handle and allow it thoroughly, remove all dirt, grease, leaves, etc. sand lightly before...
... the handle brackets and pivot entire handle assembly forward and allow handle to fold down to the rear. 2. Operator presence control bar FOLD FORWARD FOR STORAGE MOWING POSITION Upper handle Cam lock Lower handle HANDLE You can fold your lawn mower handle for damage, breakage and wear. Loosen the two handle knobs on sides of the upper handle and allow it thoroughly, remove all dirt, grease, leaves, etc. sand lightly before...
Owner Manual
Page 15
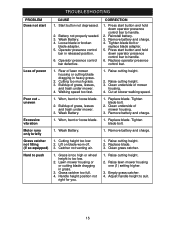
... air. 1. Tighten blade bolt. 1. Tighten blade bolt or replace blade adapter. 5. Lift on blade worn off. 3. Remove battery and charge. 1. Raise cutting height. 3. Handle height position not right for you. 1. Excessive vibration Motor runs only briefly Grass catcher not filling (If so equipped) Hard to suit. 15 Adjust handle height to push 1. Rear of mower housing. 3. Clean grass catcher. 1. Raise lawn mower housing one (1) setting higher. 3. TROUBLESHOOTING PROBLEM Does not start button and hold down operator presence control bar to handle. 6. Loose blade...
... air. 1. Tighten blade bolt. 1. Tighten blade bolt or replace blade adapter. 5. Lift on blade worn off. 3. Remove battery and charge. 1. Raise cutting height. 3. Handle height position not right for you. 1. Excessive vibration Motor runs only briefly Grass catcher not filling (If so equipped) Hard to suit. 15 Adjust handle height to push 1. Rear of mower housing. 3. Clean grass catcher. 1. Raise lawn mower housing one (1) setting higher. 3. TROUBLESHOOTING PROBLEM Does not start button and hold down operator presence control bar to handle. 6. Loose blade...

Owner Manual
Page 16
... subject to the engine, transaxle/transmission components, battery (except as noted below) or components parts thereof. Transportation charges for any unanswered questions concerning this Warranty are the responsibility of how long an implied Warranty may last, so the above limitations or exclusions may have been properly assembled, adjusted, operated, and maintained in accordance with the instructions furnished. 4. THIS WARRANTY DOES NOT APPLY...
... subject to the engine, transaxle/transmission components, battery (except as noted below) or components parts thereof. Transportation charges for any unanswered questions concerning this Warranty are the responsibility of how long an implied Warranty may last, so the above limitations or exclusions may have been properly assembled, adjusted, operated, and maintained in accordance with the instructions furnished. 4. THIS WARRANTY DOES NOT APPLY...


