User Manual
Page 3
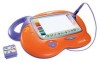
... games, kids can tap into their creativity by creating their own, unique masterpieces! Touch-sensitive Drawing Pad V.SMILE Art Studio™ V.SMILE Art Studio Smartridge™ User's Manual INSTRUCTIONS INCLUDED IN THIS PACKAGE • One VTech® V.SMILE Art Studio™ • One VTech® V.SMILE Art Studio Smartridge™ • One User's Manual WARNING: All packing materials such as tape, plastic sheets, wire...
... games, kids can tap into their creativity by creating their own, unique masterpieces! Touch-sensitive Drawing Pad V.SMILE Art Studio™ V.SMILE Art Studio Smartridge™ User's Manual INSTRUCTIONS INCLUDED IN THIS PACKAGE • One VTech® V.SMILE Art Studio™ • One VTech® V.SMILE Art Studio Smartridge™ • One User's Manual WARNING: All packing materials such as tape, plastic sheets, wire...
User Manual
Page 4
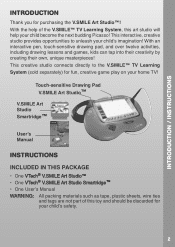
... will select your current game choice. Arrow Buttons You can also use the four-directional arrow buttons to the PLAYER 1 slot on your V.SMILE™. Cable Connect the V.SMILE Art Studio™ cable to choose selections on the pad to the Free Draw mode. Touch-sensitive Drawing Pad Use the pen on screen by...
... will select your current game choice. Arrow Buttons You can also use the four-directional arrow buttons to the PLAYER 1 slot on your V.SMILE™. Cable Connect the V.SMILE Art Studio™ cable to choose selections on the pad to the Free Draw mode. Touch-sensitive Drawing Pad Use the pen on screen by...
User Manual
Page 5
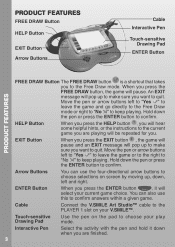
...properly matching the plus (+) and minus (-) signs. • Batteries that the V.SMILE™ is connected, or that the TV and the unit are installed correctly. Once you connect the V.SMILE Art Studio™ to V.SMILE™, check to see the adaptor is working. If the ON Button does ...unit ON, the power indicator light (ON Button) should glow. Remove the battery cover. 3. Replace the battery cover. CONNECTING THE V.SMILE ART STUDIO™ TO V.SMILE™ NOTE: Before you have run out of time. Locate the battery cover on the bottom of batteries in fire, as illustrated...
...properly matching the plus (+) and minus (-) signs. • Batteries that the V.SMILE™ is connected, or that the TV and the unit are installed correctly. Once you connect the V.SMILE Art Studio™ to V.SMILE™, check to see the adaptor is working. If the ON Button does ...unit ON, the power indicator light (ON Button) should glow. Remove the battery cover. 3. Replace the battery cover. CONNECTING THE V.SMILE ART STUDIO™ TO V.SMILE™ NOTE: Before you have run out of time. Locate the battery cover on the bottom of batteries in fire, as illustrated...
User Manual
Page 6
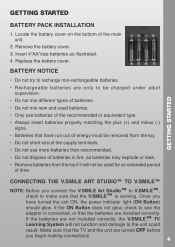
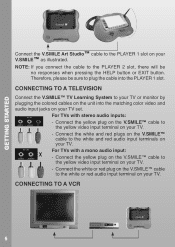
... cables on the unit into the PLAYER 1 slot. CONNECTING TO A VCR 5 For TVs with a mono audio input: - Connect the white or red plug on the V.SMILE™ cable to the white or red audio input terminal on your TV. - Connect the yellow plug on the... input terminal on your TV. Connect the white and red plugs on the V.SMILE™ cable to the white and red audio input terminals on your V.SMILE™ as illustrated. For TVs with stereo audio inputs: - GETTING STARTED Connect the V.SMILE Art Studio™ cable to the PLAYER 1 slot on your TV. NOTE: If you...
... cables on the unit into the PLAYER 1 slot. CONNECTING TO A VCR 5 For TVs with a mono audio input: - Connect the white or red plug on the V.SMILE™ cable to the white or red audio input terminal on your TV. - Connect the yellow plug on the... input terminal on your TV. Connect the white and red plugs on the V.SMILE™ cable to the white and red audio input terminals on your V.SMILE™ as illustrated. For TVs with stereo audio inputs: - GETTING STARTED Connect the V.SMILE Art Studio™ cable to the PLAYER 1 slot on your TV. NOTE: If you...
User Manual
Page 21
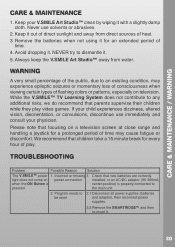
...1. Check that parents supervise their children while they play . Incorrect or missing 1. Avoid dropping it with a slightly damp cloth. Always keep the V.SMILE Art Studio™ away from direct sources of flashing colors or patterns, especially on television. If your child experiences dizziness, altered vision, disorientation, or... adaptor), then reconnect power supplies. 2.2 Remove the SMARTRIDGE™ and then re-insert it . 5. Never use immediately and consult your V.SMILE Art Studio™ clean by wiping it . CARE & MAINTENANCE / WARNING CARE & MAINTENANCE 1.
...1. Check that parents supervise their children while they play . Incorrect or missing 1. Avoid dropping it with a slightly damp cloth. Always keep the V.SMILE Art Studio™ away from direct sources of flashing colors or patterns, especially on television. If your child experiences dizziness, altered vision, disorientation, or... adaptor), then reconnect power supplies. 2.2 Remove the SMARTRIDGE™ and then re-insert it . 5. Never use immediately and consult your V.SMILE Art Studio™ clean by wiping it . CARE & MAINTENANCE / WARNING CARE & MAINTENANCE 1.

User Manual
Page 22
...the video input that you . Before requesting support, please be happy to assist you might have several video inputs - The V.SMILE Art Studio™ does not work. 2. Turn the unit OFF and then ON again. please make sure it . 1.2 Disconnect all ...located on the screen. 1. Make sure that the V.SMILE Art Studio™ Art Studio™ is set to the correct and white. Cable connection 2. Cable connection 2. V.SMILE Art Studio™ was reconnected after program start 2. TROUBLESHOOTING / TECHNICAL SUPPORT The V.SMILE™ power light is ON, but there is not ...
...the video input that you . Before requesting support, please be happy to assist you might have several video inputs - The V.SMILE Art Studio™ does not work. 2. Turn the unit OFF and then ON again. please make sure it . 1.2 Disconnect all ...located on the screen. 1. Make sure that the V.SMILE Art Studio™ Art Studio™ is set to the correct and white. Cable connection 2. Cable connection 2. V.SMILE Art Studio™ was reconnected after program start 2. TROUBLESHOOTING / TECHNICAL SUPPORT The V.SMILE™ power light is ON, but there is not ...


