User Manual
Page 1
User's Manual TM © 2013 VTech Printed in China 91-009654-006
User's Manual TM © 2013 VTech Printed in China 91-009654-006
User Manual
Page 2
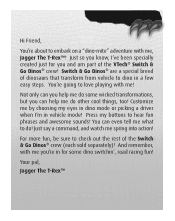
... Switch & Go Dinos® crew (each sold separately)! Customize me ! Hi Friend, You're about to embark on a "dino-mite" adventure with me spring into action! For more fun, be sure to dino in vehicle mode! Just so you know, I 'm in a few easy steps. Not only can you help me do ! Just say a command, and watch me , Jagger The T-Rex™! Press my buttons to hear fun...
... Switch & Go Dinos® crew (each sold separately)! Customize me ! Hi Friend, You're about to embark on a "dino-mite" adventure with me spring into action! For more fun, be sure to dino in vehicle mode! Just so you know, I 'm in a few easy steps. Not only can you help me do ! Just say a command, and watch me , Jagger The T-Rex™! Press my buttons to hear fun...
User Manual
Page 3
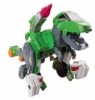
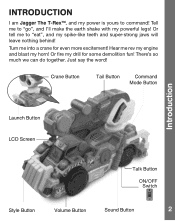
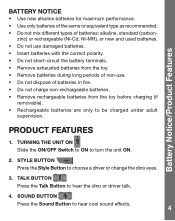
... "go", and I am Jagger The T-RexTM, and my power is yours to "eat", and my spike-like teeth and super-strong jaws will leave nothing behind! Tell me rev my engine and blast my horn! Turn me to command! There's so much we can do together. Crane Button Tail Button Command Mode Button Introduction Launch Button LCD Screen Talk Button ON/OFF Switch Style Button Volume Button Sound Button...
... "go", and I am Jagger The T-RexTM, and my power is yours to "eat", and my spike-like teeth and super-strong jaws will leave nothing behind! Tell me rev my engine and blast my horn! Turn me to command! There's so much we can do together. Crane Button Tail Button Command Mode Button Introduction Launch Button LCD Screen Talk Button ON/OFF Switch Style Button Volume Button Sound Button...
User Manual
Page 4
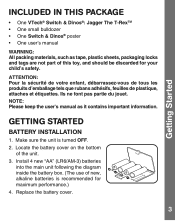
Replace the battery cover. 3 Getting Started INCLUDED IN THIS PACKAGE • One VTech® Switch & Dinos®: Jagger The T-RexTM • One small bulldozer • One Switch & Dinos® poster • One user's manual WARNING: All...Install 4 new "AA" (LR6/AM-3) batteries into the main unit following the diagram inside the battery box. (The use of new, alkaline batteries is turned OFF. 2. GETTING STARTED BATTERY INSTALLATION 1. Locate the battery cover on the bottom of this toy, and should be discarded for maximum performance.) 4. NOTE: Please keep the user's manual...
Replace the battery cover. 3 Getting Started INCLUDED IN THIS PACKAGE • One VTech® Switch & Dinos®: Jagger The T-RexTM • One small bulldozer • One Switch & Dinos® poster • One user's manual WARNING: All...Install 4 new "AA" (LR6/AM-3) batteries into the main unit following the diagram inside the battery box. (The use of new, alkaline batteries is turned OFF. 2. GETTING STARTED BATTERY INSTALLATION 1. Locate the battery cover on the bottom of this toy, and should be discarded for maximum performance.) 4. NOTE: Please keep the user's manual...
User Manual
Page 5
.... • Do not short-circuit the battery terminals. • Remove exhausted batteries from the toy. • Remove batteries during long periods of non-use. • Do not dispose of batteries: alkaline, standard (carbon- STYLE BUTTON Press the Style Button to hear cool sound effects. 4 TALK BUTTON Press the Talk Button to turn the unit ON. 2. TURNING THE UNIT ON Slide the ON/OFF Switch to ON to hear the dino or driver talk. 4. PRODUCT FEATURES 1.
.... • Do not short-circuit the battery terminals. • Remove exhausted batteries from the toy. • Remove batteries during long periods of non-use. • Do not dispose of batteries: alkaline, standard (carbon- STYLE BUTTON Press the Style Button to hear cool sound effects. 4 TALK BUTTON Press the Talk Button to turn the unit ON. 2. TURNING THE UNIT ON Slide the ON/OFF Switch to ON to hear the dino or driver talk. 4. PRODUCT FEATURES 1.
User Manual
Page 6
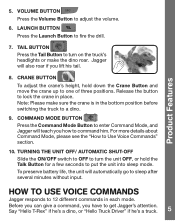
... drill. 7. LAUNCH BUTTON Press the Launch Button to adjust the volume. 6. TURNING THE UNIT OFF/ AUTOMATIC SHUT-OFF Slide the ON/OFF switch to OFF to turn on the truck's headlights or make sure the crane is in the bottom position before switching the truck to lock the crane in each mode. Say "Hello T-Rex" if he's a dino, or "Hello Truck Driver" if he...
... drill. 7. LAUNCH BUTTON Press the Launch Button to adjust the volume. 6. TURNING THE UNIT OFF/ AUTOMATIC SHUT-OFF Slide the ON/OFF switch to OFF to turn on the truck's headlights or make sure the crane is in the bottom position before switching the truck to lock the crane in each mode. Say "Hello T-Rex" if he's a dino, or "Hello Truck Driver" if he...
User Manual
Page 7
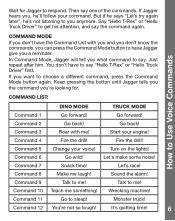
... Mode button to say . COMMAND LIST: DINO MODE TRUCK MODE Command 1 Go forward! Go back! Turn on the lights! Let's race! Command 10 Teach me laugh! How to Use Voice Commands COMMAND MODE If you don't have Jagger give you want to me! You don't have to have the Command List with me ! If you a reminder. Command 2 Go back! Start your voice! Command 7 Snack time! Command 9 Talk...
... Mode button to say . COMMAND LIST: DINO MODE TRUCK MODE Command 1 Go forward! Go back! Turn on the lights! Let's race! Command 10 Teach me laugh! How to Use Voice Commands COMMAND MODE If you don't have Jagger give you want to me! You don't have to have the Command List with me ! If you a reminder. Command 2 Go back! Start your voice! Command 7 Snack time! Command 9 Talk...

User Manual
Page 8
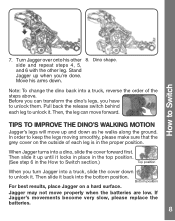
Truck shape. 2. Turn Jagger over onto his 6. With Jagger still resting on his of the truck. push the cover up towards the front and turn his foot and his leg back. side and flip his big toe forward as far as it will go. Separate the grill on the leg side, turn his heel up until it locks into place. 7 Make sure it locks into place. 2 1 5. Slide the grey cover on the front 4. How to Switch 3. Then up towards the back. HOW TO SWITCH THE TRUCK TO A DINO 1. Move the crane back.
Truck shape. 2. Turn Jagger over onto his 6. With Jagger still resting on his of the truck. push the cover up towards the front and turn his foot and his leg back. side and flip his big toe forward as far as it will go. Separate the grill on the leg side, turn his heel up until it locks into place. 7 Make sure it locks into place. 2 1 5. Slide the grey cover on the front 4. How to Switch 3. Then up towards the back. HOW TO SWITCH THE TRUCK TO A DINO 1. Move the crane back.
User Manual
Page 9
... cover on a hard surface. When Jagger turns into the bottom position. For best results, place Jagger on the outside of the steps above. Stand Jagger up and down . Then slide it up until it locks in place in the top position. (See step 6 in the proper position. How to unlock it. If Jagger's movements become very slow, please replace the batteries...
... cover on a hard surface. When Jagger turns into the bottom position. For best results, place Jagger on the outside of the steps above. Stand Jagger up and down . Then slide it up until it locks in place in the top position. (See step 6 in the proper position. How to unlock it. If Jagger's movements become very slow, please replace the batteries...

User Manual
Page 10
...®. 9 Pull the string over to give you a 3D prehistoric adventure! Place this poster on the crane wheel. Tie a small knot at one end of 2. If the string attached to the crane gets disconnected, follow the instructions below to reattach it. 1. To use the poster, please follow the steps below . 1. Download or update the VTech® Switch & Go Dinos® App...
...®. 9 Pull the string over to give you a 3D prehistoric adventure! Place this poster on the crane wheel. Tie a small knot at one end of 2. If the string attached to the crane gets disconnected, follow the instructions below to reattach it. 1. To use the poster, please follow the steps below . 1. Download or update the VTech® Switch & Go Dinos® App...

User Manual
Page 11
... replace the batteries. 10 Interrupt the power supply by wiping it come to life! Apple, the Apple logo, iPhone and iPad are available on VTechDinoDen.com. App Store is not in the U.S. Keep the unit out of time. 4. Let the unit stand for some reason the unit stops working, please follow these steps: 1. Keep the unit clean by removing the batteries. 3. Remove the batteries when the unit is a service...
... replace the batteries. 10 Interrupt the power supply by wiping it come to life! Apple, the Apple logo, iPhone and iPad are available on VTechDinoDen.com. App Store is not in the U.S. Keep the unit out of time. 4. Let the unit stand for some reason the unit stops working, please follow these steps: 1. Keep the unit clean by removing the batteries. 3. Remove the batteries when the unit is a service...
User Manual
Page 12
...installed and used in accordance with the limits for help you. If the product still does not work, replace with an entire set of the FCC Rules. 4. If this equipment does cause harmful interference to play again. 5. Turn the unit ON. If the problem persists, please call our Consumer Services...equipment and receiver. • Connect the equipment into an outlet on , the user is connected. • Consult the dealer or an experienced radio/TV technician for a Class B digital device, pursuant to help . The unit should now be happy to Part 15 of new batteries. or 1-877-352-8697 ...
...installed and used in accordance with the limits for help you. If the product still does not work, replace with an entire set of the FCC Rules. 4. If this equipment does cause harmful interference to play again. 5. Turn the unit ON. If the problem persists, please call our Consumer Services...equipment and receiver. • Connect the equipment into an outlet on , the user is connected. • Consult the dealer or an experienced radio/TV technician for a Class B digital device, pursuant to help . The unit should now be happy to Part 15 of new batteries. or 1-877-352-8697 ...


