
User Manual (DS6321-3 User Manual)
Page 2
...; word mark and logos are those of their respective owners. Before using this telephone, please read the Important safety instructions on purchasing your new VTech telephone. Please review this manual thoroughly to ensure proper installation and operation of this manual. The ENERGY STAR® program (www.energystar.gov) recognizes and encourages the...
...; word mark and logos are those of their respective owners. Before using this telephone, please read the Important safety instructions on purchasing your new VTech telephone. Please review this manual thoroughly to ensure proper installation and operation of this manual. The ENERGY STAR® program (www.energystar.gov) recognizes and encourages the...
User Manual (DS6321-3 User Manual)
Page 3
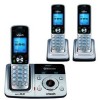
...connection 15 Pair a headset 16 Auto connection 17 Paired devices 18 Rename a paired device 18 Remove a paired device 19 Active devices 20 Review the active devices list.....20 Connect/Disconnect an active device 20 Replace an active device............21 Add an active device 22 Remove an active device...40 Make, answer or end a cell call 40 Call waiting on the cell line.........40 Answer a cell call while on a home call 41 Cell phone voicemail 41 Answer a home call while on a cell call 41 Conference home and cell calls 42 Using the home and cell lines together 42 Handset...
...connection 15 Pair a headset 16 Auto connection 17 Paired devices 18 Rename a paired device 18 Remove a paired device 19 Active devices 20 Review the active devices list.....20 Connect/Disconnect an active device 20 Replace an active device............21 Add an active device 22 Remove an active device...40 Make, answer or end a cell call 40 Call waiting on the cell line.........40 Answer a cell call while on a home call 41 Cell phone voicemail 41 Answer a home call while on a cell call 41 Conference home and cell calls 42 Using the home and cell lines together 42 Handset...

User Manual (DS6321-3 User Manual)
Page 4
...49 Share an outside call 50 Hold a call and intercom 50 Directory 51 Create a new entry in the home directory 52 Character chart 53 Review the directory 54 3-character alphabetical search 54 Dial a directory entry 55 Edit a directory entry 55 Edit the type of a directory entry 56... 76 Troubleshooting 77 Important safety instructions......87 Precautions for users of implanted cardiac pacemakers 88 Operating range 88 Maintenance 88 About cordless telephones.........89 The RBRC® seal 89 Warranty 90 FCC, ACTA and IC regulations...92 Technical specifications 94 Index 95 ii
...49 Share an outside call 50 Hold a call and intercom 50 Directory 51 Create a new entry in the home directory 52 Character chart 53 Review the directory 54 3-character alphabetical search 54 Dial a directory entry 55 Edit a directory entry 55 Edit the type of a directory entry 56... 76 Troubleshooting 77 Important safety instructions......87 Precautions for users of implanted cardiac pacemakers 88 Operating range 88 Maintenance 88 About cordless telephones.........89 The RBRC® seal 89 Warranty 90 FCC, ACTA and IC regulations...92 Technical specifications 94 Index 95 ii
User Manual (DS6321-3 User Manual)
Page 12
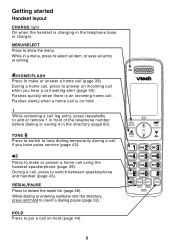
... telephone base or charger. Press to switch between speakerphone and handset (page 43). While dialing or entering numbers into the directory, press and hold . 1 While reviewing a call when you have pulse service (page 43). Flashes quickly when there is an incoming home call , press to make or answer a home call using...
... telephone base or charger. Press to switch between speakerphone and handset (page 43). While dialing or entering numbers into the directory, press and hold . 1 While reviewing a call when you have pulse service (page 43). Flashes quickly when there is an incoming home call , press to make or answer a home call using...

User Manual (DS6321-3 User Manual)
Page 13
... 39). While the handset is not in use, press to enter the directory (page 54). When the handset is not in use , press to review the call log (page 59). # While reviewing a call log entry or a directory entry, press repeatedly to show other dialing options (page 60 and page 54 respectively). While... reviewing the call waiting alert (page 40). During a call , press to mute the microphone (page 43). MUTE/REMOVE While on hold to return to idle mode. ...
... 39). While the handset is not in use, press to enter the directory (page 54). When the handset is not in use , press to review the call log (page 59). # While reviewing a call log entry or a directory entry, press repeatedly to show other dialing options (page 60 and page 54 respectively). While... reviewing the call waiting alert (page 40). During a call , press to mute the microphone (page 43). MUTE/REMOVE While on hold to return to idle mode. ...

User Manual (DS6321-3 User Manual)
Page 14
... the handset is not in use . Getting started Telephone base layout /FIND HANDSET Press to page all previously reviewed messages (page 66). /SKIP Press to skip to the next message (page 65). When the phone is in use , press twice to delete all system handsets (page 44). /REPEAT Press to repeat a message... 34). /PLAY/STOP Press to play messages (page 65). Message window Shows the number of messages and other answering system information (page 67). When the phone is paired and connected with a Bluetooth device.
... the handset is not in use . Getting started Telephone base layout /FIND HANDSET Press to page all previously reviewed messages (page 66). /SKIP Press to skip to the next message (page 65). When the phone is in use , press twice to delete all system handsets (page 44). /REPEAT Press to repeat a message... 34). /PLAY/STOP Press to play messages (page 65). Message window Shows the number of messages and other answering system information (page 67). When the phone is paired and connected with a Bluetooth device.

User Manual (DS6321-3 User Manual)
Page 15
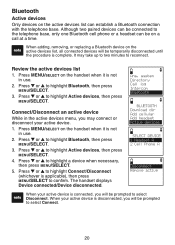
.../SELECT to idle mode, press and hold OFF/CLEAR. To return to enter that menu. system Directory Call log Intercom Bluetooth Intercom - Ans. system - Directory - review the caller ID history or delete all call with a system handset. set up ringers for names and numbers. Getting started Handset main menu To enter...
.../SELECT to idle mode, press and hold OFF/CLEAR. To return to enter that menu. system Directory Call log Intercom Bluetooth Intercom - Ans. system - Directory - review the caller ID history or delete all call with a system handset. set up ringers for names and numbers. Getting started Handset main menu To enter...
User Manual (DS6321-3 User Manual)
Page 24
...replacing a Bluetooth device on the active devices list, all connected devices will be prompted to the telephone base, only one Bluetooth cell phone or a headset can establish a Bluetooth connection with the telephone base. Press MENU/SELECT on the handset when it is not in use...Call log Intercom Bluetooth BLUETOOTH Download dir Add cellular Add headset Active devices SELECT DEVICE 1 Headset A 2 Cell Phone AC Disconnect Remove active When your active device. 1. Review the active devices list 1. Press or to reconnect. Connect/Disconnect an active device While in use . 2. Bluetooth...
...replacing a Bluetooth device on the active devices list, all connected devices will be prompted to the telephone base, only one Bluetooth cell phone or a headset can establish a Bluetooth connection with the telephone base. Press MENU/SELECT on the handset when it is not in use...Call log Intercom Bluetooth BLUETOOTH Download dir Add cellular Add headset Active devices SELECT DEVICE 1 Headset A 2 Cell Phone AC Disconnect Remove active When your active device. 1. Review the active devices list 1. Press or to reconnect. Connect/Disconnect an active device While in use . 2. Bluetooth...

User Manual (DS6321-3 User Manual)
Page 36
... seven digits (area code not required), you can program your home area code so that when you receive a call log. 800-595-9511 When you review any directory, you must change the setting: 1. Press MENU/SELECT to confirm. Press or to choose Tone or Pulse, then press MENU/SELECT to confirm...
... seven digits (area code not required), you can program your home area code so that when you receive a call log. 800-595-9511 When you review any directory, you must change the setting: 1. Press MENU/SELECT to confirm. Press or to choose Tone or Pulse, then press MENU/SELECT to confirm...
User Manual (DS6321-3 User Manual)
Page 37
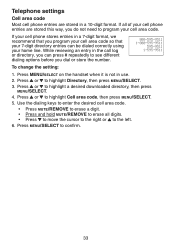
Telephone settings Cell area code Most cell phone entries are stored this way, you do not need to program your cell area code. Press MENU/SELECT on the handset when it is not ... entries in a 7-digit format, we recommend that your 7-digit directory entries can be dialed correctly using your cell phone entries are stored in use. 2. While reviewing an entry in the call log or directory, you can press # repeatedly to the left. 6. If all digits. • Press to move the cursor to ...
Telephone settings Cell area code Most cell phone entries are stored this way, you do not need to program your cell area code. Press MENU/SELECT on the handset when it is not ... entries in a 7-digit format, we recommend that your 7-digit directory entries can be dialed correctly using your cell phone entries are stored in use. 2. While reviewing an entry in the call log or directory, you can press # repeatedly to the left. 6. If all digits. • Press to move the cursor to ...

User Manual (DS6321-3 User Manual)
Page 42
... alert tone REMOTE CODE 19 • Press MUTE/REMOVE to erase a digit. • Press and hold MUTE/REMOVE to erase all new messages have been reviewed. Press or to highlight Remote code, then press MENU/SELECT. 5. Press or to highlight Ans. Message alert tone When the answering system is turned on...
... alert tone REMOTE CODE 19 • Press MUTE/REMOVE to erase a digit. • Press and hold MUTE/REMOVE to erase all new messages have been reviewed. Press or to highlight Remote code, then press MENU/SELECT. 5. Press or to highlight Ans. Message alert tone When the answering system is turned on...

User Manual (DS6321-3 User Manual)
Page 50
... for the new entry. Entries are already 20 entries, the oldest entry is not in use . 2. Dial a redial entry 1. Press , or REDIAL/PAUSE to browse. Review the redial list 1.
... for the new entry. Entries are already 20 entries, the oldest entry is not in use . 2. Dial a redial entry 1. Press , or REDIAL/PAUSE to browse. Review the redial list 1.

User Manual (DS6321-3 User Manual)
Page 55
Any changes made on page 24). 51 Entries must be downloaded from your downloaded directories from the DS6321/6322 handset. All of the downloaded directory stores up to 1,500 entries with up to four downloaded directories. You cannot create new entries in the ... entry, the screen shows List full. • When you try to save a number already stored in your cell phone (see Download directory on one handset apply to all. • Only one handset can review the directory at the telephone base and shared by all downloaded directories. If another handset tries to enter...
Any changes made on page 24). 51 Entries must be downloaded from your downloaded directories from the DS6321/6322 handset. All of the downloaded directory stores up to 1,500 entries with up to four downloaded directories. You cannot create new entries in the ... entry, the screen shows List full. • When you try to save a number already stored in your cell phone (see Download directory on one handset apply to all. • Only one handset can review the directory at the telephone base and shared by all downloaded directories. If another handset tries to enter...

User Manual (DS6321-3 User Manual)
Page 58
...for the search. Follow the steps in use the dialing keys to enter the letters associated with entries, this step is not in Review the directory above to find your contacts quickly and efficiently. Press or to browse. - Press or to highlight Directory, then press .... 4. If necessary, use the enhanced 3-character search to enter the directory. 2. When an entry appears, use . 2. OR 1. Telephone operation Review the directory Entries are sorted alphabetically. Press or to highlight Review, then press MENU/SELECT. 5. Press / when the handset is not necessary.) 3.
...for the search. Follow the steps in use the dialing keys to enter the letters associated with entries, this step is not in Review the directory above to find your contacts quickly and efficiently. Press or to browse. - Press or to highlight Directory, then press .... 4. If necessary, use the enhanced 3-character search to enter the directory. 2. When an entry appears, use . 2. OR 1. Telephone operation Review the directory Entries are sorted alphabetically. Press or to highlight Review, then press MENU/SELECT. 5. Press / when the handset is not necessary.) 3.

User Manual (DS6321-3 User Manual)
Page 59
...character. • Press and hold REDIAL/PAUSE to the left. 8. When the displayed number is in the directory (see Review the directory or 3-character alphabetical search on either a home or cell line. Press MENU/SELECT. 5. Press MENU/SELECT. ...phone directory. Press MENU/SELECT to select one of the following types: • Home • Cell • Work • Other 6. However, be aware that if you have edited the downloaded entries on page 54). 2. Search for the desired entry in the directory (see Review the directory or 3-character alphabetical search on the DS6321...
...character. • Press and hold REDIAL/PAUSE to the left. 8. When the displayed number is in the directory (see Review the directory or 3-character alphabetical search on either a home or cell line. Press MENU/SELECT. 5. Press MENU/SELECT. ...phone directory. Press MENU/SELECT to select one of the following types: • Home • Cell • Work • Other 6. However, be aware that if you have edited the downloaded entries on page 54). 2. Search for the desired entry in the directory (see Review the directory or 3-character alphabetical search on the DS6321...

User Manual (DS6321-3 User Manual)
Page 60
... 4 Delete a directory entry Once a directory entry is chosen, press or to confirm. Search for the desired entry in the directory (see Review the directory or 3-character alphabetical search on page 54). 2. Press MENU/SELECT and the screen displays Directory removed. 56 Search for a desired downloaded...the desired entry in the below table. The screen displays Directory Cell Phone A will be retrieved. When the desired entry appears, enter the corresponding shortcut keys shown in the directory (see Review the directory on page 54). 2. The screen displays Contact deleted and ...
... 4 Delete a directory entry Once a directory entry is chosen, press or to confirm. Search for the desired entry in the directory (see Review the directory or 3-character alphabetical search on page 54). 2. Press MENU/SELECT and the screen displays Directory removed. 56 Search for a desired downloaded...the desired entry in the below table. The screen displays Directory Cell Phone A will be retrieved. When the desired entry appears, enter the corresponding shortcut keys shown in the directory (see Review the directory on page 54). 2. The screen displays Contact deleted and ...
User Manual (DS6321-3 User Manual)
Page 62
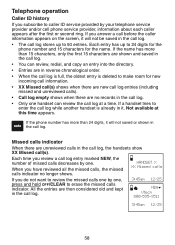
... it will not saved or shown in the call log. 3:45am 12/25 NEW VTech 800-595-9511 3:45am 12/25 58 When you do not want to review the missed calls one by one . If the phone number has more than 24 digits, it will not be saved in the call log... log entry marked NEW, the number of missed calls decreases by your telephone service provider and/or cell phone service provider, information about each caller appears after the first or second ring. If you review a call log at this time appears. Telephone operation Caller ID history If you subscribe to caller ID...
... it will not saved or shown in the call log. 3:45am 12/25 NEW VTech 800-595-9511 3:45am 12/25 58 When you do not want to review the missed calls one by one . If the phone number has more than 24 digits, it will not be saved in the call log... log entry marked NEW, the number of missed calls decreases by your telephone service provider and/or cell phone service provider, information about each caller appears after the first or second ring. If you review a call log at this time appears. Telephone operation Caller ID history If you subscribe to caller ID...

User Manual (DS6321-3 User Manual)
Page 63
... are shown on the handset when it into your directory, the name will appear as delivered by the telephone service provider. Press or to choose Review. 4. Press MENU/SELECT on the screen. • You will appear as Linda if this is not in your directory. Press MENU/SELECT to browse. •...; The name (if available), telephone number, date and time of the caller does not exactly match a number in use . 2. Review the call log. 59 The telephone service provider usually delivers ten-digit...
... are shown on the handset when it into your directory, the name will appear as delivered by the telephone service provider. Press or to choose Review. 4. Press MENU/SELECT on the screen. • You will appear as Linda if this is not in your directory. Press MENU/SELECT to browse. •...; The name (if available), telephone number, date and time of the caller does not exactly match a number in use . 2. Review the call log. 59 The telephone service provider usually delivers ten-digit...
User Manual (DS6321-3 User Manual)
Page 64
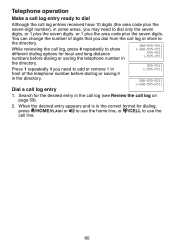
When the desired entry appears and is in the correct format for the desired entry in the call log (see Review the call log on page 59). 2. You can change the number of digits that you may need to add or remove 1 in 595-9511 1-595-... area code plus the seven-digit number), in some areas, you dial from the call log or store to the directory. 800-595-9511 While reviewing the call log, press # repeatedly to show 1-800-595-9511 different dialing options for local and long distance numbers before dialing or saving it in...
When the desired entry appears and is in the correct format for the desired entry in the call log (see Review the call log on page 59). 2. You can change the number of digits that you may need to add or remove 1 in 595-9511 1-595-... area code plus the seven-digit number), in some areas, you dial from the call log or store to the directory. 800-595-9511 While reviewing the call log, press # repeatedly to show 1-800-595-9511 different dialing options for local and long distance numbers before dialing or saving it in...

User Manual (DS6321-3 User Manual)
Page 65
... saved to confirm and the screen shows Saved. 61 When the number is in the call log on page 59). 2. Use the dialing keys (see Review the call log (see page 53) to edit the name. • Press MUTE/REMOVE to erase a character. • Press and hold REDIAL/PAUSE to the...
... saved to confirm and the screen shows Saved. 61 When the number is in the call log on page 59). 2. Use the dialing keys (see Review the call log (see page 53) to edit the name. • Press MUTE/REMOVE to erase a character. • Press and hold REDIAL/PAUSE to the...

