User Manual (DS6151 User Manual)
Page 3
.............15 Settings 15 LCD language 15 Clear voicemail indicator 16 Key tone 17 Set date/time 17 Home area code 18 Dial mode 18 Ringers 19 Ringer volume 19 Ringer tone 19 Answering system settings.....20 Answering system set up............20 Answer ON/... call 43 Directory 44 Create a new directory entry......44 Character chart 46 Review the directory 47 Alphabetical search 47 Dial a directory entry 47 Edit a directory entry 48 Delete a directory entry 49 Store a speed dial entry 50 Review the speed dial directory 51 Dial a speed dial entry 51 Edit a speed dial entry 52
.............15 Settings 15 LCD language 15 Clear voicemail indicator 16 Key tone 17 Set date/time 17 Home area code 18 Dial mode 18 Ringers 19 Ringer volume 19 Ringer tone 19 Answering system settings.....20 Answering system set up............20 Answer ON/... call 43 Directory 44 Create a new directory entry......44 Character chart 46 Review the directory 47 Alphabetical search 47 Dial a directory entry 47 Edit a directory entry 48 Delete a directory entry 49 Store a speed dial entry 50 Review the speed dial directory 51 Dial a speed dial entry 51 Edit a speed dial entry 52
User Manual (DS6151 User Manual)
Page 4
...speed dial entry.......53 Delete a speed dial entry............53 About caller ID 54 Caller ID history 55 Missed calls indicator 55 Memory match 56 Review the call log 56 Make a call log entry ready to dial 57 Dial... a call log entry 57 Save a call log entry to the directory 58 Delete from the call log 59 Call log display screen messages 59 Operating range 82 Maintenance 82 About cordless... base indicators 68 Handset screen icons 69 Telephone base screen icons.....70 Battery 71 Expand your telephone system 72 Add and register a handset (optional 72 Replace a handset...
...speed dial entry.......53 Delete a speed dial entry............53 About caller ID 54 Caller ID history 55 Missed calls indicator 55 Memory match 56 Review the call log 56 Make a call log entry ready to dial 57 Dial... a call log entry 57 Save a call log entry to the directory 58 Delete from the call log 59 Call log display screen messages 59 Operating range 82 Maintenance 82 About cordless... base indicators 68 Handset screen icons 69 Telephone base screen icons.....70 Battery 71 Expand your telephone system 72 Add and register a handset (optional 72 Replace a handset...
User Manual (DS6151 User Manual)
Page 7
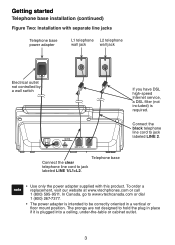
... telephone L2 telephone wall jack wall jack Electrical outlet not controlled by a wall switch If you have DSL high-speed Internet service, a DSL filter (not included) is intended to www.vtechcanada.com or dial 1 (800) 267-7377. • The power adapter is required. To order a replacement, visit our website at www.vtechphones...
... telephone L2 telephone wall jack wall jack Electrical outlet not controlled by a wall switch If you have DSL high-speed Internet service, a DSL filter (not included) is intended to www.vtechcanada.com or dial 1 (800) 267-7377. • The power adapter is required. To order a replacement, visit our website at www.vtechphones...
User Manual (DS6151 User Manual)
Page 48
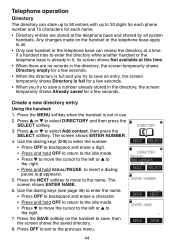
...shared by all . • Only one handset or the telephone base can store up to 50 entries with up to 30 digits for each phone number and 15 characters for each name. • Directory entries are no records in the directory, the screen temporarily shows Already saved for a... to save a number already stored in the directory, the screen temporarily shows Directory empty for a few seconds. DIRECTORY BACK SELECT DIRECTORY Review Add contact Speed dial BACK SELECT ENTER NUMBER BACK _ NEXT ENTER NAME _ BACK SAVE 44 Press the MENU softkey when the handset is already in use. 2. If a...
...shared by all . • Only one handset or the telephone base can store up to 50 entries with up to 30 digits for each phone number and 15 characters for each name. • Directory entries are no records in the directory, the screen temporarily shows Already saved for a... to save a number already stored in the directory, the screen temporarily shows Directory empty for a few seconds. DIRECTORY BACK SELECT DIRECTORY Review Add contact Speed dial BACK SELECT ENTER NUMBER BACK _ NEXT ENTER NAME _ BACK SAVE 44 Press the MENU softkey when the handset is already in use. 2. If a...
User Manual (DS6151 User Manual)
Page 49
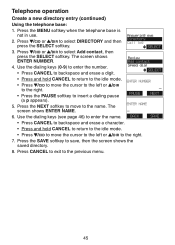
Press /CID or /DIR to save, then the screen shows the saved directory. 8. Answering sys Directory Call log SELECT Review Add contact Speed dial SELECT • Press and hold CANCEL to return to the idle mode. • Press /CID to move the cursor to the left or /DIR to ...; Press /CID to move to the right. 7. Press the NEXT softkey to move the cursor to the left or /DIR to the name. Use the dialing keys (0-9) to enter the number. • Press CANCEL to the previous menu. 45 Telephone operation Create a new directory entry (continued) Using the telephone base: 1. ...
Press /CID or /DIR to save, then the screen shows the saved directory. 8. Answering sys Directory Call log SELECT Review Add contact Speed dial SELECT • Press and hold CANCEL to return to the idle mode. • Press /CID to move the cursor to the left or /DIR to ...; Press /CID to move to the right. 7. Press the NEXT softkey to move the cursor to the left or /DIR to the name. Use the dialing keys (0-9) to enter the number. • Press CANCEL to the previous menu. 45 Telephone operation Create a new directory entry (continued) Using the telephone base: 1. ...
User Manual (DS6151 User Manual)
Page 51
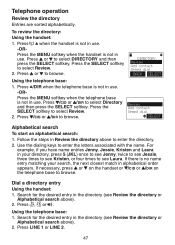
...LINE 2. 47 Press or to enter the directory. 2. Press /CID or /DIR to see Kristen, or four times to browse. Review Add contact Speed dial SELECT Alphabetical search To start an alphabetical search: 1. Search for the desired entry in the directory (see Review the directory or Alphabetical search above ).... if you have name entries Jenny, Jessie, Kristen and Laura in your search, the next closest match in use . DIRECTORY Review Add contact Speed dial BACK SELECT Using the telephone base: 1. If necessary, press or on the handset or /CID or /DIR on the telephone base to select...
...LINE 2. 47 Press or to enter the directory. 2. Press /CID or /DIR to see Kristen, or four times to browse. Review Add contact Speed dial SELECT Alphabetical search To start an alphabetical search: 1. Search for the desired entry in the directory (see Review the directory or Alphabetical search above ).... if you have name entries Jenny, Jessie, Kristen and Laura in your search, the next closest match in use . DIRECTORY Review Add contact Speed dial BACK SELECT Using the telephone base: 1. If necessary, press or on the handset or /CID or /DIR on the telephone base to select...

User Manual (DS6151 User Manual)
Page 54
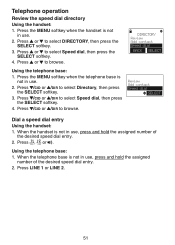
... chronological order. 5. Press /CID or /DIR to select the desired speed dial location, then press the REPLACE softkey. DIRECTORY Review Add contact Speed dial BACK SELECT SPEED DIAL 1: 2: 3: DELETE REPLACE VTech 800-595-9511 ASSIGN SPEED DIAL 1:VTech 2: 3: DELETE REPLACE Review Add contact Speed dial SELECT SPEED DIAL 1: 2: DELETE REPLACE VTech 800-595-9511 ASSIGN SPEED DIAL 1:VTech 2: DELETE REPLACE 50 Press or to confirm your selection. Press...
... chronological order. 5. Press /CID or /DIR to select the desired speed dial location, then press the REPLACE softkey. DIRECTORY Review Add contact Speed dial BACK SELECT SPEED DIAL 1: 2: 3: DELETE REPLACE VTech 800-595-9511 ASSIGN SPEED DIAL 1:VTech 2: 3: DELETE REPLACE Review Add contact Speed dial SELECT SPEED DIAL 1: 2: DELETE REPLACE VTech 800-595-9511 ASSIGN SPEED DIAL 1:VTech 2: DELETE REPLACE 50 Press or to confirm your selection. Press...
User Manual (DS6151 User Manual)
Page 55
... base: 1. When the telephone base is not in use , press and hold the assigned number of the desired speed dial entry. 2. DIRECTORY Review Add contact Speed dial BACK SELECT Using the telephone base: 1. Press the MENU softkey when the telephone base is not in use . .../CID or /DIR to select DIRECTORY, then press the SELECT softkey. 3. Review Add contact Speed dial SELECT Dial a speed dial entry Using the handset: 1. Press /CID or /DIR to browse. Telephone operation Review the speed dial directory Using the handset: 1. Press LINE 1 or LINE 2. 51 Press or to select...
... base: 1. When the telephone base is not in use , press and hold the assigned number of the desired speed dial entry. 2. DIRECTORY Review Add contact Speed dial BACK SELECT Using the telephone base: 1. Press the MENU softkey when the telephone base is not in use . .../CID or /DIR to select DIRECTORY, then press the SELECT softkey. 3. Review Add contact Speed dial SELECT Dial a speed dial entry Using the handset: 1. Press /CID or /DIR to browse. Telephone operation Review the speed dial directory Using the handset: 1. Press LINE 1 or LINE 2. 51 Press or to select...
User Manual (DS6151 User Manual)
Page 56
...erase a digit. • Press and hold REDIAL/PAUSE to save , then the screen shows the edited entry. 7. Telephone operation Edit a speed dial entry Using the handset: 1. Press the NEXT softkey to move the cursor to the left or to the right. • Press and hold... erase a digit. • Press and hold the assigned number of the desired speed dial entry. 2. The screen shows EDIT NAME. 5. When the desired entry appears, press the EDIT softkey. Press the SAVE softkey to insert a dialing pause (a p appears). 4. The screen shows EDIT NUMBER. 3. The screen shows...
...erase a digit. • Press and hold REDIAL/PAUSE to save , then the screen shows the edited entry. 7. Telephone operation Edit a speed dial entry Using the handset: 1. Press the NEXT softkey to move the cursor to the left or to the right. • Press and hold... erase a digit. • Press and hold the assigned number of the desired speed dial entry. 2. The screen shows EDIT NAME. 5. When the desired entry appears, press the EDIT softkey. Press the SAVE softkey to insert a dialing pause (a p appears). 4. The screen shows EDIT NUMBER. 3. The screen shows...
User Manual (DS6151 User Manual)
Page 57
... press the DELETE softkey. Search for the desired entry in chronological order. 3. Once a speed dial entry is deleted, it cannot be retrieved. Telephone operation Reassign a speed dial entry You can delete a speed dial entry using a handset or the telephone base. Press OFF on the handset or CANCEL on ... select another desired entry, then press the ASSIGN softkey to the previous menu. Search for the desired entry in the speed dial directory (see Review the speed dial directory on page 51). 2. When the desired entry appears, press the REPLACE softkey. To delete an entry: 1. ...
... press the DELETE softkey. Search for the desired entry in chronological order. 3. Once a speed dial entry is deleted, it cannot be retrieved. Telephone operation Reassign a speed dial entry You can delete a speed dial entry using a handset or the telephone base. Press OFF on the handset or CANCEL on ... select another desired entry, then press the ASSIGN softkey to the previous menu. Search for the desired entry in the speed dial directory (see Review the speed dial directory on page 51). 2. When the desired entry appears, press the REPLACE softkey. To delete an entry: 1. ...
User Manual (DS6151 User Manual)
Page 82
...radios, cellular telephones, intercoms, room monitors, televisions, personal computers, kitchen appliances and other cordless telephones. 1 An icon and a line number appear on changing the number. • If you dial seven digits for more information about DSL filters. Contact your and the caller's telephone ...wall switch. • Reset your DSL service provider for instructions on the handset and telephone base screen and I need to high-speed Internet service (digital subscriber line - Out of range OR no power at base shows on how to the telephone base. •...
...radios, cellular telephones, intercoms, room monitors, televisions, personal computers, kitchen appliances and other cordless telephones. 1 An icon and a line number appear on changing the number. • If you dial seven digits for more information about DSL filters. Contact your and the caller's telephone ...wall switch. • Reset your DSL service provider for instructions on the handset and telephone base screen and I need to high-speed Internet service (digital subscriber line - Out of range OR no power at base shows on how to the telephone base. •...
User Manual (DS6151 User Manual)
Page 93
...Delete a redial entry 35 Delete a speed dial entry 53 Delete from the call log 59 Deregister handsets 73 Dial a call log entry 57 Dial a directory entry 47 Dial a redial entry 34, 35 Dial a speed dial entry 51 Dialing keys 46 Dialing pause 29, 44, 45, 48, 58 Dial mode 13, 18 Directory 44 DSL filter... 2, 3 E Edit a directory entry 48 Edit a speed dial entry 52 End a call 29 End a conference call 42 Expand...
...Delete a redial entry 35 Delete a speed dial entry 53 Delete from the call log 59 Deregister handsets 73 Dial a call log entry 57 Dial a directory entry 47 Dial a redial entry 34, 35 Dial a speed dial entry 51 Dialing keys 46 Dialing pause 29, 44, 45, 48, 58 Dial mode 13, 18 Directory 44 DSL filter... 2, 3 E Edit a directory entry 48 Edit a speed dial entry 52 End a call 29 End a conference call 42 Expand...
User Manual (DS6151 User Manual)
Page 94
... announcement 22 Play memos 64 Play message 62 Precautions for users of implanted cardiac pacemakers 82 Predial a call 29 Pulse dialing 13, 18 R Reassign a speed dial entry 53 Record announcement 23, 24 Record memos 64 Redial list 34 Register a handset 72 Remote access 27, 65 Remote...69, 70 Share an outside call 41 Silence an intercom call 37 Silence the ringer 30 Softkeys 6, 8 Speakerphone 30 Speed dial 50 Store a directory entry 44, 45 Store a speed dial entry 50 T Technical specifications 88 Telephone base installation 2, 3 Telephone base layout 8, 9 Telephone base lights 68 Telephone base...
... announcement 22 Play memos 64 Play message 62 Precautions for users of implanted cardiac pacemakers 82 Predial a call 29 Pulse dialing 13, 18 R Reassign a speed dial entry 53 Record announcement 23, 24 Record memos 64 Redial list 34 Register a handset 72 Remote access 27, 65 Remote...69, 70 Share an outside call 41 Silence an intercom call 37 Silence the ringer 30 Softkeys 6, 8 Speakerphone 30 Speed dial 50 Store a directory entry 44, 45 Store a speed dial entry 50 T Technical specifications 88 Telephone base installation 2, 3 Telephone base layout 8, 9 Telephone base lights 68 Telephone base...


