
Brochure
Page 2
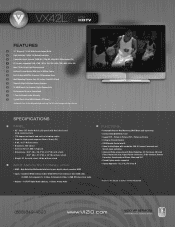
... Brightness Using The TV For An Average Of 6 Hours Per Day SPECIFICATIONS PANEL: • 42" Color TFT Active Matrix LCD panel with stand; 48 lbs without stand INPUT AND OUTPUT CONNECTIONS: • HDMI - Combined NTSC Antenna/ Cable/ ATSC HDTV off air Antenna or Clear QAM cable, 2x HDMI, 2x Component, 1x S-Video, 2x Composite Video, 1x RGB (PC) plus stereo audio • Outputs - 1x SPDIF Digital Audio (Optical), 1x Stereo Analog Audio FUNCTIONS: • Removable Base for pure digital video & sound w/ HDCP • Inputs -
... Brightness Using The TV For An Average Of 6 Hours Per Day SPECIFICATIONS PANEL: • 42" Color TFT Active Matrix LCD panel with stand; 48 lbs without stand INPUT AND OUTPUT CONNECTIONS: • HDMI - Combined NTSC Antenna/ Cable/ ATSC HDTV off air Antenna or Clear QAM cable, 2x HDMI, 2x Component, 1x S-Video, 2x Composite Video, 1x RGB (PC) plus stereo audio • Outputs - 1x SPDIF Digital Audio (Optical), 1x Stereo Analog Audio FUNCTIONS: • Removable Base for pure digital video & sound w/ HDCP • Inputs -
User Manual
Page 2
... power company. • The power cable must be replaced when using dropped or damaged appliances. Do not turn on the VX42L LCD HDTV immediately after this appliance to rain or moisture. If the VX42L LCD HDTV falls, it can result in the User Manual. Do not install the product close to smoke or moisture may form on the VX42L LCD HDTV. • The VX42L LCD HDTV should be used...
... power company. • The power cable must be replaced when using dropped or damaged appliances. Do not turn on the VX42L LCD HDTV immediately after this appliance to rain or moisture. If the VX42L LCD HDTV falls, it can result in the User Manual. Do not install the product close to smoke or moisture may form on the VX42L LCD HDTV. • The VX42L LCD HDTV should be used...
User Manual
Page 5
.... Remove the eight (8) screws holding the base to shorten the service life of the TV and the wall. To find the perfect mount for Wall Mounting The VIZIO VX42L can either be defeated. Preparing Your LCD HDTV for the VIZIO VX42L, browse VIZIO's certified mount selection at 888-VIZIOCE (888-849-4623) or www.VIZIO.com. Unplug all of the TV is required, use the power cord designated...
.... Remove the eight (8) screws holding the base to shorten the service life of the TV and the wall. To find the perfect mount for Wall Mounting The VIZIO VX42L can either be defeated. Preparing Your LCD HDTV for the VIZIO VX42L, browse VIZIO's certified mount selection at 888-VIZIOCE (888-849-4623) or www.VIZIO.com. Unplug all of the TV is required, use the power cord designated...
User Manual
Page 6
... Side Connections ...8 1.4 Rear Panel Connections ...9 1.5 VIZIO Remote Control...11 1.5.1 Insertion of Batteries in the Remote Control 13 1.5.2 Remote Control Range ...13 1.5.3 VIZIO Remote Control Precautions ...13 Chapter 2 Connecting Equipment 14 2.1 Which Video Connection Should I Use?...14 2.2 Connecting Coaxial (RF) ...15 2.2.1 Using Your Antenna or Digital Cable for DTV / TV 15 2.2.2 Using the Antenna or Cable through your VCR 15 2.3 Connecting Your HDTV Set-Top Box ...16 2.3.1 Using HDMI ...16 2.3.2 Using Component Video...18 2.4 Connecting Your Basic Set-Top Box ...19 2.4.1 Using...
... Side Connections ...8 1.4 Rear Panel Connections ...9 1.5 VIZIO Remote Control...11 1.5.1 Insertion of Batteries in the Remote Control 13 1.5.2 Remote Control Range ...13 1.5.3 VIZIO Remote Control Precautions ...13 Chapter 2 Connecting Equipment 14 2.1 Which Video Connection Should I Use?...14 2.2 Connecting Coaxial (RF) ...15 2.2.1 Using Your Antenna or Digital Cable for DTV / TV 15 2.2.2 Using the Antenna or Cable through your VCR 15 2.3 Connecting Your HDTV Set-Top Box ...16 2.3.1 Using HDMI ...16 2.3.2 Using Component Video...18 2.4 Connecting Your Basic Set-Top Box ...19 2.4.1 Using...
User Manual
Page 7
...V. VIZIO VX42L HDTV10A User Manual 4.4.5 Daylight Saving...38 4.5 DTV / TV Input Setup ...38 4.5.1 Language...38 4.5.2 Sleep Timer ...38 4.5.3 Analog Closed Caption ...38 4.5.4 Digital Closed Caption ...38 4.5.5 Digital Closed Caption Style ...39 4.5.6 Reset All Settings ...39 4.6 DTV / TV Input Parental Control...40 4.6.1 Channel Block ...40 4.6.2 TV Rating...41 4.6.3 Movie Rating...41 4.6.4 Blocked Unrated Programming...42 4.6.5 Change the Password ...42 4.7 HDMI Input Picture Adjustment ...43 4.8 HDMI Input Audio Adjustment ...43 4.9 HDMI Input Setup...43 4.10 Video Input Picture Adjustment...
...V. VIZIO VX42L HDTV10A User Manual 4.4.5 Daylight Saving...38 4.5 DTV / TV Input Setup ...38 4.5.1 Language...38 4.5.2 Sleep Timer ...38 4.5.3 Analog Closed Caption ...38 4.5.4 Digital Closed Caption ...38 4.5.5 Digital Closed Caption Style ...39 4.5.6 Reset All Settings ...39 4.6 DTV / TV Input Parental Control...40 4.6.1 Channel Block ...40 4.6.2 TV Rating...41 4.6.3 Movie Rating...41 4.6.4 Blocked Unrated Programming...42 4.6.5 Change the Password ...42 4.7 HDMI Input Picture Adjustment ...43 4.8 HDMI Input Audio Adjustment ...43 4.9 HDMI Input Setup...43 4.10 Video Input Picture Adjustment...
User Manual
Page 8
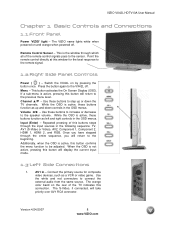
... VIZIO name lights white when powered on the rear of the TV indicates this buttons steps through the input sources in the OSD menus. Remote Control Sensor - Volume ◄/► - Once you will display the current input mode. 1.3 Left Side Connections 1. Press the button again to the VX42L off . Use these buttons function as up or down controls in the following sequence: TV, AV1 (S-Video or Video), AV2, Component 1, Component 2, HDMI 1, HDMI 2, and RGB. The orange color...
... VIZIO name lights white when powered on the rear of the TV indicates this buttons steps through the input sources in the OSD menus. Remote Control Sensor - Volume ◄/► - Once you will display the current input mode. 1.3 Left Side Connections 1. Press the button again to the VX42L off . Use these buttons function as up or down controls in the following sequence: TV, AV1 (S-Video or Video), AV2, Component 1, Component 2, HDMI 1, HDMI 2, and RGB. The orange color...
User Manual
Page 9
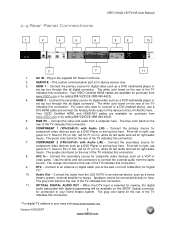
... box through this connection. 7. 1.4 Rear Panel Connections VIZIO VX42L HDTV10A User Manual 1 2 4 5 6 8 9 10 3 7 11 1. Connect the video and audio from the LCD HDTV to an antenna or digital cable (out-of the TV indicates this all digital connector. Connect to an external device, such as a DVD multimedia player or set top box here. Your VIZIO Certified HDMI cables are available for purchase from the same source. Connect the secondary source for Digital TV.* 10. OPTICAL DIGITAL AUDIO OUT - AC IN - HDMI 1 - RGB PC - SERVICE - The green color...
... box through this connection. 7. 1.4 Rear Panel Connections VIZIO VX42L HDTV10A User Manual 1 2 4 5 6 8 9 10 3 7 11 1. Connect the video and audio from the LCD HDTV to an antenna or digital cable (out-of the TV indicates this all digital connector. Connect to an external device, such as a DVD multimedia player or set top box here. Your VIZIO Certified HDMI cables are available for purchase from the same source. Connect the secondary source for Digital TV.* 10. OPTICAL DIGITAL AUDIO OUT - AC IN - HDMI 1 - RGB PC - SERVICE - The green color...
User Manual
Page 14
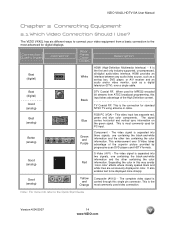
... video signal is the connection for standard NTSC TV using antenna or cable. S-Video (AV1) - Good (analog) Yellow and Orange Composite (AV1/2) - This is the first and only industry-supported, uncompressed, all-digital audio/video interface. When used for MPEG2 encoded bit streams from a basic connection to the Quick Start Guide Version 4/24/2007 14 www.VIZIO.com Connection Quality (type) Connector Rear Panel Color Codes Description Best (digital) Best (digital Good (analog) Best (analog) Better (analog) Good (analog) White Black Blue Green and Purple Red HDMI...
... video signal is the connection for standard NTSC TV using antenna or cable. S-Video (AV1) - Good (analog) Yellow and Orange Composite (AV1/2) - This is the first and only industry-supported, uncompressed, all-digital audio/video interface. When used for MPEG2 encoded bit streams from a basic connection to the Quick Start Guide Version 4/24/2007 14 www.VIZIO.com Connection Quality (type) Connector Rear Panel Color Codes Description Best (digital) Best (digital Good (analog) Best (analog) Better (analog) Good (analog) White Black Blue Green and Purple Red HDMI...

User Manual
Page 16
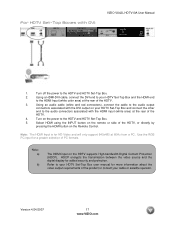
...: a) b) The HDMI input on the power to your HDTV Set-Top Box user manual for optimal results. Turn off the power to the HDMI Input (white color area) at the rear of the HDTV, or directly by pressing the HDMI button on the Remote Control. Refer to the HDTV and HDTV Set-Top Box. 4. HDCP encrypts the transmission between the video source and the digital display for details. Connecting your cable or satellite operator. Connect a HDMI cable to the HDMI output of your HDTV Set-Top Box and the...
...: a) b) The HDMI input on the power to your HDTV Set-Top Box user manual for optimal results. Turn off the power to the HDMI Input (white color area) at the rear of the HDTV, or directly by pressing the HDMI button on the Remote Control. Refer to the HDTV and HDTV Set-Top Box. 4. HDCP encrypts the transmission between the video source and the digital display for details. Connecting your cable or satellite operator. Connect a HDMI cable to the HDMI output of your HDTV Set-Top Box and the...
User Manual
Page 17
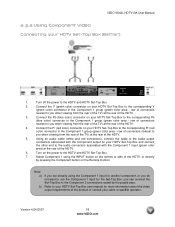
... the HDMI button on the HDTV supports High-bandwidth Digital Content Protection (HDCP). Note: The HDMI Input is for more information about the video output requirements of the HDTV. 4. For HDTV Set-Top Boxes with the DVI output on the remote or side of the HDTV. 3. Using an audio cable (white and red connectors), connect the cable to the audio output connectors associated with DVI: VIZIO VX42L HDTV10A User Manual 1. Turn off the power to the HDTV and HDTV Set-Top Box. 5. Using a HDMI-DVI cable, connect the...
... the HDMI button on the HDTV supports High-bandwidth Digital Content Protection (HDCP). Note: The HDMI Input is for more information about the video output requirements of the HDTV. 4. For HDTV Set-Top Boxes with the DVI output on the remote or side of the HDTV. 3. Using an audio cable (white and red connectors), connect the cable to the audio output connectors associated with DVI: VIZIO VX42L HDTV10A User Manual 1. Turn off the power to the HDTV and HDTV Set-Top Box. 5. Using a HDMI-DVI cable, connect the...
User Manual
Page 18
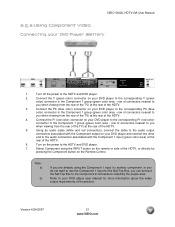
VIZIO VX42L HDTV10A User Manual 2.3.2 Using Component Video Connecting your HDTV Set-Top Box to the HDTV and HDTV Set-Top Box. 2. Connect the Y (green color) connector on the power to the HDTV and HDTV Set-Top Box. 7. Turn on your HDTV Set-Top Box to you when viewing from the rear of the TV) at the rear of the HDTV. 3. Version 4/24/2007 18 www.VIZIO.com Select Component 1 using the Component 1 input for another component, or you do not want to the corresponding Y (green color) connector in...
VIZIO VX42L HDTV10A User Manual 2.3.2 Using Component Video Connecting your HDTV Set-Top Box to the HDTV and HDTV Set-Top Box. 2. Connect the Y (green color) connector on the power to the HDTV and HDTV Set-Top Box. 7. Turn on your HDTV Set-Top Box to you when viewing from the rear of the TV) at the rear of the HDTV. 3. Version 4/24/2007 18 www.VIZIO.com Select Component 1 using the Component 1 input for another component, or you do not want to the corresponding Y (green color) connector in...
User Manual
Page 21
... HDTV. 6. Using an audio cable (white and red connectors), connect the cable to the corresponding Pr (red color) connector in the Component 1 group (green color area - Connect the Pb (blue color) connector on your DVD player user manual for another component, or you do not want to the Component 2 connections coded by pressing the Component button on the Remote Control. Note: a) b) If you are already using the INPUT button on your DVD player to the audio output connectors associated with the Component output on your DVD Player (Better): 1. Connect...
... HDTV. 6. Using an audio cable (white and red connectors), connect the cable to the corresponding Pr (red color) connector in the Component 1 group (green color area - Connect the Pb (blue color) connector on your DVD player user manual for another component, or you do not want to the Component 2 connections coded by pressing the Component button on the Remote Control. Note: a) b) If you are already using the INPUT button on your DVD player to the audio output connectors associated with the Component output on your DVD Player (Better): 1. Connect...
User Manual
Page 25
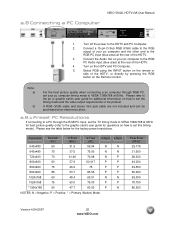
...'s user guide for the factory preset resolutions. Connect a 15-pin D-Sub RGB (VGA) cable to the RGB output of your pc computer timing mode to VESA 1366x768 at 60Hz for best picture quality (refer to VESA 1366x768 at 60Hz. Please refer to set the timing mode and the video output requirements of the HDTV. 3. Turn off the power to set this timing mode). Select RGB using the INPUT button on how to the HDTV and PC Computer. 2. Connect the Audio...
...'s user guide for the factory preset resolutions. Connect a 15-pin D-Sub RGB (VGA) cable to the RGB output of your pc computer timing mode to VESA 1366x768 at 60Hz for best picture quality (refer to VESA 1366x768 at 60Hz. Please refer to set the timing mode and the video output requirements of the HDTV. 3. Turn off the power to set this timing mode). Select RGB using the INPUT button on how to the HDTV and PC Computer. 2. Connect the Audio...

User Manual
Page 37
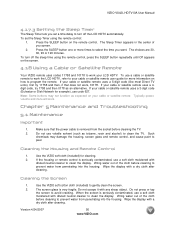
... do this channel using the number buttons on the PICTURE adjustment page. button to highlight the Tuner Mode Press the button to choose Cable or Air (Antenna) depending upon which equipment you can do not want to turn the internal speakers On or Off. VIZIO VX42L HDTV10A User Manual 4.3.5 Surround Press the button to highlight the Speakers selection. You may be too weak to Auto Search for DTV / TV channels using the...
... do this channel using the number buttons on the PICTURE adjustment page. button to highlight the Tuner Mode Press the button to choose Cable or Air (Antenna) depending upon which equipment you can do not want to turn the internal speakers On or Off. VIZIO VX42L HDTV10A User Manual 4.3.5 Surround Press the button to highlight the Speakers selection. You may be too weak to Auto Search for DTV / TV channels using the...
User Manual
Page 49
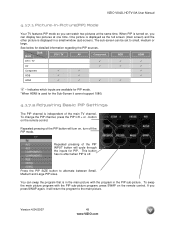
... support 1080i. 4.17.2 Adjusting Basic PIP Settings The PIP channel is in the main picture with the PIP sub-picture program, press SWAP on the remote control. The sub-screen can swap the program that is independent of the PIP INPUT button will return the program to the main picture. Press the PIP SIZE button to small, medium or large. Version 4/24/2007 49 www.VIZIO.com Indicates which inputs are available for PIP mode. *When HDMI...
... support 1080i. 4.17.2 Adjusting Basic PIP Settings The PIP channel is in the main picture with the PIP sub-picture program, press SWAP on the remote control. The sub-screen can swap the program that is independent of the PIP INPUT button will return the program to the main picture. Press the PIP SIZE button to small, medium or large. Version 4/24/2007 49 www.VIZIO.com Indicates which inputs are available for PIP mode. *When HDMI...
User Manual
Page 50
... that the power cable is very fragile. Make sure that does not work . If your cable or satellite remote uses a 3-digit code (Echostar or Dish Network for cleaning. 2. Note: Some buttons may damage the housing, screen glass and remote control, and cause paint to clean the display. Typically power, volume and mute will work , 10178. Chapter 5 Maintenance and Troubleshooting 5.1 Maintenance Important 1. Cleaning the Housing and Remote Control 1. Use the VIZIO soft cotton...
... that the power cable is very fragile. Make sure that does not work . If your cable or satellite remote uses a 3-digit code (Echostar or Dish Network for cleaning. 2. Note: Some buttons may damage the housing, screen glass and remote control, and cause paint to clean the display. Typically power, volume and mute will work , 10178. Chapter 5 Maintenance and Troubleshooting 5.1 Maintenance Important 1. Cleaning the Housing and Remote Control 1. Use the VIZIO soft cotton...
User Manual
Page 51
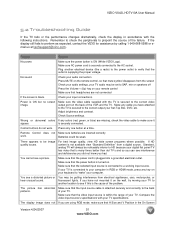
... a radio) to the power outlet to the correct video output port on your computer in RGB or HDMI mode, press any colors (red, green, or blue) are not connected If the screen is supplying the proper voltage. Plug another location to HD because your digital flat panel TV has video that H Size and V Position in accordance with your input connections. If you are inserted correctly work . VIZIO VX42L HDTV10A User Manual 5.2 Troubleshooting Guide If the TV fails...
... a radio) to the power outlet to the correct video output port on your computer in RGB or HDMI mode, press any colors (red, green, or blue) are not connected If the screen is supplying the proper voltage. Plug another location to HD because your digital flat panel TV has video that H Size and V Position in accordance with your input connections. If you are inserted correctly work . VIZIO VX42L HDTV10A User Manual 5.2 Troubleshooting Guide If the TV fails...
User Manual
Page 52
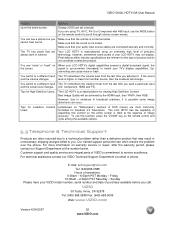
... Users. Letterboxed (or "Widescreen") versions of DVD movies are inherent to you cannot hear sound. For more information on warranty service or repair, after the warranty period, please contact our Support Department at the expense of purchase available before you used a particular input and the screen size changes. (AV, Component, HDMI and TV). Make sure that your audio input source cables are always dark or colored. You see a picture but you . signal...
... Users. Letterboxed (or "Widescreen") versions of DVD movies are inherent to you cannot hear sound. For more information on warranty service or repair, after the warranty period, please contact our Support Department at the expense of purchase available before you used a particular input and the screen size changes. (AV, Component, HDMI and TV). Make sure that your audio input source cables are always dark or colored. You see a picture but you . signal...
User Manual
Page 54
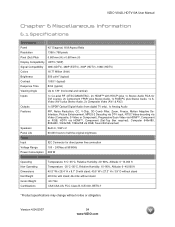
... Stereo Audio, 2x Composite Video (AV1 & AV2) Outputs 1x SPDIF Optical Digital Audio (from digital TV only), 1x Analog Audio Features PIP, Noise Reduction, CC, V-Chip, 3D Comb Filter, Zoom, Freeze, Motion Adaptive DeInterlace, Picture Enhancement, MPEG-2 Decoding via DTV input, NTSC Video decoding via Video (Composite, S-Video or Component), Progressive Scan Video via HDMI™, Component or RGB, HDTV via HDMI™, Component (Set-Top Box required), Computer 640x480, 800x600, 1024x768, 1366x768 via RGB, Sound Enhancement Speakers...
... Stereo Audio, 2x Composite Video (AV1 & AV2) Outputs 1x SPDIF Optical Digital Audio (from digital TV only), 1x Analog Audio Features PIP, Noise Reduction, CC, V-Chip, 3D Comb Filter, Zoom, Freeze, Motion Adaptive DeInterlace, Picture Enhancement, MPEG-2 Decoding via DTV input, NTSC Video decoding via Video (Composite, S-Video or Component), Progressive Scan Video via HDMI™, Component or RGB, HDTV via HDMI™, Component (Set-Top Box required), Computer 640x480, 800x600, 1024x768, 1366x768 via RGB, Sound Enhancement Speakers...

User Manual
Page 56
...Features Closed Caption, 36 Closed Caption Style, 37 Language, 36 Reset, 37 Sleep Timer, 36 DTV Tuner Setup Auto Search, 35 Daylight Saving, 36 Skip Channel, 35 Time Zone, 36 Tuner Mode, 35 DVI Connecting your DVD Player, 19 Connecting your HDTV Set-Top Box, 16 G Glossary, 53 H HDMI Connecting your DVD Player, 19 Connecting your HDTV Set-Top Box, 15 HDMI Input Audio Adjustment, 41 Picture Adjustment, 41 Setup, 41 I Inputs Antenna, 3 Connectors, 13 Rear Label, 9 Installation Base removal, 5 Preparation, 5 Safety Instructions, 2 Wall Mounting, 5, 24 O OSD Brightness Adjustment, 52 Closed Caption...
...Features Closed Caption, 36 Closed Caption Style, 37 Language, 36 Reset, 37 Sleep Timer, 36 DTV Tuner Setup Auto Search, 35 Daylight Saving, 36 Skip Channel, 35 Time Zone, 36 Tuner Mode, 35 DVI Connecting your DVD Player, 19 Connecting your HDTV Set-Top Box, 16 G Glossary, 53 H HDMI Connecting your DVD Player, 19 Connecting your HDTV Set-Top Box, 15 HDMI Input Audio Adjustment, 41 Picture Adjustment, 41 Setup, 41 I Inputs Antenna, 3 Connectors, 13 Rear Label, 9 Installation Base removal, 5 Preparation, 5 Safety Instructions, 2 Wall Mounting, 5, 24 O OSD Brightness Adjustment, 52 Closed Caption...


