

QuickStart Guide
Page 2
... Support 34 Front Panel 1 Rear Panel 2 Using the USB Power Feature 23 Turning the Power Indicator On or Off 23 Help Topics 35 Wall-mounting the TV 4 Using the Remote 5 Completing the First-Time Setup 6 Using the On-Screen Menu 7 Navigating the On-Screen Menu 7 Changing the Input Source 7 Adjusting the Picture Settings 8 Adjusting the Color Temperature 8 Changing the Picture Aspect Ratio 9 Adjusting Advanced Picture Settings 9 Adjusting Picture Input Settings 12 Adjusting the Picture Mode Edit Settings 12 Adjusting the Audio Settings 14 Setting Timers 23 Setting...
... Support 34 Front Panel 1 Rear Panel 2 Using the USB Power Feature 23 Turning the Power Indicator On or Off 23 Help Topics 35 Wall-mounting the TV 4 Using the Remote 5 Completing the First-Time Setup 6 Using the On-Screen Menu 7 Navigating the On-Screen Menu 7 Changing the Input Source 7 Adjusting the Picture Settings 8 Adjusting the Color Temperature 8 Changing the Picture Aspect Ratio 9 Adjusting Advanced Picture Settings 9 Adjusting Picture Input Settings 12 Adjusting the Picture Mode Edit Settings 12 Adjusting the Audio Settings 14 Setting Timers 23 Setting...

QuickStart Guide
Page 3
... call toll free at vizio.com. For more detailed information about accessories and installation services for replacement of the obsolete outlet. • Protect the power cord from the type of time. • When moving the cart/apparatus combination to ensure there are provided for the installation, use attachments/accessories specified by the manufacturer. • Use only with the cart, stand, tripod, bracket, or table specified...
... call toll free at vizio.com. For more detailed information about accessories and installation services for replacement of the obsolete outlet. • Protect the power cord from the type of time. • When moving the cart/apparatus combination to ensure there are provided for the installation, use attachments/accessories specified by the manufacturer. • Use only with the cart, stand, tripod, bracket, or table specified...

QuickStart Guide
Page 4
... children to repair or service your TV may become accustomed to the floor/wall in accordance with the installation instructions. • Insert batteries in environments with instructions. To avoid electric shock, avoid handling the power cord during a lightning storm or when it cannot be pulled, pushed or knocked over , pulled or grabbed. • NEVER place a television set and supporting furniture. Do...
... children to repair or service your TV may become accustomed to the floor/wall in accordance with the installation instructions. • Insert batteries in environments with instructions. To avoid electric shock, avoid handling the power cord during a lightning storm or when it cannot be pulled, pushed or knocked over , pulled or grabbed. • NEVER place a television set and supporting furniture. Do...

QuickStart Guide
Page 5
..., part H) v Receiving Stations. Article 810 of the National Electrical Code, ANSI/NFPSA 70, provides information with regard to proper grounding of the mast and supporting structure, grounding of the lead-in wire to an antenna discharge unit, size of the grounding conductors, location of CATV The installation instructions states the cable distribution system should be grounded (earthed) in the building installation. TELEVISION ANTENNA CONNECTION...
..., part H) v Receiving Stations. Article 810 of the National Electrical Code, ANSI/NFPSA 70, provides information with regard to proper grounding of the mast and supporting structure, grounding of the lead-in wire to an antenna discharge unit, size of the grounding conductors, location of CATV The installation instructions states the cable distribution system should be grounded (earthed) in the building installation. TELEVISION ANTENNA CONNECTION...

QuickStart Guide
Page 11
USING THE REMOTE Input Change the currently displayed input App Launcher Quickly launch the pictured app Menu Display the settings menu WatchFreeTM Access WatchFree channels (not available in fire. Make sure that came with this remote with two, new Duracell 'AAA' alkaline batteries. 5 Do not dispose of your batteries consistent with number pad to close captions Long press to open . 2. Replace the battery cover and click to manually enter a digital subchannel (for...
USING THE REMOTE Input Change the currently displayed input App Launcher Quickly launch the pictured app Menu Display the settings menu WatchFreeTM Access WatchFree channels (not available in fire. Make sure that came with this remote with two, new Duracell 'AAA' alkaline batteries. 5 Do not dispose of your batteries consistent with number pad to close captions Long press to open . 2. Replace the battery cover and click to manually enter a digital subchannel (for...

QuickStart Guide
Page 12
... license Viewing Data to analytics companies, media companies, advertisers, ad agencies, and other data about your TV? users engage with authorized data partners. Home Use Store Demo Home Use Store Demo Home Use Store Demo Rescan Networks 4. How are you VIZIO TV located? antenna, wall or cable box is properly connected to -speech) functionality. ose a Wi-Fi Network. The first time you turn your phone into one simple e Download now from...
... license Viewing Data to analytics companies, media companies, advertisers, ad agencies, and other data about your TV? users engage with authorized data partners. Home Use Store Demo Home Use Store Demo Home Use Store Demo Rescan Networks 4. How are you VIZIO TV located? antenna, wall or cable box is properly connected to -speech) functionality. ose a Wi-Fi Network. The first time you turn your phone into one simple e Download now from...
QuickStart Guide
Page 14
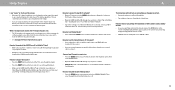
... name. Adjusts the black level of the picture. Optimized for watching TV in a dark room. • Game - Produces an orange-hued picture. • Cool - Adjusts the LED brightness to values ideal for television viewing. Adjusts the white level of the picture. To adjust the color temperature: Menu > Picture > Color Temperature Use the Navigation buttons on the remote to highlight that produce a brighter, more vivid picture. • Bright - To adjust the picture mode settings: Menu > Picture > Picture Mode 1. Adjusts the edge...
... name. Adjusts the black level of the picture. Optimized for watching TV in a dark room. • Game - Produces an orange-hued picture. • Cool - Adjusts the LED brightness to values ideal for television viewing. Adjusts the white level of the picture. To adjust the color temperature: Menu > Picture > Color Temperature Use the Navigation buttons on the remote to highlight that produce a brighter, more vivid picture. • Bright - To adjust the picture mode settings: Menu > Picture > Picture Mode 1. Adjusts the edge...
QuickStart Guide
Page 15
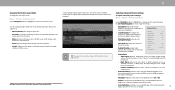
...; Game Low Latency - Advanced Picture Black Detail Super Resolution Edge Enhancement Local Contrast Backlight Control Reduce Noise Game Low Latency Film Mode Gamma Color Calibration Off Medium Low Low On Auto On 2.1 - Reduces video delay (lag) when gaming. Optimizes the picture for bright room conditions, and higher values when it's dark. • Color Calibration - 3 Changing the Picture Aspect Ratio To change the screen aspect ratio: Menu > Picture > Picture Aspect Use the Navigation buttons to...
...; Game Low Latency - Advanced Picture Black Detail Super Resolution Edge Enhancement Local Contrast Backlight Control Reduce Noise Game Low Latency Film Mode Gamma Color Calibration Off Medium Low Low On Auto On 2.1 - Reduces video delay (lag) when gaming. Optimizes the picture for bright room conditions, and higher values when it's dark. • Color Calibration - 3 Changing the Picture Aspect Ratio To change the screen aspect ratio: Menu > Picture > Picture Aspect Use the Navigation buttons to...

QuickStart Guide
Page 16
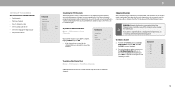
... POINT WHITE BALANCE menu is displayed. When you to adjust the color management system, 20 point white balance, turn the color channel off for testing, and display SMPTE, flat, ramp, and uniformity analyzer test patterns. Red Hue 0 Saturation -1 Brightness -24 Offset 0 Gain 0 Green 0 5 0 0 0 Color Tuner Blue 0 -4 -22 0 0 Cyan 0 0 0 Magenta 25 -2 0 Yellow -14 0 0 To adjust the 20 Point White Balance settings: 3. From the Color Tuner table, use the Left/Right Navigation buttons to adjust the value. Use...
... POINT WHITE BALANCE menu is displayed. When you to adjust the color management system, 20 point white balance, turn the color channel off for testing, and display SMPTE, flat, ramp, and uniformity analyzer test patterns. Red Hue 0 Saturation -1 Brightness -24 Offset 0 Gain 0 Green 0 5 0 0 0 Color Tuner Blue 0 -4 -22 0 0 Cyan 0 0 0 Magenta 25 -2 0 Yellow -14 0 0 To adjust the 20 Point White Balance settings: 3. From the Color Tuner table, use the Left/Right Navigation buttons to adjust the value. Use...
QuickStart Guide
Page 18
...Calibrated picture mode. To adjust the Input settings: Menu > Picture > Input Settings Use the Navigation buttons to highlight the setting you to change the setting: • Save Picture Mode - Copy the settings for the source. Bright* Saving a Custom Picture Mode Custom picture modes allow you wish to adjust, then press OK to save a group of custom settings for an HDMI input. • Full Color 4:4:4* - Only available for various viewing conditions and video sources. 3 Adjusting Picture Input Settings Enable HDMI Mode, Full Color 4:4:4, Filmmaker Mode and adjust picture size...
...Calibrated picture mode. To adjust the Input settings: Menu > Picture > Input Settings Use the Navigation buttons to highlight the setting you to change the setting: • Save Picture Mode - Copy the settings for the source. Bright* Saving a Custom Picture Mode Custom picture modes allow you wish to adjust, then press OK to save a group of custom settings for an HDMI input. • Full Color 4:4:4* - Only available for various viewing conditions and video sources. 3 Adjusting Picture Input Settings Enable HDMI Mode, Full Color 4:4:4, Filmmaker Mode and adjust picture size...

QuickStart Guide
Page 19
... the user created Custom 1 picture mode, select the Delete button. A notification displays after the copy to your custom picture mode: Menu > Picture > Picture Mode Edit > Copy Picture Mode 5. Delete Cancel Resetting a Picture Mode A preset picture mode that are no longer needed to the Calibration picture mode. 3 Copy a Picture Mode Custom picture mode settings can be copied to be restored to the factory default settings. Enter PIN Confirm PIN Deleting a Picture Mode Custom picture modes that has been edited can be applied to other inputs. 1. TIP: Inputs...
... the user created Custom 1 picture mode, select the Delete button. A notification displays after the copy to your custom picture mode: Menu > Picture > Picture Mode Edit > Copy Picture Mode 5. Delete Cancel Resetting a Picture Mode A preset picture mode that are no longer needed to the Calibration picture mode. 3 Copy a Picture Mode Custom picture mode settings can be copied to be restored to the factory default settings. Enter PIN Confirm PIN Deleting a Picture Mode Custom picture modes that has been edited can be applied to other inputs. 1. TIP: Inputs...

QuickStart Guide
Page 20
... channels (e.g., 3.0, 5.0, or 5.1). 3 14 Digital Audio Out Analog Audio Out Dialogue Enhancer Auto Fixed Off • Balance - Turn the built-in speakers automaticcaly turn off if a sound bar is uncompressed. Select Fixed if an external audio device (sound bar or AV receiver) will control the volume. • Dialogue Enhancer - Boosts or attenuates loudness at different frequencies. Select the digital audio output format for audio with more information. • Equalizer - If Off, audio is sent using HDMI 1. When set...
... channels (e.g., 3.0, 5.0, or 5.1). 3 14 Digital Audio Out Analog Audio Out Dialogue Enhancer Auto Fixed Off • Balance - Turn the built-in speakers automaticcaly turn off if a sound bar is uncompressed. Select Fixed if an external audio device (sound bar or AV receiver) will control the volume. • Dialogue Enhancer - Boosts or attenuates loudness at different frequencies. Select the digital audio output format for audio with more information. • Equalizer - If Off, audio is sent using HDMI 1. When set...
QuickStart Guide
Page 22
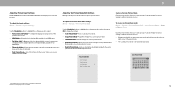
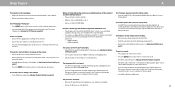
... scans for free over-the-air channels (using the number pad. A P appears to the right of -the-wall connection (without a cable box). To remove a channel: 1. Moving the TV to an area with the Skip Channel feature. 3 SETTING UP TV CHANNELS You can use the TV's Channels menu to: • Find channels • Find new channels • Select channels to skip • Select analog audio mode • Select the language for digital audio • Set parental controls TV Channels Find Channels...
... scans for free over-the-air channels (using the number pad. A P appears to the right of -the-wall connection (without a cable box). To remove a channel: 1. Moving the TV to an area with the Skip Channel feature. 3 SETTING UP TV CHANNELS You can use the TV's Channels menu to: • Find channels • Find new channels • Select channels to skip • Select analog audio mode • Select the language for digital audio • Set parental controls TV Channels Find Channels...
QuickStart Guide
Page 24
... using the tuner to receive your TV signals, such as a VCR, satellite or cable box, or DVR. To enable or disable the Program Rating feature: Menu > TV Channels > Parental Controls > Locks > Off/On Locking and Unlocking Channels When a channel is entered. USA television program broadcasts. • USA Movie - TIP: For a list of audiences (some for children and some for Over-the-Air signals or when connected to cable TV directly from being viewed. To lock...
... using the tuner to receive your TV signals, such as a VCR, satellite or cable box, or DVR. To enable or disable the Program Rating feature: Menu > TV Channels > Parental Controls > Locks > Off/On Locking and Unlocking Channels When a channel is entered. USA television program broadcasts. • USA Movie - TIP: For a list of audiences (some for children and some for Over-the-Air signals or when connected to cable TV directly from being viewed. To lock...

QuickStart Guide
Page 29
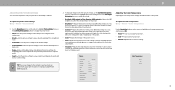
... without a video or audio signal. If you want the sleep timer to charge devices. Power is only available with the TV is on the remote to sleep: 30, 60, 90, 120, or 180 minutes. Using the USB Power Feature The USB port can be deactivated. To setup a sleep timer: Menu > System > Timers > Sleep Timer Timers Sleep Timer Auto Power Off Blank Screen Use the Left/Right Navigation buttons on . To set the Auto Power Off feature: Menu > System > Timers > Auto Power Off > Off Setting Timers When activated...
... without a video or audio signal. If you want the sleep timer to charge devices. Power is only available with the TV is on the remote to sleep: 30, 60, 90, 120, or 180 minutes. Using the USB Power Feature The USB port can be deactivated. To setup a sleep timer: Menu > System > Timers > Sleep Timer Timers Sleep Timer Auto Power Off Blank Screen Use the Left/Right Navigation buttons on . To set the Auto Power Off feature: Menu > System > Timers > Auto Power Off > Off Setting Timers When activated...

QuickStart Guide
Page 30
... Adjusting the CEC Settings The CEC function on specific device): • Power On/Off • Volume and mute • Play and pause WARNING: Not all HDMI devices support CEC. To see a list of paired devices or unpair a device: Menu > System > Mobile Devices Highlight a device name to lock content and picture modes, as well as prevent accidental system resets. On your PIN. WARNING: You will need...
... Adjusting the CEC Settings The CEC function on specific device): • Power On/Off • Volume and mute • Play and pause WARNING: Not all HDMI devices support CEC. To see a list of paired devices or unpair a device: Menu > System > Mobile Devices Highlight a device name to lock content and picture modes, as well as prevent accidental system resets. On your PIN. WARNING: You will need...

QuickStart Guide
Page 31
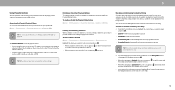
... screen will be reset to the factory defaults. Store Demo To set a system PIN code, enter it now. 2. Menu > Admin & Privacy > Soft Power Cycle > OK Checking for System Updates To check for a system update: Menu > Admin & Privacy > Check for the TV to turn off then on again. WARNING: If you can use the TV's Admin & Privacy menu to restore the TV to its factory default settings: Menu > Admin & Privacy > Reset...
... screen will be reset to the factory defaults. Store Demo To set a system PIN code, enter it now. 2. Menu > Admin & Privacy > Soft Power Cycle > OK Checking for System Updates To check for a system update: Menu > Admin & Privacy > Check for the TV to turn off then on again. WARNING: If you can use the TV's Admin & Privacy menu to restore the TV to its factory default settings: Menu > Admin & Privacy > Reset...
QuickStart Guide
Page 41
... external devices (Blu-ray player, game console, cable/satellite box) that are securely attached. 35 The picture is distorted. • Move the TV away from your antenna is connected securely to the TV and move the antenna around the room or close to a window for the best signal. There is no power. • Ensure the TV is plugged into a working . • Ensure you can also use ARC mode...
... external devices (Blu-ray player, game console, cable/satellite box) that are securely attached. 35 The picture is distorted. • Move the TV away from your antenna is connected securely to the TV and move the antenna around the room or close to a window for the best signal. There is no power. • Ensure the TV is plugged into a working . • Ensure you can also use ARC mode...
QuickStart Guide
Page 42
... you are missing. • Press the MENU button on -screen instructions to a window for the best signal. Open the VIZIO SmartCast Mobile app. If the viewing mode on the new input source differs from the one on the input source you use external antennas to watch Cable/Antenna TV channels? • If you subscribe to cable or satellite, simply connect an HDMI cable (not included) to a Wi-Fi network. You will see "noise" or...
... you are missing. • Press the MENU button on -screen instructions to a window for the best signal. Open the VIZIO SmartCast Mobile app. If the viewing mode on the new input source differs from the one on the input source you use external antennas to watch Cable/Antenna TV channels? • If you subscribe to cable or satellite, simply connect an HDMI cable (not included) to a Wi-Fi network. You will see "noise" or...

QuickStart Guide
Page 46
... Bright Pixel Defect Guarantee (Displays Only) Types of the servicer. For commercial use , VIZIO warrants the product on the availability. If VIZIO determines that you always clear all applicable user data and downloaded applications. the duration of the warranty on the terms set -up, or repairs Consumer-Related Disputes applies, then you may determine. To obtain warranty service, contact VIZIO Customer Support by a How Long...
... Bright Pixel Defect Guarantee (Displays Only) Types of the servicer. For commercial use , VIZIO warrants the product on the availability. If VIZIO determines that you always clear all applicable user data and downloaded applications. the duration of the warranty on the terms set -up, or repairs Consumer-Related Disputes applies, then you may determine. To obtain warranty service, contact VIZIO Customer Support by a How Long...


