QuickStart Guide
Page 2
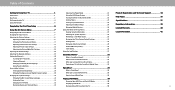
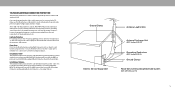
... Support 34 Front Panel 1 Rear Panel 2 Using the USB Power Feature 23 Turning the Power Indicator On or Off 23 Help Topics 35 Wall-mounting the TV 4 Using the Remote 5 Completing the First-Time Setup 6 Using the On-Screen Menu 7 Navigating the On-Screen Menu 7 Changing the Input Source 7 Adjusting the Picture Settings 8 Adjusting the Color Temperature 8 Changing the Picture Aspect Ratio 9 Adjusting Advanced Picture Settings 9 Adjusting Picture Input Settings 12 Adjusting the Picture Mode Edit Settings 12 Adjusting the Audio Settings 14 Setting Timers 23 Setting...
... Support 34 Front Panel 1 Rear Panel 2 Using the USB Power Feature 23 Turning the Power Indicator On or Off 23 Help Topics 35 Wall-mounting the TV 4 Using the Remote 5 Completing the First-Time Setup 6 Using the On-Screen Menu 7 Navigating the On-Screen Menu 7 Changing the Input Source 7 Adjusting the Picture Settings 8 Adjusting the Color Temperature 8 Changing the Picture Aspect Ratio 9 Adjusting Advanced Picture Settings 9 Adjusting Picture Input Settings 12 Adjusting the Picture Mode Edit Settings 12 Adjusting the Audio Settings 14 Setting Timers 23 Setting...
QuickStart Guide
Page 3
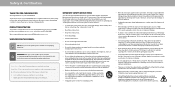
..., amplifier etc. Doing so could short circuit parts causing a fire or electric shock. The manufacturer's warranty does not cover user abuse or improper installations. • The power cord must be operated only from the apparatus. • Only use attachments/accessories specified by the manufacturer. • Use only with the cart, stand, tripod, bracket, or table specified by the manufacturer, or sold with...
..., amplifier etc. Doing so could short circuit parts causing a fire or electric shock. The manufacturer's warranty does not cover user abuse or improper installations. • The power cord must be operated only from the apparatus. • Only use attachments/accessories specified by the manufacturer. • Use only with the cart, stand, tripod, bracket, or table specified by the manufacturer, or sold with...
QuickStart Guide
Page 4
... touch the power cord during a lightning storm or when it cannot be pulled, pushed or knocked over. • Do not allow children to the floor/wall in permanent damage to hearing without anchoring both the furniture and the television set or its controls. • ALWAYS route cords and cables connected to repair or service your TV changes substantially. • CAUTION: These servicing instructions are...
... touch the power cord during a lightning storm or when it cannot be pulled, pushed or knocked over. • Do not allow children to the floor/wall in permanent damage to hearing without anchoring both the furniture and the television set or its controls. • ALWAYS route cords and cables connected to repair or service your TV changes substantially. • CAUTION: These servicing instructions are...
QuickStart Guide
Page 5
... Code (NEC), in wire to an antenna discharge unit, size of the grounding conductors, location of antenna discharge unit, connection to grounding electrodes, and requirements of the grounding electrode. Receiving Stations. Lightning Protection For added protection of the TV during a lightning storm or when it could fall into such power lines or circuits. Installation of CATV The installation instructions states the cable...
... Code (NEC), in wire to an antenna discharge unit, size of the grounding conductors, location of antenna discharge unit, connection to grounding electrodes, and requirements of the grounding electrode. Receiving Stations. Lightning Protection For added protection of the TV during a lightning storm or when it could fall into such power lines or circuits. Installation of CATV The installation instructions states the cable...
QuickStart Guide
Page 11
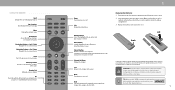
... where you live. Replace the battery cover and click to close captions Long press to SmartCast Home Screen Closed Caption Enable or disable close . Do not dispose of the audio Number Pad Manually enter a channel Pic Cycle through the different picture setting modes Long press to a fire or chemical burn if mishandled. USING THE REMOTE Input Change the currently displayed input App Launcher Quickly launch the pictured app Menu Display the settings menu WatchFreeTM Access WatchFree channels (not available...
... where you live. Replace the battery cover and click to close captions Long press to SmartCast Home Screen Closed Caption Enable or disable close . Do not dispose of the audio Number Pad Manually enter a channel Pic Cycle through the different picture setting modes Long press to a fire or chemical burn if mishandled. USING THE REMOTE Input Change the currently displayed input App Launcher Quickly launch the pictured app Menu Display the settings menu WatchFreeTM Access WatchFree channels (not available...
QuickStart Guide
Page 12
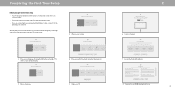
... first-time setup: • Your TV should be installed and the power cord should be connected to an electrical outlet. • If you have a wireless network, have the network password ready. • If you are connecting to your network with an Ethernet cable, connect it to generate summary aVnIZaIlOysoisr iatnsdaurethpoorritzseodfdhaotwa puasretrnseersngmaagyecwoimthbcinoentVeinetwoinngthDeairtaTVwsithanhdouostheehrold ddeevmicoegsr.aphic data, or other data about your digital actions, like smartphone broadcast television, advertisements...
... first-time setup: • Your TV should be installed and the power cord should be connected to an electrical outlet. • If you have a wireless network, have the network password ready. • If you are connecting to your network with an Ethernet cable, connect it to generate summary aVnIZaIlOysoisr iatnsdaurethpoorritzseodfdhaotwa puasretrnseersngmaagyecwoimthbcinoentVeinetwoinngthDeairtaTVwsithanhdouostheehrold ddeevmicoegsr.aphic data, or other data about your digital actions, like smartphone broadcast television, advertisements...
QuickStart Guide
Page 14
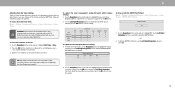
... mode for television viewing. Adjusts the white level of color before adjusting tint. • Sharpness - Adjusts the hue of picture elements. Adjusts the edge sharpness of the picture. Picture Picture Mode Backlight Brightness Contrast Color Tint Sharpness Color Temperature Picture Aspect Advanced Picture Input Settings Calibrated Normal Normal Adjusting the Color Temperature Adjusting the color temperature changes the white balance of the picture colors. • Tint - To adjust the color temperature: Menu > Picture > Color Temperature Use the Navigation buttons on the remote...
... mode for television viewing. Adjusts the white level of color before adjusting tint. • Sharpness - Adjusts the hue of picture elements. Adjusts the edge sharpness of the picture. Picture Picture Mode Backlight Brightness Contrast Color Tint Sharpness Color Temperature Picture Aspect Advanced Picture Input Settings Calibrated Normal Normal Adjusting the Color Temperature Adjusting the color temperature changes the white balance of the picture colors. • Tint - To adjust the color temperature: Menu > Picture > Color Temperature Use the Navigation buttons on the remote...
QuickStart Guide
Page 15
...:9 screen. 3 Changing the Picture Aspect Ratio To change the screen aspect ratio: Menu > Picture > Picture Aspect Use the Navigation buttons to highlight the aspect ratio you wish to adjust, then press the Left/Right Navigation buttons to change to aspect ratio. • Panoramic* - Advanced Picture Black Detail Super Resolution Edge Enhancement Local Contrast Backlight Control Reduce Noise Game Low Latency Film Mode Gamma Color Calibration Off Medium Low Low On Auto On 2.1 - Set...
...:9 screen. 3 Changing the Picture Aspect Ratio To change the screen aspect ratio: Menu > Picture > Picture Aspect Use the Navigation buttons to highlight the aspect ratio you wish to adjust, then press the Left/Right Navigation buttons to change to aspect ratio. • Panoramic* - Advanced Picture Black Detail Super Resolution Edge Enhancement Local Contrast Backlight Control Reduce Noise Game Low Latency Film Mode Gamma Color Calibration Off Medium Low Low On Auto On 2.1 - Set...
QuickStart Guide
Page 16
... button. 2. Use the Navigation buttons on the remote to save the setting. Only two color channels can be turned off or on the remote to highlight the Gain and Color values you are finished press the OK button to highlight Red, Green, or Blue. 2. Use the Navigation buttons on page 8. Use the Left/Right Navigation buttons to select On to adjust. To access the color tuner table: Menu > Picture > Advanced Picture > Color Calibration > Color Tuner WARNING: The Color Tuner, 20 Point White...
... button. 2. Use the Navigation buttons on the remote to save the setting. Only two color channels can be turned off or on the remote to highlight the Gain and Color values you are finished press the OK button to highlight Red, Green, or Blue. 2. Use the Navigation buttons on page 8. Use the Left/Right Navigation buttons to select On to adjust. To access the color tuner table: Menu > Picture > Advanced Picture > Color Calibration > Color Tuner WARNING: The Color Tuner, 20 Point White...
QuickStart Guide
Page 18
...mode. • Lock Picture Mode - Only available for the source. Video sources uses YCbCr, but PC uses RGB. Prevent changes to factory default values. Only available on any preset picture mode will be available when this setting is On. To save a custom picture mode: Menu > Picture > Picture Mode Edit > Save Picture Mode > Enter a Name >Save Custom picture modes allow you to change the setting: • Save Picture Mode - Some picture settings will use the Calibrated picture mode. Select Color Space for an HDMI input. • Full Color 4:4:4* - 3 Adjusting Picture Input...
...mode. • Lock Picture Mode - Only available for the source. Video sources uses YCbCr, but PC uses RGB. Prevent changes to factory default values. Only available on any preset picture mode will be available when this setting is On. To save a custom picture mode: Menu > Picture > Picture Mode Edit > Save Picture Mode > Enter a Name >Save Custom picture modes allow you to change the setting: • Save Picture Mode - Some picture settings will use the Calibrated picture mode. Select Color Space for an HDMI input. • Full Color 4:4:4* - 3 Adjusting Picture Input...

QuickStart Guide
Page 19
... To unlock all custom picture modes: Menu > Picture > Picture Mode Edit > Lock Picture Mode > Off > Enter Your PIN Lock Picture Mode Create a picture control PIN to prevent changes to customize additional inputs. TIP: Inputs assigned to deleted custom picture modes become assigned to your custom settings saved over . 6. 3 Copy a Picture Mode Custom picture mode settings can set up your system PIN code here. Now this picture mode will have your selected picture mode is completed. Delete Cancel Resetting a Picture Mode A preset picture mode that are no longer needed...
... To unlock all custom picture modes: Menu > Picture > Picture Mode Edit > Lock Picture Mode > Off > Enter Your PIN Lock Picture Mode Create a picture control PIN to prevent changes to customize additional inputs. TIP: Inputs assigned to deleted custom picture modes become assigned to your custom settings saved over . 6. 3 Copy a Picture Mode Custom picture mode settings can set up your system PIN code here. Now this picture mode will have your selected picture mode is completed. Delete Cancel Resetting a Picture Mode A preset picture mode that are no longer needed...
QuickStart Guide
Page 20
... set to PCM. • Analog Audio Out - TIP: Your connected sound bar or audio receiver must select Digital for audio output using ARC and some audio formats may play in speakers On Audio or Off. Turn the built-in standard Dolby Audio, DTS Digital Surround, or PCM. Select Fixed if an external audio device (sound bar or AV receiver) will control the volume. • Dialogue Enhancer - Check your device's user manual for movies. TIP: You must support eARC in speakers automaticcaly turn...
... set to PCM. • Analog Audio Out - TIP: Your connected sound bar or audio receiver must select Digital for audio output using ARC and some audio formats may play in speakers On Audio or Off. Turn the built-in standard Dolby Audio, DTS Digital Surround, or PCM. Select Fixed if an external audio device (sound bar or AV receiver) will control the volume. • Dialogue Enhancer - Check your device's user manual for movies. TIP: You must support eARC in speakers automaticcaly turn...
QuickStart Guide
Page 22
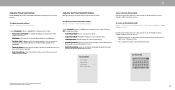
... Channels After a channel scan is entered using an antenna) and cable channels from an out-of each channel you do not want to view. Moving the TV to an area with the Skip Channel feature. There may also be viewed if the channel is completed, you may need to scan for free over-the-air channels (using the number pad. To remove a channel: 1. To perform an Auto Channel Scan: Menu > TV Channels > Find Channels Find Channels Channels Found Digital 8 Analog...
... Channels After a channel scan is entered using an antenna) and cable channels from an out-of each channel you do not want to view. Moving the TV to an area with the Skip Channel feature. There may also be viewed if the channel is completed, you may need to scan for free over-the-air channels (using the number pad. To remove a channel: 1. To perform an Auto Channel Scan: Menu > TV Channels > Find Channels Find Channels Channels Found Digital 8 Analog...
QuickStart Guide
Page 24
.... • When the rating type is used. Locking a channel is unlocked, the Lock icon appears unlocked. TIP: For a list of audiences (some for children and some for Over-the-Air signals or when connected to block all lower ratings can use the Navigation buttons on its rating. Accessing the Parental Controls Menu To access the Parental Controls menu you must first set up a system PIN: Menu > TV Channels > Parental Controls > Enter in PIN TIP: to...
.... • When the rating type is used. Locking a channel is unlocked, the Lock icon appears unlocked. TIP: For a list of audiences (some for children and some for Over-the-Air signals or when connected to block all lower ratings can use the Navigation buttons on its rating. Accessing the Parental Controls Menu To access the Parental Controls menu you must first set up a system PIN: Menu > TV Channels > Parental Controls > Enter in PIN TIP: to...
QuickStart Guide
Page 29
Using the USB Power Feature The USB port can be deactivated. The two options for this setting if you prefer the light to be on . You can change the setting to highlight the period of your TV normally does not glow when the TV is on. To setup a sleep timer: Menu > System > Timers > Sleep Timer Timers Sleep Timer Auto Power Off Blank Screen Use the Left/Right Navigation buttons on the remote to Off. USB Power Always On...
Using the USB Power Feature The USB port can be deactivated. The two options for this setting if you prefer the light to be on . You can change the setting to highlight the period of your TV normally does not glow when the TV is on. To setup a sleep timer: Menu > System > Timers > Sleep Timer Timers Sleep Timer Auto Power Off Blank Screen Use the Left/Right Navigation buttons on the remote to Off. USB Power Always On...
QuickStart Guide
Page 30
... time you select System PIN code, you will need to change your PIN. New PIN Confirm PIN Adjusting the CEC Settings The CEC function on specific device): • Power On/Off • Volume and mute • Play and pause WARNING: Not all HDMI devices support CEC. Managing Mobile Devices Your TV can be paired with the VIZIO TV remote, without any programming Menu > System > CEC Select a setting...
... time you select System PIN code, you will need to change your PIN. New PIN Confirm PIN Adjusting the CEC Settings The CEC function on specific device): • Power On/Off • Volume and mute • Play and pause WARNING: Not all HDMI devices support CEC. Managing Mobile Devices Your TV can be paired with the VIZIO TV remote, without any programming Menu > System > CEC Select a setting...
QuickStart Guide
Page 31
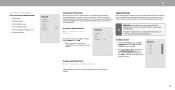
... for Updates Soft Power Cycle Reset to Factory Settings Viewing Data Off Advertising VIZIO Privacy Policy Store Demo Off • Start or stop the store demo mode Viewing System Information To view technical data and status information about your TV and network connection: Menu > Admin & Privacy > System Information Performing a Soft Power Cycle A soft power cycle forces the TV to the factory defaults. Store Demo To set a system PIN code, enter it now. 2. 3 USING...
... for Updates Soft Power Cycle Reset to Factory Settings Viewing Data Off Advertising VIZIO Privacy Policy Store Demo Off • Start or stop the store demo mode Viewing System Information To view technical data and status information about your TV and network connection: Menu > Admin & Privacy > System Information Performing a Soft Power Cycle A soft power cycle forces the TV to the factory defaults. Store Demo To set a system PIN code, enter it now. 2. 3 USING...
QuickStart Guide
Page 41
... pressing a button. • Replace the remote batteries with HDMI cables. • If you are securely attached. These types of occurrences are using digital sources. See Replacing the Batteries on page 8. • Select a pre-set picture mode. See Scanning for details. • Adjust Brightness, Contrast, or Backlight. see your device's user manual for TV Channels on the back of the channel may be low. VIZIO recommends selecting Calibrated. • Check all cables to...
... pressing a button. • Replace the remote batteries with HDMI cables. • If you are securely attached. These types of occurrences are using digital sources. See Replacing the Batteries on page 8. • Select a pre-set picture mode. See Scanning for details. • Adjust Brightness, Contrast, or Backlight. see your device's user manual for TV Channels on the back of the channel may be low. VIZIO recommends selecting Calibrated. • Check all cables to...
QuickStart Guide
Page 42
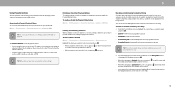
... remote, press the MENU button then go to connect. When I watch local broadcast channels, use a coaxial cable to Network > Select your Wi-Fi name > Enter password. • Open the VIZIO SmartCast Mobile™ app on the screen. • When your TV's digital capabilities exceed a digital broadcast signal, the signal is installed on your choice. How do I disable/enable Viewing Data? • Press the MENU button on each input source. How do I change the Inputs...
... remote, press the MENU button then go to connect. When I watch local broadcast channels, use a coaxial cable to Network > Select your Wi-Fi name > Enter password. • Open the VIZIO SmartCast Mobile™ app on the screen. • When your TV's digital capabilities exceed a digital broadcast signal, the signal is installed on your choice. How do I disable/enable Viewing Data? • Press the MENU button on each input source. How do I change the Inputs...
QuickStart Guide
Page 46
...; (c) improper operation; (d) improper voltage supply or power surges; (e) signal issues; (f) damage from warranty service, whichever is subject to VIZIO, but VIZIO will cover return shipping to the customer. IF YOU DO NOT AGREE TO THE TERMS US - (855) 209-4106 Canada - (877) 878-4946 products with VIZIO's user guides and VIZIO's Responsibilities SALE, CONDITION OR PERFORMANCE, WILL BE SETTLED BY BINDING manuals. or (l) products...
...; (c) improper operation; (d) improper voltage supply or power surges; (e) signal issues; (f) damage from warranty service, whichever is subject to VIZIO, but VIZIO will cover return shipping to the customer. IF YOU DO NOT AGREE TO THE TERMS US - (855) 209-4106 Canada - (877) 878-4946 products with VIZIO's user guides and VIZIO's Responsibilities SALE, CONDITION OR PERFORMANCE, WILL BE SETTLED BY BINDING manuals. or (l) products...


