
Quick Start Guide
Page 2
... accessories recommended by the manufacturer to insure compatibility. • When moving your Sound Bar. • When unplugging your Sound Bar away from children. Never spill liquids on your Sound Bar. • Your Sound Bar should be observed for its installation, use a liquid or a spray cleaner ...drops into the slots and openings on your Sound Bar. Unplug the power cord immediately and contact your dealer for your Sound Bar - Pulling on your Sound Bar that the power cord and any abnormality occurs. Sound Bar is damaged, the internal components may function ...
... accessories recommended by the manufacturer to insure compatibility. • When moving your Sound Bar. • When unplugging your Sound Bar away from children. Never spill liquids on your Sound Bar. • Your Sound Bar should be observed for its installation, use a liquid or a spray cleaner ...drops into the slots and openings on your Sound Bar. Unplug the power cord immediately and contact your dealer for your Sound Bar - Pulling on your Sound Bar that the power cord and any abnormality occurs. Sound Bar is damaged, the internal components may function ...
Quick Start Guide
Page 3
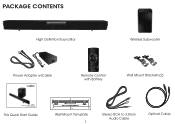
PACKAGE CONTENTS High Definition Sound Bar Wireless Subwoofer Power Adapter w/Cable VIZIO Remote Control with Battery Wall Mount Brackets (2) Quick Start Guide Model: SB4021M-B1 This Quick Start Guide Wall Mount Template 3 Stereo RCA to 3.5mm Audio Cable Optical Cable
PACKAGE CONTENTS High Definition Sound Bar Wireless Subwoofer Power Adapter w/Cable VIZIO Remote Control with Battery Wall Mount Brackets (2) Quick Start Guide Model: SB4021M-B1 This Quick Start Guide Wall Mount Template 3 Stereo RCA to 3.5mm Audio Cable Optical Cable

Quick Start Guide
Page 4
Power Light When Sound Bar is on, this light is on or off . Power Cord 4 Volume Up/Down Press to change input source. Power Switch Press to turn on or off . Power Press to re-link the Subwoofer with the Sound Bar. CONTROLS & CONNECTIONS Info Display Displays volume, input, and other information. Input Press to increase or decrease overall volume. Link LED Light Link Button Used to turn on .
Power Light When Sound Bar is on, this light is on or off . Power Cord 4 Volume Up/Down Press to change input source. Power Switch Press to turn on or off . Power Press to re-link the Subwoofer with the Sound Bar. CONTROLS & CONNECTIONS Info Display Displays volume, input, and other information. Input Press to increase or decrease overall volume. Link LED Light Link Button Used to turn on .

Quick Start Guide
Page 7
USB CHOOSE ONE CABLE: GOOD BETTER AND CONNECT IT TO YOUR TV Connect the Sound Bar to your TV using one of the connection types to the left. Choose the best possible connection type. Be sure the TV port is an audio output, not an audio input. 7
USB CHOOSE ONE CABLE: GOOD BETTER AND CONNECT IT TO YOUR TV Connect the Sound Bar to your TV using one of the connection types to the left. Choose the best possible connection type. Be sure the TV port is an audio output, not an audio input. 7

Quick Start Guide
Page 9
Wireless Subwoofer is in the front corner of the room, up to ear level. Bass is projected outward. For the best surround sound experience, position the speakers as shown. 9 6 Sound Bar is centered below the TV, close to 60 feet away from the Sound Bar.
Wireless Subwoofer is in the front corner of the room, up to ear level. Bass is projected outward. For the best surround sound experience, position the speakers as shown. 9 6 Sound Bar is centered below the TV, close to 60 feet away from the Sound Bar.
Quick Start Guide
Page 11
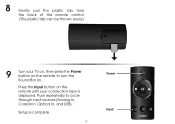
Press the Input button on . Push repeatedly to turn the Sound Bar on the remote until your connection type is complete. 11 Power Input Setup is displayed. 8 Gently pull the plastic tab from the back of the remote control. (The plastic tab can be thrown away) 9 Turn your TV on, then press the Power button on the remote to cycle through input sources (Analog In, Coaxial In, Optical In, and USB).
Press the Input button on . Push repeatedly to turn the Sound Bar on the remote until your connection type is complete. 11 Power Input Setup is displayed. 8 Gently pull the plastic tab from the back of the remote control. (The plastic tab can be thrown away) 9 Turn your TV on, then press the Power button on the remote to cycle through input sources (Analog In, Coaxial In, Optical In, and USB).
Quick Start Guide
Page 13
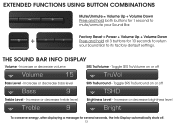
... + Volume Up + Volume Down + + Press and hold both buttons for 1 second to mute/unmute your Sound Bar to return your Sound Bar. Increase or decrease volume SRS TruVolume - Toggle SRS TruSurround on or off TSHD Treble Level - THE SOUND BAR INFO DISPLAY Volume - Increase or decrease bass level Bass 9 SRS TruSurround - Toggle SRS TruVolume on or...
... + Volume Up + Volume Down + + Press and hold both buttons for 1 second to mute/unmute your Sound Bar to return your Sound Bar. Increase or decrease volume SRS TruVolume - Toggle SRS TruSurround on or off TSHD Treble Level - THE SOUND BAR INFO DISPLAY Volume - Increase or decrease bass level Bass 9 SRS TruSurround - Toggle SRS TruVolume on or...

Quick Start Guide
Page 14
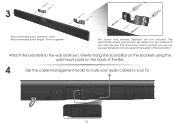
T 2 MARK HERE MARK HERE 19.75" NG TEMPLATE WALL MOUNT CENTER LINPElace the included wall mounting template against the wall under your TV. Mark the locations of the 4 bracket holes using a pencil. 14 Save the stands for safekeeping. WALL MOUNTING THE SOUND BAR 1 Use a phillips-head screwdriver to remove the screws from the Sound Bar stands. HE SOULNEDABVAE RTHAINSDSPYAOCUERBTEVTWEEN Reinsert the screws for future use.
T 2 MARK HERE MARK HERE 19.75" NG TEMPLATE WALL MOUNT CENTER LINPElace the included wall mounting template against the wall under your TV. Mark the locations of the 4 bracket holes using a pencil. 14 Save the stands for safekeeping. WALL MOUNTING THE SOUND BAR 1 Use a phillips-head screwdriver to remove the screws from the Sound Bar stands. HE SOULNEDABVAE RTHAINSDSPYAOCUERBTEVTWEEN Reinsert the screws for future use.
Quick Start Guide
Page 15
Gently hang the Sound Bar on the brackets using the wall mount posts on the material of your TV. Be sure that the screws and/or anchors you use are not included. USB 1.85 1.85 15 Attach the brackets to your wall. 3 Recommended screw diameter: 4mm Recommended screw length: 8mm or greater The screws and anchors depicted are securely fastened and can support the weight of the Sound Bar. The appropriate screws and anchors will depend on the back of the Bar. 4 Use the cable management hooks to route your audio cables to the wall as shown.
Gently hang the Sound Bar on the brackets using the wall mount posts on the material of your TV. Be sure that the screws and/or anchors you use are not included. USB 1.85 1.85 15 Attach the brackets to your wall. 3 Recommended screw diameter: 4mm Recommended screw length: 8mm or greater The screws and anchors depicted are securely fastened and can support the weight of the Sound Bar. The appropriate screws and anchors will depend on the back of the Bar. 4 Use the cable management hooks to route your audio cables to the wall as shown.

Quick Start Guide
Page 16
Press and hold the INPUT button on the back of the Sound Bar for 5 seconds. RE-LINKING THE SUBWOOFER AND SOUND BAR 1 You may need to re-link the Subwoofer to the Sound Bar if there is no sound coming from the Subwoofer and the orange light on the rear of the Subwoofer is either blinking or not lit. 2 3 Press and hold the LINK button on the top of the Subwoofer until the Sound Bar displays 16 Paired. The Sound Bar will display Pairing.
Press and hold the INPUT button on the back of the Sound Bar for 5 seconds. RE-LINKING THE SUBWOOFER AND SOUND BAR 1 You may need to re-link the Subwoofer to the Sound Bar if there is no sound coming from the Subwoofer and the orange light on the rear of the Subwoofer is either blinking or not lit. 2 3 Press and hold the LINK button on the top of the Subwoofer until the Sound Bar displays 16 Paired. The Sound Bar will display Pairing.
Quick Start Guide
Page 17
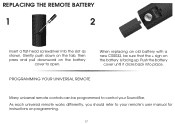
Gently push down on the tab, then press and pull downward on the battery cover to your Sound Bar. When replacing an old battery with a new CR2032, be programmed to control your remote's user manual for instructions on the battery is facing up. Push the battery cover until it clicks back into the slot as shown. As each universal remote works differently, you should refer to open. REPLACING THE REMOTE BATTERY 1 2 Insert a flat-head screwdriver into place. PROGRAMMING YOUR UNIVERSAL REMOTE Many universal remote controls can be sure that the + sign on programming. 17
Gently push down on the tab, then press and pull downward on the battery cover to your Sound Bar. When replacing an old battery with a new CR2032, be programmed to control your remote's user manual for instructions on the battery is facing up. Push the battery cover until it clicks back into the slot as shown. As each universal remote works differently, you should refer to open. REPLACING THE REMOTE BATTERY 1 2 Insert a flat-head screwdriver into place. PROGRAMMING YOUR UNIVERSAL REMOTE Many universal remote controls can be sure that the + sign on programming. 17

Quick Start Guide
Page 18
CONNECTING ADDITIONAL DEVICES Connect up to four different devices to the Sound Bar (devices shown are examples-you will need a separate video connection from the device to a device, change the input source on the Sound Bar. If connecting a video device, you can use any device). DIGITAL OPTICAL CABLE DIGITAL COAXIAL CABLE* 3.5mm CABLE USB THUMB DRIVE™ Game Console *Not Included Network Media Player 18 Tablet/MP3 Player/Laptop To listen to your TV. USB 1.85 Optical, Coaxial, and 3.5mm cables transmit audio only.
CONNECTING ADDITIONAL DEVICES Connect up to four different devices to the Sound Bar (devices shown are examples-you will need a separate video connection from the device to a device, change the input source on the Sound Bar. If connecting a video device, you can use any device). DIGITAL OPTICAL CABLE DIGITAL COAXIAL CABLE* 3.5mm CABLE USB THUMB DRIVE™ Game Console *Not Included Network Media Player 18 Tablet/MP3 Player/Laptop To listen to your TV. USB 1.85 Optical, Coaxial, and 3.5mm cables transmit audio only.
Quick Start Guide
Page 20
Sunday: 8 AM TO 4 PM (PST) Phone: (877) 698-4946 (TOLL-FREE) Email: techsupport@VIZIO.com Web: www.VIZIO.com/support There is paired with the Sound Bar. • Ensure all cables and wires are securely connected. • Connect a different source device (TV, Blu-ray player, etc) to select ...setting is securely connected. • Ensure the light on the Sound Bar. I hear buzzing or humming. • Press the POWER button on the remote control or on the top of operation: Monday - HELP & TROUBLESHOOTING All VIZIO products include FREE lifetime technical support. Confirm that the outlet ...
Sunday: 8 AM TO 4 PM (PST) Phone: (877) 698-4946 (TOLL-FREE) Email: techsupport@VIZIO.com Web: www.VIZIO.com/support There is paired with the Sound Bar. • Ensure all cables and wires are securely connected. • Connect a different source device (TV, Blu-ray player, etc) to select ...setting is securely connected. • Ensure the light on the Sound Bar. I hear buzzing or humming. • Press the POWER button on the remote control or on the top of operation: Monday - HELP & TROUBLESHOOTING All VIZIO products include FREE lifetime technical support. Confirm that the outlet ...
Quick Start Guide
Page 21
... • Make sure the plastic tab has been removed from the battery compartment. • Replace the remote battery with the Sound Bar. How do I want to return my Sound Bar to factory settings. • Press and hold the Power, Volume Up, and Volume Down buttons for 10 seconds to return ... application. (e.g., a music streaming app may bake up to 20 seconds for the Subwoofer to link after the Sound Bar is turned on page 16. • Move the Subwoofer closer to the Sound Bar • Turn the Subwoofer power switch to ON. • To conserve power, the Subwoofer will automatcially enter...
... • Make sure the plastic tab has been removed from the battery compartment. • Replace the remote battery with the Sound Bar. How do I want to return my Sound Bar to factory settings. • Press and hold the Power, Volume Up, and Volume Down buttons for 10 seconds to return ... application. (e.g., a music streaming app may bake up to 20 seconds for the Subwoofer to link after the Sound Bar is turned on page 16. • Move the Subwoofer closer to the Sound Bar • Turn the Subwoofer power switch to ON. • To conserve power, the Subwoofer will automatcially enter...

Quick Start Guide
Page 22
... Hz FCC, NOM, cULus THIS WARRANTY GIVES YOU SPECIFIC LEGAL RIGHTS, AND YOU MAY ALSO HAVE OTHER RIGHTS, WHICH VARY FROM STATE TO STATE. SPECIFICATIONS Sound Bar: Subwoofer Inputs: Two 3" Full-range Drivers One 6.5" Driver 1 x 3.5mm Stereo Audio 1 x RCA Stereo Audio 1 x Optical (Toslink) 1 x USB (for ...DAMAGES, SO THE ABOVE LIMITATIONS OR EXCLUSIONS MAY NOT APPLY TO YOU. PRE-AUTHORIZATION IS REQUIRED BEFORE SENDING ANY PRODUCT TO A VIZIO SERVICE CENTER FOR WARRANTY SERVICE. Type of Service Defective Products must utilize either repair or replace the Product at its sole option ...
... Hz FCC, NOM, cULus THIS WARRANTY GIVES YOU SPECIFIC LEGAL RIGHTS, AND YOU MAY ALSO HAVE OTHER RIGHTS, WHICH VARY FROM STATE TO STATE. SPECIFICATIONS Sound Bar: Subwoofer Inputs: Two 3" Full-range Drivers One 6.5" Driver 1 x 3.5mm Stereo Audio 1 x RCA Stereo Audio 1 x Optical (Toslink) 1 x USB (for ...DAMAGES, SO THE ABOVE LIMITATIONS OR EXCLUSIONS MAY NOT APPLY TO YOU. PRE-AUTHORIZATION IS REQUIRED BEFORE SENDING ANY PRODUCT TO A VIZIO SERVICE CENTER FOR WARRANTY SERVICE. Type of Service Defective Products must utilize either repair or replace the Product at its sole option ...
Data Sheet
Page 1
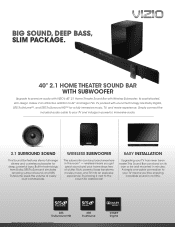
...next to the couch for added kick! It's packed with Wireless Subwoofer. wireless means you 'll be enjoying incredible sound in minutes. This Sound Bar can be wall mounted in no time. SRS TruSurround HD *Wireless Subwoofer range approximately 60 feet - Simply connect the ...INSTALLATION Upgrading your TV means you get great sound and your TV and indulge in the room* - BIG SOUND, DEEP BASS, SLIM PACKAGE. 40" 2.1 HOME THEATER SOUND BAR WITH SUBWOOFER Upgrade to premium audio with VIZIO's 40" 2.1 Home Theater Sound Bar with sound technology like Dolby Digital, SRS TruVolume™...
...next to the couch for added kick! It's packed with Wireless Subwoofer. wireless means you 'll be enjoying incredible sound in minutes. This Sound Bar can be wall mounted in no time. SRS TruSurround HD *Wireless Subwoofer range approximately 60 feet - Simply connect the ...INSTALLATION Upgrading your TV means you get great sound and your TV and indulge in the room* - BIG SOUND, DEEP BASS, SLIM PACKAGE. 40" 2.1 HOME THEATER SOUND BAR WITH SUBWOOFER Upgrade to premium audio with VIZIO's 40" 2.1 Home Theater Sound Bar with sound technology like Dolby Digital, SRS TruVolume™...
Data Sheet
Page 2
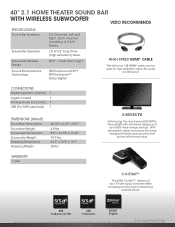
... consisting of their respective owners. Now all-LED with slim-frame design and up to change without notice. © 2012 VIZIO Inc. CONNECTIONS Digital Optical In (Toslink) 1 Digital Coaxial 1 Analog Audio In (3.5mm) 1 USB (For MP3 playback)... 40" 2.1 HOME THEATER SOUND BAR WITH WIRELESS SUBWOOFER VIZIO RECOMMENDS SPECIFICATIONS Sound Bar Speakers Subwoofer Speakers Subwoofer Wireless Range Sound Enhancement Technology (2) Channels, Left and Right. all -in streaming entertainment. Clear line of VIZIO Inc. WARRANTY 1 year CO-STAR™ The VIZIO Co-Star™ decks ...
... consisting of their respective owners. Now all-LED with slim-frame design and up to change without notice. © 2012 VIZIO Inc. CONNECTIONS Digital Optical In (Toslink) 1 Digital Coaxial 1 Analog Audio In (3.5mm) 1 USB (For MP3 playback)... 40" 2.1 HOME THEATER SOUND BAR WITH WIRELESS SUBWOOFER VIZIO RECOMMENDS SPECIFICATIONS Sound Bar Speakers Subwoofer Speakers Subwoofer Wireless Range Sound Enhancement Technology (2) Channels, Left and Right. all -in streaming entertainment. Clear line of VIZIO Inc. WARRANTY 1 year CO-STAR™ The VIZIO Co-Star™ decks ...


