
User Manual
Page 1
USER MANUAL Model: SB36312-G6 VIZIO 36" 3.1.2 Channel Sound Bar Home Theater Sound System Please read this guide before using the product.
USER MANUAL Model: SB36312-G6 VIZIO 36" 3.1.2 Channel Sound Bar Home Theater Sound System Please read this guide before using the product.

User Manual
Page 4
iv HDMI ARC ...28 Connecting with HDMI ARC ...29 Connecting a Subwoofer ...31 Wall-Mounting the Sound Bar...32 Help & Troubleshooting...36 Frequently Asked Questions ...37 Limited Warranty...38 Specifications ...41 Legal & Compliance...42 English - TABLE OF CONTENTS Package Contents ...5 Controls & Connections ...6 First-...10 Proper Placement...15 Using the Remote ...17 Using your tablet or smartphone as a remote 18 LED Indicators...19 Using Button Combinations ...23 Programming the Sound Bar ...24 Bluetooth Audio Pairing...25 Using Bluetooth mode ...26 Advanced Setup...27 Advanced Setup -
iv HDMI ARC ...28 Connecting with HDMI ARC ...29 Connecting a Subwoofer ...31 Wall-Mounting the Sound Bar...32 Help & Troubleshooting...36 Frequently Asked Questions ...37 Limited Warranty...38 Specifications ...41 Legal & Compliance...42 English - TABLE OF CONTENTS Package Contents ...5 Controls & Connections ...6 First-...10 Proper Placement...15 Using the Remote ...17 Using your tablet or smartphone as a remote 18 LED Indicators...19 Using Button Combinations ...23 Programming the Sound Bar ...24 Bluetooth Audio Pairing...25 Using Bluetooth mode ...26 Advanced Setup...27 Advanced Setup -
User Manual
Page 5
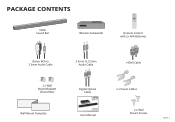
PACKAGE CONTENTS VIZIO Sound Bar Wireless Subwoofer Remote Control with 2x AAA Batteries Stereo RCA to 3.5mm Audio Cable 2 x Wall Mount Brackets (Sound Bar) Wall Mount Template 3.5mm to 3.5mm Audio Cable Digital Optical Cable User Manual HDMI Cable 2 x Power Cables 2 x Wall Mount Screws English - 5
PACKAGE CONTENTS VIZIO Sound Bar Wireless Subwoofer Remote Control with 2x AAA Batteries Stereo RCA to 3.5mm Audio Cable 2 x Wall Mount Brackets (Sound Bar) Wall Mount Template 3.5mm to 3.5mm Audio Cable Digital Optical Cable User Manual HDMI Cable 2 x Power Cables 2 x Wall Mount Screws English - 5

User Manual
Page 6
CONTROLS & CONNECTIONS Back of Sound Bar Power Port OPTICAL Digital Optical Audio In 3.5mm IN Analog Audio In (Stereo 3.5mm) English - 6
CONTROLS & CONNECTIONS Back of Sound Bar Power Port OPTICAL Digital Optical Audio In 3.5mm IN Analog Audio In (Stereo 3.5mm) English - 6

User Manual
Page 8
Top of the audio. Input Press to turn sound bar on or off. Bluetooth Input Hold to pair. (See 'Bluetooth Audio Pairing' for more information.) English - 8 Volume Increase or decrease the loudness of Sound Bar Power Press to change the audio source.
Top of the audio. Input Press to turn sound bar on or off. Bluetooth Input Hold to pair. (See 'Bluetooth Audio Pairing' for more information.) English - 8 Volume Increase or decrease the loudness of Sound Bar Power Press to change the audio source.
User Manual
Page 10
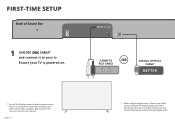
To connect the sound bar directly to your Blu-ray/other devices (Blu-ray player, game system, etc.). See your device's user manual. English - 10 3.5MM TO RCA CABLE OR GOOD DIGITAL OPTICAL CABLE† BETTER † When using the digital input, if there is powered on. * Not all TVs/Displays have the audio outputs shown above. FIRST-TIME SETUP Back of Sound Bar 1 CHOOSE ONE CABLE* and connect it to your tv Ensure your TV is no audio: (A) try setting the TV/Display output to PCM or (B) Connect directly to your other source, some TV/Display do not pass through digital audio.
To connect the sound bar directly to your Blu-ray/other devices (Blu-ray player, game system, etc.). See your device's user manual. English - 10 3.5MM TO RCA CABLE OR GOOD DIGITAL OPTICAL CABLE† BETTER † When using the digital input, if there is powered on. * Not all TVs/Displays have the audio outputs shown above. FIRST-TIME SETUP Back of Sound Bar 1 CHOOSE ONE CABLE* and connect it to your tv Ensure your TV is no audio: (A) try setting the TV/Display output to PCM or (B) Connect directly to your other source, some TV/Display do not pass through digital audio.

User Manual
Page 11
See the Connecting with HDMI section for First-Time Setup. English - 11 Be sure the TV/Display port is an audio output, not an audio input. Connect the sound bar to the left. Choose the best possible connection type. HDMI ARC CABLE BEST Do not use HDMI IN for more information. See Advanced Setup if you would like to connect HDMI devices (such as Blu-ray™ players, cable boxes, and game consoles) to your TV/Display* using one of the connection types to your Sound Bar. HDMI cables send Video (Out) and receive Audio from the TV/Display.
See the Connecting with HDMI section for First-Time Setup. English - 11 Be sure the TV/Display port is an audio output, not an audio input. Connect the sound bar to the left. Choose the best possible connection type. HDMI ARC CABLE BEST Do not use HDMI IN for more information. See Advanced Setup if you would like to connect HDMI devices (such as Blu-ray™ players, cable boxes, and game consoles) to your TV/Display* using one of the connection types to your Sound Bar. HDMI cables send Video (Out) and receive Audio from the TV/Display.

User Manual
Page 12
...outlet. The sound bar will automatically begin cycling in pairs through inputs until an audio source is detected.** Tip: Pressing the INPUT button will stop the auto detect function. *Occurs only during first-time set up. **Auto detect function only occurs once when the sound bar is first ...powered on the front of Sound Bar 2 Connect the power cable to the sound bar AC IN as shown. Back of the sound bar will begin searching for 3 seconds. To enable this feature again, you must do...
...outlet. The sound bar will automatically begin cycling in pairs through inputs until an audio source is detected.** Tip: Pressing the INPUT button will stop the auto detect function. *Occurs only during first-time set up. **Auto detect function only occurs once when the sound bar is first ...powered on the front of Sound Bar 2 Connect the power cable to the sound bar AC IN as shown. Back of the sound bar will begin searching for 3 seconds. To enable this feature again, you must do...

User Manual
Page 13
Back of Subwoofer 3 4 5 Connect a power cable to confirm. English - 13 The LED will glow to solid to the subwoofer. The subwoofer should automatically power on and link to the sound bar when plugged in. Plug the power cable into a power outlet.
Back of Subwoofer 3 4 5 Connect a power cable to confirm. English - 13 The LED will glow to solid to the subwoofer. The subwoofer should automatically power on and link to the sound bar when plugged in. Plug the power cable into a power outlet.
User Manual
Page 14
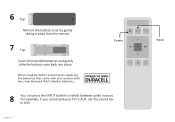
English - 14 Input 6 Top Remove the battery cover by gently sliding it away from the remote. 7 Top Insert the included batteries and gently slide the battery cover back into place. Power You can press the INPUT button to switch between audio sources. 8 For example, if you connected your TV to AUX, set the sound bar to AUX. When needed, VIZIO recommends replacing the batteries that came with this remote with two, new Duracell 'AAA' alkaline batteries.
English - 14 Input 6 Top Remove the battery cover by gently sliding it away from the remote. 7 Top Insert the included batteries and gently slide the battery cover back into place. Power You can press the INPUT button to switch between audio sources. 8 For example, if you connected your TV to AUX, set the sound bar to AUX. When needed, VIZIO recommends replacing the batteries that came with this remote with two, new Duracell 'AAA' alkaline batteries.

User Manual
Page 15
... be facing the front of the subwoofer if there isn't enough room. You'll get the best sound effect if your ceiling is flat and 7.5 ft to ear level. OPTION 1 If your couch. Sound bar is sufficient room to freely place the subwoofer underneath your couch permits, you can place the subwoofer underneath.... Note: Make sure there is centered below the TV. Subwoofer Note: Do not block the subwoofer port. English - 15 PROPER PLACEMENT For the best surround sound experience, position the sound bar and subwoofer as shown.
... be facing the front of the subwoofer if there isn't enough room. You'll get the best sound effect if your ceiling is flat and 7.5 ft to ear level. OPTION 1 If your couch. Sound bar is sufficient room to freely place the subwoofer underneath your couch permits, you can place the subwoofer underneath.... Note: Make sure there is centered below the TV. Subwoofer Note: Do not block the subwoofer port. English - 15 PROPER PLACEMENT For the best surround sound experience, position the sound bar and subwoofer as shown.

User Manual
Page 16
Sound bar is centered below the TV. English - 16 Subwoofer Note: Do not block the subwoofer port. OPTION 2 You can also stand the subwoofer upright with the ports facing out.
Sound bar is centered below the TV. English - 16 Subwoofer Note: Do not block the subwoofer port. OPTION 2 You can also stand the subwoofer upright with the ports facing out.

User Manual
Page 17
Press INPUT then Next to select previous input. USING THE REMOTE Display Displays Sound Bar Settings Power Press to turn on or off Input Press to change the input source Previous Press to return to previous track (Changes audio settings ...
Press INPUT then Next to select previous input. USING THE REMOTE Display Displays Sound Bar Settings Power Press to turn on or off Input Press to change the input source Previous Press to return to previous track (Changes audio settings ...

User Manual
Page 18
English - 18 This will allow you to: Connect to setup your phone or tablet Visit www.vizio.com/smartcastapp for minimium requirements. USING YOUR TABLET OR SMARTPHONE AS A REMOTE Download the VIZIO SmartCast Mobile™ app and turn your smartphone or tablet into a remote to control your sound bar system. • Visit www.vizio.com/smartcastapp on your device to download. • Install the app and follow the on screen instructions to Wi-Fi Enable automatic updates and future enhancements Cast your favorite audio applications Control your sound bar with your device.
English - 18 This will allow you to: Connect to setup your phone or tablet Visit www.vizio.com/smartcastapp for minimium requirements. USING YOUR TABLET OR SMARTPHONE AS A REMOTE Download the VIZIO SmartCast Mobile™ app and turn your smartphone or tablet into a remote to control your sound bar system. • Visit www.vizio.com/smartcastapp on your device to download. • Install the app and follow the on screen instructions to Wi-Fi Enable automatic updates and future enhancements Cast your favorite audio applications Control your sound bar with your device.
User Manual
Page 19
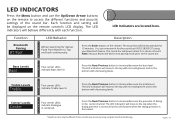
...will move to the top when the dialog presence is increased and to the bottom when the dialog presence is decreased. *Sound bar name may be discoverable for 15 minutes. Each function and setting will behave differently with decreasing levels. The LED Indicators will ... Bluetooth Pairing BT Pair (When searching for the sound bar (VIZIO SB36312*) using the SmartCast Mobile app. The LED indicators will be different if the sound bar was previously setup using your Bluetooth device into pairing mode prior to the sound bar. Treble Levels Treble Center Levels Center Two center ...
...will move to the top when the dialog presence is increased and to the bottom when the dialog presence is decreased. *Sound bar name may be discoverable for 15 minutes. Each function and setting will behave differently with decreasing levels. The LED Indicators will ... Bluetooth Pairing BT Pair (When searching for the sound bar (VIZIO SB36312*) using the SmartCast Mobile app. The LED indicators will be different if the sound bar was previously setup using your Bluetooth device into pairing mode prior to the sound bar. Treble Levels Treble Center Levels Center Two center ...

User Manual
Page 20
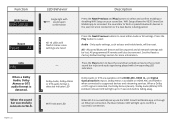
...and seating distances. The setting will lower bass frequency levels to the minimum turns off . Press the Next/Previous button to Off when the sound bar is selected, the height speakers are turned off without virtualizing height. When On is powered off the subwoofer. When Off is selected, the... system creates a virtual height speaker effect using the front firing speakers. Note: Default is setting is Off. When enabled (On), the sound bar will return to increase/decrease the level of the height speakers. Note: Default is setting is Off. The LED indicators will move to the ...
...and seating distances. The setting will lower bass frequency levels to the minimum turns off . Press the Next/Previous button to Off when the sound bar is selected, the height speakers are turned off without virtualizing height. When On is powered off the subwoofer. When Off is selected, the... system creates a virtual height speaker effect using the front firing speakers. Note: Default is setting is Off. When enabled (On), the sound bar will return to increase/decrease the level of the height speakers. Note: Default is setting is Off. The LED indicators will move to the ...

User Manual
Page 21
... delay levels. Press the Next/Previous and Play buttons to toggle and select and program your sound bar. Off disables this function to increase/decrease the amount of inactivity. Note: If you can use a VIZIO TV remote control to the top with left front. (Left Front, Center, Right Front, ...is detected. Press the Next/Previous button to enable/disable the Power LED. Press the Next/Previous and Play buttons to enable/disable VIZIO TV Remotes. The sound bar will go into standby after a period of audio delay. When enabled (On), you would like to cast content without the need ...
... delay levels. Press the Next/Previous and Play buttons to toggle and select and program your sound bar. Off disables this function to increase/decrease the amount of inactivity. Note: If you can use a VIZIO TV remote control to the top with left front. (Left Front, Center, Right Front, ...is detected. Press the Next/Previous button to enable/disable the Power LED. Press the Next/Previous and Play buttons to enable/disable VIZIO TV Remotes. The sound bar will go into standby after a period of audio delay. When enabled (On), you would like to cast content without the need ...
User Manual
Page 22
Press the Next/Previous buttons to select. All - Dolby Atmos is being played with sound upon confirmation All 10 LEDs will also be reset. WiFi Setup allows the VIZIO SmartCast Mobile app to reconnect the sound bar to Wi-Fi or paired bluetooth devices in the event of a lost . See the Reset to Factory Default...
Press the Next/Previous buttons to select. All - Dolby Atmos is being played with sound upon confirmation All 10 LEDs will also be reset. WiFi Setup allows the VIZIO SmartCast Mobile app to reconnect the sound bar to Wi-Fi or paired bluetooth devices in the event of a lost . See the Reset to Factory Default...
User Manual
Page 23
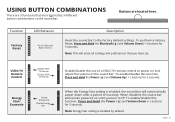
..., Press and Hold the Power ( ) and Volume Up ( + ) buttons for 5 seconds. Note: This will remain powered on and adjust the volume of the sound bar. VIZIO TV Remote Control Enable VIZIO TV Remote Disable VIZIO TV Remote Energy Star/ Ecomode Enable Energy Star Disable Energy Star Enable/disable the use of inactivity. When disabled, the...
..., Press and Hold the Power ( ) and Volume Up ( + ) buttons for 5 seconds. Note: This will remain powered on and adjust the volume of the sound bar. VIZIO TV Remote Control Enable VIZIO TV Remote Disable VIZIO TV Remote Energy Star/ Ecomode Enable Energy Star Disable Energy Star Enable/disable the use of inactivity. When disabled, the...

User Manual
Page 24
... remote control. All of the sound bar when programming. Press the Play button to Prg Remote. English - 24 Turn off your TV speakers when programming your sound bar to confirm. PROGRAMMING THE SOUND BAR You can program your sound bar. While the sound bar is in learning mode, press ...the Volume Up button on the sound bar will flash two times indicating that it has successfully recognized the...
... remote control. All of the sound bar when programming. Press the Play button to Prg Remote. English - 24 Turn off your TV speakers when programming your sound bar to confirm. PROGRAMMING THE SOUND BAR You can program your sound bar. While the sound bar is in learning mode, press ...the Volume Up button on the sound bar will flash two times indicating that it has successfully recognized the...


