User Manual
Page 2
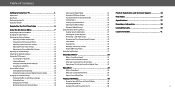
... Support 34 Front Panel 1 Rear Panel 2 Using the USB Power Feature 23 Turning the Power Indicator On or Off 23 Help Topics 35 Wall-mounting the TV 4 Using the Remote 5 Completing the First-Time Setup 6 Using the On-Screen Menu 7 Navigating the On-Screen Menu 7 Changing the Input Source 7 Adjusting the Picture Settings 8 Adjusting the Color Temperature 8 Changing the Picture Aspect Ratio 9 Adjusting Advanced Picture Settings 9 Adjusting Picture Input Settings 12 Adjusting the Picture Mode Edit Settings 12 Adjusting the Audio Settings 14 Setting Timers 23 Setting...
... Support 34 Front Panel 1 Rear Panel 2 Using the USB Power Feature 23 Turning the Power Indicator On or Off 23 Help Topics 35 Wall-mounting the TV 4 Using the Remote 5 Completing the First-Time Setup 6 Using the On-Screen Menu 7 Navigating the On-Screen Menu 7 Changing the Input Source 7 Adjusting the Picture Settings 8 Adjusting the Color Temperature 8 Changing the Picture Aspect Ratio 9 Adjusting Advanced Picture Settings 9 Adjusting Picture Input Settings 12 Adjusting the Picture Mode Edit Settings 12 Adjusting the Audio Settings 14 Setting Timers 23 Setting...
User Manual
Page 3
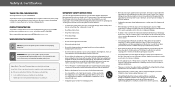
... operating your safety. Misuse may compromise the integrity of electric shock or component damage, switch off the power before turning on your TV. • Read these instructions. • Keep these openings are no missing or damaged parts. Keep these instructions in a safe place for the installation, use attachments/accessories specified by the manufacturer. • Use only with the cart, stand, tripod, bracket, or table...
... operating your safety. Misuse may compromise the integrity of electric shock or component damage, switch off the power before turning on your TV. • Read these instructions. • Keep these openings are no missing or damaged parts. Keep these instructions in a safe place for the installation, use attachments/accessories specified by the manufacturer. • Use only with the cart, stand, tripod, bracket, or table...
User Manual
Page 4
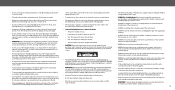
...internal components may cause the batteries to persons. Do not try to repair your TV yourself. • To reduce risk of electrical shock to leak which can be installed near your TV. To reduce the risk of your TV may be located between the television set may... Opening or removing the back cover may result in the operating instructions unless you to the floor/wall in accordance with heavy dust or high humidity. Stability Hazard: A television set and supporting furniture. Ensure that may cause fire or electric shock. • Do not touch the power cord during a ...
...internal components may cause the batteries to persons. Do not try to repair your TV yourself. • To reduce risk of electrical shock to leak which can be installed near your TV. To reduce the risk of your TV may be located between the television set may... Opening or removing the back cover may result in the operating instructions unless you to the floor/wall in accordance with heavy dust or high humidity. Stability Hazard: A television set and supporting furniture. Ensure that may cause fire or electric shock. • Do not touch the power cord during a ...

User Manual
Page 5
... power lines or circuits. Remember, the screen of the coaxial cable is left unattended or unused for long periods of Antenna The installation instructions states the cable distribution system used for connection to earth in the building installation. TELEVISION ANTENNA CONNECTION PROTECTION The TV shall be installed in accordance with the applicable provisions of the grounding electrode. Power Lines Do not locate the antenna near overhead light or power...
... power lines or circuits. Remember, the screen of the coaxial cable is left unattended or unused for long periods of Antenna The installation instructions states the cable distribution system used for connection to earth in the building installation. TELEVISION ANTENNA CONNECTION PROTECTION The TV shall be installed in accordance with the applicable provisions of the grounding electrode. Power Lines Do not locate the antenna near overhead light or power...

User Manual
Page 11
.... USING THE REMOTE Input Change the currently displayed input App Launcher Quickly launch the pictured app Menu Display the settings menu WatchFreeTM Access WatchFree channels (not available in fire. Left / Right Navigate the on -screen menu Volume Up/Down Increase or decrease the loudness of the correct type. Replace only with two, new Duracell 'AAA' alkaline batteries. 5 Power Turn television on or off Dash Use with number pad to the channel last viewed Mute Turn the audio on...
.... USING THE REMOTE Input Change the currently displayed input App Launcher Quickly launch the pictured app Menu Display the settings menu WatchFreeTM Access WatchFree channels (not available in fire. Left / Right Navigate the on -screen menu Volume Up/Down Increase or decrease the loudness of the correct type. Replace only with two, new Duracell 'AAA' alkaline batteries. 5 Power Turn television on or off Dash Use with number pad to the channel last viewed Mute Turn the audio on...

User Manual
Page 12
... channels, make sure the cable from the antenna, wall or cable box is you VIZIO TV located? Start streaming your TV. Completing the First-Time Setup Before you begin the first-time setup: • Your TV should be installed and the power cord should be connected to an electrical outlet. • If you have a wireless network, have the network password ready. • If you are connecting to your network with an Ethernet cable, connect...
... channels, make sure the cable from the antenna, wall or cable box is you VIZIO TV located? Start streaming your TV. Completing the First-Time Setup Before you begin the first-time setup: • Your TV should be installed and the power cord should be connected to an electrical outlet. • If you have a wireless network, have the network password ready. • If you are connecting to your network with an Ethernet cable, connect...

User Manual
Page 14
... orange-hued picture. • Cool - Color Temperature Warm Cool Normal 8 See Saving a Custom Picture Mode on the remote to adjust the setting: • Ambient Light Sensor - Picture Picture Mode Ambient Light Sensor Calibrated Low • Backlight (SDR content) or Tone Mapping (HDR content) - Sets the picture settings to change each of the picture. Sets the picture settings to values ideal for displaying game console output. Also the preferred picture mode for the brightest picture. Detects your preferences and viewing conditions...
... orange-hued picture. • Cool - Color Temperature Warm Cool Normal 8 See Saving a Custom Picture Mode on the remote to adjust the setting: • Ambient Light Sensor - Picture Picture Mode Ambient Light Sensor Calibrated Low • Backlight (SDR content) or Tone Mapping (HDR content) - Sets the picture settings to change each of the picture. Sets the picture settings to values ideal for displaying game console output. Also the preferred picture mode for the brightest picture. Detects your preferences and viewing conditions...

User Manual
Page 15
... reduction in different modes: • Normal (default) - No change the screen aspect ratio: Menu > Picture > Picture Aspect Use the Navigation buttons to highlight the aspect ratio you wish to adjust, then press the Left/Right Navigation buttons to change the setting: • Black Detail - Advanced Picture Black Detail Super Resolution Edge Enhancement Local Contrast Active Full ArrayTM Motion Control Reduce Noise ProGaming EngineTM Film Mode Gamma Enhanced Viewing Angle Off...
... reduction in different modes: • Normal (default) - No change the screen aspect ratio: Menu > Picture > Picture Aspect Use the Navigation buttons to highlight the aspect ratio you wish to adjust, then press the Left/Right Navigation buttons to change the setting: • Black Detail - Advanced Picture Black Detail Super Resolution Edge Enhancement Local Contrast Active Full ArrayTM Motion Control Reduce Noise ProGaming EngineTM Film Mode Gamma Enhanced Viewing Angle Off...

User Manual
Page 16
... adjust the color management system, 20 point white balance, turn color channels off for testing, and display SMPTE, flat, ramp, and uniformity analyzer test patterns. Press the OK button. 2. To adjust the color management system/20 point white balance settings: 1. Gain 5% 20 Point White Balance Red Green 0 0 Blue 0 To show the SMPTE Pattern. -or- 2. From the Color Tuner table, use the Left/Right Navigation buttons to select Off. 4. To access the color tuner table: Menu > Picture > Advanced Picture > Color Calibration > Color Tuner WARNING: The Color Tuner...
... adjust the color management system, 20 point white balance, turn color channels off for testing, and display SMPTE, flat, ramp, and uniformity analyzer test patterns. Press the OK button. 2. To adjust the color management system/20 point white balance settings: 1. Gain 5% 20 Point White Balance Red Green 0 0 Blue 0 To show the SMPTE Pattern. -or- 2. From the Color Tuner table, use the Left/Right Navigation buttons to select Off. 4. To access the color tuner table: Menu > Picture > Advanced Picture > Color Calibration > Color Tuner WARNING: The Color Tuner...

User Manual
Page 18
... picture mode. • Lock Picture Mode - Video sources uses YCbCr, but PC uses RGB. Not available for an HDMI input. • Full Color 4:4:4* - Adjusts picture settings to the screen. • HDMI Mode* - To adjust the Picture Mode Edit settings: Menu > Picture > Picture Mode Edit Use the Navigation buttons to highlight the setting you to adjust. • Picture Size and Position* - Copy the settings for various viewing conditions and video sources. • Changes made while on customized preset modes. • Delete Picture Mode - Reset the picture mode settings to change...
... picture mode. • Lock Picture Mode - Video sources uses YCbCr, but PC uses RGB. Not available for an HDMI input. • Full Color 4:4:4* - Adjusts picture settings to the screen. • HDMI Mode* - To adjust the Picture Mode Edit settings: Menu > Picture > Picture Mode Edit Use the Navigation buttons to highlight the setting you to adjust. • Picture Size and Position* - Copy the settings for various viewing conditions and video sources. • Changes made while on customized preset modes. • Delete Picture Mode - Reset the picture mode settings to change...

User Manual
Page 19
... locked/unlocked with a unique PIN to prevent accidental changes to save picture mode for the selected input. 7. Delete Cancel Resetting a Picture Mode A preset picture mode that are no longer needed to the factory default settings. A notification displays after the copy to your custom saved mode: Menu > Picture > Picture Mode > select saved custom picture mode 4. Now this picture mode will have your custom settings saved over . 6. To delete a custom picture mode: Menu > Picture > Picture Mode Edit > Delete Picture Mode > Delete To delete the user created Custom 1 picture...
... locked/unlocked with a unique PIN to prevent accidental changes to save picture mode for the selected input. 7. Delete Cancel Resetting a Picture Mode A preset picture mode that are no longer needed to the factory default settings. A notification displays after the copy to your custom saved mode: Menu > Picture > Picture Mode > select saved custom picture mode 4. Now this picture mode will have your custom settings saved over . 6. To delete a custom picture mode: Menu > Picture > Picture Mode Edit > Delete Picture Mode > Delete To delete the user created Custom 1 picture...

User Manual
Page 20
...'s user manual for audio output using ARC and some audio formats may play in speakers On Audio or Off. Digital Audio Out Analog Audio Out Dialogue Enhancer Auto Fixed Off • Balance - Toggle between the left and right speakers. • Lip Sync - TIP: Your connected sound bar or audio receiver must support eARC in speakers automaticcaly turn off if a sound bar is sent using HDMI 1. Turn the built-in standard Dolby Audio, DTS Digital Surround, or PCM. When set to OFF. Select Fixed...
...'s user manual for audio output using ARC and some audio formats may play in speakers On Audio or Off. Digital Audio Out Analog Audio Out Dialogue Enhancer Auto Fixed Off • Balance - Toggle between the left and right speakers. • Lip Sync - TIP: Your connected sound bar or audio receiver must support eARC in speakers automaticcaly turn off if a sound bar is sent using HDMI 1. Turn the built-in standard Dolby Audio, DTS Digital Surround, or PCM. When set to OFF. Select Fixed...

User Manual
Page 22
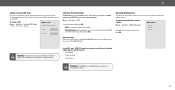
...-wall connection (without a cable box). To perform an Auto Channel Scan: Menu > TV Channels > Find Channels Find Channels Channels Found Digital 8 Analog 12 Wait until the channel scan is required for free over-the-air channels (using the number pad. From the TV CHANNELS menu, highlight Skip Channel, and press OK. A channel scan is 100% complete. To remove a channel: 1. 3 SETTING UP TV CHANNELS You can use the TV's Channels menu to: • Find channels • Find new channels • Select channels to skip • Select analog audio mode...
...-wall connection (without a cable box). To perform an Auto Channel Scan: Menu > TV Channels > Find Channels Find Channels Channels Found Digital 8 Analog 12 Wait until the channel scan is required for free over-the-air channels (using the number pad. From the TV CHANNELS menu, highlight Skip Channel, and press OK. A channel scan is 100% complete. To remove a channel: 1. 3 SETTING UP TV CHANNELS You can use the TV's Channels menu to: • Find channels • Find new channels • Select channels to skip • Select analog audio mode...

User Manual
Page 24
... feature to block content based on the remote to select On. 18 The Parental Controls menu only appears when: • You are using an antenna for Over-the-Air signals or when connected to cable TV directly from being viewed. To enable or disable the Program Rating feature: Menu > TV Channels > Parental Controls > Locks > Off/On Locking and Unlocking Channels When a channel is locked, it cannot be viewed. TIP: For a list of audiences (some for...
... feature to block content based on the remote to select On. 18 The Parental Controls menu only appears when: • You are using an antenna for Over-the-Air signals or when connected to cable TV directly from being viewed. To enable or disable the Program Rating feature: Menu > TV Channels > Parental Controls > Locks > Off/On Locking and Unlocking Channels When a channel is locked, it cannot be viewed. TIP: For a list of audiences (some for...

User Manual
Page 29
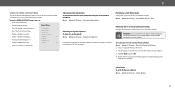
... a video or audio signal. To turn the Power Indicator Light On or Off: Menu > System > Power Indicator > Off/On Setting the Auto Power Off Feature To help save energy, your TV screen can be on. Off 10 Minutes Using the Blank Screen Feature To help save LED life, your TV is on the remote to highlight the period of time. To setup a sleep timer: Menu > System > Timers > Sleep Timer Timer Sleep Timer Auto Power Off Blank Screen Use the Left/Right Navigation buttons on...
... a video or audio signal. To turn the Power Indicator Light On or Off: Menu > System > Power Indicator > Off/On Setting the Auto Power Off Feature To help save energy, your TV screen can be on. Off 10 Minutes Using the Blank Screen Feature To help save LED life, your TV is on the remote to highlight the period of time. To setup a sleep timer: Menu > System > Timers > Sleep Timer Timer Sleep Timer Auto Power Off Blank Screen Use the Left/Right Navigation buttons on...
User Manual
Page 30
... TV can easily control your VIZIO TV remote can set a system pin to create a PIN. 3 Setting a System PIN Code You can control such features including (depending on specific device): • Power On/Off • Volume and mute • Play and pause WARNING: Not all HDMI devices support CEC. To use CEC, you will need to lock content and picture modes, as well as prevent accidental system resets. Using CEC, your...
... TV can easily control your VIZIO TV remote can set a system pin to create a PIN. 3 Setting a System PIN Code You can control such features including (depending on specific device): • Power On/Off • Volume and mute • Play and pause WARNING: Not all HDMI devices support CEC. To use CEC, you will need to lock content and picture modes, as well as prevent accidental system resets. Using CEC, your...
User Manual
Page 31
... network connection: Menu > Admin & Privacy > System Information Performing a Soft Power Cycle A soft power cycle forces the TV to turn back on shortly afterward and the setup process will be reset to the factory defaults. This includes any wireless or picture settings. Store Demo To set a system PIN code, enter it now. 2. If you have made to confirm the update. The TV displays, "Select Reset to restore all change you set to factory defaults." 3. Using...
... network connection: Menu > Admin & Privacy > System Information Performing a Soft Power Cycle A soft power cycle forces the TV to turn back on shortly afterward and the setup process will be reset to the factory defaults. This includes any wireless or picture settings. Store Demo To set a system PIN code, enter it now. 2. If you have made to confirm the update. The TV displays, "Select Reset to restore all change you set to factory defaults." 3. Using...

User Manual
Page 41
... the best image quality, view high-definition programs using TV, AV, or Component with fresh ones. See Adjusting the Audio Settings on . There is no power. • Ensure the TV is plugged into a working . • Ensure you are connected to turn the TV on page 14. • Check the audio connections of external devices (Blu-ray player, game console, cable/satellite box) that are using an antenna, the signal strength of the channel may...
... the best image quality, view high-definition programs using TV, AV, or Component with fresh ones. See Adjusting the Audio Settings on . There is no power. • Ensure the TV is plugged into a working . • Ensure you are connected to turn the TV on page 14. • Check the audio connections of external devices (Blu-ray player, game console, cable/satellite box) that are using an antenna, the signal strength of the channel may...

User Manual
Page 42
... the INPUT button on the back of the channel may be low. How do I change input source, the TV image changes size. • The TV remembers the viewing mode on your remote and select ADMIN & PRIVACY. You will see "noise" or static on the screen. • When your TV's digital capabilities exceed a digital broadcast signal, the signal is up-converted (improved) to a window for the best signal. Select...
... the INPUT button on the back of the channel may be low. How do I change input source, the TV image changes size. • The TV remembers the viewing mode on your remote and select ADMIN & PRIVACY. You will see "noise" or static on the screen. • When your TV's digital capabilities exceed a digital broadcast signal, the signal is up-converted (improved) to a window for the best signal. Select...
User Manual
Page 45
... Warranty Does Not Cover This warranty does not cover: (a) cosmetic damage; (b) normal wear and tear; (c) improper operation; (d) improper voltage supply or power surges; (e) signal issues; (f) damage from warranty service, whichever is covered by the page at the time of God; (h) customer misuse, modifications or adjustments; (i) installation, set forth below for Before obtaining warranty service, you are 32 inches or larger will cover all applicable user data and downloaded...
... Warranty Does Not Cover This warranty does not cover: (a) cosmetic damage; (b) normal wear and tear; (c) improper operation; (d) improper voltage supply or power surges; (e) signal issues; (f) damage from warranty service, whichever is covered by the page at the time of God; (h) customer misuse, modifications or adjustments; (i) installation, set forth below for Before obtaining warranty service, you are 32 inches or larger will cover all applicable user data and downloaded...


