M420SV User Manual
Page 3
...Contents 1 Installing the TV 1 Installing the TV Stand 1 Installing the TV on a Wall 2 Controls and Connections 3 Rear Panel Inputs 3 Rear Panel Buttons 4 Front Panel 4 Remote Control 5 VIA Shortcut Buttons 6 Replacing the Batteries 6 Connecting Your Devices 7 Before You Begin 7 Connecting Your Devices 7 Setting Up Your Network Connection 9 Connecting to A Wired Network... of the Inputs 26 Changing the On-Screen Menu Language 26 Setting the Time Zone 27 Adjusting the CEC Settings 27 Turning the VIZIO Logo On or Off 28 Using the Help Menu 28 Displaying System Information 28
...Contents 1 Installing the TV 1 Installing the TV Stand 1 Installing the TV on a Wall 2 Controls and Connections 3 Rear Panel Inputs 3 Rear Panel Buttons 4 Front Panel 4 Remote Control 5 VIA Shortcut Buttons 6 Replacing the Batteries 6 Connecting Your Devices 7 Before You Begin 7 Connecting Your Devices 7 Setting Up Your Network Connection 9 Connecting to A Wired Network... of the Inputs 26 Changing the On-Screen Menu Language 26 Setting the Time Zone 27 Adjusting the CEC Settings 27 Turning the VIZIO Logo On or Off 28 Using the Help Menu 28 Displaying System Information 28
M420SV User Manual
Page 4
... the USB Media Player 31 Connecting a USB Thumb Drive to the TV 31 Playing USB Media 31 Using VIZIO Internet Apps 34 Using the VIA Shortcut Buttons 34 Using the VIA Dock 34 Moving an App on the... There is no sound 38 The colors on the TV don't look right 38 The buttons on the remote aren't working 38 The image quality is not good 38 The picture is distorted 39 The display image... does not cover the entire screen 39 M420SV / M470SV / M550SV The TV has pixels (dots) that are always dark or always lit 39 I see "noise" or ...
... the USB Media Player 31 Connecting a USB Thumb Drive to the TV 31 Playing USB Media 31 Using VIZIO Internet Apps 34 Using the VIA Shortcut Buttons 34 Using the VIA Dock 34 Moving an App on the... There is no sound 38 The colors on the TV don't look right 38 The buttons on the remote aren't working 38 The image quality is not good 38 The picture is distorted 39 The display image... does not cover the entire screen 39 M420SV / M470SV / M550SV The TV has pixels (dots) that are always dark or always lit 39 I see "noise" or ...
M420SV User Manual
Page 7
...no objects fill with heavy dust or high humidity may expose you are qualified to constitute a risk of electric shock, do so. M420SV / M470SV / M550SV • Do not overload power strips and extension cords. If water penetrates into your TV. Ensure that the power cord and any... Your TV is damaged, the internal components may damage the wires inside the cord and cause fire or electric shock. Overloading can damage the remote control or injure the operator. Incorrect polarities may cause fire or electric shock. • Do not install your dealer. To avoid electric shock...
...no objects fill with heavy dust or high humidity may expose you are qualified to constitute a risk of electric shock, do so. M420SV / M470SV / M550SV • Do not overload power strips and extension cords. If water penetrates into your TV. Ensure that the power cord and any... Your TV is damaged, the internal components may damage the wires inside the cord and cause fire or electric shock. Overloading can damage the remote control or injure the operator. Incorrect polarities may cause fire or electric shock. • Do not install your dealer. To avoid electric shock...
M420SV User Manual
Page 9
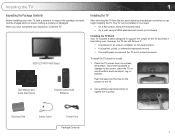
Use the images below to support the weight of the TV. VIZIO LCD HDTV with Batteries 2. Your TV can still fall over . However, the TV can be installed in two ways: • On a flat surface, using the ... is pushed, pulled, or otherwise improperly moved • If an earthquake occurs and the TV is missing or damaged. User Manual and Quick Start Guide Remote Control with Stand Installing the TV After removing the TV from falling over if: • It is placed on a clean, flat surface. Installing the TV...
Use the images below to support the weight of the TV. VIZIO LCD HDTV with Batteries 2. Your TV can still fall over . However, the TV can be installed in two ways: • On a flat surface, using the ... is pushed, pulled, or otherwise improperly moved • If an earthquake occurs and the TV is missing or damaged. User Manual and Quick Start Guide Remote Control with Stand Installing the TV After removing the TV from falling over if: • It is placed on a clean, flat surface. Installing the TV...
M420SV User Manual
Page 12
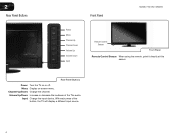
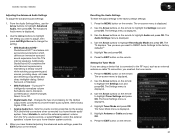
With each press of the TVs audio. Channel Up/Down: Change the channel. Volume Up/Down: Increase or decrease the loudness of the button, the TV will display a different input source 4 Rear Panel Buttons Power: Turn the TV on -screen menu. Input: Change the input device. 2 Rear Panel Buttons Front Panel M420SV / M470SV / M550SV Power Menu Channel Up Channel Down Volume Up Volume Down Input Remote Control Sensor Front Panel Remote Control Sensor: When using the remote, point it directly at this sensor. Menu: Display on or off.
With each press of the TVs audio. Channel Up/Down: Change the channel. Volume Up/Down: Increase or decrease the loudness of the button, the TV will display a different input source 4 Rear Panel Buttons Power: Turn the TV on -screen menu. Input: Change the input device. 2 Rear Panel Buttons Front Panel M420SV / M470SV / M550SV Power Menu Channel Up Channel Down Volume Up Volume Down Input Remote Control Sensor Front Panel Remote Control Sensor: When using the remote, point it directly at this sensor. Menu: Display on or off.
M420SV User Manual
Page 13
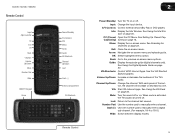
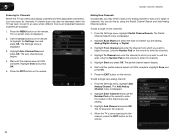
...Arrow: Navigate the on page 34. Info: Display the Info Window. VIA Shortcuts: Control VIZIO Internet Apps. See Using the VIA Dock on -screen menu and episode guide. M420SV / M470SV / M550SV Remote Control Input App Launcher CC Exit OK Back V Button Volume Up/Down Mute Number Pad... Wide QWERTY Keypad Arrow Power/Standby A/V Controls Info Menu Arrow Guide VIA Shortcuts Channel Up/Down Last Dash (-) Battery Compartment VIA Shortcuts Remote Control 2 Power/Standby...
...Arrow: Navigate the on page 34. Info: Display the Info Window. VIA Shortcuts: Control VIZIO Internet Apps. See Using the VIA Dock on -screen menu and episode guide. M420SV / M470SV / M550SV Remote Control Input App Launcher CC Exit OK Back V Button Volume Up/Down Mute Number Pad... Wide QWERTY Keypad Arrow Power/Standby A/V Controls Info Menu Arrow Guide VIA Shortcuts Channel Up/Down Last Dash (-) Battery Compartment VIA Shortcuts Remote Control 2 Power/Standby...
M420SV User Manual
Page 14
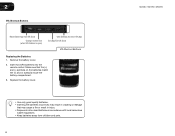
Remove the battery cover. 2. Insert two AAA batteries into the remote control. Replace the battery cover. • Use only good quality batteries. • Inserting the batteries incorrectly may result in cracking or leakage that the (+) and ...(-) symbols on the batteries match the (+) and (-) symbols inside the battery compartment. 3. 2 VIA Shortcut Buttons Move/Delete App from children and pets. 6 M420SV / M470SV / M550SV Make sure that may cause a fire or result in injury. • Dispose of old or dead batteries in accordance with local hazardous waste regulations...
Remove the battery cover. 2. Insert two AAA batteries into the remote control. Replace the battery cover. • Use only good quality batteries. • Inserting the batteries incorrectly may result in cracking or leakage that the (+) and ...(-) symbols on the batteries match the (+) and (-) symbols inside the battery compartment. 3. 2 VIA Shortcut Buttons Move/Delete App from children and pets. 6 M420SV / M470SV / M550SV Make sure that may cause a fire or result in injury. • Dispose of old or dead batteries in accordance with local hazardous waste regulations...
M420SV User Manual
Page 15
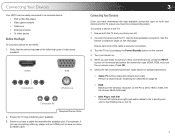
... other device Before You Begin To connect a device to the TV: 1. When you are off. 2. Set the Screen Mode to the HDMI ports on the remote and select the connection type (HDMI, RGB, etc) from wall) Perform a channel scan. To connect a device to the HDTV: 1. Check the list of the cable... an HDMI cable. 3 Connecting Your Devices Once you have determined the best available connection type on -screen menu. See the Device Connection Chart on the remote. 4. Turn your newly connected device, press the INPUT button on the TV. 7 Press OK. 6.
... other device Before You Begin To connect a device to the TV: 1. When you are off. 2. Set the Screen Mode to the HDMI ports on the remote and select the connection type (HDMI, RGB, etc) from wall) Perform a channel scan. To connect a device to the HDTV: 1. Check the list of the cable... an HDMI cable. 3 Connecting Your Devices Once you have determined the best available connection type on -screen menu. See the Device Connection Chart on the remote. 4. Turn your newly connected device, press the INPUT button on the TV. 7 Press OK. 6.

M420SV User Manual
Page 18
...-Time Setup is connected to your First Name, Last Name, Phone Number, ZIP Code, and E-mail Address using the Arrow and OK buttons on the remote. 3. See Installing the TV on page 1. • Your devices should be connected. If the TV is complete. Enter your network automatically. See Connecting Your Devices... • Your TV should be installed and the power cord should be connected to the ethernet port on the TV. The TV powers on the remote. Select the name of the steps necessary to Live TV and press OK. When you have the network key ready. • If you are connecting...
...-Time Setup is connected to your First Name, Last Name, Phone Number, ZIP Code, and E-mail Address using the Arrow and OK buttons on the remote. 3. See Installing the TV on page 1. • Your devices should be connected. If the TV is complete. Enter your network automatically. See Connecting Your Devices... • Your TV should be installed and the power cord should be connected to the ethernet port on the TV. The TV powers on the remote. Select the name of the steps necessary to Live TV and press OK. When you have the network key ready. • If you are connecting...

M420SV User Manual
Page 19
... the on-screen menu by pressing the VIA button and selecting HDTV Settings from the VIA Dock, then pressing OK. While navigating the on the remote. To open the on-screen menu, press the MENU button on -screen menu, you wish to select that option. Press the MENU button on -screen... the On-Screen Menu To open the on-screen menu, press the MENU button on your TV. To display one of these devices on the remote. The on -screen menu. The Input menu is displayed. 2. From this menu, you must first change the input device: 1. For instructions on connecting external devices...
... the on-screen menu by pressing the VIA button and selecting HDTV Settings from the VIA Dock, then pressing OK. While navigating the on the remote. To open the on-screen menu, press the MENU button on -screen menu, you wish to select that option. Press the MENU button on -screen... the On-Screen Menu To open the on-screen menu, press the MENU button on your TV. To display one of these devices on the remote. The on -screen menu. The Input menu is displayed. 2. From this menu, you must first change the input device: 1. For instructions on connecting external devices...

M420SV User Manual
Page 21
...aspect ratio. If you wish to select the caption channel you are watching widescreen (1.85:1 or 2.35:1) content, black bars will appear on the remote to see : • Analog Closed Caption for analog (NTSC) TV channels. • Digital Closed Caption for digital (ATSC) TV channels. ...stretches a 4:3 aspect ratio picture to fill the screen. Each mode displays the picture differently. Images may appear distorted. M420SV / M470SV / M550SV 5 Changing the Screen Aspect Ratio The TV can display closed captions for programs that include them . Images may display Spanish captions. 13
...aspect ratio. If you wish to select the caption channel you are watching widescreen (1.85:1 or 2.35:1) content, black bars will appear on the remote to see : • Analog Closed Caption for analog (NTSC) TV channels. • Digital Closed Caption for digital (ATSC) TV channels. ...stretches a 4:3 aspect ratio picture to fill the screen. Each mode displays the picture differently. Images may appear distorted. M420SV / M470SV / M550SV 5 Changing the Screen Aspect Ratio The TV can display closed captions for programs that include them . Images may display Spanish captions. 13
M420SV User Manual
Page 22
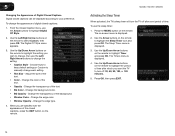
...setting you wish to change the appearance of digital closed captions, press the EXIT button on the remote. When you want the TV to highlight the Sleep Timer icon and press OK. M420SV / M470SV / M550SV Activating the Sleep Timer When activated, the TV's sleep timer will turn off after ... Change the color of the text. • Color - Change the transparency of the text. • BG Color - Use the Arrow buttons on the remote to manually change the setting: • Caption Style - Choose Auto to keep default settings or Custom to highlight Timer and press OK. Use the Up...
...setting you wish to change the appearance of digital closed captions, press the EXIT button on the remote. When you want the TV to highlight the Sleep Timer icon and press OK. M420SV / M470SV / M550SV Activating the Sleep Timer When activated, the TV's sleep timer will turn off after ... Change the color of the text. • Color - Change the transparency of the text. • BG Color - Use the Arrow buttons on the remote to manually change the setting: • Caption Style - Choose Auto to keep default settings or Custom to highlight Timer and press OK. Use the Up...
M420SV User Manual
Page 23
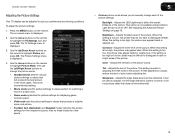
...• Vivid mode sets the picture settings to highlight the TV Settings icon and press OK. See Adjusting the Advanced Picture Settings on the remote to highlight Picture Mode, then use the Left/Right Arrow buttons to change the picture mode: • Standard mode sets the various picture ...- It can be used to sharpen non-HD (high definition) content; M420SV / M470SV / M550SV Adjusting the Picture Settings Your TV display can be adjusted to suit your preferences and viewing conditions. The on the remote to values that does not otherwise exist. 15 Use the Arrow buttons on -screen ...
...• Vivid mode sets the picture settings to highlight the TV Settings icon and press OK. See Adjusting the Advanced Picture Settings on the remote to highlight Picture Mode, then use the Left/Right Arrow buttons to change the picture mode: • Standard mode sets the various picture ...- It can be used to sharpen non-HD (high definition) content; M420SV / M470SV / M550SV Adjusting the Picture Settings Your TV display can be adjusted to suit your preferences and viewing conditions. The on the remote to values that does not otherwise exist. 15 Use the Arrow buttons on -screen ...
M420SV User Manual
Page 24
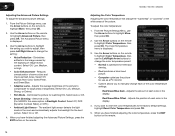
... the Color Temperature Adjusting the color temperature will change the setting: • Noise Reduction - Use the Arrow buttons on the remote to the factory default settings, highlight Reset Color Temperature and press OK. 5. When you want to reset the color temperatures to... highlight Color Temperature, then press OK. 5 M420SV / M470SV / M550SV Adjusting the Advanced Picture Settings To adjust the advanced picture settings: 1. If you have finished adjusting the color temperature, press ...
... the Color Temperature Adjusting the color temperature will change the setting: • Noise Reduction - Use the Arrow buttons on the remote to the factory default settings, highlight Reset Color Temperature and press OK. 5. When you want to reset the color temperatures to... highlight Color Temperature, then press OK. 5 M420SV / M470SV / M550SV Adjusting the Advanced Picture Settings To adjust the advanced picture settings: 1. If you have finished adjusting the color temperature, press ...
M420SV User Manual
Page 25
...to adjust, then press Left/Right Arrow to change the setting: • Auto Adjust - Press the EXIT button on the remote to HDMI or RGB. 2. M420SV / M470SV / M550SV 5 Adjusting the Picture Size and Position When displaying an image from the HDMI or RGB input, the size and ...- Adjusts the width of the display image. • Vertical Position - When you have finished adjusting the color temperature, press the EXIT button on the remote to highlight More, then press OK. 2. To adjust the picture size and position: 1. Highlight OK and press OK. 4. Resetting the Picture Settings To...
...to adjust, then press Left/Right Arrow to change the setting: • Auto Adjust - Press the EXIT button on the remote to HDMI or RGB. 2. M420SV / M470SV / M550SV 5 Adjusting the Picture Size and Position When displaying an image from the HDMI or RGB input, the size and ...- Adjusts the width of the display image. • Vertical Position - When you have finished adjusting the color temperature, press the EXIT button on the remote to highlight More, then press OK. 2. To adjust the picture size and position: 1. Highlight OK and press OK. 4. Resetting the Picture Settings To...

M420SV User Manual
Page 26
5 M420SV / M470SV / M550SV Using the PIP (Picture-In-Picture) Feature The PIP feature on your network's ...in high-speed 802.11n. Using the Network Connection Menu Your TV is displayed. 2. Use the Arrow buttons on the remote to hear on the full screen. Select Off, PIP, or POP. • Source - Choose which audio source you ... Left, Bottom Right, or Bottom Left. • Size - Select Small, Medium, or Large. • Audio - The on the remote to view content from two different inputs at once. The Network Connection menu is the network's SSID) and press OK. 4. Highlight the...
5 M420SV / M470SV / M550SV Using the PIP (Picture-In-Picture) Feature The PIP feature on your network's ...in high-speed 802.11n. Using the Network Connection Menu Your TV is displayed. 2. Use the Arrow buttons on the remote to hear on the full screen. Select Off, PIP, or POP. • Source - Choose which audio source you ... Left, Bottom Right, or Bottom Left. • Size - Select Small, Medium, or Large. • Audio - The on the remote to view content from two different inputs at once. The Network Connection menu is the network's SSID) and press OK. 4. Highlight the...

M420SV User Manual
Page 27
M420SV / M470SV / M550SV 5 To connect to a wireless network whose network name (SSID) is displayed. 3. The on the remote. 19 The Network Connection menu is not being broadcast: 1. Use the Arrow and OK buttons to adjust each setting: • DHCP - (Dynamic Host ...: 1. Your network's default gateway address. • Pref. Press the EXIT button on -screen menu is displayed. 2. Press the MENU button on the remote. Changing the Advanced Network Settings Advanced users can fine-tune the network settings using the Manual Setup feature. To change any of your network's password...
M420SV / M470SV / M550SV 5 To connect to a wireless network whose network name (SSID) is displayed. 3. The on the remote. 19 The Network Connection menu is not being broadcast: 1. Use the Arrow and OK buttons to adjust each setting: • DHCP - (Dynamic Host ...: 1. Your network's default gateway address. • Pref. Press the EXIT button on -screen menu is displayed. 2. Press the MENU button on the remote. Changing the Advanced Network Settings Advanced users can fine-tune the network settings using the Manual Setup feature. To change any of your network's password...
M420SV User Manual
Page 28
...21. 4. The Input Source menu is displayed. 3. See Resetting the Audio Settings on the remote. Use the Arrow buttons to highlight the setting you wish to adjust, then press Left/Right...on or off . • Advanced Audio - To change the setting: • Balance - 5 M420SV / M470SV / M550SV Changing the TV Settings Using the settings menu, you can be connected to your TV, you must ...on-screen menu language • Set the time • Adjust the CEC settings • Turn the VIZIO logo on page 21. • Equalizer Settings - Turns the built-in the on-screen menu. ...
...21. 4. The Input Source menu is displayed. 3. See Resetting the Audio Settings on the remote. Use the Arrow buttons to highlight the setting you wish to adjust, then press Left/Right...on or off . • Advanced Audio - To change the setting: • Balance - 5 M420SV / M470SV / M550SV Changing the TV Settings Using the settings menu, you can be connected to your TV, you must ...on-screen menu language • Set the time • Adjust the CEC settings • Turn the VIZIO logo on page 21. • Equalizer Settings - Turns the built-in the on-screen menu. ...
M420SV User Manual
Page 29
...The Advanced Audio menu is connected to highlight the Settings icon and press OK. Use the Arrow buttons on the remote to a home theater audio system. The on the remote. 21 From the Audio Settings Menu, use the Arrow buttons to the factory defaults?" 5. Select On or ... Mode and press OK. Select Dolby Digital, PCM, or Off. • Analog Audio Out - Highlight Yes and press OK. 6. M420SV / M470SV / M550SV Adjusting the Advanced Audio Settings To adjust the advanced audio settings: 1. TruVolume™ intelligently normalizes volume fluctuations due to highlight Reset Audio Mode...
...The Advanced Audio menu is connected to highlight the Settings icon and press OK. Use the Arrow buttons on the remote to a home theater audio system. The on the remote. 21 From the Audio Settings Menu, use the Arrow buttons to the factory defaults?" 5. Select On or ... Mode and press OK. Select Dolby Digital, PCM, or Off. • Analog Audio Out - Highlight Yes and press OK. 6. M420SV / M470SV / M550SV Adjusting the Advanced Audio Settings To adjust the advanced audio settings: 1. TruVolume™ intelligently normalizes volume fluctuations due to highlight Reset Audio Mode...
M420SV User Manual
Page 30
... Highlight Enter Channel # and use the Number Pad on the remote to enter the number of channel you must scan for channels. Adding New Channels Occasionally, you are adding: Analog/Digital, Analog, or Digital. 3. 5 M420SV / M470SV / M550SV Scanning for Channels Before the TV can do this by... using the Partial Channel Search and Add Analog Channel options. Use the Arrow buttons on the remote. 22 Highlight Auto Channel Scan and press OK. The auto ...
... Highlight Enter Channel # and use the Number Pad on the remote to enter the number of channel you must scan for channels. Adding New Channels Occasionally, you are adding: Analog/Digital, Analog, or Digital. 3. 5 M420SV / M470SV / M550SV Scanning for Channels Before the TV can do this by... using the Partial Channel Search and Add Analog Channel options. Use the Arrow buttons on the remote. 22 Highlight Auto Channel Scan and press OK. The auto ...


