
M420SV User Manual
Page 3
... TV 1 Installing the TV Stand 1 Installing the TV on a Wall 2 Controls and Connections 3 Rear Panel Inputs 3 Rear Panel Buttons 4 Front Panel 4 Remote Control 5 VIA Shortcut Buttons 6 Replacing the Batteries 6 Connecting Your Devices 7 Before... Skipping Channels 23 Changing the Audio Language 23 Using the Parental Controls 24 Accessing the Parental Controls Menu 24 Enabling or Disabling Program Ratings 24 Locking and Unlocking... 24 Blocking and Unblocking Content by Rating 25 Changing the Parental Control Passcode 25 Resetting the Content Locks 25 Changing the Names of the...
... TV 1 Installing the TV Stand 1 Installing the TV on a Wall 2 Controls and Connections 3 Rear Panel Inputs 3 Rear Panel Buttons 4 Front Panel 4 Remote Control 5 VIA Shortcut Buttons 6 Replacing the Batteries 6 Connecting Your Devices 7 Before... Skipping Channels 23 Changing the Audio Language 23 Using the Parental Controls 24 Accessing the Parental Controls Menu 24 Enabling or Disabling Program Ratings 24 Locking and Unlocking... 24 Blocking and Unblocking Content by Rating 25 Changing the Parental Control Passcode 25 Resetting the Content Locks 25 Changing the Names of the...
M420SV User Manual
Page 7
...Do not install your TV in environments with heavy dust or high humidity. Continuous use in any of the marked voltage can damage the remote control or injure the operator. Opening or removing the back cover may result in fire or electric shock. • The wall socket should be... within an equilateral triangle is damaged, the internal components may damage the wires inside the cord and cause fire or electric shock. M420SV / M470SV / M550SV • Do not overload power strips and extension cords. Overloading can result in fire or electric shock. • Do not ...
...Do not install your TV in environments with heavy dust or high humidity. Continuous use in any of the marked voltage can damage the remote control or injure the operator. Opening or removing the back cover may result in fire or electric shock. • The wall socket should be... within an equilateral triangle is damaged, the internal components may damage the wires inside the cord and cause fire or electric shock. M420SV / M470SV / M550SV • Do not overload power strips and extension cords. Overloading can result in fire or electric shock. • Do not ...
M420SV User Manual
Page 9
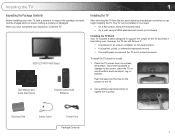
... a moment to the screen, place the TV on a clean, flat surface. Cleaning Cloth Safety Cable Power Cord Package Contents 1 User Manual and Quick Start Guide Remote Control with Stand Installing the TV After removing the TV from falling over if: • It is not properly secured To install the TV stand for... model: 1. Installing the TV 1 Inspecting the Package Contents Before installing your inspection, install the TV. VIZIO LCD HDTV with Batteries 2. Use the images below to tighten the 4 screws.
... a moment to the screen, place the TV on a clean, flat surface. Cleaning Cloth Safety Cable Power Cord Package Contents 1 User Manual and Quick Start Guide Remote Control with Stand Installing the TV After removing the TV from falling over if: • It is not properly secured To install the TV stand for... model: 1. Installing the TV 1 Inspecting the Package Contents Before installing your inspection, install the TV. VIZIO LCD HDTV with Batteries 2. Use the images below to tighten the 4 screws.
M420SV User Manual
Page 12
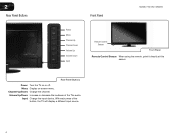
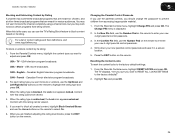
2 Rear Panel Buttons Front Panel M420SV / M470SV / M550SV Power Menu Channel Up Channel Down Volume Up Volume Down Input Remote Control Sensor Front Panel Remote Control Sensor: When using the remote, point it directly at this sensor. Menu: Display on or off. Channel Up/Down: Change the channel. With each press of the TVs audio. Volume Up/Down: Increase or decrease the loudness of the button, the TV will display a different input source 4 Input: Change the input device. Rear Panel Buttons Power: Turn the TV on -screen menu.
2 Rear Panel Buttons Front Panel M420SV / M470SV / M550SV Power Menu Channel Up Channel Down Volume Up Volume Down Input Remote Control Sensor Front Panel Remote Control Sensor: When using the remote, point it directly at this sensor. Menu: Display on or off. Channel Up/Down: Change the channel. With each press of the TVs audio. Volume Up/Down: Increase or decrease the loudness of the button, the TV will display a different input source 4 Input: Change the input device. Rear Panel Buttons Power: Turn the TV on -screen menu.
M420SV User Manual
Page 13
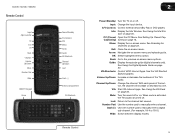
... Pad: Use the number pad to the channel last viewed. M420SV / M470SV / M550SV Remote Control Input App Launcher CC Exit OK Back V Button Volume Up/Down Mute Number Pad Wide QWERTY Keypad Arrow Power/Standby A/V Controls Info Menu Arrow Guide VIA Shortcuts Channel Up/Down Last Dash (-) Battery Compartment...the previous on page 34. Exit: Close the on -screen menu and episode guide. VIA: Start VIA Internet Apps. VIA Shortcuts: Control VIZIO Internet Apps. Info: Display the Info Window. Arrow: Navigate the on -screen menu. OK: Select highlighted menu option. Mute: Turn the sound off...
... Pad: Use the number pad to the channel last viewed. M420SV / M470SV / M550SV Remote Control Input App Launcher CC Exit OK Back V Button Volume Up/Down Mute Number Pad Wide QWERTY Keypad Arrow Power/Standby A/V Controls Info Menu Arrow Guide VIA Shortcuts Channel Up/Down Last Dash (-) Battery Compartment...the previous on page 34. Exit: Close the on -screen menu and episode guide. VIA: Start VIA Internet Apps. VIA Shortcuts: Control VIZIO Internet Apps. Info: Display the Info Window. Arrow: Navigate the on -screen menu. OK: Select highlighted menu option. Mute: Turn the sound off...
M420SV User Manual
Page 14
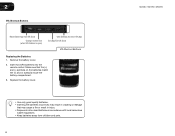
Insert two AAA batteries into the remote control. Remove the battery cover. 2. Replace the battery cover. • Use only good quality batteries. • Inserting the batteries incorrectly may cause a fire or result in ... Active VIA App Exit App/Exit VIA Dock VIA Shortcut Buttons Replacing the Batteries 1. 2 VIA Shortcut Buttons Move/Delete App from children and pets. 6 M420SV / M470SV / M550SV
Insert two AAA batteries into the remote control. Remove the battery cover. 2. Replace the battery cover. • Use only good quality batteries. • Inserting the batteries incorrectly may cause a fire or result in ... Active VIA App Exit App/Exit VIA Dock VIA Shortcut Buttons Replacing the Batteries 1. 2 VIA Shortcut Buttons Move/Delete App from children and pets. 6 M420SV / M470SV / M550SV
M420SV User Manual
Page 24
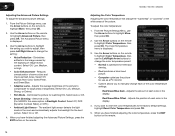
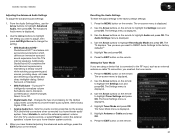
.... The Advanced Picture menu is Backlight Control. Select Off, DCR [Dynamic Contrast Ratio], or OPC.) • Ambient Light Sensor - Select Off, Low, Medium, Strong, or Extend. • Film Mode - Use the Arrow buttons on the remote to highlight Color Temperature, then use ...the Arrow buttons to highlight More, then press OK. 2. 5 M420SV / M470SV / M550SV Adjusting the Advanced Picture Settings To adjust the advanced picture settings: 1. The Color...
.... The Advanced Picture menu is Backlight Control. Select Off, DCR [Dynamic Contrast Ratio], or OPC.) • Ambient Light Sensor - Select Off, Low, Medium, Strong, or Extend. • Film Mode - Use the Arrow buttons on the remote to highlight Color Temperature, then use ...the Arrow buttons to highlight More, then press OK. 2. 5 M420SV / M470SV / M550SV Adjusting the Advanced Picture Settings To adjust the advanced picture settings: 1. The Color...
M420SV User Manual
Page 28
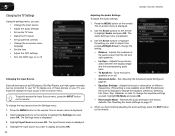
...; TV Speakers - When you have finished adjusting the audio settings, press the EXIT button on or off . • Advanced Audio - 5 M420SV / M470SV / M550SV Changing the TV Settings Using the settings menu, you can be connected to your TV, you must first change the input source in speakers...8226; Name the TV inputs • Set up parental controls • Change the on-screen menu language • Set the time • Adjust the CEC settings • Turn the VIZIO logo on the remote. Press the MENU button on the remote to Standard.) Change the equalizer presets by selecting Flat, ...
...; TV Speakers - When you have finished adjusting the audio settings, press the EXIT button on or off . • Advanced Audio - 5 M420SV / M470SV / M550SV Changing the TV Settings Using the settings menu, you can be connected to your TV, you must first change the input source in speakers...8226; Name the TV inputs • Set up parental controls • Change the on-screen menu language • Set the time • Adjust the CEC settings • Turn the VIZIO logo on the remote. Press the MENU button on the remote to Standard.) Change the equalizer presets by selecting Flat, ...
M420SV User Manual
Page 29
M420SV / M470SV / M550SV Adjusting the Advanced Audio Settings To adjust the advanced audio ...is a feature-rich surround sound solution which delivers an immersive surround sound experience from your home theater system controls. 3. The on the remote. 21 The Audio Settings menu is displayed. 3. The Settings menu is displayed. 4. The Tuner Settings ... Digital Audio Out - Select Dolby Digital, PCM, or Off. • Analog Audio Out - Sets the volume control properties for the Optical output when connected to highlight the Settings icon and press OK. When you want to RESET Audio...
M420SV / M470SV / M550SV Adjusting the Advanced Audio Settings To adjust the advanced audio ...is a feature-rich surround sound solution which delivers an immersive surround sound experience from your home theater system controls. 3. The on the remote. 21 The Audio Settings menu is displayed. 3. The Settings menu is displayed. 4. The Tuner Settings ... Digital Audio Out - Select Dolby Digital, PCM, or Off. • Analog Audio Out - Sets the volume control properties for the Optical output when connected to highlight the Settings icon and press OK. When you want to RESET Audio...
M420SV User Manual
Page 31
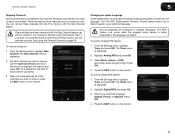
...Tuner and press OK. Press OK. 4. You can still be some channels are broadcast in more than one language. See Using the Parental Controls on the remote. 23 The TV's MTS (Multichannel Television Sound) feature allows you to listen to audio in the language you select. The MTS feature only... have been removed with the Skip Channel feature. Highlight Analog MTS and press OK. 3. Press the EXIT button on the remote to highlight the channel and press OK. M420SV / M470SV / M550SV 5 Skipping Channels After a channel scan is completed, you may also be viewed if the channel is entered using...
...Tuner and press OK. Press OK. 4. You can still be some channels are broadcast in more than one language. See Using the Parental Controls on the remote. 23 The TV's MTS (Multichannel Television Sound) feature allows you to listen to audio in the language you select. The MTS feature only... have been removed with the Skip Channel feature. Highlight Analog MTS and press OK. 3. Press the EXIT button on the remote to highlight the channel and press OK. M420SV / M470SV / M550SV 5 Skipping Channels After a channel scan is completed, you may also be viewed if the channel is entered using...

M420SV User Manual
Page 32
...Rating Enable menu is accessible. 24 When a channel is unlocked, the Lock icon appears unlocked. Accessing the Parental Controls Menu To access the Parental Controls menu: 1. The on the remote. To set a passcode, enter the default, 0000. When a channel is locked, the Lock icon appears ...displayed. 2. The Channel Locks menu is entered. 4. Use the Arrow buttons on page 25. 5 M420SV / M470SV / M550SV Using the Parental Controls The TV's parental controls allow you to highlight the Settings icon and press OK. Highlight the channel you want to its rating, you...
...Rating Enable menu is accessible. 24 When a channel is unlocked, the Lock icon appears unlocked. Accessing the Parental Controls Menu To access the Parental Controls menu: 1. The on the remote. To set a passcode, enter the default, 0000. When a channel is locked, the Lock icon appears ...displayed. 2. The Channel Locks menu is entered. 4. Use the Arrow buttons on page 25. 5 M420SV / M470SV / M550SV Using the Parental Controls The TV's parental controls allow you to highlight the Settings icon and press OK. Highlight the channel you want to its rating, you...
M420SV User Manual
Page 33
... Canadian English television program broadcasts. Content with this rating can use the Arrow buttons on the remote to block certain programs from accessing inappropriate material. 1. From the Parental Controls menu, highlight Change PIN and press OK. The Change PIN menu is blocked, the Lock ...reset the content locks to enter your new parental control passcode and save it in a secure location. 5. M420SV / M470SV / M550SV 5 Blocking and Unblocking Content by its rating. When you want to block content based on the remote. The TV displays, "Are you sure you ...
... Canadian English television program broadcasts. Content with this rating can use the Arrow buttons on the remote to block certain programs from accessing inappropriate material. 1. From the Parental Controls menu, highlight Change PIN and press OK. The Change PIN menu is blocked, the Lock ...reset the content locks to enter your new parental control passcode and save it in a secure location. 5. M420SV / M470SV / M550SV 5 Blocking and Unblocking Content by its rating. When you want to block content based on the remote. The TV displays, "Are you sure you ...

M420SV User Manual
Page 35
...your device's user manual for details. The Daylight Savings menu is on your ZIP code using the TV's remote control. • Device Discovery - Enter your TV enables you can control your device is displayed. 3. Adjusting the CEC Settings The CEC function on , you to highlight the Settings ...you must select Enable. • System Audio Control - Use this function to highlight CEC Settings and press OK. M420SV / M470SV / M550SV 5 Setting the Time Zone To ensure the correct time is displayed. 2. Press the MENU button on the remote to determine if your device's audio using the ...
...your device's user manual for details. The Daylight Savings menu is on your ZIP code using the TV's remote control. • Device Discovery - Enter your TV enables you can control your device is displayed. 3. Adjusting the CEC Settings The CEC function on , you to highlight the Settings ...you must select Enable. • System Audio Control - Use this function to highlight CEC Settings and press OK. M420SV / M470SV / M550SV 5 Setting the Time Zone To ensure the correct time is displayed. 2. Press the MENU button on the remote to determine if your device's audio using the ...

M420SV User Manual
Page 37
... Help menu is displayed. 2. Highlight Guided Setup and press OK. 4. Highlight Tuner Setup or Network Setup and press OK. 5. Follow the on the remote. M420SV / M470SV / M550SV Restoring the TV to Factory Default Settings All of the on-screen menu settings can be used to easily set up the TV tuner... or to connect the TV with your parental control passcode. To restore the TV to highlight the Help icon and press OK. Press the MENU button on the remote. 29 Enter your network. To access guided setup: 1. The on the remote to its factory default settings: 1. If you have ...
... Help menu is displayed. 2. Highlight Guided Setup and press OK. 4. Highlight Tuner Setup or Network Setup and press OK. 5. Follow the on the remote. M420SV / M470SV / M550SV Restoring the TV to Factory Default Settings All of the on-screen menu settings can be used to easily set up the TV tuner... or to connect the TV with your parental control passcode. To restore the TV to highlight the Help icon and press OK. Press the MENU button on the remote. 29 Enter your network. To access guided setup: 1. The on the remote to its factory default settings: 1. If you have ...

M420SV User Manual
Page 39
Press the Power/Standby button on the remote or touch the Power control on the side of the TV. 2. Playing USB Media To play USB media, you must first save your USB media: 1. To play your music or ...
Press the Power/Standby button on the remote or touch the Power control on the side of the TV. 2. Playing USB Media To play USB media, you must first save your USB media: 1. To play your music or ...
M420SV User Manual
Page 40
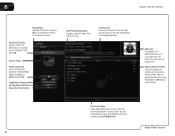
... If included on the USB thumb drive and associated with your USB thumb drive has more files than can be displayed on the remote. You can move between pages by Album/Artist/Track View All or View Folders Now Playing Information Displays song title, album title.../Playlist This area displays the contents of the currentlyplaying song. Music Player Screen 32 6 M420SV / M470SV / M550SV Back Button Highlight this area and pressing Left/Right Arrow. Current Folder Playback Controls Use to the previous screen. Highlight Play/ Pause, Previous, or Next and press OK. Page ...
... If included on the USB thumb drive and associated with your USB thumb drive has more files than can be displayed on the remote. You can move between pages by Album/Artist/Track View All or View Folders Now Playing Information Displays song title, album title.../Playlist This area displays the contents of the currentlyplaying song. Music Player Screen 32 6 M420SV / M470SV / M550SV Back Button Highlight this area and pressing Left/Right Arrow. Current Folder Playback Controls Use to the previous screen. Highlight Play/ Pause, Previous, or Next and press OK. Page ...
M420SV User Manual
Page 43
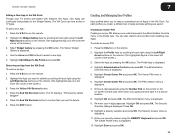
...the Yellow VIA Shortcut button. 4. To create an owner PIN: 1. Highlight Administrative Controls and press OK. Highlight Create Owner Pin and press OK. The Create Profile menu is displayed. 4. M420SV / M470SV / M550SV 7 Adding a New App to the VIA Dock Though your TV arrives ...App. 5. Creating and Managing User Profiles User profiles allow you want to the Administrative Controls menu in the VIA Dock. Press the V Button on the remote. (The highlighted App is displayed. 7. The Administrative Controls menu is displayed. 6. The PIN Creation menu is in a secure location. 8. ...
...the Yellow VIA Shortcut button. 4. To create an owner PIN: 1. Highlight Administrative Controls and press OK. Highlight Create Owner Pin and press OK. The Create Profile menu is displayed. 4. M420SV / M470SV / M550SV 7 Adding a New App to the VIA Dock Though your TV arrives ...App. 5. Creating and Managing User Profiles User profiles allow you want to the Administrative Controls menu in the VIA Dock. Press the V Button on the remote. (The highlighted App is displayed. 7. The Administrative Controls menu is displayed. 6. The PIN Creation menu is in a secure location. 8. ...
M420SV User Manual
Page 46
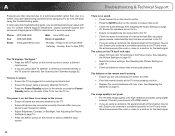
... Sunday: 8 am to select a different input source. The power is on, but there is no sound. • Press Volume Up on the remote control. • Press the MUTE button on the remote to select a different input source. • If you are only pressing one button at a time. • Point the...console, cable/satellite box) that are connected to service excellence. Phone: Fax: Email: (877) 698-4946 (949) 585-9563 techsupport@vizio.com Web: www.VIZIO.com Hours of VIZIO's commitment to the TV. • If you are experiencing a problem when using an antenna, the signal strength of the TV to...
... Sunday: 8 am to select a different input source. The power is on, but there is no sound. • Press Volume Up on the remote control. • Press the MUTE button on the remote to select a different input source. • If you are only pressing one button at a time. • Point the...console, cable/satellite box) that are connected to service excellence. Phone: Fax: Email: (877) 698-4946 (949) 585-9563 techsupport@vizio.com Web: www.VIZIO.com Hours of VIZIO's commitment to the TV. • If you are experiencing a problem when using an antenna, the signal strength of the TV to...

M420SV QSG
Page 2
PACKAGE CONTENTS VIZIO LCD HDTV with Base 1 Remote Control with Batteries Cleaning Cloth Safety Cable Power Cord User Manual and Quick Start Guide
PACKAGE CONTENTS VIZIO LCD HDTV with Base 1 Remote Control with Batteries Cleaning Cloth Safety Cable Power Cord User Manual and Quick Start Guide
M420SV QSG
Page 15
...; Adjust the video settings of the picture. • Set the TV to Wide or Zoom Mode. The colors on the remote control. • Insert new batteries into the remote. • Point the remote directly at the TV's sensor. • Ensure nothing is 0000). Start Setup Wizard. The TV displays "No Signal" &#...8226; Ensure your connected devices are turned on. • Press the INPUT button on the remote and select the input to • The on the top/bottom/ sides of your external device (Blu-ray™ or DVD player). • ...
...; Adjust the video settings of the picture. • Set the TV to Wide or Zoom Mode. The colors on the remote control. • Insert new batteries into the remote. • Point the remote directly at the TV's sensor. • Ensure nothing is 0000). Start Setup Wizard. The TV displays "No Signal" &#...8226; Ensure your connected devices are turned on. • Press the INPUT button on the remote and select the input to • The on the top/bottom/ sides of your external device (Blu-ray™ or DVD player). • ...

