
User Manual English
Page 2
... by the manufacturer. • se only with the cart, stand, tripod, bracket, or table specified by a L Listed all servicing to rain or other voltage than the voltage specified. Opening or removing the back cover may be maintained between your HD Display and any heat source, such as power-supply cord or plug is damaged, liquid has been spilled or objects have fallen...
... by the manufacturer. • se only with the cart, stand, tripod, bracket, or table specified by a L Listed all servicing to rain or other voltage than the voltage specified. Opening or removing the back cover may be maintained between your HD Display and any heat source, such as power-supply cord or plug is damaged, liquid has been spilled or objects have fallen...
User Manual English
Page 3
... 33 Adjusting Picture Settings 36 Adjusting the Picture Mode Edit Settings 40 Adjusting the Color Calibration Settings 43 Adjusting Audio Settings 45 Adjusting Timer Settings 47 Activating the Sleep Timer 48 Setting the Auto Power Off Feature 48 Adjusting Network Settings 49 Using the Network Connection menu 50 Renaming Devices on the Input Menu 53 Renaming Devices on the Input Menu 54 Enabling HDMI Color Subsampling 54 Changing the Display System Settings 55 Viewing System Information 56 Changing the On-Screen Menu Language 56 Setting the Time and Local Settings 57 Adjusting...
... 33 Adjusting Picture Settings 36 Adjusting the Picture Mode Edit Settings 40 Adjusting the Color Calibration Settings 43 Adjusting Audio Settings 45 Adjusting Timer Settings 47 Activating the Sleep Timer 48 Setting the Auto Power Off Feature 48 Adjusting Network Settings 49 Using the Network Connection menu 50 Renaming Devices on the Input Menu 53 Renaming Devices on the Input Menu 54 Enabling HDMI Color Subsampling 54 Changing the Display System Settings 55 Viewing System Information 56 Changing the On-Screen Menu Language 56 Setting the Time and Local Settings 57 Adjusting...
User Manual English
Page 5
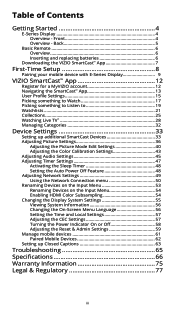
The actual number of ports and their locations may be subject to change. Back 1 2 2 3 1 Power Button Volume Up/Down Buttons Input Button USB 2.0 Port Component Ports HDMI Port Optical/SPDIF Audio Out Port HDMI Ports 3 RCA Audio Out Ports Ethernet Port Note: The images shown here are for illustrative purposes only and may vary, depending on the model. 5 1 Overview -
The actual number of ports and their locations may be subject to change. Back 1 2 2 3 1 Power Button Volume Up/Down Buttons Input Button USB 2.0 Port Component Ports HDMI Port Optical/SPDIF Audio Out Port HDMI Ports 3 RCA Audio Out Ports Ethernet Port Note: The images shown here are for illustrative purposes only and may vary, depending on the model. 5 1 Overview -
User Manual English
Page 6
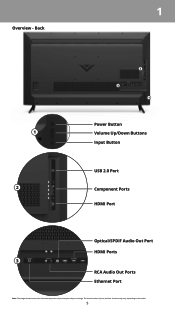
... basic remote control. Mute Turn the audio on or off . Aspect Ratio Cycle through the different picture modes. Play/Pause Play or pause content. Remove the back cover and insert two AAA batteries (included). Be sure to align the and symbols on the back of the audio. Power Turn the TV on or off . Picture Mode Cycle through the different aspect ratio modes. Input Change the currently displayed input...
... basic remote control. Mute Turn the audio on or off . Aspect Ratio Cycle through the different picture modes. Play/Pause Play or pause content. Remove the back cover and insert two AAA batteries (included). Be sure to align the and symbols on the back of the audio. Power Turn the TV on or off . Picture Mode Cycle through the different aspect ratio modes. Input Change the currently displayed input...
User Manual English
Page 8
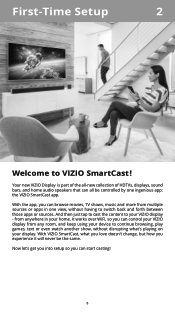
...-Time Setup 2 Welcome to VIZIO SmartCast !™ Your new VIZIO Display is part of the all-new collection of HDTVs, displays, sound bars, and home audio speakers that can all be the same. With the app, you can control your VIZIO display from any room, and keep using your device to continue browsing, play games, text or even watch another show, without having to your display. It works over WiFi...
...-Time Setup 2 Welcome to VIZIO SmartCast !™ Your new VIZIO Display is part of the all-new collection of HDTVs, displays, sound bars, and home audio speakers that can all be the same. With the app, you can control your VIZIO display from any room, and keep using your device to continue browsing, play games, text or even watch another show, without having to your display. It works over WiFi...
User Manual English
Page 13
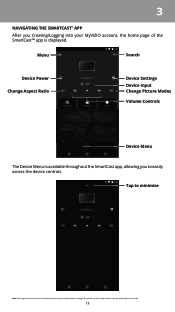
The actual on the model. 13 3 NAVIGATING THE SMARTCAST™ APP After you to change. Menu Search Device Power Change Aspect Ratio Device Settings Device Input Change Picture Modes Volume Controls Device Menu The Device Menu is available throughout the SmartCast app, allowing you Creating/Logging into your MyVIZIO account, the home page of the SmartCast™ app is displayed. Tap to minimize Note: The images shown here are for illustrative purposes only and may vary, depending on -screen image and text may be subject to easily access the device controls.
The actual on the model. 13 3 NAVIGATING THE SMARTCAST™ APP After you to change. Menu Search Device Power Change Aspect Ratio Device Settings Device Input Change Picture Modes Volume Controls Device Menu The Device Menu is available throughout the SmartCast app, allowing you Creating/Logging into your MyVIZIO account, the home page of the SmartCast™ app is displayed. Tap to minimize Note: The images shown here are for illustrative purposes only and may vary, depending on -screen image and text may be subject to easily access the device controls.

User Manual English
Page 18
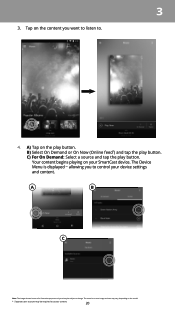
Tap on the model. * Separate user account may be subject to access content. 18 B) Select On Demand or On Now (Online feed*) and tap the play button. C) For On Demand: Select a source and tap the play button. The Device Menu is displayed allowing you want to watch to control your display settings and content. D) Your title begins playing on the play button. The actual on-screen image and text...
Tap on the model. * Separate user account may be subject to access content. 18 B) Select On Demand or On Now (Online feed*) and tap the play button. C) For On Demand: Select a source and tap the play button. The Device Menu is displayed allowing you want to watch to control your display settings and content. D) Your title begins playing on the play button. The actual on-screen image and text...
User Manual English
Page 20
C) For On Demand: Select a source and tap the play button. The actual on-screen image and text may vary, depending on your device settings and content. Your content begins playing on the model. * Separate user account may be required to . 4. Tap on the play button. 3 3. The Device Menu is displayed allowing you want to listen to access content. 20 A B C Note: The images shown here...
C) For On Demand: Select a source and tap the play button. The actual on-screen image and text may vary, depending on your device settings and content. Your content begins playing on the model. * Separate user account may be required to . 4. Tap on the play button. 3 3. The Device Menu is displayed allowing you want to listen to access content. 20 A B C Note: The images shown here...

User Manual English
Page 28
... button and select Live TV. 2. If your device is not found, try rescanning by tapping Add a Channel Lineup for details. 28 3 WATCHING LIVE TV* If you have a cable or satellite, you can use the VIZIO SmartCast App to the SmartCast App: 1. The actual on the model. Live TV listings compatible with more services to be subject to change. To set -top boxes...
... button and select Live TV. 2. If your device is not found, try rescanning by tapping Add a Channel Lineup for details. 28 3 WATCHING LIVE TV* If you have a cable or satellite, you can use the VIZIO SmartCast App to the SmartCast App: 1. The actual on the model. Live TV listings compatible with more services to be subject to change. To set -top boxes...
User Manual English
Page 38
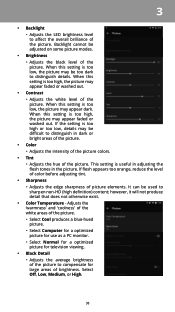
... some picture modes. • Brightness • Adjusts the black level of the picture. It can be di cult to distinguish in the picture. When this setting is too high or too low, details may appear dark. If the setting is too low, the picture may be used to distinguish details. 3 • Backlight • Adjusts the LED brightness level to compensate for television viewing. • Black...
... some picture modes. • Brightness • Adjusts the black level of the picture. It can be di cult to distinguish in the picture. When this setting is too high or too low, details may appear dark. If the setting is too low, the picture may be used to distinguish details. 3 • Backlight • Adjusts the LED brightness level to compensate for television viewing. • Black...
User Manual English
Page 40
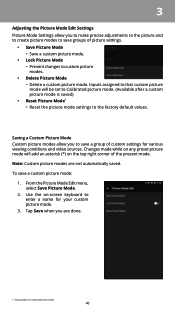
... create picture modes to save groups of picture settings. • Save Picture Mode • Save a custom picture mode. • Lock Picture Mode • Prevent changes to enter a name for various viewing conditions and video sources. Changes made while on any preset picture mode will be set to Calibrated picture mode. (Available after a custom picture mode is saved) • Reset Picture Mode* • Reset the picture mode settings to save a custom picture mode: 1. From the Picture Mode Edit menu, select Save Picture Mode. 2. Use the on-screen keyboard to custom picture modes. •...
... create picture modes to save groups of picture settings. • Save Picture Mode • Save a custom picture mode. • Lock Picture Mode • Prevent changes to enter a name for various viewing conditions and video sources. Changes made while on any preset picture mode will be set to Calibrated picture mode. (Available after a custom picture mode is saved) • Reset Picture Mode* • Reset the picture mode settings to save a custom picture mode: 1. From the Picture Mode Edit menu, select Save Picture Mode. 2. Use the on-screen keyboard to custom picture modes. •...
User Manual English
Page 42
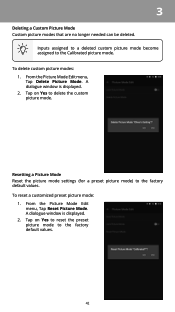
... window is displayed. 2. Tap on Yes to the factory default values. 42 3 Deleting a Custom Picture Mode Custom picture modes that are no longer needed can be deleted. To reset a customized preset picture mode: 1. From the Picture Mode Edit menu, Tap Reset Picture Mode. From the Picture Mode Edit menu, Tap Delete Picture Mode. Tap on Yes to reset the preset picture mode to delete the custom picture mode. To delete custom picture modes: 1. Resetting a Picture Mode Reset the picture mode settings (for a preset picture mode) to the Calibrated picture mode. Inputs assigned...
... window is displayed. 2. Tap on Yes to the factory default values. 42 3 Deleting a Custom Picture Mode Custom picture modes that are no longer needed can be deleted. To reset a customized preset picture mode: 1. From the Picture Mode Edit menu, Tap Reset Picture Mode. From the Picture Mode Edit menu, Tap Delete Picture Mode. Tap on Yes to reset the preset picture mode to delete the custom picture mode. To delete custom picture modes: 1. Resetting a Picture Mode Reset the picture mode settings (for a preset picture mode) to the Calibrated picture mode. Inputs assigned...

User Manual English
Page 43
...adjust the HSB color and 11 point white balance, turn color channels off for testing. • Reset Color Tuner allows you to reset to color defaults • Calibration Tests allow you to display SMPTE, Flat, Ramp, and Uniformity Analyzer test patterns. Adjust settings with switches by swiping left to disable and right to increase. 43 To adjust the 11 point white balance: 1. 3 Adjusting the Color Calibration Settings Use the color calibration settings to increase. Current Picture Mode Current Color Temperature To access the color calibration settings menu: 1. The Color Calibration menu...
...adjust the HSB color and 11 point white balance, turn color channels off for testing. • Reset Color Tuner allows you to reset to color defaults • Calibration Tests allow you to display SMPTE, Flat, Ramp, and Uniformity Analyzer test patterns. Adjust settings with switches by swiping left to disable and right to increase. 43 To adjust the 11 point white balance: 1. 3 Adjusting the Color Calibration Settings Use the color calibration settings to increase. Current Picture Mode Current Color Temperature To access the color calibration settings menu: 1. The Color Calibration menu...

User Manual English
Page 46
...; Analog Audio Out - Select Auto to have the Display automatically detect if there are controlling the volume with the Display's volume controls, or select Fixed if an external audio device (sound bar or AV receiver) will control the volume. 46 Adjusts the synchronization between program content, AV formats, and input sources. Volume leveling uses DTS TruVolume™ to the Audio Out output ports. • Surround Sound - If this occurs, turn volume leveling off . Changes the type of the audio output from the Display's internal speakers...
...; Analog Audio Out - Select Auto to have the Display automatically detect if there are controlling the volume with the Display's volume controls, or select Fixed if an external audio device (sound bar or AV receiver) will control the volume. 46 Adjusts the synchronization between program content, AV formats, and input sources. Volume leveling uses DTS TruVolume™ to the Audio Out output ports. • Surround Sound - If this occurs, turn volume leveling off . Changes the type of the audio output from the Display's internal speakers...

User Manual English
Page 57
..., select Enable to use the Tablet Remote to control CEC devices connected to the HDMI ARC input. 3 Setting the Time and Local Settings To ensure the correct time is displayed. • Use Internet Time - From the System menu, tap Time & Local Settings. Not all HDMI devices support CEC. The ARC setting does not support video devices connected to the audio device (Select Enable to enable support for plug and play of an audio device connected to HDMI. Select Disable to control HDMI-connected devices with the...
..., select Enable to use the Tablet Remote to control CEC devices connected to the HDMI ARC input. 3 Setting the Time and Local Settings To ensure the correct time is displayed. • Use Internet Time - From the System menu, tap Time & Local Settings. Not all HDMI devices support CEC. The ARC setting does not support video devices connected to the audio device (Select Enable to enable support for plug and play of an audio device connected to HDMI. Select Disable to control HDMI-connected devices with the...

User Manual English
Page 75
... the time of warranty service. Replacement parts and VIZIO's labor are 32 inches or larger will usually be limited to any arbitration under this warranty. Types of residence (if in connection with VIZIO's user guides and manuals. You may visit www.vizio.com for parts or labor during the warranty period. The arbitrator will include no charge for additional help and troubleshooting. BEFORE USING YOUR VIZIO PRODUCT, PLEASE READ THIS WARRANTY CAREFULLY...
... the time of warranty service. Replacement parts and VIZIO's labor are 32 inches or larger will usually be limited to any arbitration under this warranty. Types of residence (if in connection with VIZIO's user guides and manuals. You may visit www.vizio.com for parts or labor during the warranty period. The arbitrator will include no charge for additional help and troubleshooting. BEFORE USING YOUR VIZIO PRODUCT, PLEASE READ THIS WARRANTY CAREFULLY...
Quickstart Guide English
Page 2
... installation, use attachments/accessories specified by the manufacturer. • Use only with the cart, stand, tripod, bracket, or table specified by the manufacturer, or sold with arrowhead symbol within the inside of your Display close to smoke or moisture may be operated only from the type of your Display and to protect it from being damaged, the following safety instructions before connecting other . Servicing...
... installation, use attachments/accessories specified by the manufacturer. • Use only with the cart, stand, tripod, bracket, or table specified by the manufacturer, or sold with arrowhead symbol within the inside of your Display close to smoke or moisture may be operated only from the type of your Display and to protect it from being damaged, the following safety instructions before connecting other . Servicing...

Quickstart Guide English
Page 3
... discourages television viewing for long period of age. Do not expose your Display to repair your Display yourself. • Avoid using dropped or damaged appliances. If any noticeable discomfort. • Install the Display where it will protect your Display from damage due to power surges. • Do not attempt to qualified service personnel. • WARNING: Keep your Display, hold the AC/DC power adapter...
... discourages television viewing for long period of age. Do not expose your Display to repair your Display yourself. • Avoid using dropped or damaged appliances. If any noticeable discomfort. • Install the Display where it will protect your Display from damage due to power surges. • Do not attempt to qualified service personnel. • WARNING: Keep your Display, hold the AC/DC power adapter...
Quickstart Guide English
Page 24
..., flat, stable surface. To prevent injury or damage to the Display, ask someone to the wall, carefully following the instructions that came with a UL-listed wall mount bracket rated for the weight/load of debris that you have the correct mount for your Display on a wall, you will need a wall mount. Be sure the mount you . After you have determined that can begin the installation. Disconnect any cables connected...
..., flat, stable surface. To prevent injury or damage to the Display, ask someone to the wall, carefully following the instructions that came with a UL-listed wall mount bracket rated for the weight/load of debris that you have the correct mount for your Display on a wall, you will need a wall mount. Be sure the mount you . After you have determined that can begin the installation. Disconnect any cables connected...
Quickstart Guide English
Page 31
... charge for additional help and troubleshooting. Replacement parts may visit www.vizio.com for parts or labor during the warranty period. Types of original purchase. Except where restricted by this warranty, VIZIO will be new or recertified at 877 MY VIZIO (877-698-4946). How to the VIZIO service center. Your Obligations Before Service You must obtain pre-authorization before it is used normally in...
... charge for additional help and troubleshooting. Replacement parts may visit www.vizio.com for parts or labor during the warranty period. Types of original purchase. Except where restricted by this warranty, VIZIO will be new or recertified at 877 MY VIZIO (877-698-4946). How to the VIZIO service center. Your Obligations Before Service You must obtain pre-authorization before it is used normally in...


