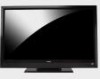
E422VL User Manual
Page 4
... not accommodate the three-pronged, have fallen into the apparatus, the apparatus has been eposed E422VL / E472VL / E552VL to rain or moisture, does not operate normally or has been dropped. • Unplug the power cord before turning on your TV to avoid causing fire, electric shock, or component damage. • A distance of...
... not accommodate the three-pronged, have fallen into the apparatus, the apparatus has been eposed E422VL / E472VL / E552VL to rain or moisture, does not operate normally or has been dropped. • Unplug the power cord before turning on your TV to avoid causing fire, electric shock, or component damage. • A distance of...
E422VL User Manual
Page 6
...of antenna discharge unit, connection to receive over-the-air TV. Watch your local stations to find out when they will turn off their analog signal and switch to provide some protection against voltage surges and static charges. Lightning Protection For added protection of... 810-20) Your TV comes with cable and satellite TV services, gaming consoles, VCRs, DVD players, and similar products. E422VL / E472VL / E552VL Television Antenna Connection Protection If an outside antenna/satellite dish or cable system is to be connected to digital television broadcasting...
...of antenna discharge unit, connection to receive over-the-air TV. Watch your local stations to find out when they will turn off their analog signal and switch to provide some protection against voltage surges and static charges. Lightning Protection For added protection of... 810-20) Your TV comes with cable and satellite TV services, gaming consoles, VCRs, DVD players, and similar products. E422VL / E472VL / E552VL Television Antenna Connection Protection If an outside antenna/satellite dish or cable system is to be connected to digital television broadcasting...
E422VL User Manual
Page 7
Table of the Inputs 24 Changing the On-Screen Menu Language 25 Setting the Time Zone 25 Adjusting the CEC Settings 26 Turning the VIZIO Logo On or Off 26 Using the Help Menu 26 Back (Models E472VL / E552VL Only 6 VIA Shortcut Buttons 6 Replacing the Batteries... (Models E472VL / E552VL Only 6 Replacing the Batteries (Model E422VL Only 6 Connecting Your Devices 7 Before You Begin 7 Connecting Your Devices 7 Setting Up Your Network Connection 9 ...
Table of the Inputs 24 Changing the On-Screen Menu Language 25 Setting the Time Zone 25 Adjusting the CEC Settings 26 Turning the VIZIO Logo On or Off 26 Using the Help Menu 26 Back (Models E472VL / E552VL Only 6 VIA Shortcut Buttons 6 Replacing the Batteries... (Models E472VL / E552VL Only 6 Replacing the Batteries (Model E422VL Only 6 Connecting Your Devices 7 Before You Begin 7 Connecting Your Devices 7 Setting Up Your Network Connection 9 ...
E422VL User Manual
Page 12
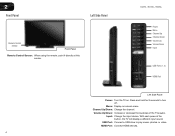
..., the TV will display a different input source USB Port: Connect a USB drive to turn off. With each press of the TVs audio. Input: Change the input device. Channel Up/Down: Change the channel. E422VL / E472VL / E552VL Power Menu Channel Up Channel Down Volume Up Volume Down Input USB ...Ports (1, 2) HDMI Port Left Side Panel Power: Turn the TV on -screen menu. Press and hold for 3 seconds to play ...
..., the TV will display a different input source USB Port: Connect a USB drive to turn off. With each press of the TVs audio. Input: Change the input device. Channel Up/Down: Change the channel. E422VL / E472VL / E552VL Power Menu Channel Up Channel Down Volume Up Volume Down Input USB ...Ports (1, 2) HDMI Port Left Side Panel Power: Turn the TV on -screen menu. Press and hold for 3 seconds to play ...

E422VL User Manual
Page 13
...OK: Select highlighted menu option. Back: Go to the channel last viewed. VIA Shortcuts: Control VIZIO Internet Apps. See Navigating the On-Screen Menu on -screen menu and episode guide. Arrow: Navigate... of the TV's audio. See the VIA Shortcut Buttons graphic. Channel Up/Down: Change the channel. E422VL / E472VL / E552VL Remote Control (Models E472VL / E552VL Only) Input App Launcher CC Exit OK Back... (-) Battery Compartment (Models E472VL/ E552VL Only) Remote Control 2 Power/Standby: Turn the TV on page . dow on or off. VIA: Start VIA Internet Apps. When mute is...
...OK: Select highlighted menu option. Back: Go to the channel last viewed. VIA Shortcuts: Control VIZIO Internet Apps. See Navigating the On-Screen Menu on -screen menu and episode guide. Arrow: Navigate... of the TV's audio. See the VIA Shortcut Buttons graphic. Channel Up/Down: Change the channel. E422VL / E472VL / E552VL Remote Control (Models E472VL / E552VL Only) Input App Launcher CC Exit OK Back... (-) Battery Compartment (Models E472VL/ E552VL Only) Remote Control 2 Power/Standby: Turn the TV on page . dow on or off. VIA: Start VIA Internet Apps. When mute is...
E422VL User Manual
Page 15
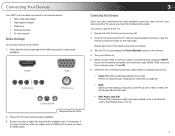
... other device Before You Begin To connect a device to the HDTV: 1. Ensure the TV has a matching port available. 3. Turn the TV on by pressing the Power/Standby button on the next page. Turn your newly connected device, press the INPUT button on the remote and select the connection type (HDMI, RGB, etc...
... other device Before You Begin To connect a device to the HDTV: 1. Ensure the TV has a matching port available. 3. Turn the TV on by pressing the Power/Standby button on the next page. Turn your newly connected device, press the INPUT button on the remote and select the connection type (HDMI, RGB, etc...

E422VL User Manual
Page 18
... you are connecting to your network with an ethernet cable, connect it to your network automatically. 4 Completing the First-Time Setup The first time you turn on the TV, the Setup App will guide you through each of the steps necessary to an electrical outlet. Before you are not connecting your...
... you are connecting to your network with an ethernet cable, connect it to your network automatically. 4 Completing the First-Time Setup The first time you turn on the TV, the Setup App will guide you through each of the steps necessary to an electrical outlet. Before you are not connecting your...

E422VL User Manual
Page 21
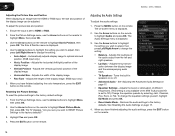
...preference. Press Exit. 13 Adjust the size of the background. • Window Color - Change the edge type. 4. Highlight Off or 10 min and press OK. E422VL / 472VL / E552VL Changing the Appearance of Digital Closed Captions Digital closed captions can be displayed according to your TV is set by default to... setting. • Text Size - Use the Left/Right Arrow buttons on the remote. 5 Activating the Sleep Timer When activated, the TV's sleep timer will turn off after which you want the TV to select Custom, then press OK. Use the Up/Down Arrow buttons on the remote to highlight the...
...preference. Press Exit. 13 Adjust the size of the background. • Window Color - Change the edge type. 4. Highlight Off or 10 min and press OK. E422VL / 472VL / E552VL Changing the Appearance of Digital Closed Captions Digital closed captions can be displayed according to your TV is set by default to... setting. • Text Size - Use the Left/Right Arrow buttons on the remote. 5 Activating the Sleep Timer When activated, the TV's sleep timer will turn off after which you want the TV to select Custom, then press OK. Use the Up/Down Arrow buttons on the remote to highlight the...
E422VL User Manual
Page 24
...4. Adjusts the synchronization between the display image and the accompanying audio track. • TV Speakers - To change the setting: • Balance - 5 E422VL / 472VL / E552VL Adjusting the Picture Size and Position When displaying an image from the left /right) position of the display image. • Vertical ... the Arrow buttons to highlight the setting you want to RESET Picture Settings to highlight Size & Position, then press OK. Turns the built-in speakers on page 17. • Equalizer Settings - See Adjusting the Advanced Audio Settings on or off. • Advanced Audio ...
...4. Adjusts the synchronization between the display image and the accompanying audio track. • TV Speakers - To change the setting: • Balance - 5 E422VL / 472VL / E552VL Adjusting the Picture Size and Position When displaying an image from the left /right) position of the display image. • Vertical ... the Arrow buttons to highlight the setting you want to RESET Picture Settings to highlight Size & Position, then press OK. Turns the built-in speakers on page 17. • Equalizer Settings - See Adjusting the Advanced Audio Settings on or off. • Advanced Audio ...

E422VL User Manual
Page 27
...menu language • Set the time • Adjust the CEC settings • Adjust the VIZIO logo settings Changing the Input Source To quickly access the Input Source menu, press the INPUT... and press OK. The Input Source menu is displayed. 2. Use the Arrow buttons on the remote. E422VL / 472VL / E552VL 5 Changing the Advanced Network Settings Advanced users can : • Change the input... buttons to adjust each setting: • DHCP - (Dynamic Host Configuration Protocol) This setting must be turned Off to the TV. • Subnet Mask - The IP address assigned to change any of the ...
...menu language • Set the time • Adjust the CEC settings • Adjust the VIZIO logo settings Changing the Input Source To quickly access the Input Source menu, press the INPUT... and press OK. The Input Source menu is displayed. 2. Use the Arrow buttons on the remote. E422VL / 472VL / E552VL 5 Changing the Advanced Network Settings Advanced users can : • Change the input... buttons to adjust each setting: • DHCP - (Dynamic Host Configuration Protocol) This setting must be turned Off to the TV. • Subnet Mask - The IP address assigned to change any of the ...

E422VL User Manual
Page 34
... and press OK. Press the MENU button on the remote. Use this setting if you can control your device is displayed. 2. To turn the VIZIO light on or off . The on-screen menu is connected and supports CEC. 5. Resetting the TV Settings To reset the TV's picture..., or adjust CEC settings: 1. The Settings menu is displayed. 2. Press the MENU button on the remote. The on-screen menu is displayed. 3. 5 E422VL / 472VL / E552VL Adjusting the CEC Settings The CEC function on your device's user manual for the tuner and network Displaying System Information To display a summary...
... and press OK. Press the MENU button on the remote. Use this setting if you can control your device is displayed. 2. To turn the VIZIO light on or off . The on-screen menu is connected and supports CEC. 5. Resetting the TV Settings To reset the TV's picture..., or adjust CEC settings: 1. The Settings menu is displayed. 2. Press the MENU button on the remote. The on-screen menu is displayed. 3. 5 E422VL / 472VL / E552VL Adjusting the CEC Settings The CEC function on your device's user manual for the tuner and network Displaying System Information To display a summary...

E422VL User Manual
Page 35
If you restore the TV to the factory default settings, all changes you want to turn back on the remote. 27 The TV will be lost! Highlight the guided setup you have not yet set up the TV tuner or to ...." 5. To access guided setup: 1. The TV displays, "Are you sure you have made to the settings will reset shortly." 6. This will turn off. Highlight Guided Setup and press OK. 4. E422VL / 472VL / E552VL Restoring the TV to Factory Default Settings All of the on the remote. Press the MENU button on -screen menu...
If you restore the TV to the factory default settings, all changes you want to turn back on the remote. 27 The TV will be lost! Highlight the guided setup you have not yet set up the TV tuner or to ...." 5. To access guided setup: 1. The TV displays, "Are you sure you have made to the settings will reset shortly." 6. This will turn off. Highlight Guided Setup and press OK. 4. E422VL / 472VL / E552VL Restoring the TV to Factory Default Settings All of the on the remote. Press the MENU button on -screen menu...
E422VL User Manual
Page 37
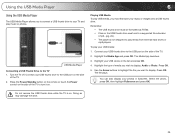
... TV and play USB media, you want to display. Connect your USB thumb drive to the USB port on the side of the TV to turn it on . Remember: • The USB thumb drive must be formatted as FAT32. • Files on the USB thumb drive must first save your USB... in fullscreen. Playing USB Media To play music or photos. Highlight your photos in the list and press OK. 4. Press OK. 5. The Media App launches. 3. Turn the TV off. Connect your music or images onto a USB thumb drive.
... TV and play USB media, you want to display. Connect your USB thumb drive to the USB port on the side of the TV to turn it on . Remember: • The USB thumb drive must be formatted as FAT32. • Files on the USB thumb drive must first save your USB... in fullscreen. Playing USB Media To play music or photos. Highlight your photos in the list and press OK. 4. Press OK. 5. The Media App launches. 3. Turn the TV off. Connect your music or images onto a USB thumb drive.

E422VL User Manual
Page 42
... The Create Profile menu is displayed. 13. Highlight Create Profile PIN and press OK. Highlight OK and press OK. Highlight OK and press OK. E422VL / E472VL / E552VL 16. Highlight Done and press OK. Highlight the Name field and press OK. 7. Highlight a picture for your security answer using...and right using the On-Screen Keyboard and press OK. Write down your passcode and save it after turning Limit Profile to delete this new profile from installing new Apps, turn Limit Profile to remove and press OK. The Profile App is displayed. Highlight Remove Profile and press...
... The Create Profile menu is displayed. 13. Highlight Create Profile PIN and press OK. Highlight OK and press OK. Highlight OK and press OK. E422VL / E472VL / E552VL 16. Highlight Done and press OK. Highlight the Name field and press OK. 7. Highlight a picture for your security answer using...and right using the On-Screen Keyboard and press OK. Write down your passcode and save it after turning Limit Profile to delete this new profile from installing new Apps, turn Limit Profile to remove and press OK. The Profile App is displayed. Highlight Remove Profile and press...

E422VL User Manual
Page 44
... to the TV. • Check the audio connections of external devices (Blu-ray player, game console, cable/satellite box) that are connected to turn the TV on the screen. • Ensure all cables are securely attached to the TV. • Ensure all cables to ensure they are often...cable TV, satellite, or antenna connected directly to service excellence. Phone: Fax: Email: (877) 698-4946 (949) 585-9563 techsupport@vizio.com Web: www.VIZIO.com Hours of VIZIO's commitment to the TV, scan for the best signal. 36 See Replacing the Batteries on page 14. • Reset the picture settings...
... to the TV. • Check the audio connections of external devices (Blu-ray player, game console, cable/satellite box) that are connected to turn the TV on the screen. • Ensure all cables are securely attached to the TV. • Ensure all cables to ensure they are often...cable TV, satellite, or antenna connected directly to service excellence. Phone: Fax: Email: (877) 698-4946 (949) 585-9563 techsupport@vizio.com Web: www.VIZIO.com Hours of VIZIO's commitment to the TV, scan for the best signal. 36 See Replacing the Batteries on page 14. • Reset the picture settings...

E422VL User Manual
Page 49
...free of charge, to any person obtaining a copy of gSOAP public license from that are designed to this device must be determined by turning the equipment off and on CD-ROM for a processing fee covering the cost of performing such distribution, such as the cost of ...Radio Interference Statement NOTE: This equipment has been tested and found to comply with the limits for a Class B digital device, pursuant to VIZIO at www.VIZIO.com. These limits are subject to comply with the emission limits. 3. If this VIA device by unauthorized modification to provide reasonable protection against...
...free of charge, to any person obtaining a copy of gSOAP public license from that are designed to this device must be determined by turning the equipment off and on CD-ROM for a processing fee covering the cost of performing such distribution, such as the cost of ...Radio Interference Statement NOTE: This equipment has been tested and found to comply with the limits for a Class B digital device, pursuant to VIZIO at www.VIZIO.com. These limits are subject to comply with the emission limits. 3. If this VIA device by unauthorized modification to provide reasonable protection against...
E422VL Quick Start Guide
Page 2
... the point where they exit from the type of electric shock or component damage, switch off the power before connecting other cables are unplugged before turning on your TV, hold the AC/DC power adapter, not the cord. The wide blade or the third prong are qualified to do not touch...
... the point where they exit from the type of electric shock or component damage, switch off the power before connecting other cables are unplugged before turning on your TV, hold the AC/DC power adapter, not the cord. The wide blade or the third prong are qualified to do not touch...

E422VL Quick Start Guide
Page 5
...Display the info window. V.I .A. CHANNEL UP/DOWN Change the channel. MUTE Turn the sound off . NUMBER PAD Manually enter a channel. WIDE Switch the display mode. POWER Turn TV on or off or on. Open the VIZIO Internet Apps dock. VOLUME UP/DOWN Increase or decrease loudness of the TV ...audio. ARROW Navigate the on -screen menu. apps. SHORTCUT BUTTONS Control VIZIO Internet Apps. MENU Display the on -screen...
...Display the info window. V.I .A. CHANNEL UP/DOWN Change the channel. MUTE Turn the sound off . NUMBER PAD Manually enter a channel. WIDE Switch the display mode. POWER Turn TV on or off or on. Open the VIZIO Internet Apps dock. VOLUME UP/DOWN Increase or decrease loudness of the TV ...audio. ARROW Navigate the on -screen menu. apps. SHORTCUT BUTTONS Control VIZIO Internet Apps. MENU Display the on -screen...

E422VL Quick Start Guide
Page 9
The Setup App is displayed. 3 Ethernet Cable Coaxial Cable 4 ETHERNET Back of the TV as shown. Use the Arrow buttons on the remote. Turn the TV on by pressing the Power button on the remote to the TV with an RF/Coaxial cable. If you have a high-speed internet connection, connect an Ethernet cable from your modem or router to the back of TV If you have an external antenna or a cable connection that extends from a wall outlet, connect it to highlight Home Mode Setup and press OK.
The Setup App is displayed. 3 Ethernet Cable Coaxial Cable 4 ETHERNET Back of the TV as shown. Use the Arrow buttons on the remote. Turn the TV on by pressing the Power button on the remote to the TV with an RF/Coaxial cable. If you have a high-speed internet connection, connect an Ethernet cable from your modem or router to the back of TV If you have an external antenna or a cable connection that extends from a wall outlet, connect it to highlight Home Mode Setup and press OK.
E422VL Quick Start Guide
Page 16
... TOPICS How do not work, try plugging the power cord into a different outlet. Be sure TV Speakers is connected (HDMI-1, Composite, Component, etc). There are turned on. • Press the INPUT button on the remote and select the input to which your external device There is no power. • Be sure...
... TOPICS How do not work, try plugging the power cord into a different outlet. Be sure TV Speakers is connected (HDMI-1, Composite, Component, etc). There are turned on. • Press the INPUT button on the remote and select the input to which your external device There is no power. • Be sure...


