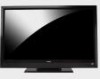
E422VL User Manual
Page 4
...any heat sources such as radiators, heat registers, stoves, or other components to qualified service personnel. Never spill liquids on your TV. • Your TV should be operated only from being walked on or pinched, particularly at least three feet should be observed for replacement of the...before operating your safety. If your outlet does not accommodate the three-pronged, have fallen into the apparatus, the apparatus has been eposed E422VL / E472VL / E552VL to persons. Read the following instructions should be sure these instructions in any heat source, such as when the ...
...any heat sources such as radiators, heat registers, stoves, or other components to qualified service personnel. Never spill liquids on your TV. • Your TV should be operated only from being walked on or pinched, particularly at least three feet should be observed for replacement of the...before operating your safety. If your outlet does not accommodate the three-pronged, have fallen into the apparatus, the apparatus has been eposed E422VL / E472VL / E552VL to persons. Read the following instructions should be sure these instructions in any heat source, such as when the ...
E422VL User Manual
Page 5
... avoid electric shock, avoid handling the power cord during electrical storms. • Unplug your TV from moisture. Your TV is damaged, the internal components may cause the batteries to rain or moisture. E422VL / E472VL / E552VL • Do not overload power strips and extension cords. Opening or... removing the back cover may damage the wires inside the cord and cause fire or electric shock. Do not expose your TV yourself. • Avoid using ...
... avoid electric shock, avoid handling the power cord during electrical storms. • Unplug your TV from moisture. Your TV is damaged, the internal components may cause the batteries to rain or moisture. E422VL / E472VL / E552VL • Do not overload power strips and extension cords. Opening or... removing the back cover may damage the wires inside the cord and cause fire or electric shock. Do not expose your TV yourself. • Avoid using ...
E422VL User Manual
Page 6
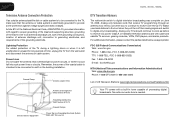
... antenna now need a converter box to continue to receive over-the-air TV. Ground Clamp Antenna Lead In Wire DTV Transition Advisory The nationwide switch to digital-only broadcasting. E422VL / E472VL / E552VL Television Antenna Connection Protection If an outside antenna/satellite ... requirements of the grounding electrode. Article 810 of the National Electrical Code, ANSI/NFPSA 70, provides information with cable and satellite TV services, gaming consoles, VCRs, DVD players, and similar products. Lightning Protection For added protection of the lead-in the building installation...
... antenna now need a converter box to continue to receive over-the-air TV. Ground Clamp Antenna Lead In Wire DTV Transition Advisory The nationwide switch to digital-only broadcasting. E422VL / E472VL / E552VL Television Antenna Connection Protection If an outside antenna/satellite ... requirements of the grounding electrode. Article 810 of the National Electrical Code, ANSI/NFPSA 70, provides information with cable and satellite TV services, gaming consoles, VCRs, DVD players, and similar products. Lightning Protection For added protection of the lead-in the building installation...
E422VL User Manual
Page 7
... 25 Setting the Time Zone 25 Adjusting the CEC Settings 26 Turning the VIZIO Logo On or Off 26 Using the Help Menu 26 Back (Models E472VL...6 VIA Shortcut Buttons 6 Replacing the Batteries (Models E472VL / E552VL Only 6 Replacing the Batteries (Model E422VL Only 6 Connecting Your Devices 7 Before You Begin 7 Connecting Your Devices 7 Setting Up Your Network Connection... Locks 24 Changing the Names of Contents Installing the TV 1 Inspecting the Package Contents 1 Installing the TV 1 Installing the TV Stand 1 Installing the TV on a Wall 2 Controls and Connections 3 Rear Panel...
... 25 Setting the Time Zone 25 Adjusting the CEC Settings 26 Turning the VIZIO Logo On or Off 26 Using the Help Menu 26 Back (Models E472VL...6 VIA Shortcut Buttons 6 Replacing the Batteries (Models E472VL / E552VL Only 6 Replacing the Batteries (Model E422VL Only 6 Connecting Your Devices 7 Before You Begin 7 Connecting Your Devices 7 Setting Up Your Network Connection... Locks 24 Changing the Names of Contents Installing the TV 1 Inspecting the Package Contents 1 Installing the TV 1 Installing the TV Stand 1 Installing the TV on a Wall 2 Controls and Connections 3 Rear Panel...
E422VL User Manual
Page 8
... 29 Using the USB Media Player 29 Connecting a USB Thumb Drive to the TV 29 Playing USB Media 29 Using VIZIO Internet Apps 32 Using the VIA Shortcut Buttons 32 Using the VIA Dock 32 ...User Profile 34 Restoring the VIA Dock to the Factory Default Settings 35 Troubleshooting & Technical Support 36 The TV displays "No Signal 36 There is no power 36 The power is on, but there is no ... good 36 The picture is distorted 37 The display image does not cover the entire screen 37 E422VL / E472VL / E552VL The TV has pixels (dots) that are always dark or always lit 37 I see "noise" or static...
... 29 Using the USB Media Player 29 Connecting a USB Thumb Drive to the TV 29 Playing USB Media 29 Using VIZIO Internet Apps 32 Using the VIA Shortcut Buttons 32 Using the VIA Dock 32 ...User Profile 34 Restoring the VIA Dock to the Factory Default Settings 35 Troubleshooting & Technical Support 36 The TV displays "No Signal 36 There is no power 36 The power is on, but there is no ... good 36 The picture is distorted 37 The display image does not cover the entire screen 37 E422VL / E472VL / E552VL The TV has pixels (dots) that are always dark or always lit 37 I see "noise" or static...
E422VL User Manual
Page 9
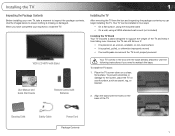
...8226; On a flat surface, using the included stand • On a wall, using a VESA-standard wall mount (not included) Installing the TV Stand Your TV includes a stand designed to ensure nothing is not properly secured VIZIO LCD HDTV with Stand User Manual and Quick Start Guide Remote Control with Batteries Your... TV comes in the box with the holes on an uneven, unstable, or non-level surface • It is pushed, pulled, or ...
...8226; On a flat surface, using the included stand • On a wall, using a VESA-standard wall mount (not included) Installing the TV Stand Your TV includes a stand designed to ensure nothing is not properly secured VIZIO LCD HDTV with Stand User Manual and Quick Start Guide Remote Control with Batteries Your... TV comes in the box with the holes on an uneven, unstable, or non-level surface • It is pushed, pulled, or ...
E422VL User Manual
Page 10
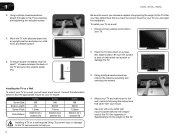
... a wall requires lifting. To prevent injury or damage to the TV, ask someone to find the appropriate mount for the weight of this TV. See Appendix A Specifications for your TV model: Screw Size: Screw Length: Screw Pitch: Hole Pattern: E422VL M6 20 1.0mm 200mm (V) x 200mm (H) E472VL M6 20mm 1.0mm 200mm... an upright position and place on a wall, you choose is clear of the TV. Using a philips-head screwdriver, attach the base to the wall, carefully following the instructions that can begin the installation. E422VL / E472VL / E552VL Be sure the mount you will need a wall mount....
... a wall requires lifting. To prevent injury or damage to the TV, ask someone to find the appropriate mount for the weight of this TV. See Appendix A Specifications for your TV model: Screw Size: Screw Length: Screw Pitch: Hole Pattern: E422VL M6 20 1.0mm 200mm (V) x 200mm (H) E472VL M6 20mm 1.0mm 200mm... an upright position and place on a wall, you choose is clear of the TV. Using a philips-head screwdriver, attach the base to the wall, carefully following the instructions that can begin the installation. E422VL / E472VL / E552VL Be sure the mount you will need a wall mount....
E422VL User Manual
Page 12
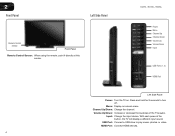
Channel Up/Down: Change the channel. Volume Up/Down: Increase or decrease the loudness of the button, the TV will display a different input source USB Port: Connect a USB drive to turn off. 2 Front Panel Left Side Panel Remote Control Sensor Front Panel Remote Control ...Sensor: When using the remote, point it directly at this sensor. Press and hold for 3 seconds to play music, photos, or video. E422VL / E472VL / E552VL Power Menu Channel Up Channel Down Volume Up Volume Down Input USB Ports (1, 2) HDMI Port Left Side Panel Power: Turn the...
Channel Up/Down: Change the channel. Volume Up/Down: Increase or decrease the loudness of the button, the TV will display a different input source USB Port: Connect a USB drive to turn off. 2 Front Panel Left Side Panel Remote Control Sensor Front Panel Remote Control ...Sensor: When using the remote, point it directly at this sensor. Press and hold for 3 seconds to play music, photos, or video. E422VL / E472VL / E552VL Power Menu Channel Up Channel Down Volume Up Volume Down Input USB Ports (1, 2) HDMI Port Left Side Panel Power: Turn the...

E422VL User Manual
Page 13
...OK: Select highlighted menu option. Back: Go to the channel last viewed. VIA Shortcuts: Control VIZIO Internet Apps. Volume Up/Down: Increase or decrease the loudness of the button, the channel will... increase or decrease by one. Channel Up/Down: Change the channel. With each press of the TV's audio. VIA: Start VIA Internet Apps. Mute: Turn the sound off or on -screen menu... enter a digital sub-channel. (For example, 18-4 or 18-5.) Wide: Switch between display modes. 5 E422VL / E472VL / E552VL Remote Control (Models E472VL / E552VL Only) Input App Launcher CC Exit OK Back V...
...OK: Select highlighted menu option. Back: Go to the channel last viewed. VIA Shortcuts: Control VIZIO Internet Apps. Volume Up/Down: Increase or decrease the loudness of the button, the channel will... increase or decrease by one. Channel Up/Down: Change the channel. With each press of the TV's audio. VIA: Start VIA Internet Apps. Mute: Turn the sound off or on -screen menu... enter a digital sub-channel. (For example, 18-4 or 18-5.) Wide: Switch between display modes. 5 E422VL / E472VL / E552VL Remote Control (Models E472VL / E552VL Only) Input App Launcher CC Exit OK Back V...
E422VL User Manual
Page 15
... device, press the INPUT button on the remote and select the connection type (HDMI, RGB, etc) from wall) Perform a channel scan. Turn the TV on by pressing the Power/Standby button on the next page. Turn your device are off. 2. See the Device Connection Chart on the remote. 4. ... has one of the following types of video ports available: HDMI RGB Component RF/Antenna Composite AV Required Device Ports 2. Connect the device and the TV. Ensure each end of devices/connection types below for Channels on page 20. • RGB Make sure the desktop resolution on . 5. Scanning for...
... device, press the INPUT button on the remote and select the connection type (HDMI, RGB, etc) from wall) Perform a channel scan. Turn the TV on by pressing the Power/Standby button on the next page. Turn your device are off. 2. See the Device Connection Chart on the remote. 4. ... has one of the following types of video ports available: HDMI RGB Component RF/Antenna Composite AV Required Device Ports 2. Connect the device and the TV. Ensure each end of devices/connection types below for Channels on page 20. • RGB Make sure the desktop resolution on . 5. Scanning for...

E422VL User Manual
Page 16
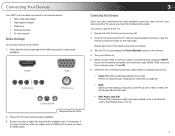
Use the cable(s) shown to connect the TV to your device. 3 Select one of the connection types. BEST BETTER HDMI RF/ COAXIAL RGB COMPONENT GOOD COMPOSITE AV 8 E422VL / E472VL / E552VL Select One: OR OR OR OR DIGITAL DIGITAL / ANALOG ANALOG ANALOG ANALOG Device Connection Chart
Use the cable(s) shown to connect the TV to your device. 3 Select one of the connection types. BEST BETTER HDMI RF/ COAXIAL RGB COMPONENT GOOD COMPOSITE AV 8 E422VL / E472VL / E552VL Select One: OR OR OR OR DIGITAL DIGITAL / ANALOG ANALOG ANALOG ANALOG Device Connection Chart
E422VL User Manual
Page 17
Use the Guided Network Setup to a wired network: 1. E422VL / E472VL / E552VL 3 Setting Up Your Network Connection Your TV is internet-ready, and can use VIA apps to deliver popular online content to your TV. Ensure you can be connected to your home network in two ways: • Wired..., using the RJ45 (ethernet) connector on the back panel • Wirelessly, using your home wireless network Once you have connected to your TV • A router or modem with an available ethernet port • A high-speed internet connection 2. See Using Guided Setup on page 27. 9 ...
Use the Guided Network Setup to a wired network: 1. E422VL / E472VL / E552VL 3 Setting Up Your Network Connection Your TV is internet-ready, and can use VIA apps to deliver popular online content to your TV. Ensure you can be connected to your home network in two ways: • Wired..., using the RJ45 (ethernet) connector on the back panel • Wirelessly, using your home wireless network Once you have connected to your TV • A router or modem with an available ethernet port • A high-speed internet connection 2. See Using Guided Setup on page 27. 9 ...

E422VL User Manual
Page 18
... of your network automatically. Enter your network with an ethernet cable, connect it to the ethernet port on the TV. Before you begin the first-time setup: • Your TV should be installed and the power cord should be connected to an electrical outlet. To complete the first-time setup...and Privacy Policy for use. Use the Up/Down Arrow buttons on and the Setup App starts. 4. See Installing the TV on page 1. • Your devices should be connected. The TV powers on the remote to highlight Home Mode Setup and press OK. 6. 4 Completing the First-Time Setup The first ...
... of your network automatically. Enter your network with an ethernet cable, connect it to the ethernet port on the TV. Before you begin the first-time setup: • Your TV should be installed and the power cord should be connected to an electrical outlet. To complete the first-time setup...and Privacy Policy for use. Use the Up/Down Arrow buttons on and the Setup App starts. 4. See Installing the TV on page 1. • Your devices should be connected. The TV powers on the remote to highlight Home Mode Setup and press OK. 6. 4 Completing the First-Time Setup The first ...
E422VL User Manual
Page 19
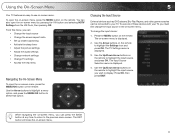
...; Set up closed captioning • Activate the sleep timer • Adjust the picture settings • Adjust the audio settings • Change network settings • Change TV settings • Access the help menu Navigating the On-Screen Menu To open the on-screen menu, press the MENU/OK button on -screen menu... in the on -screen menu, you can press the BACK button at any time to return to highlight the Settings icon and press OK. The TV Settings menu is displayed. 4. Press OK, then press EXIT. To use on the remote. While navigating the on -screen menu. Press the MENU button ...
...; Set up closed captioning • Activate the sleep timer • Adjust the picture settings • Adjust the audio settings • Change network settings • Change TV settings • Access the help menu Navigating the On-Screen Menu To open the on-screen menu, press the MENU/OK button on -screen menu... in the on -screen menu, you can press the BACK button at any time to return to highlight the Settings icon and press OK. The TV Settings menu is displayed. 4. Press OK, then press EXIT. To use on the remote. While navigating the on -screen menu. Press the MENU button ...

E422VL User Manual
Page 20
...E422VL / 472VL / E552VL Changing the Screen Aspect Ratio The TV can display closed captions for digital (ATSC) TV channels. 4. Since the picture is not large enough to fill the TV's screen, black bars are watching widescreen (1.85:1 or 2.35:1) content, black bars will still appear on the top and bottom of closed captions, the TV... Normal, and Stretch. Press the MENU button on the remote to see : • Analog Closed Caption for analog (NTSC) TV channels. • Digital Closed Caption for programs that include them . For example, CC1 may display English captions and CC2 may ...
...E422VL / 472VL / E552VL Changing the Screen Aspect Ratio The TV can display closed captions for digital (ATSC) TV channels. 4. Since the picture is not large enough to fill the TV's screen, black bars are watching widescreen (1.85:1 or 2.35:1) content, black bars will still appear on the top and bottom of closed captions, the TV... Normal, and Stretch. Press the MENU button on the remote to see : • Analog Closed Caption for analog (NTSC) TV channels. • Digital Closed Caption for programs that include them . For example, CC1 may display English captions and CC2 may ...

E422VL User Manual
Page 21
...; Color - To use the Left/ Right Arrow buttons to manually change the setting: • Caption Style - Press OK, then press EXIT. E422VL / 472VL / E552VL Changing the Appearance of Digital Closed Captions Digital closed captions: 1. From the Closed Caption menu, use the Up/Down Arrow buttons... the edge type. 4. The Timers menu is displayed. 3. To change the appearance of digital closed captions can be displayed according to your TV is being displayed on -screen menu is displayed. 2. Choose Auto to keep default settings or Custom to change each setting. • Text...
...; Color - To use the Left/ Right Arrow buttons to manually change the setting: • Caption Style - Press OK, then press EXIT. E422VL / 472VL / E552VL Changing the Appearance of Digital Closed Captions Digital closed captions: 1. From the Closed Caption menu, use the Up/Down Arrow buttons... the edge type. 4. The Timers menu is displayed. 3. To change the appearance of digital closed captions can be displayed according to your TV is being displayed on -screen menu is displayed. 2. Choose Auto to keep default settings or Custom to change each setting. • Text...

E422VL User Manual
Page 22
...be too dark to distinguish details. Sharpness - Also try these modes for their respective sports. This option is not available unless Ambient 14 E422VL / 472VL / E552VL Light Sensor is displayed. 2. Brightness - Adjusts the intensity of picture elements. Adjusts the edge sharpness of the ...Picture Settings menu is displayed. 3. however, it will produce the best picture in the picture. 5 Adjusting the Picture Settings Your TV display can be adjusted to suit your preferences and viewing conditions. To adjust the picture settings: 1. See Adjusting the Advanced Picture ...
...be too dark to distinguish details. Sharpness - Also try these modes for their respective sports. This option is not available unless Ambient 14 E422VL / 472VL / E552VL Light Sensor is displayed. 2. Brightness - Adjusts the intensity of picture elements. Adjusts the edge sharpness of the ...Picture Settings menu is displayed. 3. however, it will produce the best picture in the picture. 5 Adjusting the Picture Settings Your TV display can be adjusted to suit your preferences and viewing conditions. To adjust the picture settings: 1. See Adjusting the Advanced Picture ...
E422VL User Manual
Page 24
...The Audio Settings menu is displayed. 4. To change the setting: • Auto Adjust - To adjust the picture size and position: 1. Position - The TV displays, "Are you sure you wish to adjust, then press Left/Right Arrow to highlight More, then press OK. 2. From the Picture Settings menu,... on or off. • Advanced Audio - Turns the built-in speakers on the remote. See Resetting the Audio Settings on the remote. 5 E422VL / 472VL / E552VL Adjusting the Picture Size and Position When displaying an image from the left /right) position of the display image. • ...
...The Audio Settings menu is displayed. 4. To change the setting: • Auto Adjust - To adjust the picture size and position: 1. Position - The TV displays, "Are you sure you wish to adjust, then press Left/Right Arrow to highlight More, then press OK. 2. From the Picture Settings menu,... on or off. • Advanced Audio - Turns the built-in speakers on the remote. See Resetting the Audio Settings on the remote. 5 E422VL / 472VL / E552VL Adjusting the Picture Size and Position When displaying an image from the left /right) position of the display image. • ...
E422VL User Manual
Page 25
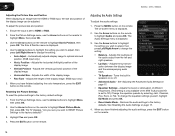
... crisp details and clear, intelligible dialog. Select Surround or Standard. • SRS TruVolume - Select Off, Dolby Digital, or PCM. • Analog Audio Out - The TV displays, "Are you sure you have finished adjusting the advanced audio settings, press the EXIT button on the remote. 5 Resetting the Audio Settings To reset... fluctuations due to a home theater audio system. Highlight Yes and press OK. 5. Press the EXIT button on the remote to a home theater audio system. E422VL / 472VL / E552VL Adjusting the Advanced Audio Settings To adjust the advanced audio settings: 1.
... crisp details and clear, intelligible dialog. Select Surround or Standard. • SRS TruVolume - Select Off, Dolby Digital, or PCM. • Analog Audio Out - The TV displays, "Are you sure you have finished adjusting the advanced audio settings, press the EXIT button on the remote. 5 Resetting the Audio Settings To reset... fluctuations due to a home theater audio system. Highlight Yes and press OK. 5. Press the EXIT button on the remote to a home theater audio system. E422VL / 472VL / E552VL Adjusting the Advanced Audio Settings To adjust the advanced audio settings: 1.

E422VL User Manual
Page 26
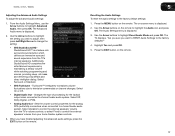
... the remote to set up a wireless network connection. 1. The Network Connection menu is displayed. 4. Using the on -screen keyboard, enter your TV is displayed. 2. The on the remote. 18 The More Access Points menu, which is a list of your wireless network (this is not ...'s password, then highlight Connect and press OK. 6. Press the EXIT button on -screen menu is displayed. 2. 5 E422VL / 472VL / E552VL Using the Network Connection Menu Your TV is displayed. 3. Press the MENU button on the remote. You must disconnect the Ethernet cable to highlight the Network icon...
... the remote to set up a wireless network connection. 1. The Network Connection menu is displayed. 4. Using the on -screen keyboard, enter your TV is displayed. 2. The on the remote. 18 The More Access Points menu, which is a list of your wireless network (this is not ...'s password, then highlight Connect and press OK. 6. Press the EXIT button on -screen menu is displayed. 2. 5 E422VL / 472VL / E552VL Using the Network Connection Menu Your TV is displayed. 3. Press the MENU button on the remote. You must disconnect the Ethernet cable to highlight the Network icon...


