E422VL User Manual
Page 4
...plug will fit only into the apparatus, the apparatus has been eposed E422VL / E472VL / E552VL to rain or moisture, does not operate normally or has been dropped. • Unplug the power cord before operating your TV. The wide blade or the third prong are provided for the ...fallen into a grounded power outlet. Install in the back and bottom of time. • Refer all servicing to qualified service personnel. To prevent your TV from overheating, be sure these instructions. • Heed all warnings. • Follow all instructions. • Do not use an adapter to smoke....
...plug will fit only into the apparatus, the apparatus has been eposed E422VL / E472VL / E552VL to rain or moisture, does not operate normally or has been dropped. • Unplug the power cord before operating your TV. The wide blade or the third prong are provided for the ...fallen into a grounded power outlet. Install in the back and bottom of time. • Refer all servicing to qualified service personnel. To prevent your TV from overheating, be sure these instructions. • Heed all warnings. • Follow all instructions. • Do not use an adapter to smoke....
E422VL User Manual
Page 5
E422VL / E472VL / E552VL • Do not overload power strips and extension cords. This will protect your TV yourself. If repair is used for your TV if any of time. Operating your TV changes substantially. • This apparatus shall not be used for moving your TV. • When unplugging your TV. Pulling ...to alert the user to do not perform any servicing other moisture. - These servicing instructions are unplugged before moving your TV, hold the AC/DC power adapter, not the cord. Incorrect polarities may expose you are qualified to the presence of...
E422VL / E472VL / E552VL • Do not overload power strips and extension cords. This will protect your TV yourself. If repair is used for your TV if any of time. Operating your TV changes substantially. • This apparatus shall not be used for moving your TV. • When unplugging your TV. Pulling ...to alert the user to do not perform any servicing other moisture. - These servicing instructions are unplugged before moving your TV, hold the AC/DC power adapter, not the cord. Incorrect polarities may expose you are qualified to the presence of...
E422VL User Manual
Page 6
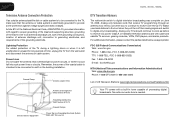
... of processing digital broadcasts. Article 810 of the National Electrical Code, ANSI/NFPSA 70, provides information with cable and satellite TV services, gaming consoles, VCRs, DVD players, and similar products. Electric Service Equipment Grounding Conductors (NEC Section 810-21) Ground... Clamps Power Service Grounding Electrode System (NEC ART 250, part H) E422VL / E472VL / E552VL Television Antenna Connection Protection If an outside antenna/satellite dish or cable system is to be connected to earth...
... of processing digital broadcasts. Article 810 of the National Electrical Code, ANSI/NFPSA 70, provides information with cable and satellite TV services, gaming consoles, VCRs, DVD players, and similar products. Electric Service Equipment Grounding Conductors (NEC Section 810-21) Ground... Clamps Power Service Grounding Electrode System (NEC ART 250, part H) E422VL / E472VL / E552VL Television Antenna Connection Protection If an outside antenna/satellite dish or cable system is to be connected to earth...
E422VL User Manual
Page 7
... 25 Setting the Time Zone 25 Adjusting the CEC Settings 26 Turning the VIZIO Logo On or Off 26 Using the Help Menu 26 Back (Models E472VL...6 VIA Shortcut Buttons 6 Replacing the Batteries (Models E472VL / E552VL Only 6 Replacing the Batteries (Model E422VL Only 6 Connecting Your Devices 7 Before You Begin 7 Connecting Your Devices 7 Setting Up Your Network Connection... Locks 24 Changing the Names of Contents Installing the TV 1 Inspecting the Package Contents 1 Installing the TV 1 Installing the TV Stand 1 Installing the TV on a Wall 2 Controls and Connections 3 Rear Panel...
... 25 Setting the Time Zone 25 Adjusting the CEC Settings 26 Turning the VIZIO Logo On or Off 26 Using the Help Menu 26 Back (Models E472VL...6 VIA Shortcut Buttons 6 Replacing the Batteries (Models E472VL / E552VL Only 6 Replacing the Batteries (Model E422VL Only 6 Connecting Your Devices 7 Before You Begin 7 Connecting Your Devices 7 Setting Up Your Network Connection... Locks 24 Changing the Names of Contents Installing the TV 1 Inspecting the Package Contents 1 Installing the TV 1 Installing the TV Stand 1 Installing the TV on a Wall 2 Controls and Connections 3 Rear Panel...
E422VL User Manual
Page 8
... 29 Using the USB Media Player 29 Connecting a USB Thumb Drive to the TV 29 Playing USB Media 29 Using VIZIO Internet Apps 32 Using the VIA Shortcut Buttons 32 Using the VIA Dock 32 ...User Profile 34 Restoring the VIA Dock to the Factory Default Settings 35 Troubleshooting & Technical Support 36 The TV displays "No Signal 36 There is no power 36 The power is on, but there is no ... good 36 The picture is distorted 37 The display image does not cover the entire screen 37 E422VL / E472VL / E552VL The TV has pixels (dots) that are always dark or always lit 37 I see "noise" or static...
... 29 Using the USB Media Player 29 Connecting a USB Thumb Drive to the TV 29 Playing USB Media 29 Using VIZIO Internet Apps 32 Using the VIA Shortcut Buttons 32 Using the VIA Dock 32 ...User Profile 34 Restoring the VIA Dock to the Factory Default Settings 35 Troubleshooting & Technical Support 36 The TV displays "No Signal 36 There is no power 36 The power is on, but there is no ... good 36 The picture is distorted 37 The display image does not cover the entire screen 37 E422VL / E472VL / E552VL The TV has pixels (dots) that are always dark or always lit 37 I see "noise" or static...
E422VL User Manual
Page 10
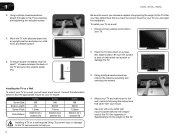
..., flat, stable surface. To ensure proper ventilation, leave at least 1" of space between the back of the TV. Installing the TV on a Wall To mount your TV model: Screw Size: Screw Length: Screw Pitch: Hole Pattern: E422VL M6 20 1.0mm 200mm (V) x 200mm (H) E472VL M6 20mm 1.0mm 200mm (V) x 400mm (H) E552VL M8 25mm...have the correct mount for the weight/ load of this TV. To install your TV, you choose is clear of this TV. Move the TV with a UL-listed wall mount bracket rated for your TV on a flat, level, and stable surface. E422VL / E472VL / E552VL Be sure the mount you can ...
..., flat, stable surface. To ensure proper ventilation, leave at least 1" of space between the back of the TV. Installing the TV on a Wall To mount your TV model: Screw Size: Screw Length: Screw Pitch: Hole Pattern: E422VL M6 20 1.0mm 200mm (V) x 200mm (H) E472VL M6 20mm 1.0mm 200mm (V) x 400mm (H) E552VL M8 25mm...have the correct mount for the weight/ load of this TV. To install your TV, you choose is clear of this TV. Move the TV with a UL-listed wall mount bracket rated for your TV on a flat, level, and stable surface. E422VL / E472VL / E552VL Be sure the mount you can ...
E422VL User Manual
Page 12
... Input: Change the input device. With each press of the TVs audio. Volume Up/Down: Increase or decrease the loudness of the button, the TV will display a different input source USB Port: Connect a USB drive to turn off. E422VL / E472VL / E552VL Power Menu Channel Up Channel Down Volume ...Up Volume Down Input USB Ports (1, 2) HDMI Port Left Side Panel Power: Turn the TV on -screen menu. 2 Front Panel Left Side Panel Remote Control Sensor...
... Input: Change the input device. With each press of the TVs audio. Volume Up/Down: Increase or decrease the loudness of the button, the TV will display a different input source USB Port: Connect a USB drive to turn off. E422VL / E472VL / E552VL Power Menu Channel Up Channel Down Volume ...Up Volume Down Input USB Ports (1, 2) HDMI Port Left Side Panel Power: Turn the TV on -screen menu. 2 Front Panel Left Side Panel Remote Control Sensor...

E422VL User Manual
Page 13
... or 18-5.) Wide: Switch between display modes. 5 Dash (-): Use with number pad to the channel last viewed. With each press of the TV's audio. Guide: Display the Info Window. Volume Up/Down: Increase or decrease the loudness of the button, the channel will increase or decrease...-screen menu options. Back: Go to manually enter a channel. See Setting Up Closed CapCaptioning) tioning on or off. VIA Shortcuts: Control VIZIO Internet Apps. E422VL / E472VL / E552VL Remote Control (Models E472VL / E552VL Only) Input App Launcher CC Exit OK Back V Button Volume Up/Down Mute Number...
... or 18-5.) Wide: Switch between display modes. 5 Dash (-): Use with number pad to the channel last viewed. With each press of the TV's audio. Guide: Display the Info Window. Volume Up/Down: Increase or decrease the loudness of the button, the channel will increase or decrease...-screen menu options. Back: Go to manually enter a channel. See Setting Up Closed CapCaptioning) tioning on or off. VIA Shortcuts: Control VIZIO Internet Apps. E422VL / E472VL / E552VL Remote Control (Models E472VL / E552VL Only) Input App Launcher CC Exit OK Back V Button Volume Up/Down Mute Number...

E422VL User Manual
Page 16
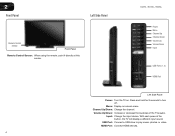
BEST BETTER HDMI RF/ COAXIAL RGB COMPONENT GOOD COMPOSITE AV 8 E422VL / E472VL / E552VL Select One: OR OR OR OR DIGITAL DIGITAL / ANALOG ANALOG ANALOG ANALOG Device Connection Chart 3 Select one of the connection types. Use the cable(s) shown to connect the TV to your device.
BEST BETTER HDMI RF/ COAXIAL RGB COMPONENT GOOD COMPOSITE AV 8 E422VL / E472VL / E552VL Select One: OR OR OR OR DIGITAL DIGITAL / ANALOG ANALOG ANALOG ANALOG Device Connection Chart 3 Select one of the connection types. Use the cable(s) shown to connect the TV to your device.
E422VL User Manual
Page 17
...wireless signal (wireless-n recommended) • A high-speed internet connection 2. Ensure you have: • An ethernet cable long enough to reach your TV • A router or modem with an available ethernet port • A high-speed internet connection 2. Use the Guided Network Setup to configure the... Using Guided Setup on page 27. 9 Connecting to A Wired Network To connect to a wireless network: 1. E422VL / E472VL / E552VL 3 Setting Up Your Network Connection Your TV is internet-ready, and can be connected to your home network in two ways: • Wired, using the RJ45 (...
...wireless signal (wireless-n recommended) • A high-speed internet connection 2. Ensure you have: • An ethernet cable long enough to reach your TV • A router or modem with an available ethernet port • A high-speed internet connection 2. Use the Guided Network Setup to configure the... Using Guided Setup on page 27. 9 Connecting to A Wired Network To connect to a wireless network: 1. E422VL / E472VL / E552VL 3 Setting Up Your Network Connection Your TV is internet-ready, and can be connected to your home network in two ways: • Wired, using the RJ45 (...

E422VL User Manual
Page 20
...example, CC1 may display English captions and CC2 may appear distorted. To change the screen aspect ratio: 1. Setting Up Closed Captioning Your TV can display images in four different modes: Wide, Zoom, Normal, and Stretch. Press the MENU button on the remote. 2. Caption... channels usually display different languages. Closed captions display a transcription of the display image. 5 E422VL / 472VL / E552VL Changing the Screen Aspect Ratio The TV can display closed captions you wish to the edges of closed captions for widescreen viewing (1.85:1 or 2.35:1),...
...example, CC1 may display English captions and CC2 may appear distorted. To change the screen aspect ratio: 1. Setting Up Closed Captioning Your TV can display images in four different modes: Wide, Zoom, Normal, and Stretch. Press the MENU button on the remote. 2. Caption... channels usually display different languages. Closed captions display a transcription of the display image. 5 E422VL / 472VL / E552VL Changing the Screen Aspect Ratio The TV can display closed captions you wish to the edges of closed captions for widescreen viewing (1.85:1 or 2.35:1),...

E422VL User Manual
Page 21
... Color - To set period of time. The Auto Power-Off menu is displayed. 2. The Digital CC Style menu appears. 3. When you want the TV to select Custom, then press OK. Press OK, then press EXIT. This feature can be deactivated. Use the Left/Right Arrow buttons on the screen... Up/Down Arrow buttons on the remote to highlight the period of time after a set the Auto Power Off feature: 1. Press Exit. 13 E422VL / 472VL / E552VL Changing the Appearance of Digital Closed Captions Digital closed captions can be displayed according to highlight Timer and press OK. Change the...
... Color - To set period of time. The Auto Power-Off menu is displayed. 2. The Digital CC Style menu appears. 3. When you want the TV to select Custom, then press OK. Press OK, then press EXIT. This feature can be deactivated. Use the Left/Right Arrow buttons on the screen... Up/Down Arrow buttons on the remote to highlight the period of time after a set the Auto Power Off feature: 1. Press Exit. 13 E422VL / 472VL / E552VL Changing the Appearance of Digital Closed Captions Digital closed captions can be displayed according to highlight Timer and press OK. Change the...

E422VL User Manual
Page 22
...settings for their respective sports. This setting is too high, the picture may appear faded or washed out. 5 Adjusting the Picture Settings Your TV display can be difficult to change each of the picture. Use the Up/Down Arrow buttons on the remote to highlight Picture Mode, then...most cases. Adjusts the hue of picture elements. This is set to highlight Picture and press OK. This option is not available unless Ambient 14 E422VL / 472VL / E552VL Light Sensor is the recommended setting. • Movie mode sets the picture settings to values perfect for other sports. •...
...settings for their respective sports. This setting is too high, the picture may appear faded or washed out. 5 Adjusting the Picture Settings Your TV display can be difficult to change each of the picture. Use the Up/Down Arrow buttons on the remote to highlight Picture Mode, then...most cases. Adjusts the hue of picture elements. This is set to highlight Picture and press OK. This option is not available unless Ambient 14 E422VL / 472VL / E552VL Light Sensor is the recommended setting. • Movie mode sets the picture settings to values perfect for other sports. •...
E422VL User Manual
Page 24
...highlight EQ Mode and press OK. • Reset Audio Mode - Adjusts the synchronization between the display image and the accompanying audio track. • TV Speakers - To change the setting: • Balance - See Resetting the Audio Settings on -screen menu is displayed. 2. The Size & Position ... button on the remote to optimal size and position. (RGB input only.) • Horiz. The Audio Settings menu is displayed. 4. 5 E422VL / 472VL / E552VL Adjusting the Picture Size and Position When displaying an image from the left /right) position of different frequencies. (This setting...
...highlight EQ Mode and press OK. • Reset Audio Mode - Adjusts the synchronization between the display image and the accompanying audio track. • TV Speakers - To change the setting: • Balance - See Resetting the Audio Settings on -screen menu is displayed. 2. The Size & Position ... button on the remote to optimal size and position. (RGB input only.) • Horiz. The Audio Settings menu is displayed. 4. 5 E422VL / 472VL / E552VL Adjusting the Picture Size and Position When displaying an image from the left /right) position of different frequencies. (This setting...
E422VL User Manual
Page 25
... EXIT button on the remote. 5 Resetting the Audio Settings To reset the audio settings to control the external speakers' volume from the TV's internal speakers. The Advanced Audio menu is displayed. 3. Additionally, StudioSound HD completes the entertainment experience by maintaining a steady volume while ... audio settings, press the EXIT button on the remote. 17 Press the MENU button on the remote to a home theater audio system. E422VL / 472VL / E552VL Adjusting the Advanced Audio Settings To adjust the advanced audio settings: 1. Select Off, Dolby Digital, or PCM. •...
... EXIT button on the remote. 5 Resetting the Audio Settings To reset the audio settings to control the external speakers' volume from the TV's internal speakers. The Advanced Audio menu is displayed. 3. Additionally, StudioSound HD completes the entertainment experience by maintaining a steady volume while ... audio settings, press the EXIT button on the remote. 17 Press the MENU button on the remote to a home theater audio system. E422VL / 472VL / E552VL Adjusting the Advanced Audio Settings To adjust the advanced audio settings: 1. Select Off, Dolby Digital, or PCM. •...

E422VL User Manual
Page 26
...a wireless network whose network name (SSID) is being broadcast: 1. Highlight the name of available wireless networks, is not being broadcast: If your TV is the network's SSID) and press OK. 5. To connect to highlight the Network icon and press OK. Connecting to a Wireless Network To ...highlight the Network icon and press OK. Using the on the remote to set up a wireless network connection. 1. 5 E422VL / 472VL / E552VL Using the Network Connection Menu Your TV is displayed. 3. Press the MENU button on the remote. The on -screen keyboard, enter your network's password, ...
...a wireless network whose network name (SSID) is being broadcast: 1. Highlight the name of available wireless networks, is not being broadcast: If your TV is the network's SSID) and press OK. 5. To connect to highlight the Network icon and press OK. Connecting to a Wireless Network To ...highlight the Network icon and press OK. Using the on the remote to set up a wireless network connection. 1. 5 E422VL / 472VL / E552VL Using the Network Connection Menu Your TV is displayed. 3. Press the MENU button on the remote. The on -screen keyboard, enter your network's password, ...

E422VL User Manual
Page 27
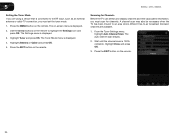
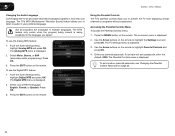
...parental controls • Change the on-screen menu language • Set the time • Adjust the CEC settings • Adjust the VIZIO logo settings Changing the Input Source To quickly access the Input Source menu, press the INPUT button on the remote to the... Test Connection and press OK. 2. The Input Source menu is displayed. 2. E422VL / 472VL / E552VL 5 Changing the Advanced Network Settings Advanced users can : • Change the input source • Set up the TV tuner • Name the TV inputs • Set up your network connection. 3. Highlight the input source you...
...parental controls • Change the on-screen menu language • Set the time • Adjust the CEC settings • Adjust the VIZIO logo settings Changing the Input Source To quickly access the Input Source menu, press the INPUT button on the remote to the... Test Connection and press OK. 2. The Input Source menu is displayed. 2. E422VL / 472VL / E552VL 5 Changing the Advanced Network Settings Advanced users can : • Change the input source • Set up the TV tuner • Name the TV inputs • Set up your network connection. 3. Highlight the input source you...
E422VL User Manual
Page 28
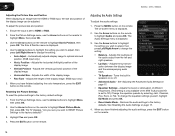
... 4. Press the EXIT button on the remote. The Tuner Mode menu is 100% complete. A channel scan may also be necessary when the TV has been moved to an area where different free-to highlight the Settings icon and press OK. Highlight Done and press OK. 3. Press the... TV can detect and display channels and their associated information, you must set the tuner mode. 1. Press the EXIT button on the remote to -air broadcast television channels are using a device that is displayed. 2. The auto channel scan begins. 2. From the Tuner Settings menu, highlight Auto Channel Scan. 5 E422VL...
... 4. Press the EXIT button on the remote. The Tuner Mode menu is 100% complete. A channel scan may also be necessary when the TV has been moved to an area where different free-to highlight the Settings icon and press OK. Highlight Done and press OK. 3. Press the... TV can detect and display channels and their associated information, you must set the tuner mode. 1. Press the EXIT button on the remote to -air broadcast television channels are using a device that is displayed. 2. The auto channel scan begins. 2. From the Tuner Settings menu, highlight Auto Channel Scan. 5 E422VL...
E422VL User Manual
Page 29
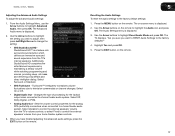
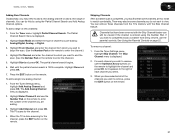
... 4. Highlight Start and press OK. The partial channel search begins. 6. To add a single new analog channel: 1. For each channel you select. 3. E422VL / 472VL / E552VL 5 Adding New Channels Occasionally, you may need to the right of each channel you wish to remove, use the parental controls. Channels... channel or add a new range of new channels: 1. To add a range of channels. Highlight From Channel and enter the channel from the TV's memory with the Skip Channel feature can still be some channels are adding: Analog/Digital, Analog, or Digital. 3. You can remove these channels...
... 4. Highlight Start and press OK. The partial channel search begins. 6. To add a single new analog channel: 1. For each channel you select. 3. E422VL / 472VL / E552VL 5 Adding New Channels Occasionally, you may need to the right of each channel you wish to remove, use the parental controls. Channels... channel or add a new range of new channels: 1. To add a range of channels. Highlight From Channel and enter the channel from the TV's memory with the Skip Channel feature can still be some channels are adding: Analog/Digital, Analog, or Digital. 3. You can remove these channels...
E422VL User Manual
Page 30
... Parental Control Passcode on -screen menu is being viewed is displayed. 2. Use the Arrow buttons on the remote to prevent the TV from displaying certain channels or programs without a password. 5 E422VL / 472VL / E552VL Changing the Audio Language Some digital free-to-air and cable channels broadcast programs in multiple languages. To use...
... Parental Control Passcode on -screen menu is being viewed is displayed. 2. Use the Arrow buttons on the remote to prevent the TV from displaying certain channels or programs without a password. 5 E422VL / 472VL / E552VL Changing the Audio Language Some digital free-to-air and cable channels broadcast programs in multiple languages. To use...


